Tag Archives: terminal

[Solved] Pycham Error: non zero exit code (2)

preface

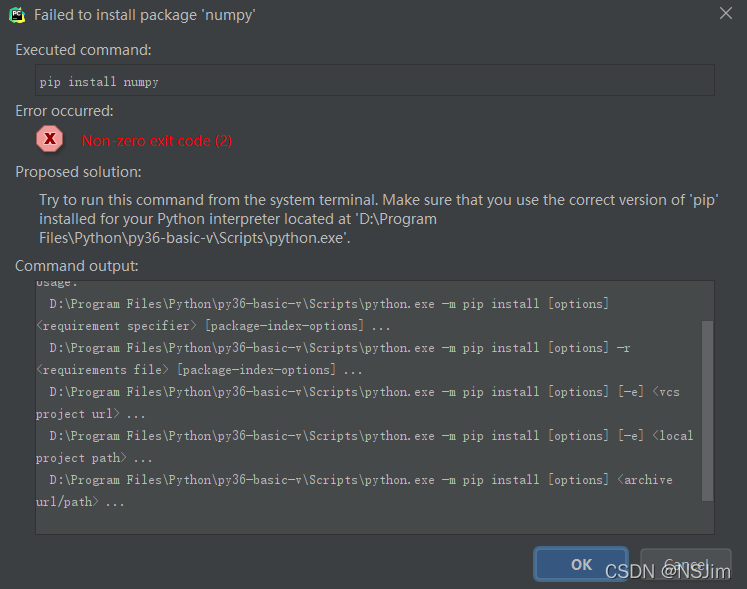
When using pycharm to install a third-party package in the python virtual environment in Python interpreter settings, it is likely to report an error: non zero exit code (2), as shown in the figure:

even upgrading pip will report an error, as shown in the figure:

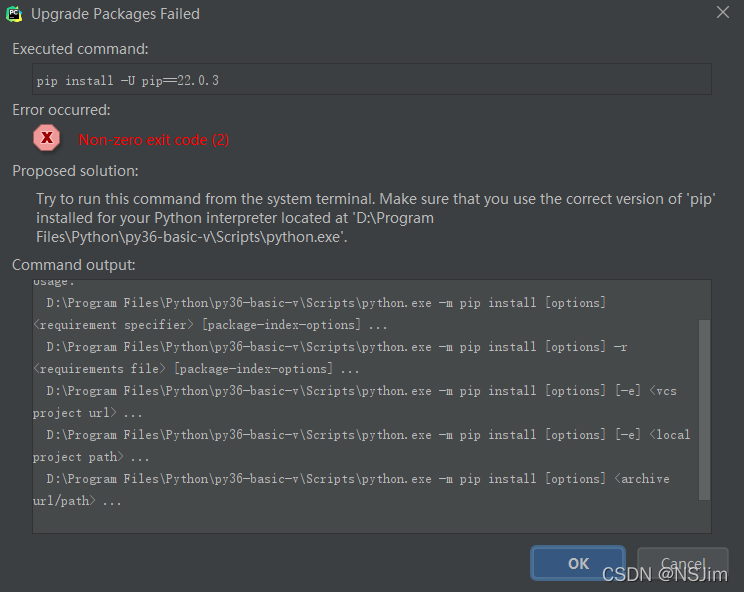
Tips are as follows:

Try to run this command from the system terminal. 
Make sure that you use the correct version of 'pip' installed for your Python interpreter located at 
'D:\Program Files\Python\py36-basic-v\Scripts\python.exe'.

As above belongs, the official says the possible reason is that pip is not installed in the specified directory of the virtual environment, and suggests running the pip command in the terminal to install the third-party package.

The official hint has a certain degree of reasonableness, but it does not try all cases, you can check whether the pip module exists in the directory of the virtual environment, if it does not exist, the pip module can be installed in the specified directory; if it exists, it is not the problem of the pip module path, so what exactly is the reason?

After investigation, it is the problem of pip version, my Python version is 3.6, pip version is 21.3.1, this version of pip will definitely appear the problem, the solution is also very simple, the pip version can be downgraded to 20.2.4, operation method see the following program 2: Downgrade pip version. (It is not recommended to upgrade pip, because new versions of pip may have the same problem)

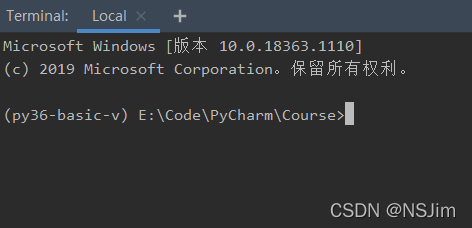
Solution 1 (recommended): install the third-party package using the terminal terminal

Click Terminal at the bottom of pycharm toolbar , as shown in the following figure:

enter the PIP install command to install the third-party package, as shown in the figure:

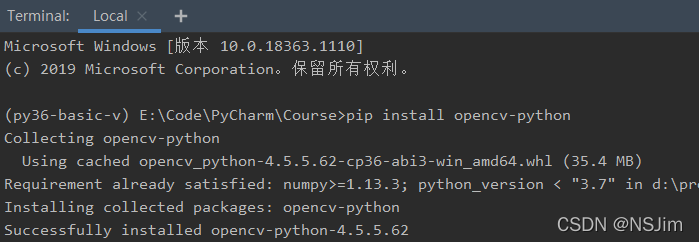
But this solution treats the symptom but not the root cause, the problem is not solved, only the installation of third-party packages by alternative methods, if you want to solve the problem at all, please see solution 2 below.

Solution 2 (fundamental solution): downgrade the PIP version

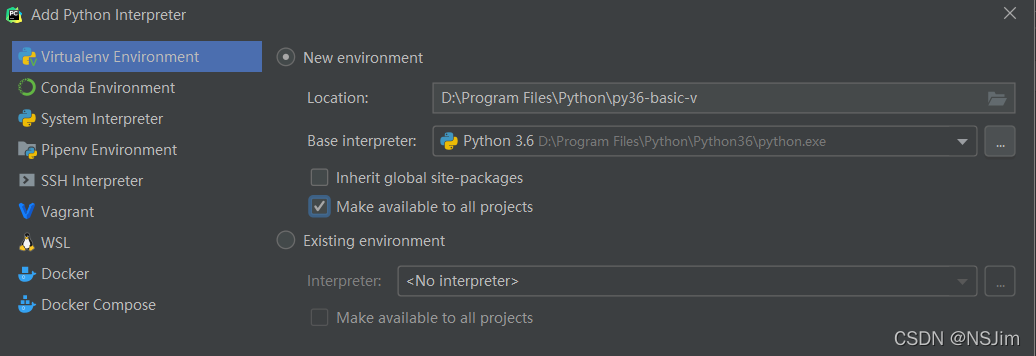
First, open a project using pycharm. If there is no Python environment, you need to create a virtual environment first, as shown in the following figure:

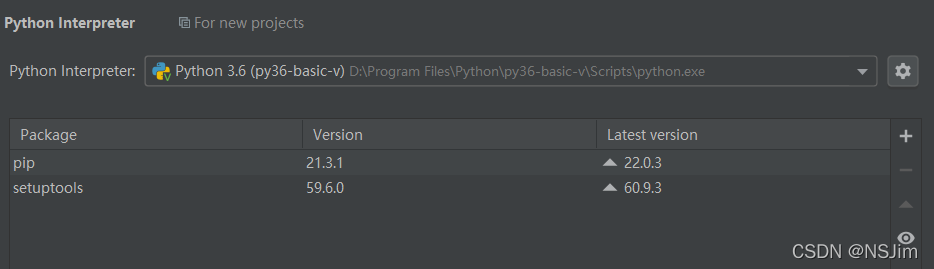
In file - Settings - Python interpreter, we can see that the version of PIP in Python virtual environment is 21.3.1. As shown in the figure below, we need to downgrade the version of Pip to 20.2.4

Click Terminal on the toolbar at the bottom of pychart, as shown in the following figure:

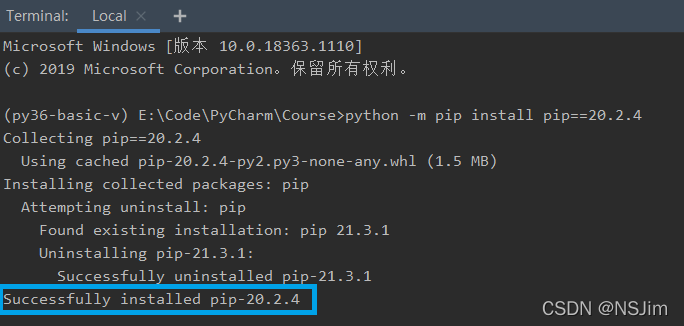
enter the following command. Note that there must be Python -m, otherwise there is no permission:

python -m pip install pip==20.2.4

After entering the command, the following prompt appears to prove that the downgrade is successful:

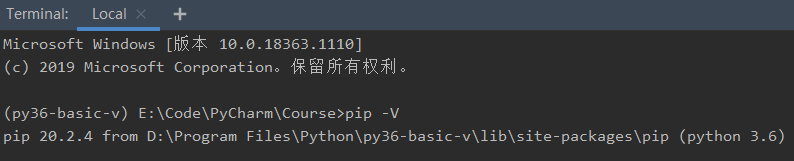
enter the command PIP - V to view the current PIP version, as shown in the following figure:

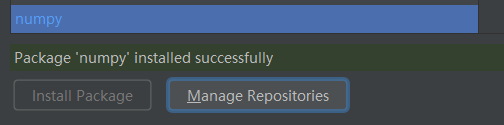
the problem has been successfully solved so far. The third-party package can be successfully installed in Settings, as shown in the following figure:

Terminal appears after anconda is installed on MAC (base)

After MAC reinstalls anaconda, it is found that each time terminal is opened, anconda’s environment is started by default. However, I don’t want to use anconda’s environment by default, as shown in the following figure.

The closing method is as follows

Method 1:

Every time you exit the base environment through CONDA deactivate on the command line, return to the automatic environment of the system

Method 2

1. By setting Auto_ activate_ Set the base parameter to false to implement:

conda config --set auto_activate_base false

2. If you want to enter, you can use CONDA activate base

3. If you go back and hope to keep it all the time, pass

conda config --set auto_activate_base true

recovery

Change the path in the user directory in Chinese Ubuntu to English

In order to make it easy for users to use, it is installed in the “home”, “music”, “pictures” and “natural” It’s all in Chinese.

Most of the time, I like to put some files to be operated on the desktop. There are many command-line operations in Linux, so it’s hard to avoid using the command line to operate things on the desktop. Then I need to “CD desktop”. When I hit “desktop”, I need to switch the input method. It’s troublesome So I tried to find a way to change the path under the user directory to English, while the other Chinese remained unchanged. The method is as follows:

Open the terminal and enter the command in the terminal

        export LANG=en_US

        xdg-user-dirs-gtk-update

Jump out of the dialog box and ask if you want to convert the directory to an English path, agree and close it.
enter the command in the terminal:

        export LANG=zh_CN

Close the terminal and restart. Next time you enter the system, the system will prompt you whether to change the converted directory back to Chinese. Select no more prompt and cancel the modification. The Chinese to English conversion of the main directory is completed~

Reprinted from: http://my.oschina.net/myriads/blog/2867

The Linux terminal appears bash: setup.bash : no such file or directory, and. Bashrc file

Earlier in the Linux open a terminal, he always appear bash:/opt/ros/indig/setup. Bash: No to the file or directory. This problem is related to the bash that needs to be loaded every time the terminal is opened.

/etc/bashrc: This file sets up environment information for each user of the system and is executed when the user first logs in and collects shell Settings from the configuration file in the /etc/profile.d directory. This file is read when the bash shell is opened.
~/.bash_profile: Each user can use this file to enter specific shell information for his or her own use, and this file is executed only once when the user logs in! By default, it sets some environment variables and executes the user’s.bashrc file.
~/.bashrc: This file contains bash information specific to your bash shell, which is read when you log in and every time you open a new shell.
/.bash_logout: This file is executed every time you exit the system (exit the bash shell)
I turn to open the file, the last in ~ /. Bashrc found the last line of this file: the source/opt/ros/indig/setup. Bash the bash file does not exist in the file system, so I deleted it. After that, it works fine when you start the terminal again.
P.S. We can get through

echo "source /opt/ros/indigo/setup.bash" >> ~/.bashrc

Command to add a path to the.bashrc file.

Then through

source ~/.bashrc

Order to put it into effect.

Solutions to the problem of unable to locate package

When installing Ubuntu12.04, the VMware Player will be installed.
Unable to locate package error: Unable to locate package error: Unable to locate package

sudo apt-get update

The reason should be that the software source has not been updated, so it can not find the package. I suspect this problem is also likely to occur after the software source is changed.


Common problems and solutions under Linux

Common problems and solutions under Linux

. What are tar,.tar.gz,.bz2,.tar.bz2,.bz,.gz files and how do I unlock them?
They are both file (compressed) packages. Tar.gz: package and compress: tar CVF *.tar dirName: tar XVF *.tar
.tar.gz: package and compress: tar CZVF *.tar.gz
2: unpack: bzip2-d *.bz2
.b>unpack: bzip2-d *.bz
.bz: unpack: bzip2-d *.bz
.gz: unpac> Gzip-d *.gz


rh8 There is a graphical interface under the software File-roller to do this. Also can use unzip *. Zip unzip file, unrar *. Rar solution
open RAR file, but the general system does not come with unrar, to download the Internet.

br>

>
a. Create a directory like mkdir a
. Mount the iso file: mount -o loop XXXX.

Delete all files in the directory including subdirectories
-rf directory names

cat /proc/ cpuinfo-CPU (i.e. vendor, Mhz, flags like MMX)
t /proc/interrupts – interrupt
c> proc/ioports – device IO port
cat/p>/ meminfo-memory (i.e. mem used, free, i.e. mem used, free, Swap the size)
the cat/proc/partitions – all equipment all partitions
the cat/proc/pci – pci devices information
the cat/proc/swaps – all the swap partition information
the cat/proc/version – Linux version number Equivalent to the uname -r
uname -a – see system information such as the kernel

RPM -qpl aaa. RPM
RPM -qpl aaa
Gz
tar XVFZ example.tar.gz
tar XVFZ example.tgz
t>vf example.tar
unzip e>le.zip

> Gaim 0.58:

www.linuxsir.org/gaim/gaim-0.58-2.i386.rpm download QQ plug-in for gcc2.9 version

www.linuxsir.org/gaim/libqq-0.0.3-ft-0.58-gcc296.so.gz will download file into the/temp directory, then delete the existing Gaim system, namely, type the command in a terminal emulator: RPM -e Gaim.
Start the installation
en the terminal emulator and continue to install Gaim version 0.58, that is:
c>temp (go to the temp directory)
RPM -iv>im -0.58-2.i386. RPM (install software)
When the inst>tion is successful, you can create the Gaim icon on the GNome or KDE desktop.
To continue installing the QQ plugin, type the command:
nzip libq-0.0.3-ft-0.58 -gcc296.so.gz (unzip the file)
c>bq-0.0.3-ft-0.58 -gcc296.so /usr/lib/gaim (copy the plugin to the gaim library directory)
Softwar>ttings
Login screen> will appear when you first start Gaim version 0.85. Select “Plugins” first, and click “Load” in the “Plugins” dialog box. Load
libmsn.so and libq-0.0.3-FT-0.58-gcc296.so files respectively, and close them after confirmation. Then choose “all accounts”, in the presence of
account in the editor to click “add”, when the modify account page, we can enter your QQ or MSN number,
the login name fill in QQ number or MSN email, password to fill in the corresponding QQ or MSN password, Alias to fill in their nicknames, protocol selection
corresponding QQ or MSN, other Settings by default. When all Settings are completed, you can log in and use.
http://wangzhihng.blog.163.com/blog/static/350999420061030105134290/

Several ways for Ubuntu to open command line terminal window

1. Shortcut key
CTRL + Alt + T the current directory is /home/< The user name & gt;
2. Right mouse button
In the terminal window, execute the following command:
sudo apt-get install local-open-terminal
sudo reboot
after restarting, right-click in the directory where you want to open terminal and select open in Termainal
3. Open multiple terminals in the same window
When you have opened a terminal window, you want to open another terminal in the current window, so that it is easier to switch back and forth. Use the shortcut Key CTRL + Shift + T, the current directory of the new window opened is the current directory of the previous port, Alt+ 123 can open the corresponding first, second, and third Windows
4. Search for Terminal application
Click the search icon in the upper left corner or press the WIN key on the keyboard to display the search application window and type Terminal
5. After launching Terminal by other means, right click Terminal in the task bar
Select New Termial to open a New Terminal window, Lock to Launcher to Lock Terminal to the task bar, and then you can directly open the Terminal window in the task bar.

Ubuntu can’t open Gnome terminal and display the error message exited status 8

I’ve been playing around with some environments for my virtual machine lately, and since I don’t have much experience, I’m just following the path of the server. However, once the virtual machine is restarted later, something goes wrong. The GNOME terminal cannot be opened. Start gnOMe-Terminal using Xterm.
Error constructing proxy for org.gnome.Terminal:/org/gnome/Terminal/Factory0: Error calling StartServiceByName for org.gnome.Terminal: GDBus.Error:org.freedesktop.DBus.Error.Spawn.ChildExited: Process org.gnome.Terminal exited with status 8

The next time I look it up, it’s a coding problem. Just use the command sudo DPkg-reconfigure locales to add the code you want.

You think that’s the end of it?If you didn’t solve it, it should be the same problem I encountered. I accidentally found that when I configured the environment for my virtual machine, I actually configured another statement: export LC_ALL=C. In this way, no matter how I configured my code, I could not open the terminal in any way.

I finally get rid of that, and the locale in the terminal, works!

caffe deep learning [three] compilation error: fatal error: hdf5.h: No such file or directory compilation terminated.

Question:
When configuring Caffe-SSD today, I was ready to compile Caffe when I encountered:

fatal error: hdf5.h: No such file or directory compilation terminated.

Such problems are shown in the following figure:

The reason is that the header file for HDF5.h was not found.


Solutions:
1. Modify makefile.config file
Go to the download directory for Caffe
In the makefile.config file, hold down CRTL + F to search: INCLUDE_DIRS
Note that it’s not makefile.config. example!!
Add/usr/include/hdf5/serial/to INCLUDE_DIRS
Namely, the original:

INCLUDE_DIRS := $(PYTHON_INCLUDE) /usr/local/include

Now it’s:

INCLUDE_DIRS := $(PYTHON_INCLUDE) /usr/local/include /usr/include/hdf5/serial/


2. Modify the Makefile file
In the Makefile file, press and hold CRTL + F to search: LIBRARIES +=
Note that this is not the makefile.config from step 1 above!!
Change HDF5_HL and HDF5 to HDF5_SERIal_HL and HDF5_serial.
Namely, the original:

LIBRARIES += glog gflags protobuf boost_system boost_filesystem m hdf5_hl hdf5

Now it’s:

LIBRARIES += glog gflags protobuf boost_system boost_filesystem m hdf5_serial_hl hdf5_serial


Results:


launch failed.Binary Not found in Linux / Ubuntu solution

launch failed.Binary not found the solution:

first of all when you’re confused about mingw solutions online, I’ll tell you to stop reading about mingw. Under Linux, mingw is not used, but

is directly completed by Linux GCC

1, look at your Eclipse Console output, if there is g++ not found, it means your system g++ did not install successfully.

Solution: Ctrl+Alt+t to terminal (console) mode, enter sudo apt-get install g++

2, not yet?

Project-> Properties-> C/C++Build-> Settings-> Binary Parsers

check GNU Elf Parser and Elf Parser

and then don’t forget about Project-> Build All (Ctrl+B), then run (Ctrl+ F11)

. If you see the item below come out called Binaries, Congradulations! Configured successfully, ready to run!

3, not yet?

check your file name is XXX. CPP ?And XXX must not contain “. “such symbols


under Windows is best used mingw…

http://hi.baidu.com/doctorjohnson/blog/item/2fafa2431187e11d9213c67e.html

WSL 2 needs to update its kernel components

welcome to my blog

problem description: open win10 terminal display: WSL 2 needs to update its kernel components;

download the upgrade package of WSL2 Linux kernel from Microsoft, download the link, as shown in the figure below, click “this link” to download

install the update package, all the way next, without any additional options