Tag Archives: win10

[Solved] Win10 Install pyav Error: ERROR: Failed building wheel for avFailed to build av. ERROR: Could not build wheel

Python3. 6: In win10 environment, use the following command to install pyav:

pip install av

Failed to install pyav, here is the error message:

        ERROR: Failed building wheel for av
        Failed to build av
        ERROR: Could not build wheels for av which use PEP 517 and cannot be installed directly:


(C:\Users\Jayce\Anaconda3\envs\tf1.7) E:\Code\Python>pip install av
Looking in indexes: https://pypi.doubanio.com/simple
Collecting av
  Downloading https://pypi.doubanio.com/packages/00/3f/9fe21065912902a7856a69df334a67b73a51da5e08ff033fd79f15d05764/av-9.1.1.tar.gz (2.4 MB)
     |████████████████████████████████| 2.4 MB 3.2 MB/s
  Installing build dependencies ... done
  Getting requirements to build wheel ... done
    Preparing wheel metadata ... done
Building wheels for collected packages: av
  Building wheel for av (PEP 517) ... error
  ERROR: Command errored out with exit status 1:
   command: 'C:\Users\Jayce\Anaconda3\envs\tf1.7\python.exe' 'C:\Users\Jayce\Anaconda3\envs\tf1.7\lib\site-packages\pip\_vendor\pep517\in_process\_in_process.py' build_wheel 'C:\Users\J
ayce\AppData\Local\Temp\tmpctqsnqx6'
       cwd: C:\Users\Jayce\AppData\Local\Temp\pip-install-hi4s2fdw\av_03c9287622cf4da7918135c5be424e7b
  Complete output (38 lines):
  running bdist_wheel
  running build
  running build_py
  creating build
  creating build\lib.win-amd64-3.6
  creating build\lib.win-amd64-3.6\av
  copying av\about.py -> build\lib.win-amd64-3.6\av
  copying av\datasets.py -> build\lib.win-amd64-3.6\av
  copying av\deprecation.py -> build\lib.win-amd64-3.6\av
  copying av\__init__.py -> build\lib.win-amd64-3.6\av
  copying av\__main__.py -> build\lib.win-amd64-3.6\av
  creating build\lib.win-amd64-3.6\av\audio
  copying av\audio\__init__.py -> build\lib.win-amd64-3.6\av\audio
  creating build\lib.win-amd64-3.6\av\codec
  copying av\codec\__init__.py -> build\lib.win-amd64-3.6\av\codec
  creating build\lib.win-amd64-3.6\av\container
  copying av\container\__init__.py -> build\lib.win-amd64-3.6\av\container
  creating build\lib.win-amd64-3.6\av\data
  copying av\data\__init__.py -> build\lib.win-amd64-3.6\av\data
  creating build\lib.win-amd64-3.6\av\filter
  copying av\filter\__init__.py -> build\lib.win-amd64-3.6\av\filter
  creating build\lib.win-amd64-3.6\av\sidedata
  copying av\sidedata\__init__.py -> build\lib.win-amd64-3.6\av\sidedata
  creating build\lib.win-amd64-3.6\av\subtitles
  copying av\subtitles\__init__.py -> build\lib.win-amd64-3.6\av\subtitles
  creating build\lib.win-amd64-3.6\av\video
  copying av\video\__init__.py -> build\lib.win-amd64-3.6\av\video
  running build_ext
  building 'av.buffer' extension
  creating build\temp.win-amd64-3.6
  creating build\temp.win-amd64-3.6\Release
  creating build\temp.win-amd64-3.6\Release\src
  creating build\temp.win-amd64-3.6\Release\src\av
  C:\Program Files (x86)\Microsoft Visual Studio 14.0\VC\BIN\x86_amd64\cl.exe /c logo /Ox /W3 /GL /DNDEBUG /MD -IC:\Users\Jayce\Anaconda3\envs\tf1.7\include -IC:\Users\Jayce\Anaconda
3\envs\tf1.7\include "-IC:\Program Files (x86)\Microsoft Visual Studio 14.0\VC\INCLUDE" "-IC:\Program Files (x86)\Windows Kits\10\include\10.0.10240.0\ucrt" "-IC:\Program Files (x86)\Wi
ndows Kits\8.1\include\shared" "-IC:\Program Files (x86)\Windows Kits\8.1\include\um" "-IC:\Program Files (x86)\Windows Kits\8.1\include\winrt" /Tcsrc\av\buffer.c /Fobuild\temp.win-amd6
4-3.6\Release\src\av\buffer.obj
  buffer.c
  C:\Program Files (x86)\Microsoft Visual Studio 14.0\VC\BIN\x86_amd64\link.exe logo /INCREMENTAL:NO /LTCG /DLL /MANIFEST:EMBED,ID=2 /MANIFESTUAC:NO /LIBPATH:C:\Users\Jayce\Anaconda3
\envs\tf1.7\libs /LIBPATH:C:\Users\Jayce\Anaconda3\envs\tf1.7\PCbuild\amd64 "/LIBPATH:C:\Program Files (x86)\Microsoft Visual Studio 14.0\VC\LIB\amd64" "/LIBPATH:C:\Program Files (x86)\
Windows Kits\10\lib\10.0.10240.0\ucrt\x64" "/LIBPATH:C:\Program Files (x86)\Windows Kits\8.1\lib\winv6.3\um\x64" avformat.lib avcodec.lib avdevice.lib avutil.lib avfilter.lib swscale.li
b swresample.lib /EXPORT:PyInit_buffer build\temp.win-amd64-3.6\Release\src\av\buffer.obj /OUT:build\lib.win-amd64-3.6\av\buffer.cp36-win_amd64.pyd /IMPLIB:build\temp.win-amd64-3.6\Rele
ase\src\av\buffer.cp36-win_amd64.lib
  LINK : fatal error LNK1181: cannot open input file 'avformat.lib'
  error: command 'C:\\Program Files (x86)\\Microsoft Visual Studio 14.0\\VC\\BIN\\x86_amd64\\link.exe' failed with exit status 1181
  ----------------------------------------
  ERROR: Failed building wheel for av
Failed to build av
ERROR: Could not build wheels for av which use PEP 517 and cannot be installed directly

This is because installing without a version number will install the latest version of pyav, which is not suitable for Python 3 6, so you need to compile it yourself, and you need to install ffmpeg for your own compilation, which leads to compilation errors because there is no ffmpeg.

1. Either install ffmpeg by yourself and compile it;

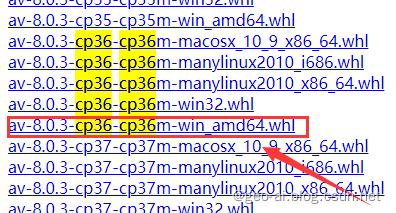
2. Or go straight to find the whl file of Python 3.6, direct installation;

I directly found the latest support for Python 3 on the mirror website Pyav of 6 is 8.0.3. Download and install:

Or add the version number of Python 3.6 in the PIP command:

pip install av==8.0.3

Win10 Right-Click desktop to Display Setting Error [How to Solve]

I don’t know what I installed. Suddenly one day, the right-click display setting reported an error.

After several inquiries, the following methods were found:

1. Win + R, enter regedit and enter the registry.

2. Find the corresponding file in the registry. Location: HKEY_CURRENT_USER\Software\Classes\ms-settings. Rename MS settings (e.g. MS settings1)

be accomplished!

Now, right-click on the desktop and click display settings to see it!

[Solved] Win10 Warning: ModuleNotFoundError: No module named ‘win32con‘ and No module named ‘antlr4‘

In the last article, win10 installs detectron2 (0.1 or 0.4.1) based on Python 1.8.1 and cuda11.1.1. After installing detectron2, run the test Demo:

python demo/demo.py --config-file configs/COCO-InstanceSegmentation/mask_rcnn_R_101_FPN_3x
.yaml   --input predict\input\1.jpg   --output predict\output --opts MODEL.WEIGHTS weights/e2e_mask_rcnn_R-101-FPN_1x.pkl

The following error occurred:

No module named ‘win32con’ and no module named ‘antlr4’

It is useless to install through pip, but there are two libraries through PIP list query

By directly looking at the file addresses of the above two packages, we found that there was no relevant py file in them. Finally, we successfully solved the problem by installing the compiled binary WHL file

pip install antlr4_python3_runtime-4.9.2-py3-none-any.whl
pip install pywin32-300-cp36-cp36m-win_amd64.whl

Run the command again to get the output:

Win10 starts infinite loop auto repair, and the repair fails

Background: since the last normal use a few hours ago, no software or patch has been installed. The only action: repair the network with Netsh command prompt, and then restart according to the prompt.

Phenomenon: after win10 starts, it prompts “diagnosing computer…” “Repairing…” , and then repair failure, dead loop. Up to the successful start, a total of 15 restarts.

Solution (failure):
1) according to the solutions of Baidu and Google, the advanced option is used to start, and the start fails.
2) after that, use the command prompt Bcdedit to turn off the automatic repair {UUID}, but it still fails.
3) security mode (with network) cannot be restarted.
4) there are still files on the desktop, which cannot be ghost, factory recovery, etc.
……

Solution (temporary success):
Advanced Options -> disable driver signature -> Restart successfully and enter the desktop.

PS:

    after restart, the device manager shows that all devices are in normal use (USB, NIC, etc.) after restart, because there is no blue screen, all minidump files are not captured, and specific errors cannot be analyzed. After restart, system32 -, logfiles -, SRT – srtTrail.txt The file indicates that the repair failed 15 times, but the error is not pointed out.

Postscript: similar solutions, https://blog.csdn.net/qq_ 40570892/article/details/83540275

Microsoft edge was unable to log in. Error code: 3,15, – 2147023579

PS: I tried a lot of methods on the Internet are not good, I found that this can be solved, so I hope to help more people
If you use Win10 to download the new version of Edge browser, landing account found that can not login, may be the computer did not set Microsoft account.
My operation is:
Open the old version of Edge browser – Settings – Account and click on it. It will jump to the system’s Add Account interface and enter your Microsoft account to log in.
Then I looked at the old version of Edge and found that it had already logged in and synced automatically.
At this point, open the new version of Edge browser and click Login. Select Microsoft Account. A pop-up interface will automatically fill in the account you just logged in.
Point next step, enter password again, discover won’t report wrong, can land normally.
Conclusion: This error may be caused by the failure to check the local Microsoft account and the failure to automatically complete the account.
 

Win10, add sublime text in the right mouse button menu to open

Environment: Win10; Take Sublime Text for example


Use the shortcut key Win + R to open Command and type Regedit to open the registry.
Find the shell in “*” in “HKEY_CLASSES_ROOT”, right-click and create a new item “Edit with Sublime Text”, and right-click on “Edit with Sublime Text” and create a new item “Command”;
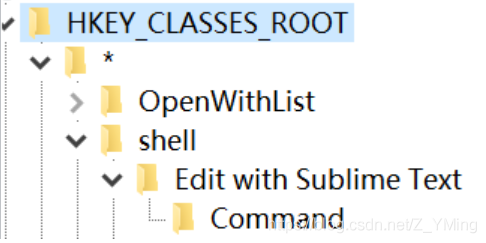
Create a new string value in “Edit with Sublime Text” and name it “Icon”. The value is the installation path of ST, but be sure to add “,0 “after it;
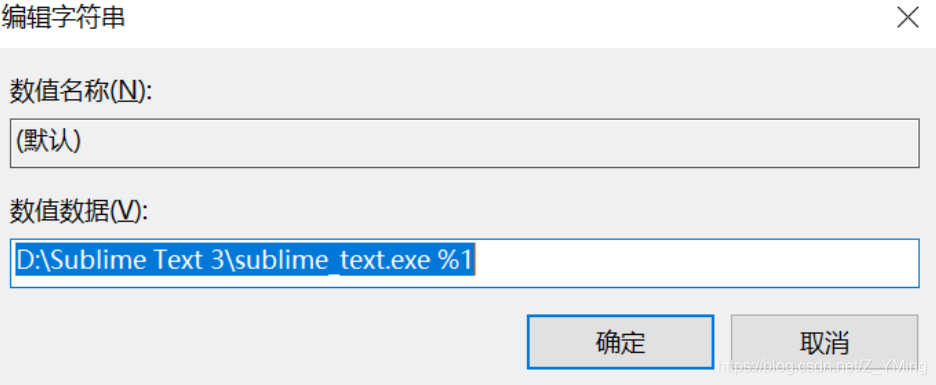
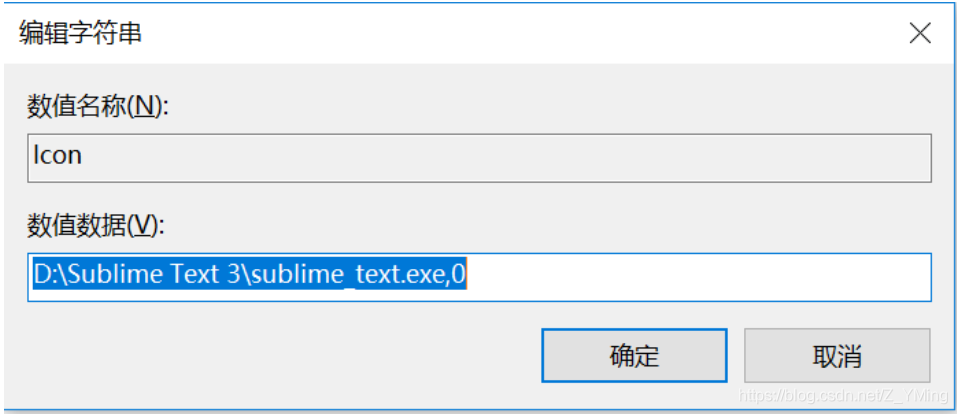
double-click to edit the default values in the “Command”, add value for the same installation path of ST, but the back to add “% 1” – pay attention to the space;

OpenGL class library and environment configuration under win10 and vs2015

Quote:
The OpenGL Super Bibliography (Fifth Edition) and the OpenGL Programming Guide (Eighth Edition) are two practical OpenGL learning books. The difference is that the former has more examples and is easier to follow step by step, while the latter focuses on the API, so it’s best to read the former first.  
OpenGL class library configuration has been troubled by many beginners, I browse the configuration methods of various reference articles, found that in VS2015 configuration encountered many problems, after a few days of groping finally solved.
This article mainly refer to https://www.cnblogs.com/zpcdbky/p/6724772.html
http://blog.csdn.net/brillianteagle/article/details/51623208
http://www.it165.net/pro/html/201504/38164.html
Thanks to the contributions of the authors.
In this paper, all the resources have been packaged well, download address: http://download.csdn.net/download/shs1992shs/10142198
I. GLEW configuration
Glew’s official website: http://glew.sourceforge.net/
glew making official homepage: https://github.com/nigels-com/glew
glew is a cross-platform OpenGL extensions library, supporting multiple operating system, the url has to provide the latest version of glew.

1. Download Source and Binaries respectively, where the Binaries version is the compiled glew file and the Source is the Source.
2. Find the VS2015 installation directory, if it is installed in C disk, most is similar to C: Program Files(x86)\Microsoft Visual Studio 15.0 such path (the next is Microsoft Visual Studio 14.0), can also be in other disk directory; For the convenience of expression, the following will be explained according to the directory “D:\ Software Installation \VS2015”.
3. Locate the C++ header directory, such as “D:\ software installation \VS2015\VC\include”, and create a new GL folder under the include directory (if there is none).
4. Page 1 Binaries glew – 2.1.0/include/GL folder 4 header files are copied to 3 GL in the folder.
5. Copy glew32.dll from Binaries version to D:\ software installation \VS2015\VC\bin.
6. Copy the Binaries version of glew-2.1.0\lib\Release\Win32 to the directory D:\ software installation \VS2015\VC\lib.
Note that it is not necessary to copy the DLL file to C:\Windows\System32 or C:\Windows\SysWOW64.
At this point, glew is configured.

FreeGLUT configuration

1. GLEW obtains the latest version of OpenGL API. The FreeGLUT is used to replace the GLUT library. So, the glew and freeGLUT libraries are configured to completely replace the glu and GLUT libraries, and the latest version of the API is available for Shader programming.

f
The latest stable version of ReeGLUT is 3.0, which can be downloaded at:
http://freeglut.sourceforge.net/

Open the page and see the following section:

Download the Prepackaged version of MSVC and click the red button to get to the next page

Click on the red box to download the file named FreeGlut-MSVC-3.0.0-2.MP.zip

2.
“FreeGlut-MSVC-3.0.0-2.MP.zip” to extract the FreeGlut-MSVC-3.0.0-2.MP.zip folder.
There are four header files in the FreeGLUT /include/GL directory. Copy the three header files except GLUT. H to the D:\ software installation \VS2015\VC\include\GL directory.

Copy the FreeGlut. DLL file from FreeGlut. bin to D:\ software installation \VS2015\VC\bin.

4. Copy the FreeGlut. lib file to D:\ software installation \VS2015\VC\lib.

At this point, the FreeGLUT is configured.

Third, GLUT configuration

The GLUT library is old and hasn’t been updated since 2000, and many of them can be downloaded online or packaged with the resource bundles I uploaded.

Glut.h, Glut.dll, Glut32.dll, Glut.lib, Glut32.lib. Glut.h, Glut.dll, Glut32.dll, Glut.lib, Glut32.lib

2. Copy Glut. h to D:\ software installation \VS2015\VC\include\GL.

3. Copy ULT. DLL, GLUT32.DLL to D:\ software installation \VS2015\VC\bin.

4. Copy Glut. lib and Glut32. lib to D:\ VS2015\VC\lib.

At this point, GLUT is configured.

Note: When using the OpenGL Super Bibliotheca example, you need to add #pragma comment(lib,”gltools.lib”) to the beginning of the program. Used to connect to gltools.lib.

Four, GLTools configuration

The GLTools library is provided by the author of the OpenGL Super Bibliome. It is cumbersome to configure. I can use the files packaged in my resource pack, or I can compile them myself.

1. Copy all 11 header files from the gltools\include directory to the D:\ software installation \VS2015\VC\include directory (note the include directory, not the GL subdirectory).

2. Copy gltools.lib to D:\ software installation \VS2015\VC\lib.
> At this point, GLTools is configured.
> At this point, OpenGL is configured.

Self-compilation method:

Unzip the resource bundle and get the gltools folder. This folder has two folders, include and SRC, in its directory. Since GLTools compilations depend on glew, you can see that GLTools \include\GL is a version of the glew header, and GLTools \ SRC has the glew.c source.  

Since you have already used the latest version of glew-2.1.0, you need to replace all the header files in the gltools\include\GL directory and select
with
Glew-2.1.0 version glew.c source file replaces glew.c in gltools\ SRC. (The Source version of glew-2.1.0\ SRC \glew.c as mentioned earlier).

Note 1: GLTools in the resource pack is all packaged and does not need to be changed. Readers who need to update the resource pack should follow the above method.

Note 2: when using the OpenGL super treasure dian example, found that transformation pipeline header file GLGeometryTransform. H compile error, a large number of can’t find the identifier, so the revised, if readers encounter such problems, in the resource bundle of gltools within a folder GLGeometryTransform – fix GLGeometryTransform. H header file to replace to D: \ software \ VS2015 VC \ \ the include directory, can be normal use.

Generate gltools. Lib

1. Copy all 11 header files from the gltools\include directory to the D:\ software installation \VS2015\VC\include directory (note the include directory, not the GL subdirectory).

2.
Start VS2015 and create a Win32 application called GLTools.

3. Select “Static Library” and uncheck the “Precompiled Header” box.

4. Copy the six files in the gltools\ SRC directory to the project directory you just created (for example, E: gltools\gltools).
5. Right-click ‘Source File’ –>; “Add”, & gt; “Existing Items”, add 6 of the 4 files to the project.


C/C++ > C/C++ > C/C++ > Add _CRT_SECURE_NO_WARNINGS to the preprocessor definition to the right of the preprocessor,
Otherwise, the function will be warned that it is not safe to use and will not compile successfully.

7. To generate – & gt; Generate gltools
I have seen a compilation in Release mode and a compilation in Debug mode in different articles, so far I can’t see the specific difference, just to be safe, I can compile in both modes.

There were a bunch of “DLL link inconsistencies” warnings on the compile, but the compilation was successful.

8. The generated gltools.lib files can be found in the E: gltools\Debug directory and the E: gltools\Release directory respectively. To copy the gltools.lib file from the Release file, refer to the lib file placement format of FreeGLUT. You can copy the gltools.lib file from the Release file to the D:\ software installation \VS2015\VC\lib directory.

At this point, you are done.

Wireshark can’t find a solution to capture interface

After installing Wireshark, in the “Capture “-> “Options” does not have a single capture interface.
Question why
Win10 compatibility issues caused. is required to uninstall Winpcap and reinstall Win10pcap
The solution
(a) to download and install win10Pcap, download links: http://www.win10pcap.org/download/
note: prior to install Wireshark off, otherwise an error during the installation.


n>

Windows 10 installation python.msi Error 2502 / 2503 solution

Error 2502/2503 also appeared when I installed msi files in windows10
I also solved the specific steps through the previous methods as follows (click to view) :
Win10 installation mSI prompt 2502, 2503 error code (successfully resolved)
However, when I installed Python today, I could not solve it according to the previous methods. I searched again by myself, and finally solved the following problems:
The reason is that the C:\Windows\Temp folder NTFS has the wrong permissions. It is OK to change its User permissions to full control.

I changed the full control permission of the TEMp myself

And then just reinstall it