Category Archives: Linux

[Solved] Esxi Warning: System Management Software 1 SEL Fullness

Today, I saw a red exclamation mark on an Esxi in vCSA.

So I clicked on the Esxi [Monitoring] under the [Problems and Alarms] and saw the status of other host hardware objects Name of serious alarm

But from this prompt still can not see what, so continue to click on the [Hardware Operational Status] to see the System Management Software 1 SEL Fullness

If you do not know what SEL is, you may not understand this error, in fact, here (SEL) that ESXi System Event Log

That is, the ESXi host system event log is full, if this is the case, we can clean up can

So first open Esxi ssh service and Bash Shell, and then ssh login to Esxi, because this Esxi and production, so I directly use localcli hardware ipmi sel clear will clear the logs

[root@EX123:~]  localcli hardware ipmi sel get
IpmiSELConfig:
   Enabled: true
   Formatted-Raw:
   Last Added: 2022-09-05T06:18:40
   Last Cleared: 2018-12-16T07:51:30
   Maximum Records: 512
   Overflow: false
   Raw:
   Sel-Clock: 2022-11-07T08:42:57
   Total Records: 456
   Version: 0x51 (1.5)
[root@EX123:~] localcli hardware ipmi sel clear
[root@EX123:~] localcli hardware ipmi sel get
IpmiSELConfig:
   Enabled: true
   Formatted-Raw:
   Last Added: 2022-11-07T08:43:45
   Last Cleared: 2022-11-07T08:43:44
   Maximum Records: 512
   Overflow: false
   Raw:
   Sel-Clock: 2022-11-07T08:43:52
   Total Records: 1
   Version: 0x51 (1.5)
[root@EX123:~]

After execution, log back into vCSA to see Esxi and find that the alarms have been eliminated, but if the Esxi is production-important, you can set a larger value or export the backup event log and then clean it up
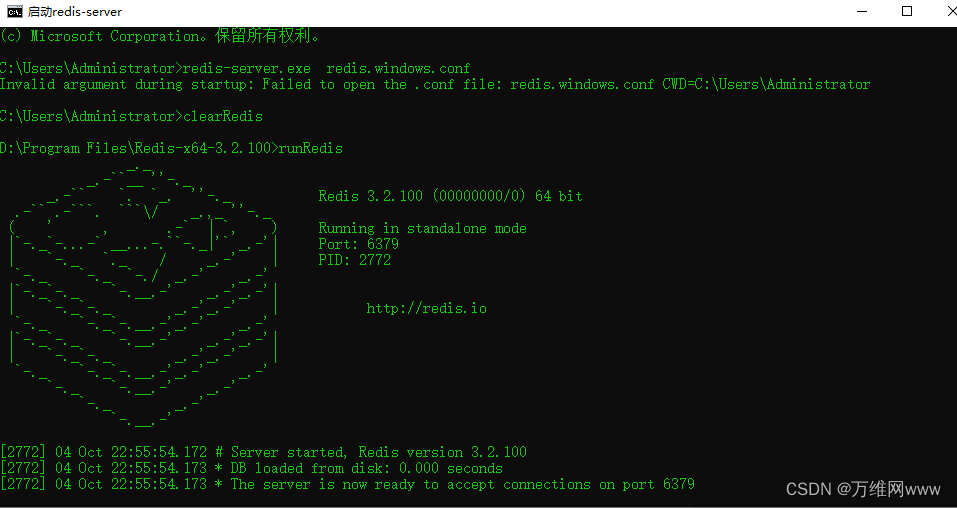
Linux Virtual Machine Boot Container: Error response from daemon: driver failed programming external connectivity on endpoint

docker: Error response from daemon: driver failed programming external connectivity on endpoint tomcat01 (00028237b8dd7b21dbce757be3bf2df0e0fcfa6c3987cac68c42d2fb6603b42d): 
(iptables failed: iptables --wait -t nat -A DOCKER -p tcp -d 0/0 --dport 49162 -j DNAT --to-destination 172.17.0.2:8080 ! -i docker0: iptables: No chain/target/match by that name.
(exit status 1)).

When starting a docker container or doing docker configuration, setting a configuration such as restart for the firewall
will clear the relevant configuration of docker, resulting in the query firewall rules when the docker chain is not displayed

The specific reason is that you deleted the chain in iptables
There are many ways to remove the links

restart firewalld firewall can be cleared, firewalld is centos7 or more, iptables is centos6 or less will have, and the underlying firewalld is involved in the iptables, so when it comes to firewall firewalld commands or commands in the iptables Be careful to remove the chain that involves docker

The solution is to restart the Docker engine

systemctl restart docker

Query the chain of the docker againiptables -L
or use this command to queryiptables -t nat - nL

Petalinux Failed to open PetaLinux lib: librdi_commonxillic.so: cannot open shared object file:

Petalinux create app reported an error

mrzhang@ubuntu:~/works/MZ702P_FEP$ petalinux-create -t apps -n testapp --enable --force
INFO: Create apps: testapp
WARNING: Component "/home/mrzhang/works/MZ702P_FEP/project-spec/meta-user/recipes-apps/testapp" already exists.
WARNING: --force parameter specified, overwriting
INFO: New apps successfully created in /home/mrzhang/works/MZ702P_FEP/project-spec/meta-user/recipes-apps/testapp
INFO: Enabling created component...
INFO: sourcing bitbake
INFO: oldconfig rootfs
INFO: testapp has been enabled 
Failed to open PetaLinux lib: librdi_commonxillic.so: cannot open shared object file: No such file or directory.

Solution:

sudo echo "/opt/pkg/petalinux/2018.3/tools/lib" > /etc/ld.so.conf.d/petalinux.so.conf
sudo ldconfig

Extended content:

Solution to ‘cannot open shared object file’ (Linux ):

1. Prompt when calling the dynamic library .so file in Linux:

cannot open shared object file: No such file or directory

Solution:

1. At this time, enter ldd xxx to check which libraries are missing

libmysqlcppconn.so.7 => not found
libboost_system.so.1.64.0 => not found

2. Set variable LD_LIBRARY_PATH

sudo gedit ~/.bashrc

Add on the last line:

export LD_LIBRARY_PATH=$LD_LIBRARY_PATH:/your/path

Re-open bash and then ldd to find the library path.

2. (Recommended) Modify the shared library configuration file /etc/ld.so.conf
/etc/ld.so.conf
1. Setting:

sudo gedit /etc/ld.so.conf

2. Add library path:

include /etc/ld.so.conf.d/*.conf
/home/xxx/Documents/core/Linux/Test/src/Test

Save and exit
3. Make the configuration effective immediately

sudo ldconfig

[Solve] Yinhe Qilin V10 System Error: Failed to download metadata for repo ‘ks10-adv-os‘

In the use of Yinhe Kirin system will be installed from time to time, yum command is the most convenient and fast command, but in the process of using the Failed to download metadata for repo ‘ks10-adv-os’ such an error how to solve it?

After several attempts, I finally succeeded in solving it, and the following is the specific solution.
Enter the yum source file directory
cd /etc/yum.repos.d
Back up the yum source files
cp kylin_aarch64.repo kylin_aarch64.repo.bak

Modify the contents of the source file
Enter the command: vim kylin_aarch64.repo
Delete the original code and copy the following code over

[ks10-adv-os]
name = Kylin Linux Advanced Server 10 - Os
baseurl = http://archive2.kylinos.cn/rpm/kylin/production/KY-KY10-GFB-aarch64/custom/kylin-server/KY10-GFB-aarch64/
#baseurl = http://update.cs2c.com.cn:8080/NS/V10/V10SP1/os/adv/lic/base/$basearch/
gpgcheck = 0
enabled = 1

[ks10-adv-updates]
name = Kylin Linux Advanced Server 10 - Updates
baseurl = http://update.cs2c.com.cn:8080/NS/V10/V10SP1/os/adv/lic/updates/$basearch/
gpgcheck = 0
enabled = 0

[ks10-adv-addons]
name = Kylin Linux Advanced Server 10 - Addons
baseurl = http://update.cs2c.com.cn:8080/NS/V10/V10SP1/os/adv/lic/addons/$basearch/
gpgcheck = 0
enabled = 0

Use the download command:
reposync -v –installroot /opt/aarch64/
After completion, you can see that the yum install program name can be downloaded normally, no error will be reported

Centos8 Could not restart the Network: Failed to restart network.service: Unit network.service not found

Error:

[root@centos8 ~]# service network  status
Redirecting to /bin/systemctl status network.service
Unit network.service could not be found.

[root@centos8 ~]# systemctl status network.service
Unit network.service could not be found.

[root@centos8 ~]# systemctl status network
Unit network.service could not be found.

[root@centos8 ~]# systemctl restart network
Failed to restart network.service: Unit network.service not found.

After installing Centos8, configure the static IP address. If you want to restart the network, the previous commands on Centos7 are hard to use

Error reported as above

After checking the data, it is found that the original network has been replaced by Centos8. The new version is called NetworkManager

This tool is amazing and easy to use. especially those related to wifi,

So you can restart with this command: systemctl restart NetworkManager

[root@centos8 ~]# systemctl status  NetworkManager
● NetworkManager.service - Network Manager
   Loaded: loaded (/usr/lib/systemd/system/NetworkManager.service; enabled; vendor preset: enabled)
   Active: active (running) since Tue 2019-10-15 22:20:43 CST; 9min ago
     Docs: man:NetworkManager(8)
 Main PID: 7299 (NetworkManager)
    Tasks: 3 (limit: 11357)
   Memory: 6.8M
   CGroup: /system.slice/NetworkManager.service
           └─7299 /usr/sbin/NetworkManager --no-daemon


[Solved] docker Startup Error: Job for docker.service failed because the control process exited with error code

I. Error

docker service startup error: sudo systemctl restart docker, prompt: Job for docker.service failed because the control process exited with error code. See “systemctl status docker.service” and “journalctl -xe” for details.
check the status fo the service: systemctl status docker.service

II. Problem-solving
1. Enter the docker directory: cd /etc/docker/
2. Modify the type of daemon: mv daemon.json daemon.conf
3. Restart docker: systemctl restart docker

petalinux-build Error: ERROR: Task (/opt/pkg/petalinux/components/yocto/source/aarch64/layers/meta-xilinx-tools/recipes-bsp/fsbl/fsbl_git.bb:do_compile) failed with exit code ‘1’

petalinux-build Error: ERROR: Task (/opt/pkg/petalinux/components/yocto/source/aarch64/layers/meta-xilinx-tools/recipes-bsp/fsbl/fsbl_git.bb:do_compile) failed with exit code ‘1’
as below:

co@nvdla:~/petaproj/nvdla$ petalinux-build 
[INFO] building project
[INFO] sourcing bitbake
[INFO] generating user layers
INFO: bitbake petalinux-user-image
Loading cache: 100% |############################################| Time: 0:00:00
Loaded 3811 entries from dependency cache.
Parsing recipes: 100% |##########################################| Time: 0:00:03
Parsing of 2777 .bb files complete (2775 cached, 2 parsed). 3812 targets, 150 skipped, 0 masked, 0 errors.
NOTE: Resolving any missing task queue dependencies
Initialising tasks: 100% |#######################################| Time: 0:00:02
Checking sstate mirror object availability: 100% |###############| Time: 0:00:11
Sstate summary: Wanted 174 Found 9 Missed 330 Current 757 (5% match, 82% complete)
NOTE: Executing SetScene Tasks
NOTE: Executing RunQueue Tasks
ERROR: fsbl-2019.1+gitAUTOINC+26c14d9861-r0 do_compile: Function failed: do_compile (log file is located at /home/co/petaproj/nvdla/build/tmp/work/plnx_zynqmp-xilinx-linux/fsbl/2019.1+gitAUTOINC+26c14d9861-r0/temp/log.do_compile.899)
ERROR: Logfile of failure stored in: /home/co/petaproj/nvdla/build/tmp/work/plnx_zynqmp-xilinx-linux/fsbl/2019.1+gitAUTOINC+26c14d9861-r0/temp/log.do_compile.899
Log data follows:
| DEBUG: Executing shell function do_compile
| aarch64-none-elf-gcc -MMD -MP      -Wall -fmessage-length=0 -DARMA53_64 -Os -flto -ffat-lto-objects -Wall -fmessage-length=0 -DARMA53_64 -Os -flto -ffat-lto-objects    -c xfsbl_board.c -o xfsbl_board.o -Izynqmp_fsbl_bsp/psu_cortexa53_0/include -I.
| In file included from xfsbl_board.c:54:
| xfsbl_board.h:64:10: fatal error: xiicps.h: No such file or directory
|  #include "xiicps.h"
|           ^~~~~~~~~~
| compilation terminated.
| make: *** [Makefile:34: xfsbl_board.o] Error 1
| WARNING: /home/co/petaproj/nvdla/build/tmp/work/plnx_zynqmp-xilinx-linux/fsbl/2019.1+gitAUTOINC+26c14d9861-r0/temp/run.do_compile.899:1 exit 2 from 'make'
| ERROR: Function failed: do_compile (log file is located at /home/co/petaproj/nvdla/build/tmp/work/plnx_zynqmp-xilinx-linux/fsbl/2019.1+gitAUTOINC+26c14d9861-r0/temp/log.do_compile.899)
ERROR: Task (/opt/pkg/petalinux/components/yocto/source/aarch64/layers/meta-xilinx-tools/recipes-bsp/fsbl/fsbl_git.bb:do_compile) failed with exit code '1'
NOTE: Tasks Summary: Attempted 2926 tasks of which 2910 didn't need to be rerun and 1 failed.

Summary: 1 task failed:
  /opt/pkg/petalinux/components/yocto/source/aarch64/layers/meta-xilinx-tools/recipes-bsp/fsbl/fsbl_git.bb:do_compile
Summary: There was 1 ERROR message shown, returning a non-zero exit code.
ERROR: Failed to build project

Solution:

1) File Directory <petalinux_proj>/project-spec/meta-user/recipes-bsp/fsbl/fsbl_%.bbappend

Check whether there is fsbl_% Bbappend or not, create it if not:

vim <plnx-proj-root>/project-spec/meta-user/recipes-bsp/fsbl/fsbl_%.bbappend

2) Add the following

do_compile_prepend(){

   install -m 0644 ${TOPDIR}/../project-spec/hw-description/psu_init.c ${B}/fsbl/psu_init.c

   install -m 0644 ${TOPDIR}/../project-spec/hw-description/psu_init.h ${B}/fsbl/psu_init.h

}

3) Clean up and rebuild the fsbl file

$ petalinux-build -c fsbl -x cleanall

$ petalinux-build -c fsbl

Problem-solving!

[Solved] Sed Failed to Reference Variable error: extra characters after command

Environment:

Operating system: CentOS
Background: shell script

Question:

sudo sed -n '842,${line}p' /.../file > ./file1

After execution, an error is reported:
– e expression # 1, char 7: extra characters after command.

Solution:

After investigation, it is found that it is OK to replace single quotation marks with double quotation marks, as follows:

sudo sed -n "842,${line}p" /.../file > ./file1

If none of the methods found work, try this one.

Remember that variables cannot be referenced within single quotes.

DONE!

[Solved] Ubuntu Compile Rust Program Error: failed to run custom build command for openssl-sys v0.9.39

Compiling Rust program in Ubuntu environment reports an error:

failed to run custom build command for openssl sys v0.9.39

Ubuntu version: 20.04

Refer to GitHub’s discussion and there are two possible solutions:

  1. sudo apt install pkg-config
  2. sudo apt install libssl-dev

I use the second method to solve this problem.