Category Archives: Python

[Solved] django mysql\base.py error: KeyError:

Tracking source code:

Problem file:Python36\lib\site-packages\django\db\backends\mysql\base.py

    def get_new_connection(self, conn_params):
        conn = Database. connect(** conn_params)
        conn.encoders[SafeText] = conn.encoders[six.text_type]
        conn.encoders[SafeBytes] = conn.encoders[bytes]
         return conn


solution

  1. Downgrade MySQLclient. Uninstall first, then install the specified version. pip3 uninstall mysqlclientpip3 install mysqlclient==1.3.
  2. My initial solution was to change the django code ( Python36\lib\site-packages\django\db\backends\mysql\base.py ), add an “if” as below:
    def get_new_connection(self, conn_params):
        conn = Database. connect(** conn_params)
        conn.encoders[SafeText] = conn.encoders[six.text_type] #First
         determine whether the bytes exist in the encoder, and if so, perform the operation 
        if bytes in conn.encoders:
            conn.encoders[SafeBytes] = conn.encoders[bytes]
         return conn
copy code

Python: How to Costomize the Background of PS

Here is the example code on how to modify the PS background.

Nedd to Install  photoshop-python-api
 
 1 """Change the color of the background and foreground."""
 2 # Import local modules
 3 from photoshop import Session
 4 
 5 
 6 with Session() as ps:
 7     foregroundColor = ps.SolidColor()
 8     foregroundColor.rgb.red = 255
 9     foregroundColor.rgb.green = 0
10     foregroundColor.rgb.blue = 0
11     ps.app.foregroundColor = foregroundColor
12 
13     backgroundColor = ps.SolidColor()
14     backgroundColor.rgb.red = 0
15     backgroundColor.rgb.green = 0
16     backgroundColor.rgb.blue = 0
17     ps.app.backgroundColor = backgroundColor

Python Selenium Common Keyboard Controls

Keyboard events
The previous send_keys() method is used to simulate keyboard input; the keys() class provides methods for almost all keys on the keyboard, and key combinations are also possible.

Commonly used keyboard operations are as follows.

send_keys(Keys.BACK_SPACE) Delete key (BackSpace)
send_keys(Keys.SPACE) Space key (Space)
send_keys(Keys.TAB) Tabulation key (Tab)
send_keys(Keys.ESCAPE) Return key (Esc)
send_keys(Keys.ENTER) Enter key (Enter)
send_keys(Keys.CONTROL,’a’) Select All (Ctrl+A)
send_keys(Keys.CONTTROL,’c’) Copy (Ctrl+C)
send_keys(Keys.CONTTROL,’x’) Cut (Ctrl+X)
send_keys(Keys.CONTTROL,’v’) Paste (Ctrl+V)
send_keys(Keys.F1) Keyboard F1
……
send_keys(Keys.F12) Keyboard F12

Keys.BACK_SPACE: Back Space key (BackSpace)
Keys.TAB: Tab key (Tab)
Keys.ENTER: Enter key (Enter)
SHIFT: Case conversion key (Shift)
Keys.CONTROL: Control key (Ctrl)
Keys.ALT: ALT key (Alt)
Keys.ESCAPE: Return key (Esc)
Keys.SPACE: Space bar (Space)
Keys.PAGE_UP: Page up key (Page Up)
PAGE_DOWN: page down key (Page Down)
Keys.END: End of line key (End)
Keys.
LEFT: left arrow key (Left)
Keys.UP: Arrow keys up (Up)
Keys.RIGHT: arrow key right (Right)
DOWN: Down arrow key (Down)
INSERT: Insert key (Insert)
DELETE: Delete key (Delete)
NUMPAD0 ~ NUMPAD9: numeric keys 1-9
F1 ~ F12: F1 – F12 keys
(Keys.CONTROL, ‘a’): key combination Control+a, select all
(Keys.CONTROL, ‘c’): key combination Control+c, copy
(Keys.CONTROL, ‘x’): key combination Control+x, cut
(Keys.CONTROL, ‘v’): key combination Control+v, Paste

Vscode Tensorboard Error: We failed to start a TensorBoard session due to the following error: Command fa

When vscode opens the tensorboard, an error is reported:We failed to start a TensorBoard session due to the following error: Command failed: conda activate python && echo ‘e8b39361-0157-4923-80e1-22d70d46dee6’ && python /home/zhangyulan/.vscode-server/extensions/ms-python.python-2022.14.0/pythonFiles/printEnvVariables. py CommandNotFoundError: Your shell has not been properly configured to use ‘conda activate’. To initialize your shell, run $ conda init < SHELL_NAME> Currently supported shells are: – bash – fish – tcsh – xonsh – zsh – powershell See ‘conda init –help’ for more information and options. IMPORTANT: You may need to close and restart your shell after running ‘conda init’.

The main reason for the above problems is the version update.

Solution:

1. Make sure that in the .vscode-server/bin directory, delete the lock file xxxx-lock xxx, or not if it is not there. The file is shown in the following figure.

2. Return the python and balance extensions of vscode to 2022.14.0 and 2022.9.10, respectively, which are the versions one month ago. But I can’t go back to the version one month ago, just go back to the version one year ago

[Solved] ssl_client_socket_impl.cc handshake failed (Same Codes in Different Environments)

First of all, the same script environment (the same code, the same plug-in version) has no problem running on my native environment, windoiws11.

However! Report an error ssl_client_socket_impl.cc  handshake failed~ QaQ in the newly installed Windows 10 environment.

[19852:2032:0912/202419:ERROR:ssl_client_socket_impl.cc(983)] handshake failed;
 returned -1, SSL error code 1, net_error -100

I have added these two conditions, but the loop still reports an error and the script stops directly

options.add_argument('--ignore-certificate-errors')
options.add_argument('--ignore-ssl-errors')

There is no difference between the chromedriver version and the Chrome version.

I can’t find any other reason

[Solved] PyTorch Error: TypeError: exceptions must derive from BaseException

Project scenario:

PyTorch reports an error: TypeError: exceptions must deliver from BaseException


Problem description

In base_options.py, set the –netG parameters to be selected only from these.

self.parser.add_argument('--netG', type=str, default='p2hed', choices=['p2hed', 'refineD', 'p2hed_att'], help='selects model to use for netG')

However, when selecting netG, the code is written as follows:

def define_G(input_nc, output_nc, ngf, netG, n_downsample_global=3, n_blocks_global=9, n_local_enhancers=1, 
             n_blocks_local=3, norm='instance', gpu_ids=[]):    
    norm_layer = get_norm_layer(norm_type=norm)     
    if netG == 'p2hed':    
        netG = DDNet_p2hED(input_nc, output_nc, ngf, n_downsample_global, n_blocks_global, norm_layer)
    elif netG == 'refineDepth':
        netG = DDNet_RefineDepth(input_nc, output_nc, ngf, n_downsample_global, n_blocks_global, n_local_enhancers, n_blocks_local, norm_layer)
    elif netG == 'p2h_noatt':        
        netG = DDNet_p2hed_noatt(input_nc, output_nc, ngf, n_downsample_global, n_blocks_global, n_local_enhancers, n_blocks_local, norm_layer)
    else:
        raise('generator not implemented!')
    #print(netG)
    if len(gpu_ids) > 0:
        assert(torch.cuda.is_available())   
        netG.cuda(gpu_ids[0])
    netG.apply(weights_init)
    return netG

Cause analysis:

Note that there is no option of ‘rfineD’, so when running the code, the program cannot find the network that netG should select, so it reports an error.


Solution:

In fact, change the “elif netG==’refineDepth’:”  to “elif netG==’refineD’:”. it will be OK!

Jetson MONAILabel(arm) Failed to Run distributed Module [How to Solve]

Solution:

  • https://forums.developer.nvidia.com/t/pytorch-for-jetson/72048
  • Switch the version to v1.11.0
  • Then install the distributed development package
  • sudo apt get install python3 pip libopenblas base libopenmpi dev libomp dev

Verification:

Cause analysis:

It is possible to call distributed modules in v1.11.0. Maybe there is something wrong with the official whl compilation in the new version

[Solved] ByteTrack Error: ModuleNotFoundError: No module named ‘yolox’

1. Error Message:

File "tools/demo_track.py", line 10, in <module>
from yolox.data.data_augment import preproc
ModuleNotFoundError: No module named 'yolox'

2. Reason

Although the yolox folder exists under the project file, it cannot be called without the yolox library installed.

3. Solution
3.1 Answer from the original author

First of, please make sure you decide for a version of CUDA and consistently use that; I am using 11.3 in this.
I fixed this and many other installation and compilation errors, by uninstalling and re-installing the following programs in the exact order

  1. Clone the yolox repo and unzip it
  2. Install Virtual Studio 2019 Community (https://visualstudio.microsoft.com/downloads/)
  3. Download CUDA https://developer.nvidia.com/cuda-11.3.0-download-archive (I just did express installation)
  4. Get https://docs.conda.io/en/latest/miniconda.html for your version of python
  5. Install pytorch with cuda enabled conda install pytorch torchvision cudatoolkit=11.3 -c pytorch
  6. Navigate conda to the download directory (cd yolox_path) of yolox and type in:
    pip install -r requirements.txt
    pip install pycocotools # this should get added to requirements.txt @FateScript
    pip install -v -e . # or python setup.py develop
  7. Congratulations you fixed the error, now you’ll be able to run yolox as described in Quick Start > Demo (example: python tools/demo.py video -n yolox-s -c /path/to/your/yolox_s.pth –path /path/to/your/video –conf 0.25 –nms 0.45 –tsize 640 –save_result –device [cpu/gpu] )

A couple notices:

  • You can at the time of writing this; not install above CUDA 11.3, because conda does not provide a higher version in sources to compile with pytorch
  • You can not install a higher version of Virtual Studio, because of incompability with CUDA (devs did not add support for MSVS22 yet)
  • You’re forced to install MSVS; because this repo depends on it, to be able to compile as written in step 6.
  • You can not simply uninstall conda, because it removes its CUDA compiled pytorch version and that in return breaks yolox. But I think you could most likely avoid this

In short you kept getting this error, because you couldn’t compile yolox properly or not at all.

3.2 Summary

Add pycocotools in requirements.txt as below:

Run pip install -r requirements.txt

Run pip install -v -e . Or python setup.py develop command
The result after running.


Run Successfully!


Reference:

    ModuleNotFoundError: No module named ‘yolox’ ??how can i resolve it ?please!

[Solved] PySide2 Failed to Create a Graphical Python Program

Error display

This application failed to start because no Qt platform plugin could be initialized. Reinstalling the application may fix this problem.

Available platform plugins are: direct2d, minimal, offscreen, windows.

Solution:

1. Install pyside2

pip install -U pyside2

2. Find Lib\site-packages\PySide2\__init__.py in the root directory of python

3. Add the following codes:

dirname = os.path.dirname(__file__)
plugin_path = os.path.join(dirname, 'plugins', 'platforms')
os.environ['QT_QPA_PLATFORM_PLUGIN_PATH'] = plugin_path

Jupyter notebook Failed to Switch to the Virual Environment: DLL load failed python.exe could not find the entry

I. Error reporting

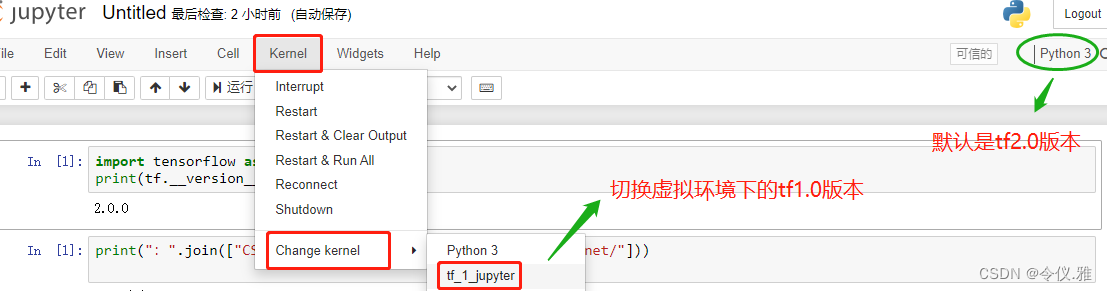
I originally installed Anaconda3, with python3.7 and Jupyter-notebook, and installed tf2.0 environment.

Later I created a new virtual environment tf_1 based on tf2.0 environment and installed tf.14, so that

tf1.0 and tf2.0 versions can be switched flexibly on Jupyter-notebook.

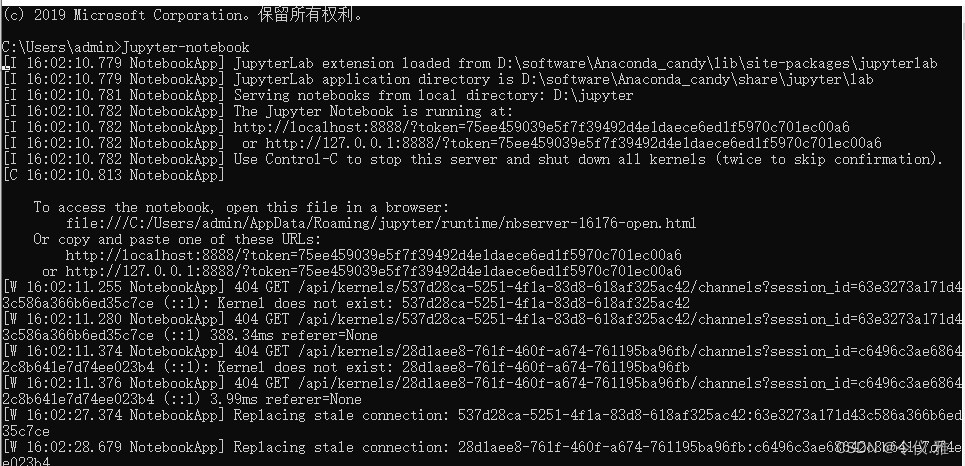
If you log in to notebook directly with cmd, see the following:

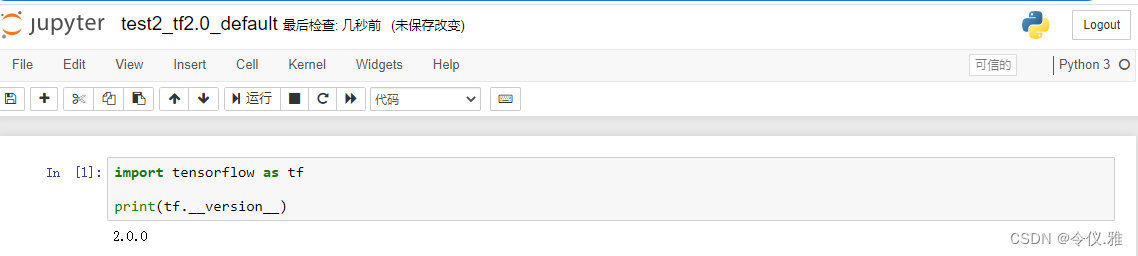
At this point, I directly create a new python3, which means that the default tf2.0 environment is Ok, as shown below:

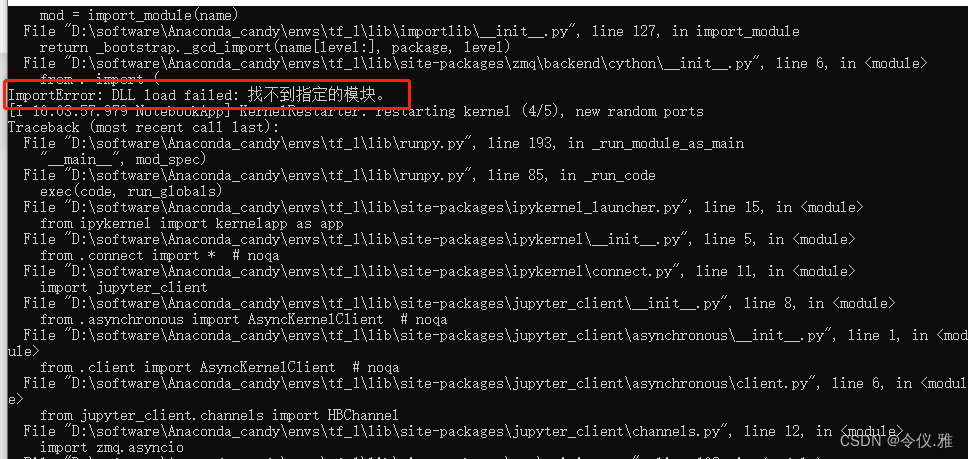
But I new a tf_1_jjupyter is reported the following error, also open a tf2.0 version of the notebook file in the change kenerl will also report the same error.

The error is reported as follows.

ImportError: DLL load failed: The specified module could not be found

II. Solution

Solve the Jupyter notebook startup error or running code error

1. ImportError: DLL load failed : The specified module could not be found
Solution.

cmd-windows console-enter conda activate virtual environment name

For example, the name of the virtual environment here is tf_1

If you don’t remember, you can find it in the Anaconda installation directory

D:\software\Anaconda_candy\envs\tf_1

2. solve python.exe can not find the entrance can not locate the program input point
After entering the virtual environment if it still reports an error as follows.

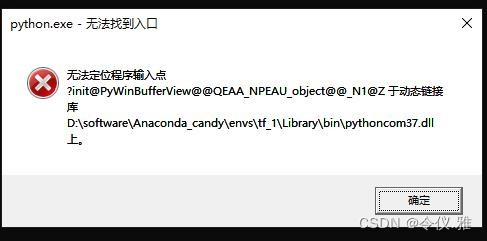
This error pops up when I enter jupyter notebook, but I can enter jupyter notebook to debug the code normally when I cross it out. Initially, I think there is a problem with the dll file. After reading some online solutions, the following is the solution:

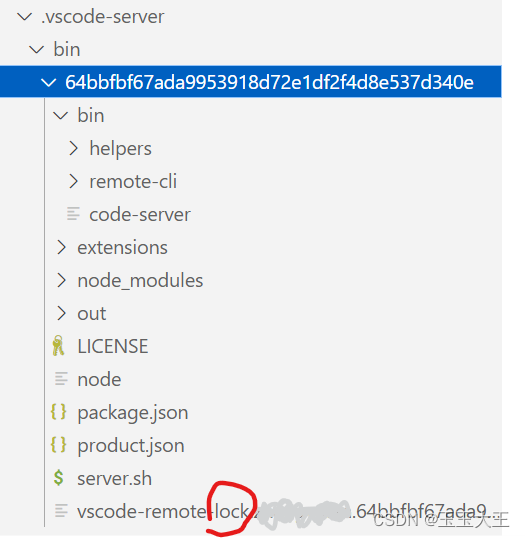
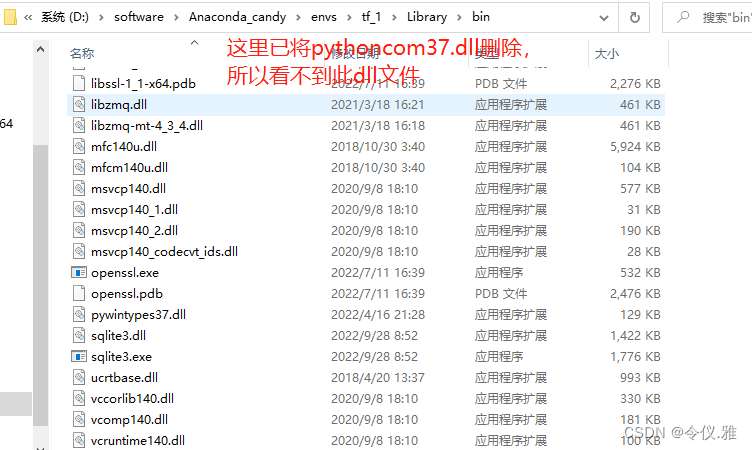
Solution: pythoncom37.dll is a file of pywin32 located in the path Anaconda3\envs\your virtual environment\Lib\site-packages\pywin32_system32, the location of my file here is shown below.

And there is a file with the same name ythoncom37.dll in D:\python\Anaconda3\envs\tf_1\Library\binp.

After deleting this file, there will be no pop-up error!

After deleting the pythoncom37.dl file according to the file path in the pop-up box, the error is still reported as follows.

[premise conda activate tf_1 under virtual environment

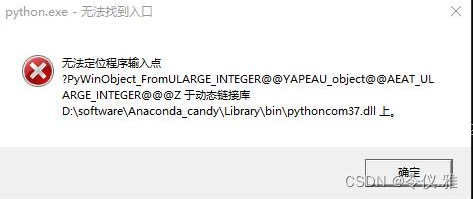
We follow the file path given in the pop-up box to find pythoncom37.dl and delete it again, and that’s the end of it.

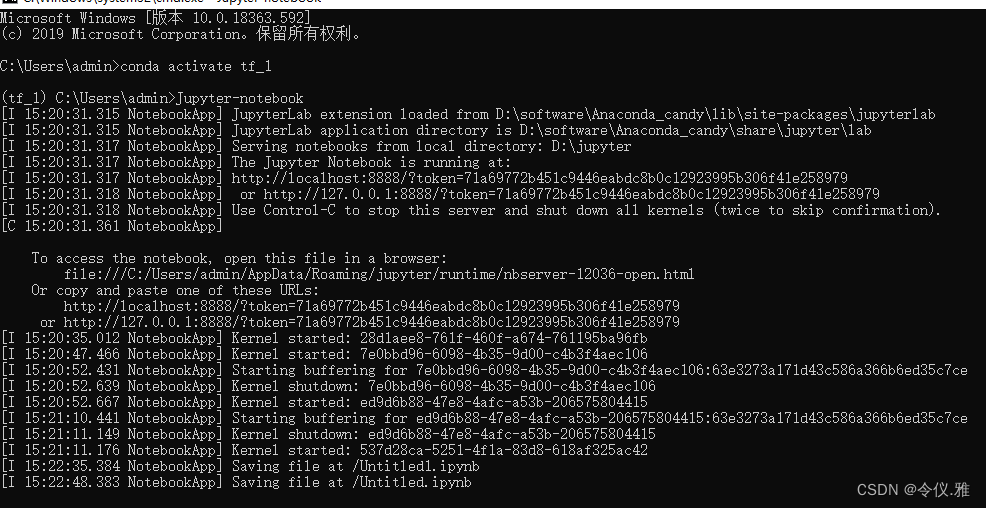
The above solution has been successfully solved as follows.

Switching kernel in the file will also not report errors

Select tf2.0 and virtual environment tf1.0 in the drop-down box by creating a new, and you can switch versions freely, or switch environments in the current file, as shown below:

[Solved] PyTorch Lightning Error: KeyError: ‘hidden_states‘

How to Solve PyTorch Lightning error KeyError: ‘hidden_ states’

Problem description: PyTorch Lightning error: KeyError: ‘hidden_ states’.

model = BertModel.from_pretrained('bert-base-uncased')

Solution: add a parameter after the above code, config=BertConfig.from_pretrained(‘bert-base-uncased’,output_hidden_states=True), as below:

model = BertModel.from_pretrained('bert-base-uncased', config=BertConfig.from_pretrained('bert-base-uncased',output_hidden_states=True))