Tag Archives: OpenCV

[Solved] cv2.error: OpenCV(4.6.0) D:\a\opencv-python\opencv-python\opencv\modules\……

Project Scenarios

Run the opencv official website example code facedetect.py

#!/usr/bin/env python

'''
face detection using haar cascades

USAGE:
    facedetect.py [--cascade <cascade_fn>] [--nested-cascade <cascade_fn>] [<video_source>]
'''

# Python 2/3 compatibility
from __future__ import print_function

import numpy as np
import cv2 as cv

# local modules
from video import create_capture
from common import clock, draw_str


def detect(img, cascade):
    rects = cascade.detectMultiScale(img, scaleFactor=1.3, minNeighbors=4, minSize=(30, 30),
                                     flags=cv.CASCADE_SCALE_IMAGE)
    if len(rects) == 0:
        return []
    rects[:,2:] += rects[:,:2]
    return rects

def draw_rects(img, rects, color):
    for x1, y1, x2, y2 in rects:
        cv.rectangle(img, (x1, y1), (x2, y2), color, 2)

def main():
    import sys, getopt

    args, video_src = getopt.getopt(sys.argv[1:], '', ['cascade=', 'nested-cascade='])
    try:
        video_src = video_src[0]
    except:
        video_src = 0
    args = dict(args)
    cascade_fn = args.get('--cascade', "data/haarcascades/haarcascade_frontalface_alt.xml")
    nested_fn = args.get('--nested-cascade', "data/haarcascades/haarcascade_eye.xml")

    
    cascade = cv.CascadeClassifier(cv.samples.findFile(cascade_fn))
    nested = cv.CascadeClassifier(cv.samples.findFile(nested_fn))
    cam = create_capture(video_src, fallback='synth:bg={}:noise=0.05'.format(cv.samples.findFile('data/lena.jpg')))#此处的data文件夹是从opencv示例simple包中复制到该项目中。

    
    while True:
        _ret, img = cam.read()
        gray = cv.cvtColor(img, cv.COLOR_BGR2GRAY)
        gray = cv.equalizeHist(gray)

        t = clock()
        rects = detect(gray, cascade)
        vis = img.copy()
        draw_rects(vis, rects, (0, 255, 0))
        if not nested.empty():
            for x1, y1, x2, y2 in rects:
                roi = gray[y1:y2, x1:x2]
                vis_roi = vis[y1:y2, x1:x2]
                subrects = detect(roi.copy(), nested)
                draw_rects(vis_roi, subrects, (255, 0, 0))
        dt = clock() - t

        draw_str(vis, (20, 20), 'time: %.1f ms' % (dt*1000))
        cv.imshow('facedetect', vis)

        if cv.waitKey(5) == 27:
            break

    print('Done')

if __name__ == '__main__':
    print(__doc__)
    main()
    cv.destroyAllWindows()
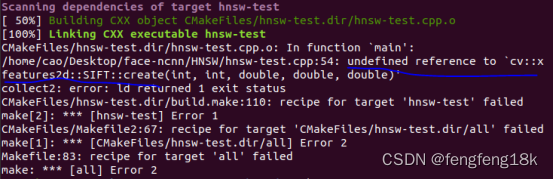
Problem description

Running the above code reports the following error:

[ WARN:[email protected]] global D:\a\opencv-python\opencv-python\opencv\modules\core\src\utils\samples.cpp (61) cv::samples::findFile cv::samples::findFile('data/haarcascades/haarcascade_frontalface_alt.xml') => ''
Traceback (most recent call last):
  File "E:\Pycharm\Pycharm7\facedetect.py", line 81, in <module>
    main()
  File "E:\Pycharm\Pycharm7\facedetect.py", line 48, in main
    cascade = cv.CascadeClassifier(cv.samples.findFile(cascade_fn))
cv2.error: OpenCV(4.6.0) D:\a\opencv-python\opencv-python\opencv\modules\core\src\utils\samples.cpp:64: error: (-2:Unspecified error) OpenCV samples: Can't find required data file: data/haarcascades/haarcascade_frontalface_alt.xml in function 'cv::samples::findFile'
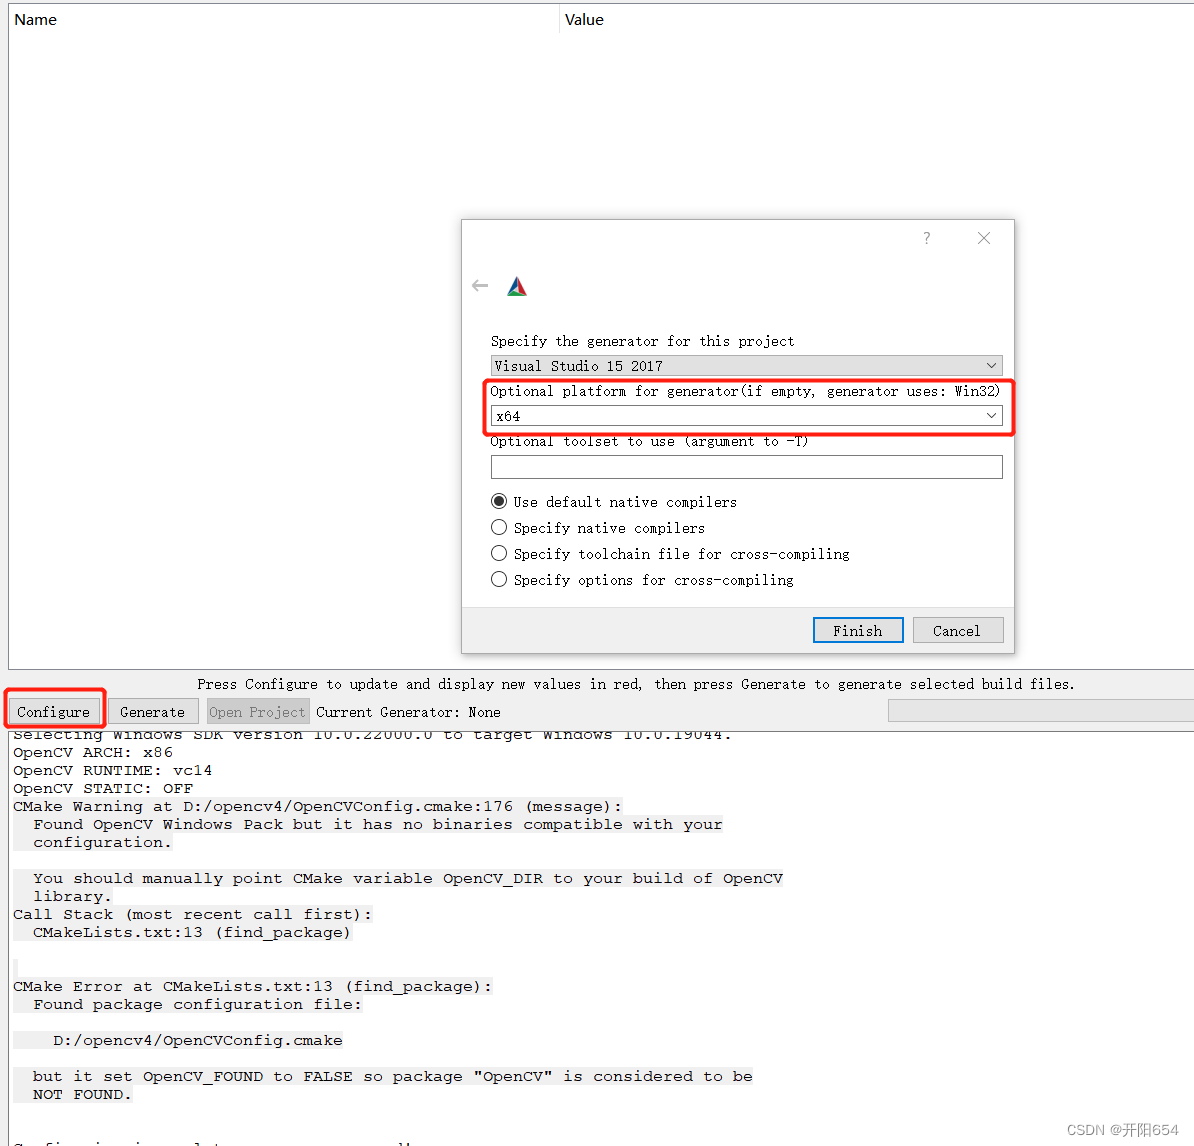
Cause analysis:

According to the error location:

cascade = cv.CascadeClassifier(cv.samples.findFile(cascade_fn))

It can be found that the file paths of “haarcascade_frontalface_alt.xml” and “data/haarcascades/haarcascade_eye.xml” are not correct.


Solution:

“haarcascade_frontalface_alt.xml” and “data/haarcascades/haarcascade_eye.xml” are under the cv2 package installed in python, just change the path in the code to a relative path.

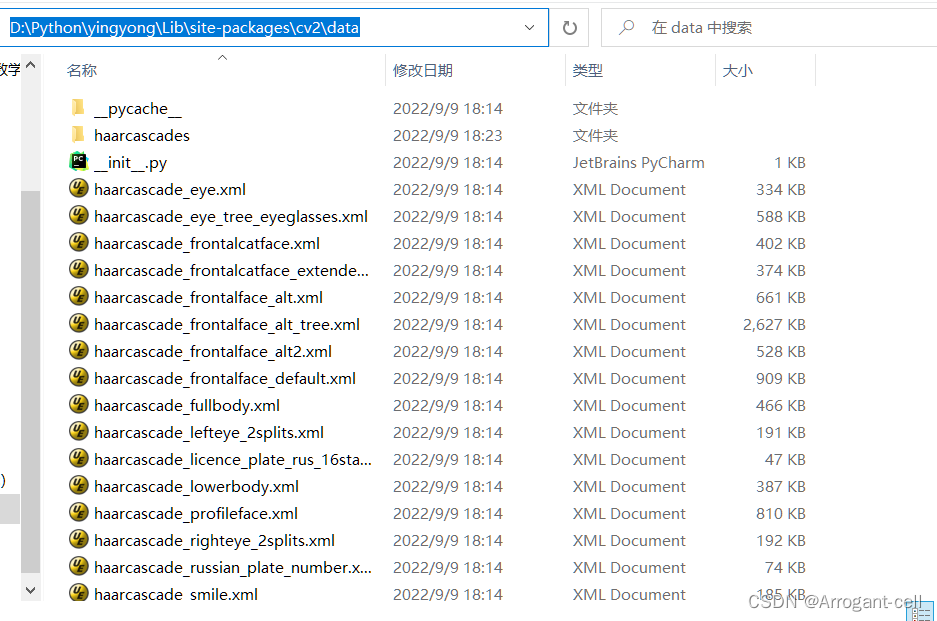
The code is changed as follows:

cascade_fn = args.get('--cascade', "D:/Python/yingyong/Lib/site-packages/cv2/data/haarcascades/haarcascade_frontalface_alt.xml")
    nested_fn  = args.get('--nested-cascade', "D:/Python/yingyong/Lib/site-packages/cv2/data/haarcascades/haarcascade_eye.xml")

Run again to run normally.

[Solved] GDAL+OPENCV often reports errors when processing remote sensing impacts

I found that every time I use the opencv package to process remote sensing images, it often reports an error, even though it has become uint format.
This time I found out that some of them only support three channels, my binary image is one channel, the error of storing the result is because I need to save the result of 1 channel, mine is three channels
so it is necessary to convert 1 channel to 3 channels back and forth ` img1 = np.array(b1)

# img2 = np.dtype(img1, np.uint8)
img = np.expand_dims(img1, axis=2)
img = np.concatenate((img, img, img), axis=-1)

gray = cv2.cvtColor(img, cv2.COLOR_BGR2GRAY)


ret, binary = cv2.threshold(gray, 127, 255, cv2.THRESH_BINARY)

contours, hierarchy = cv2.findContours(binary, cv2.RETR_TREE, cv2.CHAIN_APPROX_SIMPLE)
# contours = cv2.findContours(img)
dilate = cv2.fillPoly(img, [contours[1]],(255,15,15))
cv2.imshow("filled binary", dilate)`


[Solved] error: (-215:Assertion failed) !_src.empty() in function ‘cv::cvtColor‘

Error Message:

error: (-215:Assertion failed) !_src.empty() in function ‘cv::cvtColor’

cv2.error: OpenCV(4.6.0) D:\a\opencv-python\opencv-python\opencv\modules\imgproc\src\color.cpp:182: error: (-215:Assertion failed) !_src.empty() in function 'cv::cvtColor'

Reason:

Path read error

Solution:

Original code

videos_src_path = "D:\pythonProject\python3.9\dataset\image\baozi_image\3.png"
frame = cv2.imread(videos_src_path)

Press the following to modify the read path

videos_src_path = "D:/pythonProject/python3.9/dataset/image/baozi_image/3.png"
#or  videos_src_path = r" D:\pythonProject\python3.9\dataset\image\baozi_image\3.png"
frame = cv2.imread(videos_src_path)


How to Solve Ubuntu18 Compile Kalibr Error (Various Errors)

Opencv-3.4.13 is too new, and errors will be encountered during the compilation of kalibr. The summary is as follows:

Error 1: sudo pip install python-igraph –upgrade failed

Solution:

sudo apt-get install python-igraph

Error 2:

Could not find a package configuration file provided by “code_utils” with
any of the following names:
code_utilsConfig.cmake
code_utils-config.cmake```

Solution:

  1. You need to put the following sentence in the sumpixel_test.cpp file
    #include “backward.hpp”
    to this line
    #include “code_utils/backward.hpp”
  2. Put code_utils into the workspace first, then catkin_ws once, then put imu_utils, then compile


Error 3: catkin build -DCMAKE_BUILD_TYPE=Release -j4 errors during compilation

3-1 error reporting:

 error: ‘CV_GRAY2RGB’ was not declared in this scope
     cv::cvtColor(imageCopy1, imageCopy1, CV_GRAY2RGB);
    
 error: ‘CV_TERMCRIT_ITER’ was not declared in this scope
         cv::TermCriteria(CV_TERMCRIT_EPS + CV_TERMCRIT_ITER, 30, 0.1));

error: ‘CV_TERMCRIT_EPS’ was not declared in this scope
         cv::TermCriteria(CV_TERMCRIT_EPS + CV_TERMCRIT_ITER, 30, 0.1));

3-1 solution: add a header file to the corresponding file:

#include <opencv2/imgproc/types_c.h>

##############################################################################################################

3-2 cvstartwindowthread() error:

Change 3-2 to:

cv::startWindowThread()

3-3 CV_LOAD_IMAGE_UNCHANGED error:

3-3 changed to

cv::IMREAD_UNCHANGED

3-4 CV_LOAD_IMAGE_GRAYSCALE error:

3-4 changed to

cv::IMREAD_GRAYSCALE错误:

3-5 CV_ LOAD_ IMAGE_ Grayscale error:

Change 3-5 to

cv::IMREAD_GRAYSCALE

3-6 CV_LOAD_IMAGE_COLOR error:

Change 3-6 to

cv::IMREAD_COLOR

3-7 CV_LOAD_IMAGE_ANYDEPTH error:

3-7 changed to

cv::IMREAD_ANYDEPTH

3-8 CV_MINMAX error:

3-8 changed to

    NORM_MINMAX

3-9 CV_FONT_HERSHEY_SIMPLEX error:

3-9 changed to

cv::FONT_HERSHEY_SIMPLEX```

3-10 CV_WINDOW_AUTOSIZE error:

3-10 changed to

cv::WINDOW_AUTOSIZE

3-11 error: error: aggregate ‘std::ofstream out_t’ has incomplete type and cannot be defined std::ofstream out_t;
3-11 Solution: add the header file as below:

#include <fstream>

[Solved] error: (-2:Unspecified error) The function is not implemented. Rebuild the library with Windows

Error: error: (-2:Unspecified error) The function is not implemented. Rebuild the library with Windows

I’m on windows, and when running an image motion blur algorithm from the cv-python library, this error is suddenly reported.
Searching for similar problems has said that the path to read the image is wrong, and reinstalling a higher version of the cv library, but not all of them are useless.
All the functions under the cv2 class are not working.

Solution:
First:

pip uninstall opencv-python 

Then:

pip install opencv-python

Just reinstall this package. I don’t know the cause. The problem occurred after I installed the evaluations package. It should be caused by the conflict between versions
stackoverflow: https://stackoverflow.com/questions/67120450/error-2unspecified-error-the-function-is-not-implemented-rebuild-the-libra

[Solved] Cmake compile opencv open-source project Error: but it set OpenCV_FOUND to FALSE so package “OpenCV” is considered to be…

cmake编译opencv开源项目报错问题

Recently, cmake encountered the following problems when compiling a C + + open source project configured with OpenCV environment:

CMake Warning at D:/opencv4/OpenCVConfig.cmake:176 (message):
  Found OpenCV Windows Pack but it has no binaries compatible with your
  configuration.

  You should manually point CMake variable OpenCV_DIR to your build of OpenCV
  library.
Call Stack (most recent call first):
  CMakeLists.txt:13 (find_package)


CMake Error at CMakeLists.txt:13 (find_package):
  Found package configuration file:

    D:/opencv4/OpenCVConfig.cmake

  but it set OpenCV_FOUND to FALSE so package "OpenCV" is considered to be
  NOT FOUND.

So I checked all the methods online, which are basically divided into two categories: one is to modify cmakeLis.txt document. The other is to change the OpenCV version or vs version. But They are not working for me. Finally, I accidentally found that x64 was not selected in configure, and x86 was selected by default. After x64 was selected, the compilation was successful.

https://blog.csdn.net/weixin_61023120/article/details/124738628

[Solved] Opencv Call yolov3 Error: IndexError: invalid index to scalar variable

Call the weight file of yolov3 with OpenCV to obtain the names of the three scale output layers and report an error

ln = [ln[i[0] - 1] for i in net.getUnconnectedOutLayers()]

Error reporting
indexerror: invalid index to scalar variable

This code was a few years ago. It may be a problem with the version. Now it will report an error

Solution:
Remove [0] and modify as below:

ln = [ln[i - 1] for i in net.getUnconnectedOutLayers()]

[Solved] OpenCV Train the class Error: Bad argument & Error: Insufficient memory

OpenCV(3.4.1) Error: Bad argument (Can not get new positive sample. The most possible reason is insufficient count of samples in given vec-file.
) in CvCascadeImageReader::PosReader::get, file


Solution: reduce the number of positive samples

opencv_traincascade.exe -data data_2 -vec positives.vec -bg bg.txt -numPos 350 -numNeg 1963 -mem 8192 -numStages 20 -w 20 -h 20

Here, you can reduce the numpos value

OpenCV(3.4.1) Error: Insufficient memory (Failed to allocate 782736980 bytes) in cv::OutOfMemoryError, file C:\application\opencv\opencv\sources\modules\core\src\alloc.cpp, line 55


Solution: increase memory

Here, increase the value of -mem and decrease the value of numPos

Summary: these two errors mainly lie in that the value of the number of positive samples for each level of training is too large. Numpos must be less than the total number of positive samples. Modifying MEM value only improves the running speed

Raspberry pie Use PCA9685() Error: [Errno 121] Remote I/O error

After I install pca9685() according to the online method, the following errors will appear in the operation.

>>> pwm = Adafruit_PCA9685.PCA9685()
Traceback (most recent call last):
  File "<stdin>", line 1, in <module>
NameError: name 'Adafruit_PCA9685' is not defined
>>> import Adafruit_PCA9685
>>> pwm = Adafruit_PCA9685.PCA9685()
Traceback (most recent call last):
  File "<stdin>", line 1, in <module>
  File "/usr/local/lib/python3.7/dist-packages/Adafruit_PCA9685-1.0.1-py3.7.egg/Adafruit_PCA9685/PCA9685.py", line 75, in __init__
    self.set_all_pwm(0, 0)
  File "/usr/local/lib/python3.7/dist-packages/Adafruit_PCA9685-1.0.1-py3.7.egg/Adafruit_PCA9685/PCA9685.py", line 111, in set_all_pwm
    self._device.write8(ALL_LED_ON_L, on & 0xFF)
  File "/usr/local/lib/python3.7/dist-packages/Adafruit_GPIO-1.0.4-py3.7.egg/Adafruit_GPIO/I2C.py", line 116, in write8
    self._bus.write_byte_data(self._address, register, value)
  File "/usr/local/lib/python3.7/dist-packages/Adafruit_PureIO-1.1.9-py3.7.egg/Adafruit_PureIO/smbus.py", line 327, in write_byte_data
OSError: [Errno 121] Remote I/O error


But the premise of this method is to have the Adafruit_PCA9685 file under the path /usr/local/lib/python3.7/dist-packages/”, if there is one, use the above method

My Raspberry Pi is 4B, there are three .egg files in the above path, Adafruit_PCA9685 is placed in it, as shown below

Select the middle of the Adafruit_PCA9685 .egg file, there will be PCA9685.py file, just create PCA9685.py under raspberry home/pi/ and paste the contents of the previous PCA9685.py into the newly created file, import the code to import PCA9685 instead of not import Adafruit_PCA9685

import PCA9685

Open the PCA9685 file and find that it needs to import the I2C.py file (I forgot to take a screenshot), then open the first one under the /usr/local/lib/python3.7/dist-packages/ path

Paste the contents of I2C.py and Plaform.py inside this file into a new I2C.py and Plaform.py file under home/pi, then open the PCA9685.py file in this directory and change the imported I2C in the middle position, it seems to be form Adafurit_GPIO import I2C as I2C directly to import I2C.

Then open the I2C file, found that you need to import Plaform.py, the same operation, change the previous import to import Plaform can be, as shown, and finally in the directory I2C.py PCA9685.py and Plaform.py file

You can write it directly in the raspberry pie file

import PCA9685
pwm = PCA9685.PCA9685()

See if it’s successful. I’m successful.

[Solved] Python pytesseract(tesseract OCR) Error: TesseractNotFoundError

Error when running code

Use PIP install pytesseract

pip install tesseract

It still doesn’t work after installation. The same error is reported

Subsequent error finding:

Testseract-ocr is not installed

OCR (Optical Character Recognition): Optical Character Recognition, which refers to the process of analyzing, recognizing, and acquiring text in image files.
Tesseract: An open source OCR recognition engine. The initial Tesseract engine was developed by HP Labs, and later contributed to the open source software industry, and was later improved by Google to eliminate bugs, optimize, and re-release.

http://digi.bib.uni-mannheim.de/tesseract/tesseract-ocr-setup-4.00.00dev.exe Can be downloaded

After installation, add before the error code

pytesseract.pytesseract.tesseract_cmd = 'E:\\software\\Tesseract-OCR\\tesseract.exe'

This is followed by the path to install Tesseract-ocr

Successfully solved.

[Solved] error: (-2:Unspecified error) The function is not implemented. Rebuild the library with Windows,

Error return

terminate called after throwing an instance of 'cv::Exception'
  what():  OpenCV(3.4.3) /home/chen/Downloads/opencv-3.4.3/modules/highgui/src/window.cpp
  :632: error: (-2:Unspecified error) The function is not implemented. Rebuild the library 
  with Windows, GTK+ 2.x or Carbon support. If you are on Ubuntu or Debian, install 
  libgtk2.0-dev and pkg-config, then re-run cmake or configure script in function 
  'cvShowImage'

Aborted (core dumped)

Error resolution

Execute the command according to the solution given by the system

sudo apt-get install libgtk2.0-dev
sudo apt-get install pkg-config

It doesn’t solve the problem

Cause of problem

The problem is that there is a problem with the compilation configuration when installing opencv
I execute cmake…
and the correct command is

cmake -D CMAKE_BUILD_TYPE=RELEASE -D CMAKE_INSTALL_PREFIX=/usr/local -D WITH_TBB=ON -D BUILD_NEW_PYTHON_SUPPORT=ON -D WITH_V4L=ON -D WITH_QT=ON -D WITH_OPENGL=ON ..

Solution:

Locate the folder where opencv is installed

cd /home/chen/Downloads/opencv-3.4.3
mkdir release
cd release
cmake -D CMAKE_BUILD_TYPE=RELEASE -D CMAKE_INSTALL_PREFIX=/usr/local -D WITH_TBB=ON -D BUILD_NEW_PYTHON_SUPPORT=ON -D WITH_V4L=ON -D WITH_QT=ON -D WITH_OPENGL=ON ..
sudo make
sudo make install 

Problem-solving…