Tag Archives: ubuntu

Petalinux Failed to open PetaLinux lib: librdi_commonxillic.so: cannot open shared object file:

Petalinux create app reported an error

mrzhang@ubuntu:~/works/MZ702P_FEP$ petalinux-create -t apps -n testapp --enable --force
INFO: Create apps: testapp
WARNING: Component "/home/mrzhang/works/MZ702P_FEP/project-spec/meta-user/recipes-apps/testapp" already exists.
WARNING: --force parameter specified, overwriting
INFO: New apps successfully created in /home/mrzhang/works/MZ702P_FEP/project-spec/meta-user/recipes-apps/testapp
INFO: Enabling created component...
INFO: sourcing bitbake
INFO: oldconfig rootfs
INFO: testapp has been enabled 
Failed to open PetaLinux lib: librdi_commonxillic.so: cannot open shared object file: No such file or directory.

Solution:

sudo echo "/opt/pkg/petalinux/2018.3/tools/lib" > /etc/ld.so.conf.d/petalinux.so.conf
sudo ldconfig

Extended content:

Solution to ‘cannot open shared object file’ (Linux ):

1. Prompt when calling the dynamic library .so file in Linux:

cannot open shared object file: No such file or directory

Solution:

1. At this time, enter ldd xxx to check which libraries are missing

libmysqlcppconn.so.7 => not found
libboost_system.so.1.64.0 => not found

2. Set variable LD_LIBRARY_PATH

sudo gedit ~/.bashrc

Add on the last line:

export LD_LIBRARY_PATH=$LD_LIBRARY_PATH:/your/path

Re-open bash and then ldd to find the library path.

2. (Recommended) Modify the shared library configuration file /etc/ld.so.conf
/etc/ld.so.conf
1. Setting:

sudo gedit /etc/ld.so.conf

2. Add library path:

include /etc/ld.so.conf.d/*.conf
/home/xxx/Documents/core/Linux/Test/src/Test

Save and exit
3. Make the configuration effective immediately

sudo ldconfig

petalinux-build Error: ERROR: Task (/opt/pkg/petalinux/components/yocto/source/aarch64/layers/meta-xilinx-tools/recipes-bsp/fsbl/fsbl_git.bb:do_compile) failed with exit code ‘1’

petalinux-build Error: ERROR: Task (/opt/pkg/petalinux/components/yocto/source/aarch64/layers/meta-xilinx-tools/recipes-bsp/fsbl/fsbl_git.bb:do_compile) failed with exit code ‘1’
as below:

co@nvdla:~/petaproj/nvdla$ petalinux-build 
[INFO] building project
[INFO] sourcing bitbake
[INFO] generating user layers
INFO: bitbake petalinux-user-image
Loading cache: 100% |############################################| Time: 0:00:00
Loaded 3811 entries from dependency cache.
Parsing recipes: 100% |##########################################| Time: 0:00:03
Parsing of 2777 .bb files complete (2775 cached, 2 parsed). 3812 targets, 150 skipped, 0 masked, 0 errors.
NOTE: Resolving any missing task queue dependencies
Initialising tasks: 100% |#######################################| Time: 0:00:02
Checking sstate mirror object availability: 100% |###############| Time: 0:00:11
Sstate summary: Wanted 174 Found 9 Missed 330 Current 757 (5% match, 82% complete)
NOTE: Executing SetScene Tasks
NOTE: Executing RunQueue Tasks
ERROR: fsbl-2019.1+gitAUTOINC+26c14d9861-r0 do_compile: Function failed: do_compile (log file is located at /home/co/petaproj/nvdla/build/tmp/work/plnx_zynqmp-xilinx-linux/fsbl/2019.1+gitAUTOINC+26c14d9861-r0/temp/log.do_compile.899)
ERROR: Logfile of failure stored in: /home/co/petaproj/nvdla/build/tmp/work/plnx_zynqmp-xilinx-linux/fsbl/2019.1+gitAUTOINC+26c14d9861-r0/temp/log.do_compile.899
Log data follows:
| DEBUG: Executing shell function do_compile
| aarch64-none-elf-gcc -MMD -MP      -Wall -fmessage-length=0 -DARMA53_64 -Os -flto -ffat-lto-objects -Wall -fmessage-length=0 -DARMA53_64 -Os -flto -ffat-lto-objects    -c xfsbl_board.c -o xfsbl_board.o -Izynqmp_fsbl_bsp/psu_cortexa53_0/include -I.
| In file included from xfsbl_board.c:54:
| xfsbl_board.h:64:10: fatal error: xiicps.h: No such file or directory
|  #include "xiicps.h"
|           ^~~~~~~~~~
| compilation terminated.
| make: *** [Makefile:34: xfsbl_board.o] Error 1
| WARNING: /home/co/petaproj/nvdla/build/tmp/work/plnx_zynqmp-xilinx-linux/fsbl/2019.1+gitAUTOINC+26c14d9861-r0/temp/run.do_compile.899:1 exit 2 from 'make'
| ERROR: Function failed: do_compile (log file is located at /home/co/petaproj/nvdla/build/tmp/work/plnx_zynqmp-xilinx-linux/fsbl/2019.1+gitAUTOINC+26c14d9861-r0/temp/log.do_compile.899)
ERROR: Task (/opt/pkg/petalinux/components/yocto/source/aarch64/layers/meta-xilinx-tools/recipes-bsp/fsbl/fsbl_git.bb:do_compile) failed with exit code '1'
NOTE: Tasks Summary: Attempted 2926 tasks of which 2910 didn't need to be rerun and 1 failed.

Summary: 1 task failed:
  /opt/pkg/petalinux/components/yocto/source/aarch64/layers/meta-xilinx-tools/recipes-bsp/fsbl/fsbl_git.bb:do_compile
Summary: There was 1 ERROR message shown, returning a non-zero exit code.
ERROR: Failed to build project

Solution:

1) File Directory <petalinux_proj>/project-spec/meta-user/recipes-bsp/fsbl/fsbl_%.bbappend

Check whether there is fsbl_% Bbappend or not, create it if not:

vim <plnx-proj-root>/project-spec/meta-user/recipes-bsp/fsbl/fsbl_%.bbappend

2) Add the following

do_compile_prepend(){

   install -m 0644 ${TOPDIR}/../project-spec/hw-description/psu_init.c ${B}/fsbl/psu_init.c

   install -m 0644 ${TOPDIR}/../project-spec/hw-description/psu_init.h ${B}/fsbl/psu_init.h

}

3) Clean up and rebuild the fsbl file

$ petalinux-build -c fsbl -x cleanall

$ petalinux-build -c fsbl

Problem-solving!
[Solved] Ubuntu Compile Rust Program Error: failed to run custom build command for openssl-sys v0.9.39

Compiling Rust program in Ubuntu environment reports an error:

failed to run custom build command for openssl sys v0.9.39

Ubuntu version: 20.04

Refer to GitHub’s discussion and there are two possible solutions:

  1. sudo apt install pkg-config
  2. sudo apt install libssl-dev

I use the second method to solve this problem.

[Solved] Linux error E: dpkg is broken, you must manually run ‘sudo dpkg –configure -a’ to resolve this issue

Executes the Linux commandsudo apt install curland reports an error:

E: dpkg is interrupted. You must manually run ‘sudo dpkg — configure – a’ to solve this problem

System version: Ubuntu 20.04 LTS

Solution: three-step command line

sudo rm /var/lib/dpkg/updates/*
sudo apt-get update
sudo apt-get upgrade

PHP php-config is not installed error in ubuntu 16 [How to Solve]

Environment

Ubuntu 16.04.1 LTSPHP 7.0.33

Question

When compiling and installing php extensions with php config, it is found that php-config does not exist.

Check whether php-config exists or not?

$ whereis php-config
php-config:

As above, it returns null, indicating that it does not exist.

Solution:

This problem occurs because the php-dev package is not installed. You can install it once.

Install php-dev

$ apt-get install php-dev

If php5 is version, run apt-get install php5-dev.

re-check php-config

$ whereis php-config
php-config: /usr/bin/php-config /usr/bin/php-config7.0 /usr/share/man/man1/php-config.1.gz

As shown above, the installation is successful.

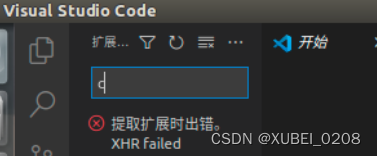
VScode Error: extension failed XHR Failed (Ubuntu Virtual Machine)

In the process of learning Linux embedded development, I encountered the following problems: after installing VS code in the Ubuntu virtual machine, it need to install appropriate plug-ins. At this point, vscode fails to expand XHR Failed, as shown in the figure:

And press the F1 key inside Vs code to open Developer:Toggle Developer Tools, enter the Console to query the reason, The error shown in the figure below appears (That is, Ubuntu system will point the domain name to the specified IP solve this problem):

After searching the Internet for many solutions, the following operations can solve the problem:

1. Open the hosts file in the Ubuntu terminal

sudo gedit /etc/hosts

2. Add the corresponding relationship between IP and domain name in the file as follows, and save the hosts file:

13.107.42.18 marketplace.visualstudio.com

3. Restart Ubuntu.

[Solved] Error occurred during initialization of VM javalangNoClassDefFoundError javalangObject

When you run java/javac/java -version under the doc command, an error was reported:

Error occurred during initialization of VM java/lang/NoClassDefFoundError: java/lang/Object


Or eclipse cannot be opened for this reason

I summarized the following three reasons:

1: java environment variables are misconfigured, check the right and wrong environment variables, especially check the classpath

General (in the case of java configuration only), the value of the environment variable

JAVA_HOME ========= “your jdk installation directory” such as “C:Program FilesJavajdk1.8.0_121”

Path ========= “%JAVA_HOME%in;%JAVA_HOME%jrein”

CLASS_PATH ========= “%JAVA_HOME%libdt.jar;%JAVA_HOME%lib ools.jar”

2: If there is no problem with the environment variable configuration, then go to the jdk installation directory (such as C:Program FilesJavajdk1.8.0_121) and look for tools.jar under lib and rt.jar under jrelib to see if they exist, it is possible that rt.pack and tools.pack exist.

At this point, just unpack the corresponding files into rt.jar and tools.jar, and you can use the unpack200 tool inside the bin

#cd /usr/java/j2sdk1.4.2/lib
#unpack tools.pack tools.jar
#cd …/jre/lib
#…/…/unpack rt.pack rt.jar

3: There is no tools.jar under lib or rt.jar under jrelib, or there are missing files under lib or jrelib (40 files), so just copy them from elsewhere.

If you run java command after copying tools.jar or rt.jar, there may be missing files under jrelib, look carefully or just copy a whole jrelib, it can be solved.

[Solved] E Sub-process usrbindpkg returned an error code (1)

1. The problems are as follows:

An error was reported when installing the software

dlz@ubuntu:~$ sudo apt install wireshark-qt

2. Solution

The code is as follows (example):

root@ubuntu:~# sudo mv /var/lib/dpkg/info /var/lib/dpkg/info_old
root@ubuntu:~# sudo mkdir /var/lib/dpkg/info
root@ubuntu:~# sudo apt-get update
Hit:1 http://mirrors.ustc.edu.cn/ubuntu focal InRelease
Hit:2 http://mirrors.ustc.edu.cn/ubuntu focal-updates InRelease                
Hit:3 http://mirrors.ustc.edu.cn/ubuntu focal-backports InRelease              
Hit:4 http://mirrors.ustc.edu.cn/ubuntu focal-security InRelease               
Hit:5 http://ppa.launchpad.net/linrunner/tlp/ubuntu focal InRelease            
Reading package lists... Done
root@ubuntu:~# sudo apt-get -f install
Reading package lists... Done
Building dependency tree       
Reading state information... Done
0 upgraded, 0 newly installed, 0 to remove and 518 not upgraded.
3 not fully installed or removed.
After this operation, 0 B of additional disk space will be used.
debconf: DbDriver "config": /var/cache/debconf/config.dat is locked by another process: Resource temporarily unavailable
Setting up wireshark-common (3.2.3-1) ...
Setting up wireshark-qt (3.2.3-1) ...
Setting up wireshark (3.2.3-1) ...
root@ubuntu:~# sudo mv /var/lib/dpkg/info/* /var/lib/dpkg/info_old
root@ubuntu:~# sudo rm -rf /var/lib/dpkg/info
root@ubuntu:~# sudo mv /var/lib/dpkg/info_old /var/lib/dpkg/info
root@ubuntu:~# 

How to Solve labelme Install Error in Ubuntu

Create a labelme environment using a virtual environment:

According to the official guidelines, link: GitHub – wkentaro/label: image polygon annotation with python (polygon, rectangle, circle, line, point and image level flag annotation)

conda create --name=labelme python=3
source activate labelme
pip install labelme

Question 1:

gcc -pthread -B /home/XXX/fxp/envs/labelme/compiler_compat -Wno-unused-
result -Wsign-compare -DNDEBUG -g -fwrapv -O2 -Wall -fPIC -O2 -isystem 
/home/XXX/fxp/envs/labelme/include -fPIC -O2 -isystem 
/home/XXX/fxp/envs/labelme/include -fPIC -DFREETYPE_BUILD_TYPE=system -
DPY_ARRAY_UNIQUE_SYMBOL=MPL_matplotlib_ft2font_ARRAY_API -
DNPY_NO_DEPRECATED_API=NPY_1_7_API_VERSION -D__STDC_FORMAT_MACROS=1 -
Iextern/agg24-svn/include -I/home/XXX/fxp/envs/labelme/lib/python3.10/site-
packages/numpy/core/include -I/home/XXX/fxp/envs/labelme/include/python3.10
 -c src/checkdep_freetype2.c -o build/temp.linux-x86_64-cpython-
310/src/checkdep_freetype2.o
      src/checkdep_freetype2.c:3:6: error: #error "FreeType version 2.3 or higher 
is required. You may set the MPLLOCALFREETYPE environment variable to 1 to let 
Matplotlib download it."
           #error "FreeType version 2.3 or higher is required. \

            ^~~~~
      src/checkdep_freetype2.c:10:10: error: #include expects "FILENAME" or 
<FILENAME>
       #include FT_FREETYPE_H
                ^~~~~~~~~~~~~
      src/checkdep_freetype2.c:15:9: note: #pragma message: Compiling with FreeType version FREETYPE_MAJOR.FREETYPE_MINOR.FREETYPE_PATCH.
       #pragma message("Compiling with FreeType version " \
               ^~~~~~~
      src/checkdep_freetype2.c:18:4: error: #error "FreeType version 2.3 or higher
 is required. You may set the MPLLOCALFREETYPE environment variable to 1 to let Matplotlib download it."
         #error "FreeType version 2.3 or higher is required. \
          ^~~~~
      error: command '/usr/bin/gcc' failed with exit code 1
      [end of output]
  
  note: This error originates from a subprocess, and is likely not a problem with 
pip.
error: legacy-install-failure

× Encountered error while trying to install package.
╰─> matplotlib

note: This is an issue with the package mentioned above, not pip.
hint: See above for output from the failure.

Relevant dependent libraries need to be installed:

sudo apt-get update
sudo apt-get install libfreetype6-dev
sudo apt-get install pkg-config
sudo apt-get install libpng12-dev
sudo apt-get install pkg-config

Error 2 encountered:

labelme
[INFO   ] __init__:get_config:70 - Loading config file from: /home/XXX/.labelmerc
Traceback (most recent call last):
  File "/home/XXX/fxp/envs/labelme/lib/python3.10/site-packages/labelme/widgets/canvas.py", line 618, in paintEvent
    p.translate(self.offsetToCenter())
  File "/home/XXX/fxp/envs/labelme/lib/python3.10/site-packages/labelme/widgets/canvas.py", line 659, in offsetToCenter
    return QtCore.QPoint(x, y)
TypeError: arguments did not match any overloaded call:
  QPoint(): too many arguments
  QPoint(int, int): argument 1 has unexpected type 'float'
  QPoint(QPoint): argument 1 has unexpected type 'float'
Aborted (core dumped)

Reference link: https://github.com/wkentaro/labelme/issues/1006

I guess the python version is too high, so I recreated the virtual environment with pyhton = 3.9

conda create --prefix=/home/fxp/envs/labelme python=3.9 -y

The final installation is successful;