Category Archives: How to Fix

Bcdboot command line parameter options

BCDBoot Command-Line Options
BCDBoot is a command-line tool used to configure the boot files on a PC or device to run the Windows operating system. You can use the tool in the following scenarios:
Add boot files to a PC after applying a new Windows image.  In a typical image-based Windows deployment, use BCDBoot to set up the firmware and system partition to boot to your image. To learn more, see Capture and Apply Windows, System, and Recovery Partitions. Set up the PC to boot to a virtual hard disk (VHD) file that includes a Windows image.  To learn more, see Boot to VHD (Native Boot): Add a Virtual Hard Disk to the Boot Menu. Repair the system partition.  If the system partition has been corrupted, you can use BCDBoot to recreate the system partition files by using new copies of these files from the Windows partition. Set up or repair the boot menu on a dual-boot PC.  If you’ve installed more than one copy of Windows on a PC, you can use BCDBoot to add or repair the boot menu. File Locations

In Windows and Windows Preinstallation Environment (WinPE) %WINDIR%\System32\BCDBoot.exe
In the Windows Assessment and Deployment Kit (Windows ADK): C:\Program Files (x86)\Windows Kits\10\Assessment and Deployment Kit\Deployment Tools\amd64\BCDBoot\BCDBoot.exe

Supported operating systems BCDBoot can copy boot environment files from images of Windows 10, Windows 8.1, Windows 8, Windows 7, Windows Vista, Windows Server 2016 Technical Preview, Windows Server 2012 R2, Windows Server 2012, Windows Server 2008 R2, or Windows Server 2008. How It Works To configure the system partition, BCDBoot copies a small set of boot-environment files from the installed Windows image to the system partition. BCDBoot can create a Boot Configuration Data (BCD) store on the system partition using the latest version of the Windows files:
BCDBoot creates a new BCD store and initialize the BCD boot-environment files on the system partition, including the Windows Boot Manager, using the %WINDIR%\System32\Config\BCD-Template file. New in Windows 10: During an upgrade, BCDBoot preserves any other existing boot entries, such as debugsettings, when creating the new store. Use the /c option to ignore the old settings and start fresh with a new BCD store. If there is already a boot entry for this Windows partition, by default, BCDBoot erases the old boot entry and its values. Use the /m option to retain the values from an existing boot entry when you update the system files. By default, BCDBoot moves the boot entry for the selected Windows partition to the top of the Windows Boot Manager boot order. Use the /d option to preserve the existing boot order. On UEFI PCs, BCDBoot can update the firmware entries in the device’s NVRAM:
BCDBoot adds a firmware entry in the NVRAM to point to the Windows Boot Manager. By default, this entry is placed as the first item in the boot list. Use the /p option to preserve the existing UEFI boot order. Use /addlast to add it to the bottom of the boot order list. Command-Line Options The following command-line options are available for BCDBoot.exe. BCDBOOT <source> [/l <locale>] [/s <volume-letter> [/f <firmware type>]] [/v] [/m [{OS Loader GUID}]] [/addlast or /p] [/d] [/c]

Option Description
<source> Required. Specifies the location of the Windows directory to use as the source for copying boot-environment files. The following example initializes the system partition by using BCD files from the C:\Windows folder: Copy

bcdboot C:\Windows
/l <locale> Optional. Specifies the locale. The default is US English (en-us). The following example sets the default BCD locale to Japanese: Copy

bcdboot C:\Windows /l ja-jp
/s <volume letter> Optional. Specifies the volume letter of the system partition. This option should not be used in typical deployment scenarios. Use this setting to specify a system partition when you are configuring a drive that will be booted on another computer, such as a USB flash drive or a secondary hard drive. UEFI:
BCDBoot copies the boot files to either the EFI system partition, or the partition specified by the /s option. BCDBoot creates the BCD store in the same partition. By default, BCDBoot creates a Windows Boot Manager entry in the NVRAM on the firmware to identify the boot files on the system partition. If the /s option is used, then this entry is not created. Instead, BCDBoot relies on the default firmware settings to identify the boot files on the system partition. By the UEFI 2.3.1 spec, the default firmware settings should open the file: \efi\boot\bootx64. efi in the EFI System Partition (ESP). BIOS:

    BCDBoot copies the boot files to either the active partition on the primary hard drive, or the partition specified by the /s option. BCDBoot creates the BCD store in the same partition.

The following example copies BCD files from the C:\Windows folder to a system partition on a secondary hard drive that will be booted on another computer. The system partition on the secondary drive was assigned the volume letter S: Copy

bcdboot C:\Windows /s S:

The following example creates boot entries on a USB flash drive with the volume letter S, including boot files to support either a UEFI-based or a BIOS-based computer: Copy

bcdboot C:\Windows /s S: /f ALL
/f <firmware type> Optional. Specifies the firmware type. Valid values include UEFIBIOS, and ALL.
On BIOS/MBR-based systems, the default value is BIOS. This option creates the \Boot directory on the system partition and copies all required boot-environment files to this directory. On UEFI/GPT-based systems, the default value is UEFI. This option creates the \Efi\Microsoft\Boot directory and copies all required boot-environment files to this directory. When you specify the ALL value, BCDBoot creates both the \Boot and the \Efi\Microsoft\Boot directories, and copies all required boot-environment files for BIOS and UEFI to these directories. If you specify the /f option, you must also specify the /s option to identify the volume letter of the system partition. The following example copies BCD files that support booting on either a UEFI-based or a BIOS-based computer from the C:\Windows folder to a USB flash drive that was assigned the volume letter S: Copy

bcdboot C:\Windows /s S: /f ALL 
/v Optional. Enables verbose mode. Example: Copy

bcdboot C:\Windows /v
/m [{OS Loader GUID}] Optional. Merges the values from an existing boot entry into a new boot entry. By default, this option merges only global objects. If you specify an OS Loader GUID, this option merges the loader object in the system template to produce a bootable entry. The following example merges the operating-system loader in the current BCD store that the specified GUID identifies in the new BCD store: Copy

bcdboot c:\Windows /m {xxxxxxxx-xxxx-xxxx-xxxx-xxxxxxxxxxxx}
/addlast Optional. Specifies that the Windows Boot Manager firmware entry should be added last. The default behavior is to add it first. Cannot be used with /p. Copy

bcdboot C:\Windows /addlast
/p Optional. Specifies that the existing Windows Boot Manager firmware entry position should be preserved in the UEFI boot order. If entry does not exist, a new entry is added in the first position. Cannot be used with /addlast. By default, during an upgrade BCDBoot moves the Windows Boot Manager to be the first entry in the UEFI boot order. Copy

bcdboot C:\Windows /p
bcdboot C:\Windows /p /d
/d Optional. Preserves the existing default operating system entry in the {bootmgr} object in Windows Boot Manager. Copy

bcdboot C:\Windows /d
/c Optional. Specifies that any existing BCD elements should not be migrated. New for Windows 10: By default, during an upgrade, BCD elements such as debugsettings or flightsigning are preserved. Copy

bcdboot C:\Windows /c

Repair the system partition If the system partition has been corrupted, you can use BCDBoot to recreate the system partition files by using new copies of these files from the Windows partition.

    Boot your PC to a command line. For example, boot to the Windows installation disk and press Shift+F10, or boot to Windows PE (WinPE: Create USB Bootable drive). Use Diskpart to determine which drive letter contains your Windows partition and system partition (diskpart, list vol, exit). Optional: Format your system partition: format (drive letter of your system partition) /q Add a boot entry for your Windows partition: bcdboot D:\Windows Reboot the PC. Windows should appear.

Set up or repair the boot menu on a dual-boot PC When setting up a PC to boot more than one operating system, you may sometimes lose the ability to boot into one of the operating systems. The BCDBoot option allows you to quickly add boot options for a Windows-based operating system. To set up a dual-boot PC:

    Install a separate hard drive or prepare a separate partition for each operating system. Install the operating systems. For example, if your PC has Windows 7, install Windows 10 onto the other hard drive or partition. Reboot the PC. The boot menus should appear with both operating systems listed. If both operating systems aren’t listed:

      Open a command line, either as an administrator from inside Windows, or by booting to a command line using the Windows installation media and pressing Shift+F10, or by booting to Windows PE (WinPE: Create USB Bootable drive). Add boot options for a Windows operating system. Copy

      bcdboot D:\Windows
      

      Reboot the PC. Now, the boot menu will show both menu options.

Troubleshooting For information about repairing the boot files on a PC with Windows XP and a more recent version of Windows such as Windows 7, see the Microsoft Knowledge Base Article 2277998. Related topics Capture and Apply Windows, System, and Recovery Partitions Configure BIOS/MBR-Based Hard Drive Partitions Configure UEFI/GPT-Based Hard Drive Partitions BCDedit Bootsect Command-Line Options Diskpart Command line syntax

How do you set, clear and toggle a single bit in C?

North Pole: http://stackoverflow.com/questions/47981/how-do-you-set-clear-and-toggle-a-single-bit-in-c
All kinds of answers. Haha… To learn!  
= = = = = = = = = = = = = = = = = = = = = = = = = = = = = = = = = = = = = = = = = = = = = = = = = = = = = = = = = = = = = = = = = = = = = = = = = = = = = = = = = = = = = = = = = = = = = = = = = = = = = = = = = = = = = = = = = = = = = = = = = = = = = = =

Setting a bit
Use the bitwise OR operator (|) to set a bit.

 number |= 1 << x;

That will set bit x.
Clearing a bit
Use the bitwise AND operator (&) to clear a bit.

 number &= ~(1 << x);

That will clear bit x. You must invert the bit string with the bitwise NOT operator (~), then AND it.
Toggling a bit
The XOR operator (^) can be used to toggle a bit.

 number ^= 1 << x;

That will toggle bit x.
Checking a bit
You didn’t ask for this but I might as well add it.
To check a bit, AND it with the bit you want to check:

 bit = number & (1 << x);

That will put the value of bit x into the variable bit.
===============================================================================================================================

Nobody mentioned the STL: std::bitset<N>.
Or the boost version: boost::dynamic_bitset.
No need to roll your own:

#include <bitset>
#include <iostream>

int main()
{
    std::bitset<5> x;

    x[1] = 1;
    x[2] = 0;
    // Note x[0-4]  valid

    std::cout << x << std::endl;
}

[Alpha:] > ./a.out
00010

Boost version allows a runtime sized bitset compared with STL compile time sized bitset.
===============================================================================================================================

The other option is to use bit fields:

struct bits {
    unsigned int a:1;
    unsigned int b:1;
    unsigned int c:1;
};

struct bits mybits;

defines a 3-bit field (actually, it’s three 1-bit felds). Bit operations now become a bit (haha) simpler:
To set or clear a bit:

mybits.b = 1;
mybits.c = 0;

To toggle a bit:

mybits.a = !mybits.a;
mybits.b = ~mybits.b;
mybits.c ^= 1;  /* all work */

Checking a bit:

if (mybits.c)

This only works with bits in fixed positions. Otherwise you have to resort to the bit-twiddling techniques described in previous posts.
===============================================================================================================================

It is sometimes worth using an enum to name the bits:

enum ThingFlags = {
  ThingMask  = 0x0000,
  ThingFlag0 = 1 << 0,
  ThingFlag1 = 1 << 1,
  ThingError = 1 << 8,
}

Then use the names later on. I.e. write

thingstate |= ThingFlag1;
thingstate &= ~ThingFlag0;
if (thing | ThingError) {...}

to set, clear and test. This way you hide the magic numbers from the rest of your code.
Other than that I endorse Jeremy’s solution.
===============================================================================================================================

I use macros defined in a header file to handle bit set and clear:

/* a=target variable, b=bit number to act upon 0-n */
#define BIT_SET(a,b) ((a) |= (1<<(b)))
#define BIT_CLEAR(a,b) ((a) &= ~(1<<(b)))
#define BIT_FLIP(a,b) ((a) ^= (1<<(b)))
#define BIT_CHECK(a,b) ((a) & (1<<(b)))

/* x=target variable, y=mask */
#define BITMASK_SET(x,y) ((x) |= (y))
#define BITMASK_CLEAR(x,y) ((x) &= (~(y)))
#define BITMASK_FLIP(x,y) ((x) ^= (y))
#define BITMASK_CHECK(x,y) ((x) & (y))

===============================================================================================================================

From snip-c. zip’s bitops.how:

/*
**  Bit set, clear, and test operations
**
**  public domain snippet by Bob Stout
*/

typedef enum {ERROR = -1, FALSE, TRUE} LOGICAL;

#define BOOL(x) (!(!(x)))

#define BitSet(arg,posn) ((arg) | (1L << (posn)))
#define BitClr(arg,posn) ((arg) & ~(1L << (posn)))
#define BitTst(arg,posn) BOOL((arg) & (1L << (posn)))
#define BitFlp(arg,posn) ((arg) ^ (1L << (posn)))

OK, let’s analyze things…
The common expression in all of these that you seem to be having problems with is “(1L << (posn))”. All this does is create a mask with a single bit on and which will work with any integer type. The “posn” argument specifies the position where you want the bit. If posn==0, then this expression will evaluate to:

    0000 0000 0000 0000 0000 0000 0000 0001 binary.

If posn==8, it will evaluate to

    0000 0000 0000 0000 0000 0001 0000 0000 binary.

In other words, it simply creates a field of 0’s with a 1 at the specified position. The only tricky part is in the BitClr() macro where we need to set a single 0 bit in a field of 1’s. This is accomplished by using the 1’s complement of the same expression as denoted by the tilde (~) operator.
Once the mask is created it’s applied to the argument just as you suggest, by use of the bitwise and (&), or (|), and xor (^) operators. Since the mask is of type long, the macros will work just as well on char’s, short’s, int’s, or long’s.
The bottom line is that this is a general solution to an entire class of problems. It is, of course, possible and even appropriate to rewrite the equivalent of any of these macros with explicit mask values every time you need one, but why do it?Remember, the macro substitution occurs in the preprocessor and so the generated code will reflect the fact that the values are considered constant by the compiler – i.e. it’s just as efficient to use the generalized macros as to “reinvent the wheel” every time you need to do bit manipulation.
Unconvinced?Here’s some test code – I used Watcom C with full optimization and without using _cdecl so the resulting disassembly would be as clean as possible:
—-[ TEST.C ]—————————————————————-

#define BOOL(x) (!(!(x)))

#define BitSet(arg,posn) ((arg) | (1L << (posn)))
#define BitClr(arg,posn) ((arg) & ~(1L << (posn)))
#define BitTst(arg,posn) BOOL((arg) & (1L << (posn)))
#define BitFlp(arg,posn) ((arg) ^ (1L << (posn)))

int bitmanip(int word)
{
      word = BitSet(word, 2);
      word = BitSet(word, 7);
      word = BitClr(word, 3);
      word = BitFlp(word, 9);
      return word;
}

—-[ TEST. OUT (disassembled) ]———————————————–
Module: C:\BINK\tst.c Group: ‘DGROUP’ CONST,CONST2,_DATA,_BSS
Segment: TEXT BYTE 00000008 bytes
0000 0c 84 bitmanip or al,84H 0002 80 f4 02 xor ah,02H 0005 24 f7 and al,0f7H 0007 c3 ret
No disassembly errors
—-[ finis ]—————————————————————–

===============================================================================================================================
===============================================================================================================================

Installing gensim in Anaconda

Environment: Win10
1. Uninstall Python (skip this step if Python is not installed), and Anaconda contains Python.
Method 1: If you have an installation package, re-open the Python installation package (the version must be the same as the python version on your computer), select Uninstall and wait for the Uninstall to complete.

Method two: right click start, select program and function, select the software to be uninstalled, right click uninstall.

2. Install Anaconda
The official download address: https://www.anaconda.com/download/
Download the installer that matches your machine environment and double-click to run it. Select the installation directory:

The first item is setting the environment variable. It is not recommended to set the environment variable. This item is not a necessary operation. Check the second option:

Select Install and click Finish to complete the installation. Open the Anaconda Prompt, enter the command Conda List, and the following screen will appear to indicate the successful installation.


3. Install Gensim
Reference: https://www.2cto.com/kf/201705/635868.html
Go to the directory Anaconda3 and enter the command PIP Install Gensim to complete the installation.

Verify the installation is successful:


Resolve Tree Conflict SVN

Resolve Tree Conflict SVN (local unversioned, incoming add upon update)

This is something I come across surprisingly often. When rolling out a new site, we try to never remove the logs directory seeing things like apache will have the log files open. We rollout using svn, which tends to leave us in a bit of a messed up state, if you see something like the following with your repo, this advice is for you!


svn status

D     C logs

      
>   
local unversioned, incoming add upon update

Summary of conflicts:

  Tree conflicts: 1

The solution that I’ve found works best is:


svn resolve 
–accept working logs

Resolved conflicted state of 
‘logs’


svn revert logs

Reverted 
‘logs’


svn status

$

Latex row overflow problem overfull / hbox (1.1499pt too wide) in paragraph

Reference: http://en.wikibooks.org/wiki/LaTeX/Errors_and_Warnings#Overfull_hbox

Problem source: When writing latex source files, Overfull \hbox (1.1499 PT too wide) in paragraph often appears. When viewing the compiled PDF, we find that the line exceeds the boundary, so we need to solve it.

Solution: Find the corresponding prompt line, then cut off the last few words arbitrarily, then start another line.
Eg; I’m very powerful in computer.
Change to: I’m very happy
Powerful in computer.
Justification problem: Moving the last word on the line to the next line would make the Spaces in the line wider than the current limit.)

Unable to call numpy in pychar, module notfounderror: no module named ‘numpy’

Python was installed before, and then Anaconda was installed because I was practicing using Python to write scientific calculations. However, after installing Anaconda, another problem occurred. When I wrote Python commands to call numpy on the command line, it could be used normally, but the call in PyCharm would report No module named ‘numpy’, that is, numpy could not be found, as shown below.
Numpy can be used normally on the command line:

However, numpy cannot be used properly in PyCharm:

This problem occurs because the interpreter that Pycharm USES is not the installed Python 3.6, but comes with the Python.exe interpreter, and there are only two modules PIP and SetupTools, so that many third-party libraries cannot be used in Pycharm. Only the Settings on PyCharm (File-> settings-> Project: Current project name -& GT; Set Interpreter in the Project Interpreter. Set it to Anaconda, as shown in the figure below.


Then the program will run normally

The experimental procedure for this example is as follows

from numpy import *
import operator

a = random.rand(4,4)
print(a)

Usage and examples of three important functions of tidyr package in R language: gather, spread and separate

Tidyr is a very useful and frequently used package that Hadley (Hadley Wickham, author of Tidy Data) has written about, often in combination with the Dplyr package (which he also wrote)
Preparation:
Install the Tidyr package first (make sure you put quotes around it or you’ll get an error)

install.packages("tidyr")

Load Tidyr (no quotes allowed)

library(tidyr)

gather()
The Gather function is similar to the PivotTable function in Excel (from 2016), which converts a two-dimensional table with variable names into a canonical two-dimensional table (similar to relational tables in databases, see examples).
We first & gt; ?Gather, read the official documentation:
Gather {tidyr} R Documentation
gather columns into key-value pairs.
Description
Gather takes multiple columns and collapses into key-value pairs, duplicating all other columns as needed. You use gather() when you notice that you have columns that are not variables.
Usage
gather(data, key = “key”, value = “value”, … Na.rm = FALSE,
convert = FALSE, factor_key = FALSE)
Arguments

A data frame.
key, value
Names of new key and value columns, as strings or symbols.
This argument is passed by expression and supports quasiquotation (you can unquote strings and symbols). The name is captured from the expression with rlang::ensym() (note that this kind of interface where symbols do not represent actual objects is now discouraged in the tidyverse; we support it here for backward compatibility).

A selection of columns. If empty, all variables are selected. You can supply bare variable names, select all variables between x and z with x:z, exclude y with -y. See the dplyr::select() documentation. See also the section on selection rules below.
na.rm
If TRUE,
convert
If TRUE will automatically run type. Convert () on the key column. This is useful If the column types are actually numeric, Integer, or logical.
factor_key
If FALSE, the default, the key values will be stored as a character vector. If TRUE, will be stored as a factor, which preserves the original ordering of the columns.
Description:
The first parameter is the original data, the data type is a data box;
Let’s pass a key-value pair named by ourselves. These two values are the table headers of the newly converted two-dimensional table, namely two variable names.
The fourth is to select the column to be transposed, if this parameter is not written, the default is all transposed;
The optional parameter na.rm can be added later. If na.rm = TRUE, the missing value (NA) from the original table will be removed from the new table.
Gather (), for example
First, construct a data box stU:

stu<-data.frame(grade=c("A","B","C","D","E"), female=c(5, 4, 1, 2, 3), male=c(1, 2, 3, 4, 5))

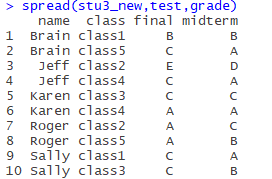
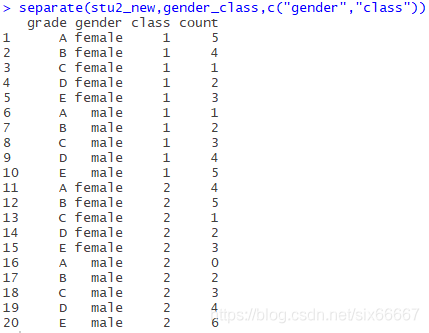
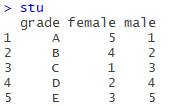
is a data box that doesn’t mean anything, but what you would expect, is the distribution of scores by sex.
Variables of the female and male is said above is contained in the variable name variable, female and male should be “gender” the variable values of the variables, the number of the following variable names (or attribute name) should be the “number”, we need to keep the original grade a list below, get rid of the female and male two columns, increase sex and count two columns, values with the original table corresponding to the up respectively, using the gather function:

gather(stu, gender, count,-grade)

The first parameter is the original data STU, the second and third parameters are key-value pairs (gender, number of people), and the fourth parameter is subtracting (remove the grade column, only the remaining two columns are transposed).

If you look at the two columns in the original table, they correspond like this:
(female, 5), (female, 4), (female, 1), (female, 2), (female, 3)
(male, 1), (male, 2), (male, 3), (male, 4), (male, 5),
The original variable name (attribute name) is used as the key and the variable value as the value.
Now we can continue with the normal statistical analysis.
separate()
Separate the data in a variable that contains two variables. (The name of an attribute “Gather” is a variable.)
Separate (), for example
Construct a new data box Stu2:

stu2<-data.frame(grade=c("A","B","C","D","E"), 
                 female_1=c(5, 4, 1, 2, 3), male_1=c(1, 2, 3, 4, 5),
                 female_2=c(4, 5, 1, 2, 3), male_2=c(0, 2, 3, 4, 6))

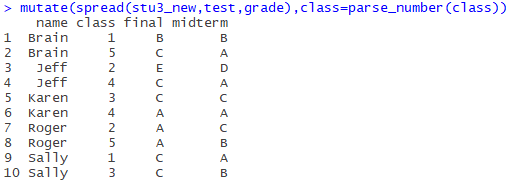
is similar to stU above, with 1 and 2 after sex denoting classes
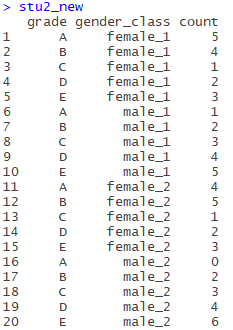
So let’s just use the Gather function and transpose:

stu2_new<-gather(stu2,gender_class,count,-grade)

No, just like above, the result is as follows:

While this table is still not a standard two-dimensional table, we have found a column (gender_class) with values containing multiple attributes (variables), separated by separate(), which is used as follows:
Separate (Data, Col, into, SEP (= regular expression), remove =TRUE,convert = FALSE, extra = “warn”, Fill = “warn”…)
The first parameter puts the data box to be separated;
The second argument puts the column to be separated;
The third parameter is the column (which must be multiple) of the split variable, represented by a vector;
The fourth argument is a delimiter, denoted by a regular expression, or a number, denoted by which digit it is separated from (in the documentation:
If character, is interpreted as a regular expression. The default value is a regular expression that matches any sequence of non-alphanumeric values.
If numeric, interpreted as positions to split at. Positive values start at 1 at the far-left of the string; Negative value start at-1 at the far right of the string. The length of sep should be one less than into.)
The following parameters are not clear, you can see the documentation
Now all we need to do is separate the gender_class column:

separate(stu2_new,gender_class,c("gender","class"))

Note that the third parameter is a vector, denoted by c(), and the fourth parameter should be “_”, omitted here (may be underlined is the default separator?).
The results are as follows:

spread()
Spread is used to extend the table to separate the values of a column (key-value pairs) into multiple columns.
spread(data, key, value, fill = NA, convert = FALSE, drop =TRUE, sep = NULL)
Key is the name of the original column (variable name), and value is what the value of those columns should be (which column of the original table should be filled).
So let’s go straight to the example
The spread (), for example
Construct data box Stu3:

name<-rep(c("Sally","Jeff","Roger","Karen","Brain"),c(2,2,2,2,2))
test<-rep(c("midterm","final"),5)
class1<-c("A","C",NA,NA,NA,NA,NA,NA,"B","B")
class2<-c(NA,NA,"D","E","C","A",NA,NA,NA,NA)
class3<-c("B","C",NA,NA,NA,NA,"C","C",NA,NA)
class4<-c(NA,NA,"A","C",NA,NA,"A","A",NA,NA)
class5<-c(NA,NA,NA,NA,"B","A",NA,NA,"A","C")
stu3<-data.frame(name,test,class1,class2,class3,class4,class5)


There are 5 courses in total. Each student chooses 2 courses and lists the mid-term and final grades.
Obviously, the original table is dirty data, and the header contains the variable (class1-5), so use the Gather function first. Note that there are many missing values, so you can use the na.rm=TRUE parameter above to automatically remove records with missing values (a record is a row) :

If I didn’t write na.rm=TRUE, it would look like this:
(Incomplete)
It is meaningless to analyze the “NA” score of students who have not selected courses, so records with missing values should be discarded in this case.
Now this table looks very neat, but everyone has four records, in which the values of test and grade are different for each course, the names and courses are the same, and most of the time, we need to carry out statistical analysis on mid-term and final scores respectively, so this table is not conducive to classification statistics.
The test is midterm and final with the spread function, and the values of these two columns are the results of the two courses I chose.
Again, the second argument is the column name of the column to be split, and the third argument is the column name of which column the value of the expanded column should come from in the original table.

stu3_new<-gather(stu3, class, grade, class1:class5, na.rm = TRUE)
spread(stu3_new,test,grade)

The results are as follows:

Now that you have a very neat table with only 10 pieces of data, it’s much easier to process.
Finally, the class column is now a little redundant, and it’s a little more neat to just put Numbers in, use the parse_number() in the readr package to pull out the number(with the addition of dplyr’s mutate function), and let out the code:

install.packages("dplyr")
install.packages("readr")
library(readr)
library(dplyr)
mutate(spread(stu3_new,test,grade),class=parse_number(class))

Final results:

Isn’t neat very good-looking!! (* ╹ del ╹ *)

Unity Cursor Lock& Camera Lock

Functional requirements:
When the menu pops up, the camera is locked and the mouse is displayed; when the menu is closed, the mouse is hidden;
Video tutorial (over the wall required) :
https://www.youtube.com/watch?v=nMgk72JSxz8& list=PLPV2KyIb3jR5PhGqsO7G4PsbEC_Al-kPZ& index=27
The code is as follows:
using UnityStandardAssets.Characters.FirstPerson; // The header file needs to be added camera first person
If (Input. GetKeyDown (KeyCode. B))
{
PauseMenu. SetActive (! PauseMenu.activeSelf);
}// press B to switch the backpack
If (pausemenu.activeself)
{
cursor.visible = true;
if (cursorlockstate == CursorLockMode.Locked)
{
curb.lockstate = CursorLockMode.None; .
}
aaaa GetComponent< RigidbodyFirstPersonController> ().mouseLook.XSensitivity = 0;
aaaa. GetComponent< RigidbodyFirstPersonController> ().mouseLook.YSensitivity = 0;
}// when the backpack is opened, the mouse will display, do not lock, the camera will lock; RigidbodyFirstPersonController script component is the camera,
The motion of the camera can be controlled by controlling XSensitivity and YSensitivity
If (! Pausemenu.activeself)
{
cursor.visible = false;
Cursor. LockState = CursorLockMode. Locked;
aaaa. GetComponent< RigidbodyFirstPersonController> ().mouseLook.XSensitivity = 2;
aaaa. GetComponent< RigidbodyFirstPersonController> ().mouseLook.YSensitivity = 2;
}// when the backpack is closed, the mouse does not show, lock, camera unlock

Atom live server plug-in installation

Github search plugin

copy plugin address:
The default directory is: C:\Users\14041\.atom\packages
Win +R — CMD goes to the command line.
Enter CD C:\Users\14041\.atom\packages enter the installation directory.
Enter git clone https://github.com/jas-chen/atom-server.git (where the first step of the plugin is copied), return to the car, and start to download.
once downloaded, the packages directory contains an additional atom-lie-server folder:
3. The first installation requires node. js environment configuration
. Download the official website address: node. js
.
4, install
into the directory of plug-ins: CD C:\Users\14041\ atom\packages\atom-live-server
enter: NPM install

Successful installation. Atom shows