Category Archives: How to Fix

[solution] how to uninstall Autodesk genuine service

The article directories
1. Problem description 2. Solution

1. Problem description
I’ve got a Maya2019 on Autodesk and now I want to uninstall it.
explains that this thing monitors your computer for unauthorized software?

2. Solutions
Run Autodesk Genuine Service.msi in the user’s application data directory and execute the uninstall option.
as mine in C:\Users\coco\AppData\Local\ \ the attached \{4ef20179-de98-4027-bbc4-9cea22b24bad}

Idle line number setting and linenumbers modification

1. The most important idea came from the boss, but he made a mistake with one of the images. The Settings should have been modified in the config-Extensions.def but his image was changed to config-keys.def.
2.LineNumbers. Py file is downloaded from Baidu Experience
This is a dividing line between the two.
One, we can’t just use Daniel’s stuff, probably because they’re using a different version of Python than ours. I used the 3.7 version of Python. There was no Confighandler. py in lib, only config. py.
If you’re using version 3.7, you can just copy the following code instead of the first few lines of Linenumbers.py

from idlelib.config import idleConf
from idlelib.delegator import Delegator
from idlelib.percolator import Percolator

First, make sure LinEnumbers.py works
Generally there will be errors, basically can not find “model”,
the main reason is the case or file name problem, you can go to a similar file to see how the file is named, modify it can be solved.
4. Configure the Idle plug-in

File path\to\your\python\ idlelib\config-extensions.def
# add to bottom
[LineNumbers]
enable=True
enable=True
enable_shell=True
enable_editor=True
visible=True
[LineNumbers_cfgBindings]
linenumbers-show=< Control-Key-space>

Five, the fly in the ointment is that the border is white, and can not be changed with the background
You know the line number so that you can quickly locate the code,
, but in addition to adding the line number, you can also use the Alt+g shortcut to quickly reach the specified line.
also indicates the row and column where the cursor is located in the bottom right corner of the idle editor interface.
so, after a lot of hard work, there’s a better way to solve the problem of locating code quickly.

Mac python install PIL

1. sudo pip install PIL
But something goes wrong, it says No request or something,
Then I learned that the Pillow would be installed directly
2. sudo pip install Pillow
And then I’m going to look at terminal and I’m going to install whatever I need, right

How to Configure DHCP for Multiple VLANs?

Almost every device connected to the Internet needs an IP address. Previously, the countless IP addresses are assigned manually, which costs a lot of time and energy. As DHCP emerges, IT specialists are not required any longer to spend countless hours providing IPs for every device connected to the network device. But what is DHCP?How does it work and how to configure DHCP for multiple VLANs?
What Is DHCP?
DHCP – Dynamic Host Configuration Protocol is a network management protocol used on TCP/IP network. There may be at least a DHCP server and many DHCP clients. The DHCP server allows the client to request the IP addresses and other network configurations from the Internet service provider. This process eliminates the need for administrators or users to assign IP address to network devices one by one. Using this protocol, the network administrators will just set up the DHCP server with all the additional network information, and it will do its work dynamically. Both network switch and router can be configured as a DHCP server.
How Does the DHCP Process Look Like?
For the DHCP client that hasn’t accessed the Internet before, it will undergo 4 phases to connect the DHCP server.

Fig 1. DHCP process
1.Discover
DHCP client after being activated will first send a broadcast message to try to look for DHCP servers. In this way, the client request IP address from the DHCP server.
2.Offer
When the DHCP server gets the message from the client, it looks in its pool to find an IP address it can lease out to the client. It then adds the MAC address information of the client and the IP address it will lease out to the ARP table. When this is done, the server sends this information to the client as a DHCPOFFER message.
3.Selection
DHCP client chooses IP address. There may be several DHCP servers sending DHCP-Offer packet, the client only receives the first DHCP-Offer then sends back DHCP-Request packet in broadcast mode to all DHCP servers to request more information on the IP address lease time and verification. The packet includes the contents of the IP address requested from the selected DHCP server.
4.Acknowledge
When the DHCP server receives a DHCP-Request packet from the DHCP client, it confirms the lease and creates a new ARP mapping with the IP address it assigned to the client and the client’s MAC address. And then send this message as a unicast to the client as a DHCPACK.
How to Configure DHCP for Multiple VLANs?
The theory cannot be well digested unless it is combined with the practice. In this section, how to configure DHCP for multiple VLANs is introduced for your reference. Take the following picture as an example.

Fig 2. DHCP Configuration for Multiple VLANs
PC1 and PC2 are connected to access port of VLAN switch 1 with VLAN ID 100 and 200.
The DHCP server was supposed to serve both the VLANs.
Command to enable multiple VLANs.

Command to enable DHCP.

Add both subnets.

Run DHCP server.

Now make PC1 and PC2 as DHCP client. Both should be able to get IP address from DHCP server in their respective VLAN.
Conclusion
How to configure DHCP for multiple VLANs?This issue has been illustrated in the above content. DHCP configuration is worthy of being learned by those who are engaged in fiber optic communication field. You just need to know “How”, and let FS provide you with the best network devices. Ethernet switch like gigabit Ethernet switch and 10gbe switch, and routers are available in FS.

Beatifulsoup MAC installation solution Python 3

Methods a

    first from package website to download the latest version of the package of http://Index/software/BeautifulSoup bs4/download and then you will get a package named beautifulsoup4-4.6.0. Tar. Gz. Unzip to the desktop (for easy path entry) then open the terminal and start switching to the unzipped folder CD Desktopcd beautifulsoup4-4.4.1sudo python3./setup.py install

 
Method 2
The PIP is installed at the terminal first

sudo easy_install pip

Install bs4

pip install beautifulsoup4

This will cause an error and will be installed in python2.7 which is shipped with the system
 
The method of loading bs4 into Python3:

pip3 install beautifulsoup4

 
Interpreted by BeautifulSoup:

from bs4 import BeautifulSoup
soup = BeautifulSoup("<p>data<p>","html.parser")


Tensorflow installation and uninstall (Anaconda version)

TensorFlow Installation and Uninstallation (Anaconda version)
Anaconda can easily configure and set up the virtual environment. Generally, we can choose PIP Install or Conda Install to download and install the package. Here are the steps of Anaconda installation:
1, anaconda search-t conda tensorflow
looks for the available tensorflow source. After this command is run, the terminal will output all available sources

2, anaconda show name
. Here the name is the name of the tensorflow column of the output source in 1, and the show command will output the specific information of the source and download the required instructions at the terminal.

such as:

conda install --channel https://conda.anacoda.org/HCC tensorflow-gpu=1.6

1.6 Is the version number, which can be set according to its own requirements.
In addition, you can choose the available channel channel without so much trouble to search package name, and you can directly use the conda command:

Conda install tensorflow – gpu = 1.6

Conda automatically selects the available channels.

1, conda list/ PIP list view package installation information in the environment
2, PIP uninstall ‘name’, name is the name of the specified package
for example:

pip uninstall tensorflow-gpu=1.6

How to install IDM Extension in Chromium-based Microsoft Edge (Canary/Dev)

The most popular download application on Windows is Internet Download Manager, we’ve covered how to install it in Chrome, (from Web Store), in Edge (from Microsoft Store), today, we’re going to tell you how to install IDM extension in Chromium-based Microsoft Edge in dev or Canary version.
Today, Microsoft has finally released Insider Edge preview build and available as a separate download in canary and dev channel for Windows 10 (64-bit), while stable is far away, Microsoft Edge Insider beta version will be released soon,  same the case with Mac and Other Windows versions also.
FYI, Microsoft Edge Insider Add-ons store at the moment has very few extensions (118) and Internet Download Manager isn’t  among them, since Edge allows to install Chrome extensions from Web Store, we can now able to install IDM Chrome Web Store extension in new Edge browser in Canary or Dev or both if you’ve them installed.

Install IDM Integration Module in Chromium-based Microsoft Edge browser
1. Launch Microsoft Edge Canary/Dev
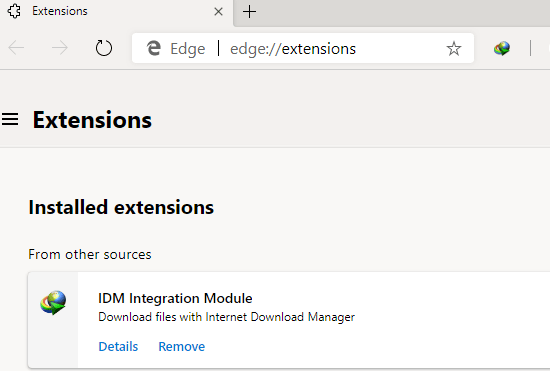
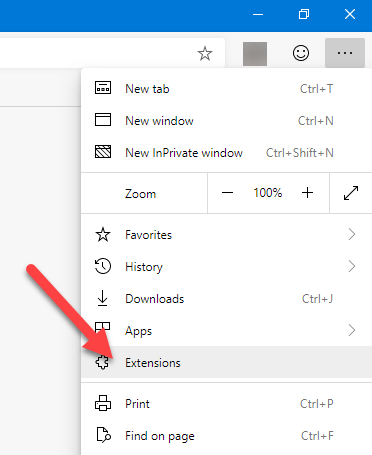
2. Click on the horizontal ellipsis (…) and select Extensions
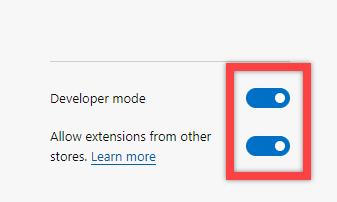
3. Turn on “Allow extensions from other sources”
4. Click “Allow”
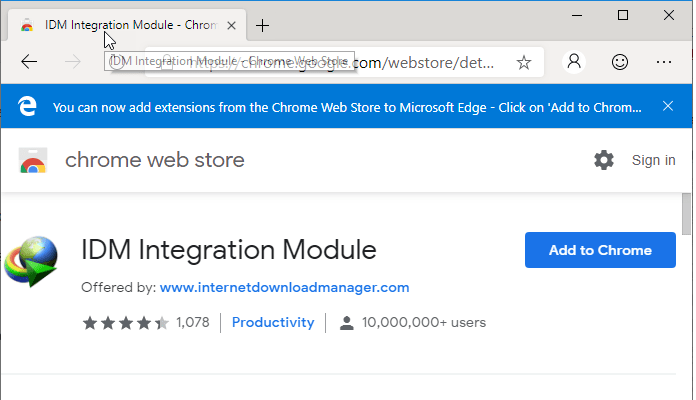
5. Visit Internet Download Manager extension page in Chrome Web Store
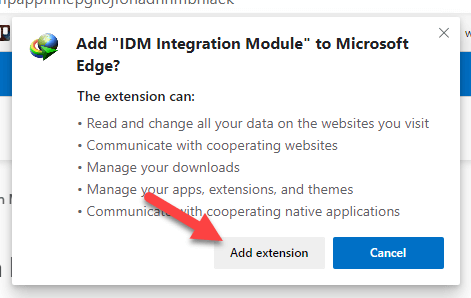
6. Click ‘Add to Chrome’, review permissions and click “Add Extension’

IDM will take over the download initiated by the user from built-in download manager in Edge browser.
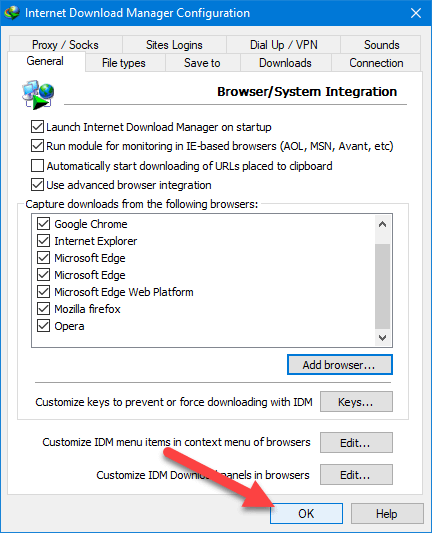
If you now visit IDM options > General, you can notice “Microsoft Edge Web Platform” added and checked, we request you to keep it enabled.
 
Filed Under: How to, Microsoft Edge, tips and tricksTagged With: IDM, IDM Integration Module, Internet Download Manager
How to Install IDM Extension in Edge Chromium Browser
https://windowsloop.com/install-idm-extension-in-edge-chromium/
Internet Download Manager is one of the most popular and awesome download accelerators for Windows. One of the best thing about IDM is that it supports almost all the major browsers to capture and accelerate downloads. Since the new Chromium Edge browser is still in development, there is no official IDM extension yet. However, you can still install IDM extension in Edge Chromium browser. Let me show you how.
Since the new Edge browser is built on Chromium, you can install Chrome extensions in it. As such, you can install IDM Chrome extension in the Edge Chromium browser and it works flawlessly. Until IDM devs release the official IDM extension for Edge Chromium browser, you can use the below hack to install IDM extension in the new Edge Chromium browser.
Install IDM Extension in Edge Chromium Browser
There are two ways to install IDM extension in the Chromium Edge browser. I will show the two methods. Both methods work the same. So, follow the one you are comfortable with.
Method #1: Download IDM Extension for Edge Chromium from Chrome Extension Store
The easiest way to install IDM extension in the new chromium edge browser is to download it from the Chrome web store. Now, if you go and search for the extension in the Chrome web store, you will not find it. Since IDM automatically installs the extension on all supported browsers, the developer chose to hide the extension in the Chrome store. To find the extension, you need to know the extension page URL.
1. First, you need to enable the necessary options to install Chrome extensions on Edge Chromium. To do that, click on the Menu icon and select “Extensions” option.

2. In the Extensions page, enable both “Developer Mode” and “Allow extensions from other stores” options appearing on the bottom left corner.

3. Next, go to the IDM extension page and click on the “Add to Chrome” button.

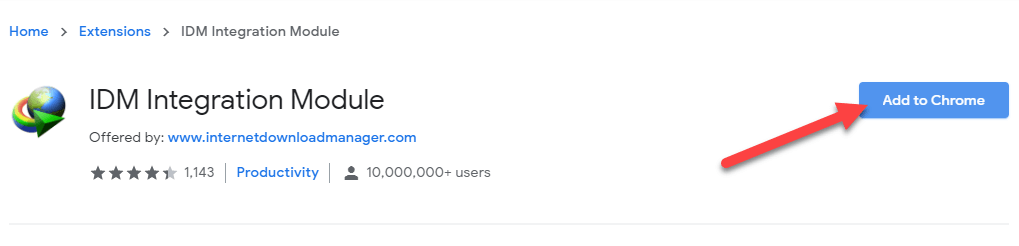
4. You will see an information prompt. Click on the “Add extension” button to install the extension.

That is all. You’ve installed the IDM extension in Edge Chromium. From now on, the IDM extension in Edge Chromium will work just like in the Chrome browser.

Method #2: Force IDM to Install Extension in Edge Browser
As an alternative, you can also force IDM to install the extension. To do that, you have to add the browser in IDM. Let me show you how.
1. First, open Internet Download Manager by clicking on the taskbar icon or by searching for it in the Start menu. In the application, click on the “Options” button.

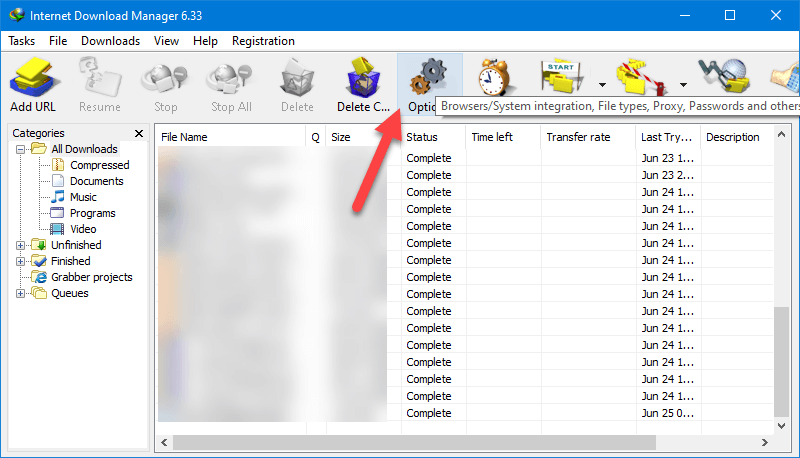
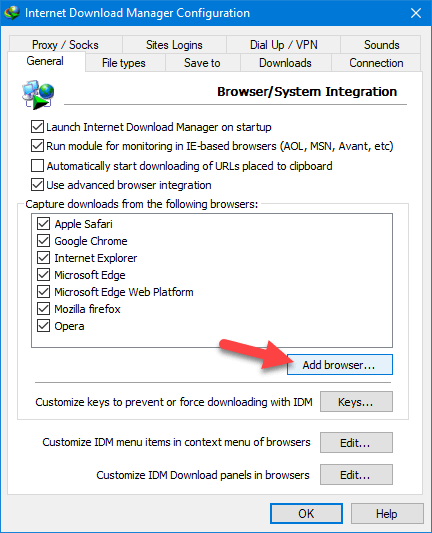
2. In the Options window, go to the “General” tab and click on the “Add Browser” button.

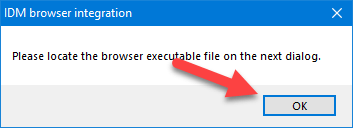
3. You will see an information window, click on the “Ok” button to continue.

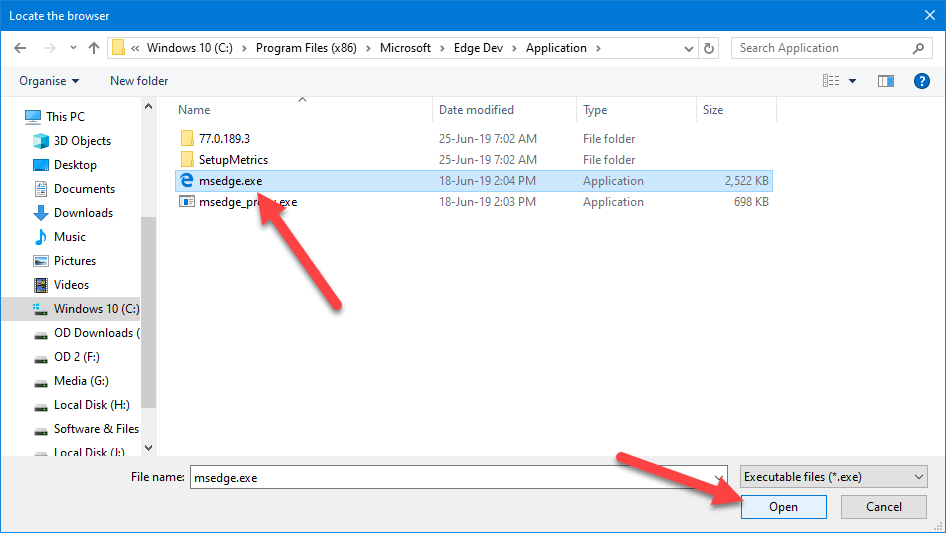
4. In the browse window, go to the following location, select “msedge. exe” file and click on the “Open” button.

C:\Program Files (x86)\Microsoft\Edge Dev\Application


5. In the main window, make sure all the browsers are selected and click on the “Ok” button to save the changes.

That is all. It is that simple to add IDM extension to Edge Chromium browser.

Comment below if you need any help in case of any problems.

How to use vimdiff to solve conflict?

Below is the sample procedure to use vimdiff for resolve merge conflicts. Based on this link
Step 1: Run following commands in your terminal

git config merge.tool vimdiff
git config merge.conflictstyle diff3
git config mergetool.prompt false

This will set vimdiff as the default merge tool.
Step 2: Run following command in terminal

git mergetool

Step 3: You will see a vimdiff display in following format

  +----------------------+
  |       |      |       |
  |LOCAL  |BASE  |REMOTE |
  |       |      |       |
  +----------------------+
  |      MERGED          |
  |                      |
  +----------------------+

These 4 views are

LOCAL – this is file from the current branch
BASE – common ancestor, how file looked before both changes
REMOTE – file you are merging into your branch
MERGED – merge result, this is what gets saved in the repo

You can navigate among these views using ctrl+w. You can directly reach MERGED view using ctrl+w followed by j.
More info about vimdiff navigation here and here
Step 4. You could edit the MERGED view the following way
If you want to get changes from REMOTE

:diffg RE  

If you want to get changes from BASE

:diffg BA  

If you want to get changes from LOCAL

:diffg LO 

Step 5. Save, Exit, Commit and Clean up
:wqa save and exit from vi
git commit -m "message"
git clean Remove extra files (e.g. *.orig) created by diff tool.

PIP install urlib2 failed

PIP Install Urllib2 prompts that the package cannot be found:

Note
The urllib2 module has been split across several modules inPython 3 named urllib.request and urllib.error.The 2to3 tool will automatically adapt imports when convertingyour sources to Python 3.

The urllib2 toolkit in Pyhton2 is split into urllib.request and urllib.error in Python3. This results in no package being found and no way to install.
So install urllib.request and install urllib.error are required, and then change the import urllib2 to import urllib.request and import urllib.error.
At the same time, the method function in the code also needs to be modified. Basically, urllib2.xxx is changed to urllib.request-xxx.
Official: https://docs.python.org/2/library/urllib2.html.

Breaking Baidu’s secret of making money by reading

Where there are people, there is money to be made, and the more people there are, the easier it is to make money.
The number of downloads of Baidu Reading APP in the mainstream application center is more than 50 million, including other platforms should have hundreds of millions of users, and backed by baidu tree.
Anyone can sell their ebook to hundreds of millions of users.
You’re still in the bonus stage, so think about how much money you can make.
As things stand, making $100,000 a year shouldn’t be a problem if the platform’s rules aren’t drastically changed and enforcement is in place.

As shown in the figure above, the content of the subsector can be sorted out, re-edited and categorized, and then uploaded to Baidu for reading. You can then wait for the payment.
We can cooperate with the use of we media explosive article collection software, only to collect high reading articles, so that the quality can also have some protection.
If your conscience and personality are more valuable, it is recommended that you keep the source of the article when editing, such as the author’s public address, blog url, etc.
With so many books, why would you buy your ebook?
You can ask this question for any project. If you can answer it, the project can be done.
Baidu reading project determines the income of the following several factors.
1. The title;
2. Cover drawing;
3. The directory;
4. Try to read chapters;
5. Quality of the whole book;
The title and the cover picture directly determine whether someone will click on your book, and the title party prevails for the same reason that people like to feel grandiose and exciting.
The table of contents and the content you read directly determine whether someone will pay you or not.
The whole book content determines the readers’ rating of this book. The higher the rating, the easier it will be to get baidu recommendation. Once it becomes hot style, it will gain fame and money.
Now that plagiarism is mentioned, let’s make a point.
Many e-books on the Internet are not copyrighted, and many of them are in PDF format. We can convert PDF directly into Word format to realize free editing.
Some PDF books are encrypted, and you can also use software to remove passwords.
Ways to be an author

1, first download baidu reading APP
download address :https://yd.baidu.com
qr code :

2. Find the exclusive original in the book interface and click to enter

3, after entering the exclusive original click on the application to become a certified author logo

4. Complete the remaining steps according to the prompts.

Error in lm.fit (x, y, offset = offset, singular.ok = singular.ok ,…): no (non Na) cases available

Maybe you didn’t report this mistake because of the same problem. I hope this blog can help those students who made the same mistake as me

When I was writing data analysis and R software job, I always reported the error of “no (non-NA) case available” when I was executing the following code. No matter how I looked at it, I always felt that my code was perfectly written. Why?Finally, it turned out that the data.exercise4.2.sav I had quoted was having a problem and the corresponding independent variable X2 in the data file had forgotten to enter the values!!

> library(foreign)
> x<-read.spss("data.exercise4.2.sav",to.data.frame=TRUE)
> lm.1<-lm(Y~X1+X2,data=x)
> summary(lm.1)

Solution: open the.SAV file in SPSS, and add the value of the independent variable X2.