When editing long code in eclipse, eclipse often gets stuck for a long time when using Ctrl.
the guess is that you can click and jump to the variable definition after holding down Ctrl in eclipse, so when you press Ctrl, eclipse will generate this mapping. When the file is large, this behavior will take a lot of time. You can set shortcut keys by the following methods.
Eclipse — Windows-> Preferences-> General-> Editors-> Text Editors-> Hyperlinking:
Remove this option: enable on demand hyperlinks style navigation
Using AspectJ to transfer the data written to FTP service to MySQL database
Recently, the company’s project has carried out the rectification of performance improvement. It was originally planned to use FTP to write the collected underlying data to the file, and the client will read the FTP file again, and then parse and display it according to the demand. In the actual application process, the display effect is not ideal due to the slow reading and parsing of the FTP file. Therefore, it is proposed that the data written to FTP should be parsed and stored in the database for the client Read the database directly, no need to read the file and parse, so as to improve the display effect and performance of this part.
After several options, in the light of minimal changes and smooth transition, the original part of FTP writing remains intact, and the client’s parsing display function is also retained. Using AspectJ, the method of writing FTP file (upload ()) is pointcut. Once FTP writes a file, the operation of writing database part is triggered. First, the parameters of upload () are obtained, and these parameters are parsed , stored in a global list, the SQL method will construct the insert statement through the global list, and finally addbatch will execute and submit. Considering that frequent connection to the database for insertion will seriously affect the performance, the insert operation is set as a scheduled task, and the corresponding insert will be constructed according to the global list every 60 seconds SQL, execute and submit transactions, so as to reduce the pressure of the database and clear the current list; in order to ensure data security, the insert and list clear operations are placed in a synchronized statement segment to prevent the list from being changed when constructing SQL. So far, the transfer of the original FTP data is completed.
Advantages: 1. Aspect programming, without affecting the original system architecture and business code, realizes the optimization of functions, and still maintains loose coupling;
2. Keep the original function and make a smooth transition;
Paste part of the code as follows (integrated development under the spring framework)
@Aspect
@Enable scheduling
@ enable aspect jautoproxy// enable aspect proxy
@ component()
public class dbsyncaop{
//Set upload (..) to pointcut and name it pointcustsignature ()
@Pointcut(“execution(* com.bjtct.oom . mms.service.FileManager .upload(..))”)
public void pointcustSignature(){}
//2. Set the loading priority of the uploadfileaspect method to high and load it first
@Around(“pointcustSignature()”)
@Order(value=1)
public Object uploadFileAspect(ProceedingJoinPoint pjp) throws Throwable{
//upload() execute before ,get upload() paramaters code here
List<String> fileNames = (List<String>) pjp.proceed ();
//upload() execute after ,handle upload() paramaters here,and store data in mysql code here
//handle upload() paramaters
List<Map<String, String>> fieldMapList = handleMsg(type, mqMsg);
//param is a global list. Here, the data originally written to FTP is saved to param, which is used to construct the inserted SQL statement
synchronized(params){
List<Object> param;
for(int i=0; i< fieldMapList.size (); i++){
param = new ArrayList<Object>();
msg = fieldMapList.get (i);
System.out.println (“msg: “+msg);
param.add (new Date());
param.add (msg);
param.add (type);
params.add (param);
}
}
//Schedule tasks regularly, execute the method regularly, and insert the data obtained from FTP
@Scheduled(cron = “${ DBSync.schedule.delay .cron}”)
private void proceedInsertion(){
if(!”Y”.equalsIgnoreCase(DBSyncEnabled)){
return;
}
log.info (“DBSyncAop scheduling start”);
Connection conn = null;
PreparedStatement ps = null;
log.info (“##params size: “+ params.size ());
synchronized(params){
if(! params.isEmpty ()){
try{
conn = DataSourceUtils.getConnection (scheduleDataSource);
conn.setAutoCommit (false);
List param;
ps = conn.prepareStatement (insertSql);
for(int i=0; i< params.size (); i++){
param = params.get (i);
ps.setDate (1, new java.sql.Date (((Date) param.get (0)).getTime()));//timestamp
ps.setString (2, (String) param.get (1));//fileName
ps.setString (3, (String) param.get (2)); //json msg
ps.setString (4, (String) param.get (3));//mq type
ps.addBatch ();
log.info (“DBSyncAop scheduling added batch”);
}
ps.executeBatch ();
conn.commit ();
log.info (“DBSyncAop scheduling committed”);
conn.setAutoCommit (true);
params.clear ();
} catch (Exception e) {
log.error (“insert MQ information data contact” + e.getmessage());
e.printstacktrace();
} finally {
try {
} DataSourceUtils.doCloseConnection (conn, scheduleDataSource);
} catch (SQLException e) {
log.error (e.getMessage());
e.printStackTrace();
}
}
}
}
log.info (“DBSyncAop scheduling finish”);
}
}
Bitmap optimization and memory optimization
Is it necessary for bitmap to call recycle method in Android system
Before Android 3.0, bitmap image data was processed in the underlying C, so before Android 3.0, recycle() should be called. Although finalize() will call recycle(), students who are experienced in Java should know that there are many problems in releasing resources only by finalize()
After Android 3.0, the image data is put in a member variable mbuffer [] of the bitmap object. Therefore, it is not necessary to call recycle (). After the bitmap is set to null, the image data will be recycled by GC.
Now that Android is in the age of 5.0, it is recommended not to consider supporting versions before 3.0.
actually Bitmap.recycle This is an advanced call, and normally need not be called, since the normal GC process will free up this memory when there are no more references to this bitmap. When no reference points to a bitmap, GC will automatically free memory.)
Managing bitmap memory Google’s official explanation of bitmap
In addition to the steps described in Caching Bitmaps, there are specific things you can do to facilitate garbage collection and bitmap reuse. The recommended strategy depends on which version(s) of Android you are targeting. The BitmapFun sample app included with this class shows you how to design your app to work efficiently across different versions of Android.
To set the stage for this lesson, here is how Android’s management of bitmap memory has evolved:
On Android Android 2.2 (API level 8) and lower, when garbage collection occurs, your app’s threads get stopped. This causes a lag that can degrade performance. Android 2.3 adds concurrent garbage collection, which means that the memory is reclaimed soon after a bitmap is no longer referenced.
On Android 2.3.3 (API level 10) and lower, the backing pixel data for a bitmap is stored in native memory. It is separate from the bitmap itself, which is stored in the Dalvik heap. The pixel data in native memory is not released in a predictable manner, potentially causing an application to briefly exceed its memory limits and crash. As of Android 3.0 (API level 11), the pixel data is stored on the Dalvik heap along with the associated bitmap.
The following sections describe how to optimize bitmap memory management for different Android versions.
Memory optimization
Memory optimization from: http://my.oschina.net/u/1753339/blog/223379
It’s easy to load a picture on the UI of your application, but when you need to load a lot of pictures on the UI, the situation becomes more complicated. In many cases (such as using listview, GridView or viewpager), the images displayed on the screen can be increased continuously by sliding the screen and other events, which eventually leads to oom.
In order to ensure that the use of memory is always maintained in a reasonable range, the removed screen images are usually recycled. At this time, the garbage collector will also think that you no longer hold the reference of these images, so it will GC these images. It’s very good to use this idea to solve the problem, but in order to make the program run quickly and load pictures on the interface quickly, you have to consider the situation that the user slides some pictures back into the screen after they are recycled. At this time, reloading the image just loaded is undoubtedly the bottleneck of performance. You need to find a way to avoid this situation.
At this time, the use of memory caching technology can solve this problem, it can let components quickly reload and process images. Now let’s take a look at how to use memory caching technology to cache images, so that your application can improve the response speed and fluency when loading many images.
Memory caching technology provides a fast way to access images that occupy a lot of valuable memory of applications. The core class is lrucache (this class is provided in the package of android-support-v4). This class is very suitable for caching images. Its main algorithm principle is to store the most recently used objects in LinkedHashMap with strong references, and remove the least recently used objects from memory before the cache value reaches the preset value.
In the past, we often used a very popular implementation of memory caching technology, namely soft reference or weak reference. However, this method is no longer recommended, because since Android 2.3 (API level 9), the garbage collector tends to recycle objects with soft references or weak references, which makes soft references and weak references unreliable. In addition, in Android 3.0 (API level 11), the image data will be stored in the local memory, so it can not be released in a predictable way, which has the potential risk of causing the memory overflow and crash of the application.
In order to select an appropriate cache size for lrucache, the following factors should be considered, for example:
How much memory can your device allocate for each application?
How many pictures can be displayed on the device screen at a time?How many images need to be preloaded because they may be displayed on the screen soon?
What is the screen size and resolution of your device?A super-high resolution device (such as Galaxy nexus) needs more cache space than a lower resolution device (such as nexus s) when holding the same number of images.
The size and size of the image, and how much memory space each image will occupy.
How often are images visited?Will some pictures be visited more frequently than others?If so, you may want to keep some images resident in memory, or use multiple lrucache objects to distinguish different groups of images.
Can you keep the balance between quantity and quality?Sometimes, it’s more effective to store multiple low pixel images, but it’s more effective to load high pixel images in the background.
There is no specified cache size for all applications, which is up to you. You should analyze the memory usage of the program, and then work out an appropriate solution. A too small cache space may cause images to be released and reloaded frequently, which is not good. However, if the cache space is too large, it may still cause problems java.lang.OutOfMemory It’s abnormal.
Here is an example of using lrucache to cache images:
private LruCache<String, Bitmap> mMemoryCache;
@Override
protected void onCreate(Bundle savedInstanceState) {
    // Get the maximum value of available memory, using memory beyond this value will raise an OutOfMemory exception.
    // LruCache passes in the cache value in KB through the constructor.
    int maxMemory = (int) (Runtime.getRuntime().maxMemory() /1024);
    // Use 1/8 of the maximum available memory value as the size of the cache.
    int cacheSize = maxMemory/8;
    mMemoryCache = new LruCache<String, Bitmap>(cacheSize) {
        @Override
        protected int sizeOf(String key, Bitmap bitmap) {
            // Override this method to measure the size of each image and return the number of images by default.
            return bitmap.getByteCount()/1024;
        }
    };
}

public void addBitmapToMemoryCache(String key, Bitmap bitmap) {
    if (getBitmapFromMemCache(key) == null) {
        mMemoryCache.put(key, bitmap);
    }
}

public Bitmap getBitmapFromMemCache(String key) {
    return mMemoryCache.get(key);
}
In this example, one eighth of the memory allocated by the system to the application is used as the cache size. In medium and high configuration mobile phones, there will be about 4 megabytes (32g8) of cache space. If a full screen GridView is filled with four 800×480 resolution images, it will occupy about 1.5 megabytes of space (800 * 480 * 4). Therefore, this cache size can store 2.5 pages of images.
When a picture is loaded into ImageView, it will be checked in the cache of lrucache first. If the corresponding key value is found, the ImageView will be updated immediately. Otherwise, a background thread will be started to load the image.
public void loadBitmap(int resId, ImageView imageView) {
    final String imageKey = String.valueOf(resId);
    final Bitmap bitmap = getBitmapFromMemCache(imageKey);
    if (bitmap != null) {
        imageView.setImageBitmap(bitmap);
    } else {
        imageView.setImageResource(R.drawable.image_placeholder);
        BitmapWorkerTask task = new BitmapWorkerTask(imageView);
        task.execute(resId);
    }
}
Bitmapworkertask also puts the key value pair of the newly loaded image into the cache.
class BitmapWorkerTask extends AsyncTask<Integer, Void, Bitmap> {
    // loading the pictures
    @Override
    protected Bitmap doInBackground(Integer... params) {
        final Bitmap bitmap = decodeSampledBitmapFromResource(
                getResources(), params[0], 100, 100);
        addBitmapToMemoryCache(String.valueOf(params[0]), bitmap);
        return bitmap;
    }
}
(how to define the key of image key value pair?Path to image (URI)
What are the common memory leaks in Android
Query database without closing cursor
In Android, Cursor is a very common object, but in writing code, people often forget to call close, or because of the code logic problem situation, close is not called.
Usually, in an activity, we can call startmanagingcursor or directly use managedquery to let the activity automatically manage the cursor object.
However, it should be noted that when activity is introduced, cursor will no longer be available!
If the code of operating cursor is not synchronized with UI (such as background thread), there is no need to judge whether the activity has ended or wait for the background thread to end before calling ondestroy.
In addition, the following is also a common case that the cursor will not be closed:
although it seems that, Cursor.close () has been called, but if there is an exception, close () will be skipped, resulting in a memory leak.
Therefore, our code should be written in the following way:
Cursor c = queryCursor();
try {
int a = c.getInt(1);
......
} catch (Exception e) {
} finally {
c.close(); //Call close() in finally, ensuring that it will be called
}
try {
Cursor c = queryCursor();
int a = c.getInt(1);
......
c.close();
} catch (Exception e) {
}
Unregisterreceiver() was not called after calling registerreceiver
After calling registerreceiver, if unregisterreceiver is not called, it will occupy a large amount of memory.
We can often see the following code:
this is a very serious error, because it will cause the broadcastreceiver not to be unregistered, resulting in memory leakage.
registerReceiver(new BroadcastReceiver() {
...
}, filter); ...
*InputStream/OutputStream not closed*
When using files or accessing network resources, using InputStream/OutputStream will also lead to memory leakage
Recycle () is not called after bitmap is used
according to the description of SDK, it is not necessary to call recycle. However, when we call recycle (), we no longer use memory as much as possible.
Context leak
this is a very obscure memory leak.
Let’s take a look at the following code:
in this code, we use a static drawable object.
This usually happens when we need to call a drawable frequently, and its loading is time-consuming. We don’t want to create the drawable every time we load an activity.
At this point, using static is undoubtedly the fastest way to write code, but it is also very bad.
When a drawable is attached to a view, the view will be set to the callback of the drawable Drawable.setCallback () Implementation).
This means that the drawable has a reference to textview, which in turn has a reference to activity.
As a result, the memory will not be released after the activity is destroyed.
Copy forbidden in C + +++
Real estate agents sell houses, and software systems that serve such agents naturally have a class to represent the houses being sold:
class HomeForSale { … };
Every real estate agent is quick to point out that every property is unique — no two are exactly alike. In this case, the idea of making a copy for a HomeForSale Object is puzzling. How can you copy something unique?So it’s best to make things like this attempt to copy a HomeForSale Object non-compilable:
HomeForSale h1;
HomeForSale h2;
HomeForSale h3(h1);// attempt to copy the h1 – should
// not compile!
h1 = h2;// attempt to copy the h2 – should
// not compile!
Alas, the way to prevent this kind of compilation is not that straightforward. In general, if you don’t want a class to support some kind of functionality, you can simply not declare the function that gives it that functionality. This strategy does not work for copy constructor (copy constructor) or copy assignment operator (copy assignment operator) because, as indicated in Item 5, if you do not declare them and someone wants to call them, the compiler will declare them for you.
That limits you. If you do not declare copy constructor or copy assignment operator, the compiler can also generate them for you. Your class will also support copying. On the other hand, if you declare these functions, your classes will still support copying. During this period, our aim is to prevent copying!
The key to solving this problem is that all compiler generated functions are public. To prevent these functions from being generated, you have to declare them yourself, but you have no reason to declare them public. Instead, declare the copy constructor (copy constructor) and the copy assignment operator (copy assignment operator) private. By explicitly declaring a member function, you prevent the compiler from generating its own version, and by declaring the function private, you prevent others from calling it.
In general, this option is not very safe, as the member and friend functions can still call your private functions. In other words, unless you’re smart enough not to define them. So, when someone accidentally calls them, there will be an error at link-time. This technique – declaring member functions private yet deliberately failing to implement it – is indeed very good. In the iostreams library of C++, there are several classes using this method to prevent copying. For example, if you look at the definitions (definitions) of ios_base, basic_ios, and Sentry in your standard library implementation, you will see that the copy constructor (copy constructor) and the copy assignment operator (copy assignment operator) are declared private and are not defined.
To apply this trick to HomeForSale, it’s simple:
The class HomeForSale {
public:
…
Private:
…
HomeForSale (const HomeForSale&) ;// declarations only
HomeForSale& operator=(const HomeForSale&) ;
};
You’ll notice That I omitted the name functions’ parameters. It’s not necessary, it’s just a common practice. After all, functions are not implemented and are less likely to be used, so why specify parameter names?
For the above class Definition, the compiler will prevent a client from attempting to copy HomeForSale Objects, and if you accidentally do so in a Member or friend function, the linker will protest.
Will link – time error (connection) in advance to compile time is feasible after all, the discovery of the error (early than late found good), by not HomeForSale itself declared in the copy constructor (copy constructor) and copy the assignment operator (copy assignment operator) is a private, but in a to prevent copying (prevent copy) and specially designed base class (base class) in a statement. The base class itself is very simple:
Class Uncopyable {
protected:// allow construction
Uncopyable () {}// and destruction of
~ Uncopyable () {}// derived objects…
Private:
Uncopyable (const Uncopyable&) ;//… But prevent copying
Uncopyable& operator=(const Uncopyable&) ;
};
To prevent copying HomeForSale Objects, we must now make it inherit from Uncopyable:
Class HomeForSale: private Uncopyable {// class no longer
…// declares copy ctor or
};// copy the assign. Operator
This is done because if someone — even a member (member) or friend function (friend function) — tries to copy a HomeForSale Objects (object), the compiler will attempt to generate a copy constructor (copy constructor) and a copy assignment operator (copy assignment operator). As explained by Item 12, the compiler-generated versions of these functions attempt to call the corresponding functions of the Base class, and these calls are rejected because the copy operation is private in the Base class.
The implementation and use of Uncopyable contain subtlety. For example, inheritance from Uncopyable need not be public (see Items 32 and 39), and Uncopyable’s destructor need not be virtual (see Item 7). Because Uncopyable does not contain data, it meets the condition of Empty Base Class Optimization described by Item 39, but because it is a base class, multiple inheritance cannot be introduced for application of this technique (see Item 40). On the other hand, Multiple inheritance sometimes defies empty Base Class optimization (see Item 39 again). In general, you can ignore these subtleties and use Uncopyable only as demonstrated here, because it works like an advertisement. You can also use a version available in Boost (see Item 55). That class is called noncopyable. That’s a good thing, I just found that name a little UN – (no…) HMM… Nonnatural.
How do you set, clear and toggle a single bit in C?
All kinds of answers. Haha… To learn!
= = = = = = = = = = = = = = = = = = = = = = = = = = = = = = = = = = = = = = = = = = = = = = = = = = = = = = = = = = = = = = = = = = = = = = = = = = = = = = = = = = = = = = = = = = = = = = = = = = = = = = = = = = = = = = = = = = = = = = = = = = = = = = =
Setting a bit
Use the bitwise OR operator (|) to set a bit.
number |= 1 << x;
That will set bit x.
Clearing a bit
Use the bitwise AND operator (&) to clear a bit.
number &= ~(1 << x);
That will clear bit x. You must invert the bit string with the bitwise NOT operator (~), then AND it.
Toggling a bit
The XOR operator (^) can be used to toggle a bit.
number ^= 1 << x;
That will toggle bit x.
Checking a bit
You didn’t ask for this but I might as well add it.
To check a bit, AND it with the bit you want to check:
bit = number & (1 << x);
That will put the value of bit x into the variable bit.
===============================================================================================================================
Nobody mentioned the STL: std::bitset<N>.
Or the boost version: boost::dynamic_bitset.
No need to roll your own:
#include <bitset>
#include <iostream>

int main()
{
    std::bitset<5> x;

    x[1] = 1;
    x[2] = 0;
    // Note x[0-4]  valid

    std::cout << x << std::endl;
}
[Alpha:] > ./a.out
00010
Boost version allows a runtime sized bitset compared with STL compile time sized bitset.
===============================================================================================================================
The other option is to use bit fields:
struct bits {
    unsigned int a:1;
    unsigned int b:1;
    unsigned int c:1;
};

struct bits mybits;
defines a 3-bit field (actually, it’s three 1-bit felds). Bit operations now become a bit (haha) simpler:
To set or clear a bit:
mybits.b = 1;
mybits.c = 0;
To toggle a bit:
mybits.a = !mybits.a;
mybits.b = ~mybits.b;
mybits.c ^= 1;  /* all work */
Checking a bit:
if (mybits.c)
This only works with bits in fixed positions. Otherwise you have to resort to the bit-twiddling techniques described in previous posts.
===============================================================================================================================
It is sometimes worth using an enum to name the bits:
enum ThingFlags = {
  ThingMask  = 0x0000,
  ThingFlag0 = 1 << 0,
  ThingFlag1 = 1 << 1,
  ThingError = 1 << 8,
}
Then use the names later on. I.e. write
thingstate |= ThingFlag1;
thingstate &= ~ThingFlag0;
if (thing | ThingError) {...}
to set, clear and test. This way you hide the magic numbers from the rest of your code.
Other than that I endorse Jeremy’s solution.
===============================================================================================================================
I use macros defined in a header file to handle bit set and clear:
/* a=target variable, b=bit number to act upon 0-n */
#define BIT_SET(a,b) ((a) |= (1<<(b)))
#define BIT_CLEAR(a,b) ((a) &= ~(1<<(b)))
#define BIT_FLIP(a,b) ((a) ^= (1<<(b)))
#define BIT_CHECK(a,b) ((a) & (1<<(b)))

/* x=target variable, y=mask */
#define BITMASK_SET(x,y) ((x) |= (y))
#define BITMASK_CLEAR(x,y) ((x) &= (~(y)))
#define BITMASK_FLIP(x,y) ((x) ^= (y))
#define BITMASK_CHECK(x,y) ((x) & (y))
===============================================================================================================================
From snip-c. zip’s bitops.how:
/*
**  Bit set, clear, and test operations
**
**  public domain snippet by Bob Stout
*/

typedef enum {ERROR = -1, FALSE, TRUE} LOGICAL;

#define BOOL(x) (!(!(x)))

#define BitSet(arg,posn) ((arg) | (1L << (posn)))
#define BitClr(arg,posn) ((arg) & ~(1L << (posn)))
#define BitTst(arg,posn) BOOL((arg) & (1L << (posn)))
#define BitFlp(arg,posn) ((arg) ^ (1L << (posn)))
OK, let’s analyze things…
The common expression in all of these that you seem to be having problems with is “(1L << (posn))”. All this does is create a mask with a single bit on and which will work with any integer type. The “posn” argument specifies the position where you want the bit. If posn==0, then this expression will evaluate to:
0000 0000 0000 0000 0000 0000 0000 0001 binary.
If posn==8, it will evaluate to
0000 0000 0000 0000 0000 0001 0000 0000 binary.
In other words, it simply creates a field of 0’s with a 1 at the specified position. The only tricky part is in the BitClr() macro where we need to set a single 0 bit in a field of 1’s. This is accomplished by using the 1’s complement of the same expression as denoted by the tilde (~) operator.
Once the mask is created it’s applied to the argument just as you suggest, by use of the bitwise and (&), or (|), and xor (^) operators. Since the mask is of type long, the macros will work just as well on char’s, short’s, int’s, or long’s.
The bottom line is that this is a general solution to an entire class of problems. It is, of course, possible and even appropriate to rewrite the equivalent of any of these macros with explicit mask values every time you need one, but why do it?Remember, the macro substitution occurs in the preprocessor and so the generated code will reflect the fact that the values are considered constant by the compiler – i.e. it’s just as efficient to use the generalized macros as to “reinvent the wheel” every time you need to do bit manipulation.
Unconvinced?Here’s some test code – I used Watcom C with full optimization and without using _cdecl so the resulting disassembly would be as clean as possible:
—-[ TEST.C ]—————————————————————-
#define BOOL(x) (!(!(x)))

#define BitSet(arg,posn) ((arg) | (1L << (posn)))
#define BitClr(arg,posn) ((arg) & ~(1L << (posn)))
#define BitTst(arg,posn) BOOL((arg) & (1L << (posn)))
#define BitFlp(arg,posn) ((arg) ^ (1L << (posn)))

int bitmanip(int word)
{
      word = BitSet(word, 2);
      word = BitSet(word, 7);
      word = BitClr(word, 3);
      word = BitFlp(word, 9);
      return word;
}
—-[ TEST. OUT (disassembled) ]———————————————–
Module: C:\BINK\tst.c Group: ‘DGROUP’ CONST,CONST2,_DATA,_BSS
Segment: TEXT BYTE 00000008 bytes
0000 0c 84 bitmanip or al,84H 0002 80 f4 02 xor ah,02H 0005 24 f7 and al,0f7H 0007 c3 ret
No disassembly errors
—-[ finis ]—————————————————————–
===============================================================================================================================
===============================================================================================================================
Solution to PCL XL error of HP p2055d laser printer
— — — — — — — — — — — — — — — — — — — — — — — — — — — error message started the author add (visit) — — — — — — — — — — — — — — — — — — — — — — — — — — — —
PCL XL error
Subsystem: KERNEL
Error: IllegalOperatorSequence
Operator: EndSession
Position: 7
— — — — — — — — — — — — — — — — — — — — — — — — — — — — — — — — — — — — — — — — — — — — — — — — — — — — — — –// error message end I (visit)
Using the built-in test function of the machine, the printer can work normally, but it cannot communicate with the PC normally. Uninstall and reinstall the driver and all associated software, and the problem remains. Helpless, call HP customer service, customer service staff told the problem cannot be determined, can only use the following methods to try. Because the telephone is far from the machine, it is not convenient to operate. After two calls to customer service, the P2055d can finally be printed. The operation method is listed here for later use.
1. Change the advanced options for the first time
1) Right-click the printer and select “Print Preference…” in the window that pops up. , as shown in Figure 1.
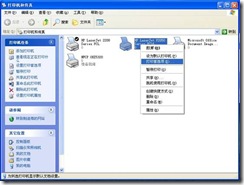
Figure 1
2) Open the print preferences window as shown in Figure 2

Figure 2
3) Expand “Graph” and select “Download as Soft Font” from the drop-down list of “True Type Font” below (Figure 3)
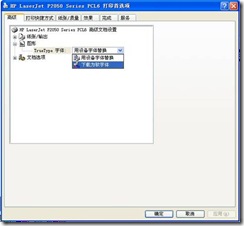
Figure 3
4) Expand Document Options a Printer Functions and change the drop-down list of Send True Type as bitmap to Enabled (Figure 4).
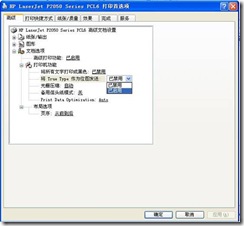
Figure 4.
5) Then, change the “Print Data Optimization” drop-down list to “Optimize for Text and Vector,” apply “–” Optimize “(Figure 5).
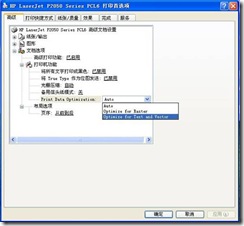
Figure 5
To be on the safe side, I restarted the machine and printer (actually shutting down the computer and then shutting down the printer).
2. Try again and change the driver
As the problem was not solved, the author turned to HP customer service again (every time I played HP customer service, I had to wait, I didn’t know whether HP service was too good or HP product quality was wrong). The author was told to replace it with a 2200 driver, so I tried again.
1) Open the “Printer and Fax” window (start A to set A printer and fax), and click “File” A to “Add Printer” in turn, as shown in Figure 6.
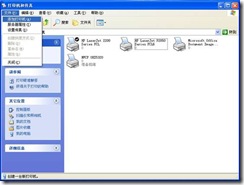
Figure 6.
2) Open the “Add Printer Wizard” window as shown in Figure 7, and click “Next”.
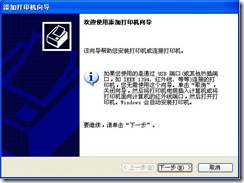
Figure 7.
3) Remove the selection of “Automatic Detection and Installation of plug and play Printer” in the window shown in Figure 8, and click “Next”.
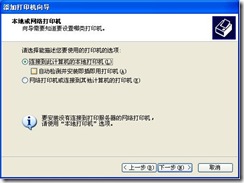
Figure 8.
4) In the “Select Printer Ports” window, select “USB001” (Figure 9) from the following port drop-down list and click “Next”.
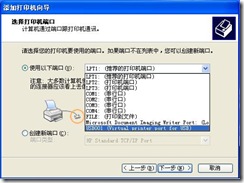
Figure 9.
5) In the “Install Printer Software” window, select “HP” from the list of manufacturers, and the printer select “HP LaserJet 2200 Series PCL”, and click “Next” to add the printer.
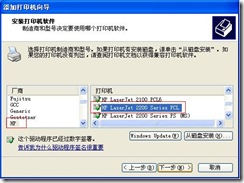
Figure 10.
After adding this printer, print the document and test page OK. The original 2055D printer system will be installed automatically. It is recommended to set this 2200 printer as the default printer. At this point, the “PCL XL error” problem is resolved.
When the operating system was reinstalled, the printer was installed directly in accordance with Plan 2, and everything was fine.
Mysql cannot allocate memory for the buffer pool solution
Further optimize the reference documentation for problem cause resolution
Cause of the problem
Last night, I modified the database and added a “FULLTEXT” index for the field. However, this morning, I found that the database could not be connected and could not be restarted. So I checked the log file:
cat /var/log/mysqld.logThe following error log was found:
130728  6:50:14 InnoDB: Initializing buffer pool, size = 128.0M
InnoDB: mmap(137363456 bytes) failed; errno 12
130728  6:50:14 InnoDB: Completed initialization of buffer pool
130728  6:50:14 InnoDB: Fatal error: cannot allocate memory for the buffer pool
The short answer is that there is no way to allocate 128M memory for mysql’s Buffer pool.
reason is obvious, the lack of memory, after looking up data found that the original parameter is mainly used to cache innodb table index, data, the buffer when inserting data. My server only has 1 gb of memory, so this parameter crashed mysql when it started allocating the cache for the index.
The solution
The configurations for mysql are inside /ect/ mysqlt.cnf (the Ubuntu directory is slightly different, where you can find it using whereis my.cnf).
vim /etc/my.cnfYou can see the fourth line:
#innodb_buffer_pool_size = 128MThe default configuration shown here is 128M, which is the annotation status. We just need to remove the annotation and change 128 to a smaller size (depending on your personal situation). I will change it to:
innodb_buffer_pool_size = 50M
That’s about it.
Further optimization
Generally appear this kind of problem students, the memory is certainly not large, so we can set swap partition, which is often said virtual memory.
is illustrated the role of the swap here won’t do, simply means can assist Mem points of memory.
direct code:
dd if=/dev/zero of=/swapfile bs=1M count=1024
mkswap /swapfile
swapon /swapfile
Finally, add the code /swapfile swap swap defaults 0 0 to the /etc/fstab file.
freeIf you can see Mem and SWAP, it’s successful.
and finally restart mysql.
Reference documentation
http://hongjiang.info/aliyun-vps-mysql-aborting/