[thinking]
The exact multiplication of large Numbers tests the bitwise operation of strings. The result is cached in an int array. The advantage of using an int array is that the value of each int can be greater than 10:
    public String multiply(String num1, String num2) {
        int len1 = num1.length(), len2 = num2.length(), len = len1 + len2, count = 0;
        int[] arr = new int[len];
        for (int i = len1 - 1; i >= 0; i--) {
            int bit1 = num1.charAt(i) - '0';
            for (int j = len2 - 1, k = j + i + 1; j >= 0; j--, k--) {
                int temp = bit1 * (num2.charAt(j) - '0') + arr[k];
                arr[k] = temp % 10;
                arr[k - 1] += temp/10;
            }
        }
        String s = "";
        for (int i = 0; i < arr.length; i++)
            s += arr[i];
        while(count < len && s.charAt(count++) == '0');
        return s.substring(count - 1);
    }
311/311
13 Ms Your Runtime beats 29.13 per cent of javasubmissions.
Of course, I laughed when I saw something simple and funny on the Internet:
    public String multiply(String num1, String num2) {
        return new BigInteger(num1).multiply(new BigInteger(num2)) + "";
    }
Of course, this method doesn’t work. It’s designed to make people laugh.
Reprinted from: https://www.cnblogs.com/mxk-star/p/7244090.html
Vscode this editor lets a person very comfortable to use, but you just start with children’s shoes on the plug-in installation may be some fear, although vscode search and provides a plug-in installed, but some of the plug-in is in need of some software or things do support package, not in vscode good can be used after download, download the plugin but no implementation support vscode frequent error really forcing obsessive-compulsive disorder.
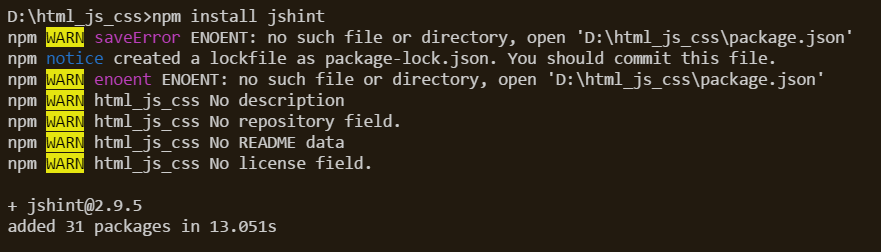
When I want to write js code in vscode today, I was prompted:
“Failed to load jshint Library.Please install Jshint in your workspace folder using ‘NPM install jshint’ or fundamental to the using’ NPM install -g jshint’ and then press Retry”
I searched for some simple configuration and introduction of JSHint on the Internet, but the problem mentioned in the problem is that there is one thing missing, which needs to be installed with NPM instruction, so I typed NPM install Jshint on the command line, but the result was disappointed, the terminal prompt said: “NPM is not internal or external instruction”. Search NPM is a package management tool for NodeJS, use nodeJS need to download. The node download and installation method is quite simple, but I won’t discuss it here.
Once you have installed Node, you can go to your workspace and open the command line using NPM install Jshint to download the missing package.
Then you need to make a simple configuration for Jshint in your workspace: create a.jshintrc file, copy the following code into it, and you’re ready to use it.
The
Because the computer system is 32-bit, software that you want to press on 64 bits can be tricky. This article made a search on the net, think of Stack Overflow use https://stackoverflow.com/questions/35139108/how-to-install-xgboost-in-anaconda-python-windows-platform;
There are only three steps:
1. Anaconda is installed; That’s not a big deal
2. Enter anaconda Prompt; Anaconda Search-t Conda XgBoost enter; A big push of XgBoost is returned
3, select the appropriate XGBoost for your system; Anaconda/py-xgBoost; So enter Conda Install-c Anaconda XgBoost enter
4, ok!
Here you can see multiple folders named with Numbers, and the game ontology directory doesn’t seem to store mods.
I’m gonna go ahead and click on one, and in this case I’m gonna copy the mod file into the mod folder in the game ontology directory,
Here I also created a folder called Mod01 that contains the unpack folder for standby (if not included, it will be created by myself)
The
The
The
The
The
The
The
The
The
The
The
The
The
The
The
The
The
The
The
The
The
The
The
The
The
The
The
The
The
The
The
The
The
The
The
The
The
The
Create a TXT file called unpack.bat in the outside directory and copy it in
“win32\asset_unpacker.exe” “mods\Mod01\contents.pak” “mods\Mod01\unpack”
save and execute
You can see that the unpack folder already has the unpacked mod file structure
If you want to package, the batch file contents are
The point of the book is to develop an application called Rango. To develop this application, it will cover most of the core content of making web applications.
2.4Rango: Initial Design and Planning
2.4.1 Design overview
Your client needs to set up a website called Rango, which allows users to browse their own customized web pages. In Spanish language, rango used to mean “sort through quality” or “place in the hierarchy of society” (see https://www.vocabulary.com/dictionary/es/rango).
On the home page of the site, visitors can see:
The 5 Most viewed pages the 5 highest quality directories How visitors can browse or find a directory
When a user views a directory page, it will display:
Directory name, number of visits, number of likes; A page close to the directory (showing the page title and its URL); Some search functions (via Bing’s search API) are used to find other pages that can be linked to this directory
A particular directory, the name of the directory the client wants, the number of times each directory page has been visited and how many users have clicked the ‘like’ button to be recorded. Each directory can be accessed via a readable URL – e.g. /rango/books-about-django/. Only registered users can search and add pages to the catalog. In the meantime, visitors can sign up for an account.
At first glance, the app looks strange. In fact, it’s just a list of directories, and they can link to the page, right?However, there is still a lot of complexity to deal with. First, let’s try to draw a picture of what we want to develop.
2.5 practice
Before going on, consider the instructions below and try to draw a design.
A framework URL binding of the N-tier or system architecture diagram home page and catalog page is the entity-relationship diagram that we are going to implement the data model
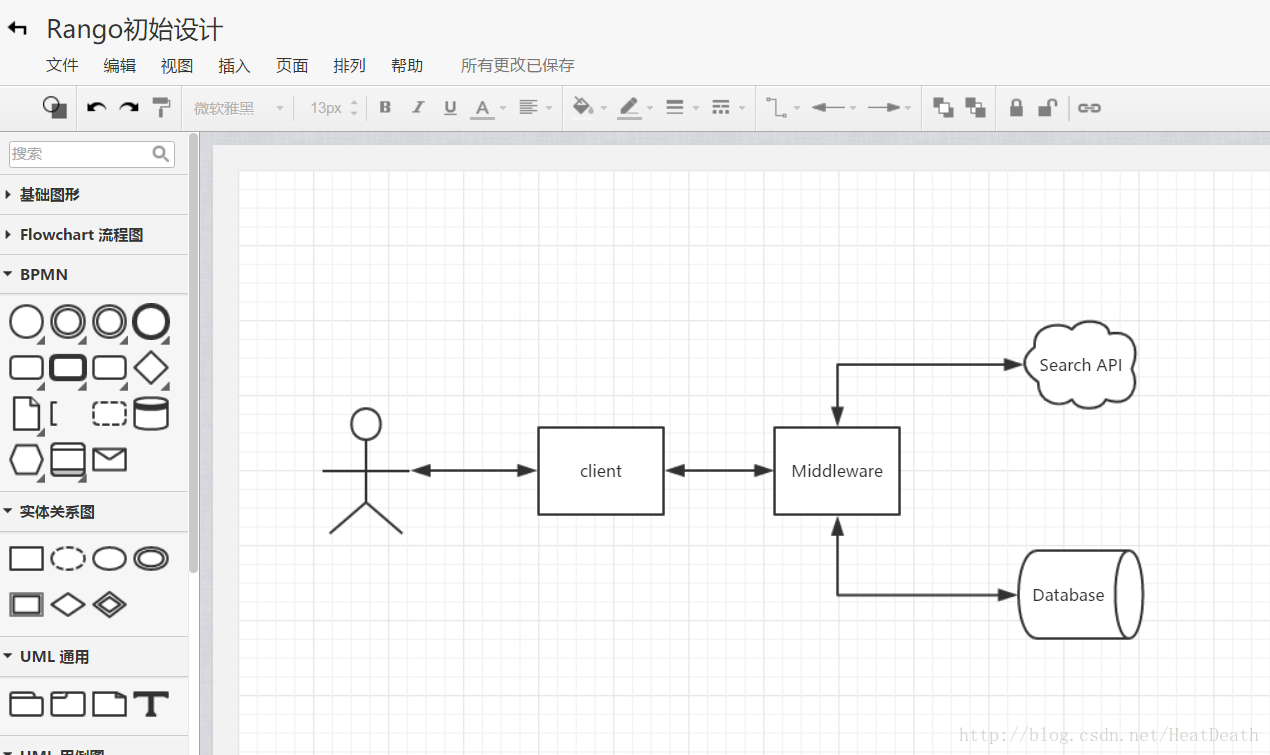
2.6 N- layer structure
Rango is a variant of the 3-tier structure in which most Web applications are structured, and requires interaction with an external service.
The UML diagram is drawn using Processon
If we were to create Web applications using Django, we would need the following techniques for each layer.
Client is a browser (i.e. Chrome, Firefox, Safari, etc.) that will return HTML/CSS page; Middleware is a Django application that will form the end of developing Django built into a Web service; database will be SQLite3 database engine based on Python; search API will be Bing search API
Although we had to deal with all the pieces above, most of the focus of the book was on developing middleware.
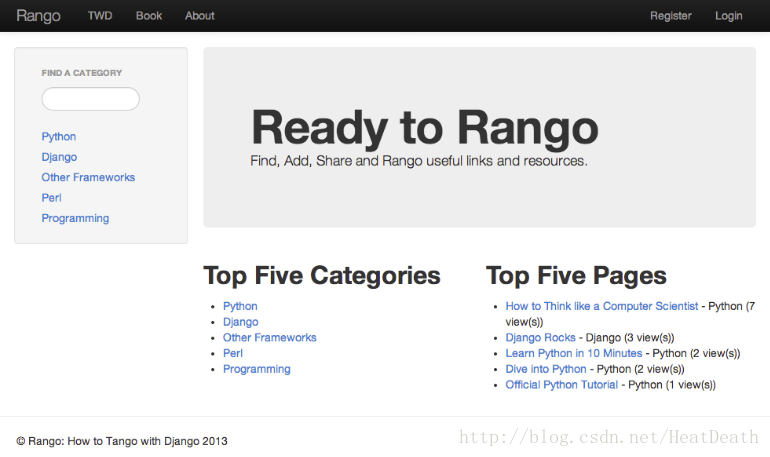
2.7 wire frame
Wireframes are a great way to design a website’s interface. They save a lot of time and are different from tool-dependent hand drawing. For Rango, we would like its home page to look like the figure below.
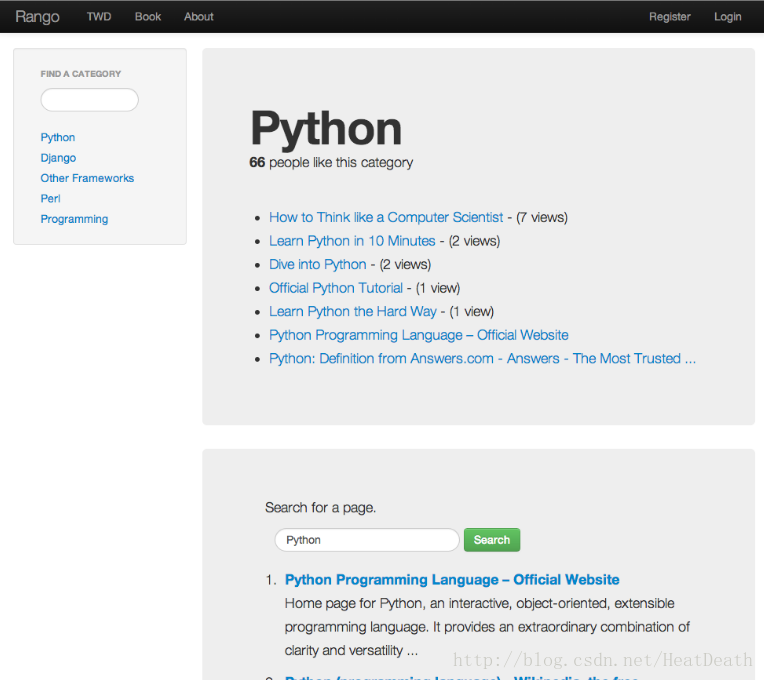
The directory page is shown in the figure below:
2.8 Page and URL mappings
By the rule description, we have confirmed that we will present two pages to the user at different times. To get to different pages we need to map the URL, which is the text that the user enters in the browser to get to the page.Rango’s URL map is shown below.
/rango/about/ will point to the About page view./ Rango /category/ will point to each category page view, which might be:
The game; Python trick code or compiler
/rango/etc/, which sets aside etc for future functional implementation
When we create an application, we might need to create some other URL mappings. But those are the ones that we need to build in the first place. Also consider that if the provided directory name does not exist, we need to convert the directory name to a valid URL string.
As we dig deeper into the book, we’ll get a handle on creating web pages with the Django framework and using the model-View-Template design pattern. Now that we have a general idea of the URL mapping and web page interface, we also need to define the data model to provide the data for our application.
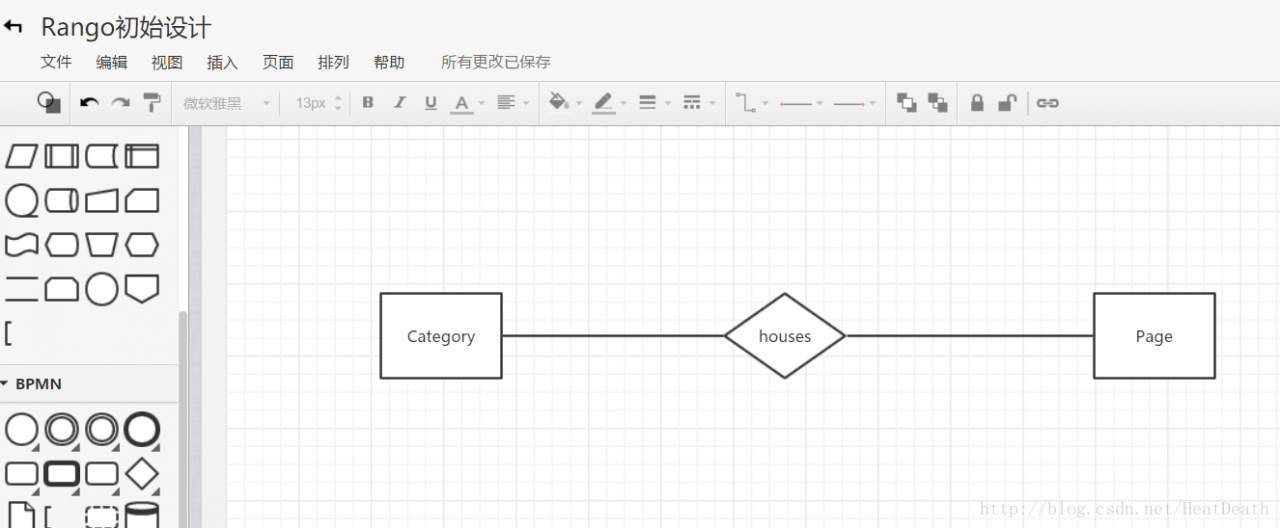
2.9 Entity-relationship diagram
Given the rules, we know that there are at least two entities: a directory and a page. One directory can hold many pages at the same time. We can describe our data model through the ER diagram below.
Note that a page can be in one or more directories. So we need to have a many-to-many relationship. To make things less complicated, let’s make the simple assumption that a directory can contain multiple pages, but a page can only belong to one directory. This does not prevent a page from appearing in two different directories – in a less-than-ideal situation, the page might enter twice.
Writing technical notes is a great hobby, especially when you know it will happen again! By writing them down, you can communicate with your development team to ensure that the same problems can be solved quickly.
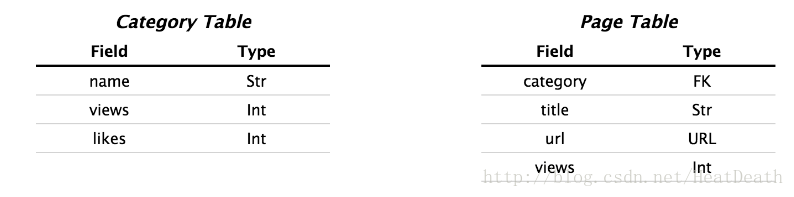
Str for string or char,Int for integer,URL for URL, FK for Foreign Key.
We also have a user table – not shown here, but described later. In the following sections we will see how to instantiate these data models in Django and learn how to use Django’s ORM to connect to a database.
2.10 summarize
These designs and instructions will be helpful in building our Web applications. The same techniques and procedures we will use apply to most data-driven websites. Familiarity with these specifications and designs is of great benefit to us.
If you already have Python2.7 and Django1.7 installed, and you know how to set up your path from the command line, you can skip the Django basics chapter. Otherwise, let’s look at chapter three.
2.10.1 Work with the Django official tutorial
We recommend that the Django official tutorial be used as an exercise for each chapter of the book. You can find the correspondence between the chapters in the two books in the table below. The official teaching exercises will help you get a deep understanding of the Django framework and improve your skills.
Tango woth Django Django Tutorial Chapter 3 Part 1 – Models Chapter 5 Part 2 – The Admin Interface Chapter 6 Part 3 – URLs and Views Chapter 7 Part 4 – Templates Chapter 18 Part 5 – Testing Chapter 11 Part 6 – CSS
1. Open ‘World Settings’. 2. Goto ‘Lightmass’ category. 3. Check ‘Force No Precomputed Lighting’. 4. A popup will appear. Press ‘OK’. 5. Press ‘Build All’ or ‘Build Lighting Only’. Static Lighting will be crack. That’s OK. 6. Save the map. 7. Reload the map. Open another map and open the map or double click the map in content browser. 8. Lightmaps will be 0 in Lightmass categoty. If not, load the map again. 9. Uncheck ‘Force No Precomputed Lighting’. 10. Save the map. 11. Press ‘Build All’ or ‘Build Lighting Only’. 12. Solved
#The second step
##unlock bootloader
##1. use phone connect Internet
##2. select develper to open usb debug and unlock OME key
##3. adb reboot bootloader
##4. fastboot oem get_unlock_data
##5. Now copy the “unlock_data” –>for example:
###(bootloader) Unlock data:
###(bootloader) 3A15680129901052#
###(bootloader) 5A4C343232354E443958006D6F746F2067280000#
###(bootloader) 3A88611E52CEF6C3BD1AB5D9473BC32A1FBAD850#
###(bootloader) 9ECEF441000000000000000000000000
##6.delete each lines (bootloader) and stitching the rest of each line ->for example:
3A15680129901052#5A4C343232354E443958006D6F746F2067280000#3A88611E52CEF6C3BD1AB5D9473BC32A1FBAD850#9ECEF441000000000000000000000000
##7. Login account of Motoroal
###1)Apply for a registration account
###2)Reference step Link-> https://www.teamandroid.com/2018/08/06/unlock-bootloader-moto-g6-play-plus/
###Account registration is successful !
##8. Now go to the Motorola unlock Page To Get the Unlock Code->Link Url
https://motorola-global-portal.custhelp.com/app/standalone/bootloader/unlock-your-device-b
##9. unlock bootloader
###1)Look at current interface option 6 is: Check if your device can be unlocked by pasting this string in the field below, and clicking “Can my device be unlocked?”
###2)Now copy the string(step 6 stitched string) from Notepad to the box shown on the website (Check Screenshot below)
###3)Once you click the “Can my Device be unlocked?” you will receive a mail with unlock key.
###4)Now copy the unlock key and type the following command and enter.
*fastboot oem unlock UNLOCK_KEY
###5)Here UNLOCK_Key is the place where you have to paste the unlock key which you copied from the email.
##That’s it! Your device will unlock. hah! Have fun!
#The third step
#Root
##1. download Twrp. img and Magsik.zip
##2. install Twrp
*fastboot flash boot Twrp.img
##3.install Magsik
*adb push local Magsik.zip /tmp
*click Install in Twrp interface
*install Magsik.zip
###display successful
##4. reboot phone
#Now This phone is root success
Topic link
https://leetcode.com/problems/reverse-linked-list/
The questions in the original
Reverse a singly linked list.
The title translation
Flip a one-way linked list
Thinking method
This topic is relatively basic, and there are many solutions to it, and there are also many solutions to AC. Here, only part of the ideas are sorted out for reference.
Thinking a
Using the stack structure, the contents of the linked list can be pushed onto the stack in turn, and then ejected from the stack in turn to construct the reverse order. The following code emulates the stack with ordinary arrays.
code
# Definition for singly-linked list.
# class ListNode(object):
# def __init__(self, x):
# self.val = x
# self.next = None
class Solution(object):
def reverseList(self, head):
"""
:type head: ListNode
:rtype: ListNode
"""
p = head
newList = []
while p:
newList.insert(0, p.val)
p = p.next
p = head
for v in newList:
p.val = v
p = p.next
return head
Idea 2
Similar to the idea of a stack, but directly in the original linked list operation, by iterating the node reorganization, the previous node moved to the back of the reorganized list. It’s actually an upside-down operation.
code
# Definition for singly-linked list.
# class ListNode(object):
# def __init__(self, x):
# self.val = x
# self.next = None
class Solution(object):
def reverseList(self, head):
"""
:type head: ListNode
:rtype: ListNode
"""
new_head = None
while head:
p = head
head = head.next
p.next = new_head
new_head = p
return new_head
Thought three
Recursion. Notice the termination condition
code
# Definition for singly-linked list.
# class ListNode(object):
# def __init__(self, x):
# self.val = x
# self.next = None
class Solution(object):
def reverseList(self, head):
"""
:type head: ListNode
:rtype: ListNode
"""
if not head or not head.next:
return head
p = head.next
n = self.reverseList(p)
head.next = None
p.next = head
return n
PS: The novice brush LeetCode, the new handwriting blog, write wrong or write unclear please help point out, thank you! reprint please indicate the: http://blog.csdn.net/coder_orz/article/details/51306170
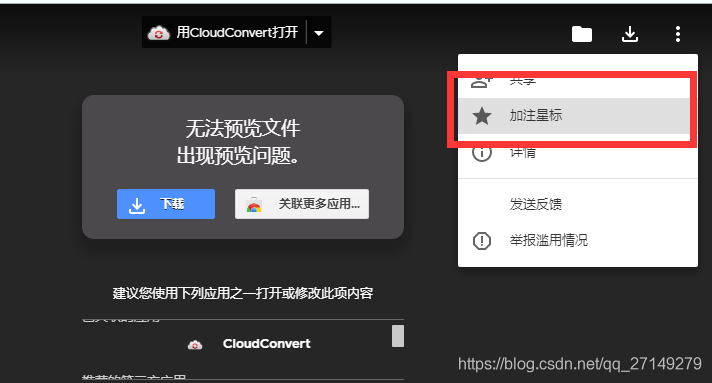
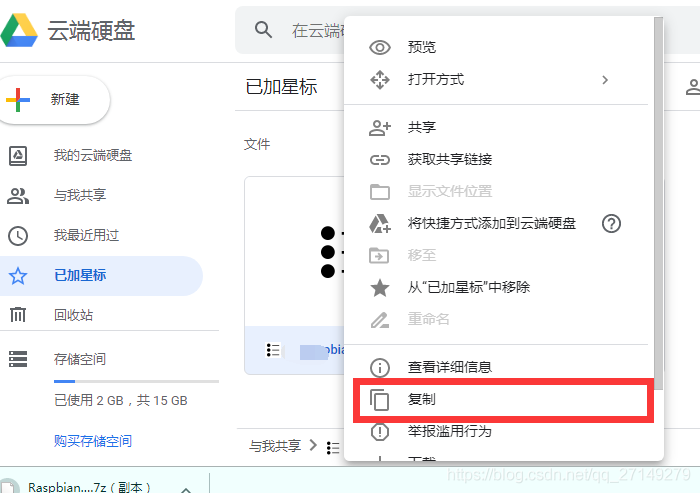
When Google downloads a Shared file, if too many people download it, this tip will appear:
Sorry, you are currently unable to view or download this file.
Too many users have viewed or downloaded this file recently. Please try to access this file again later. If the file you are trying to access is particularly large or Shared by many people, it can take up to 24 hours to view or download the file. If you still cannot access the file after 24 hours, contact your domain administrator.
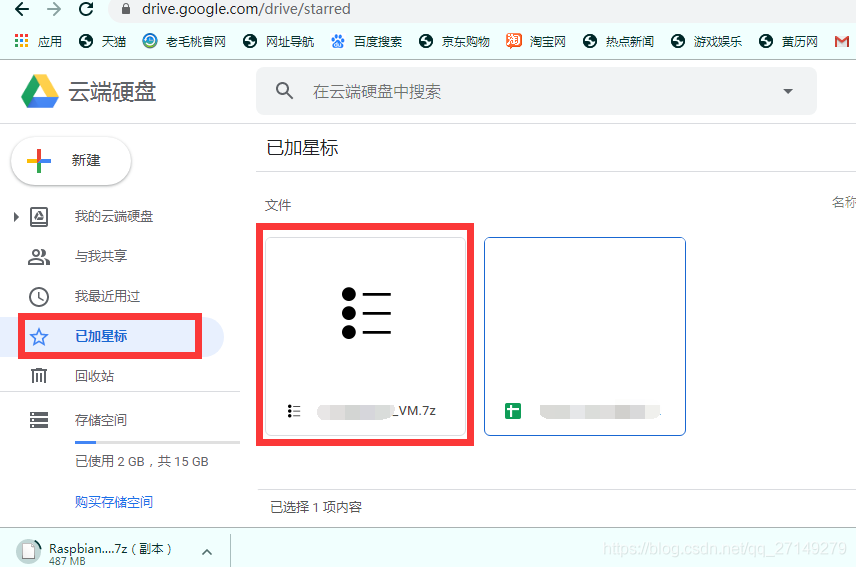
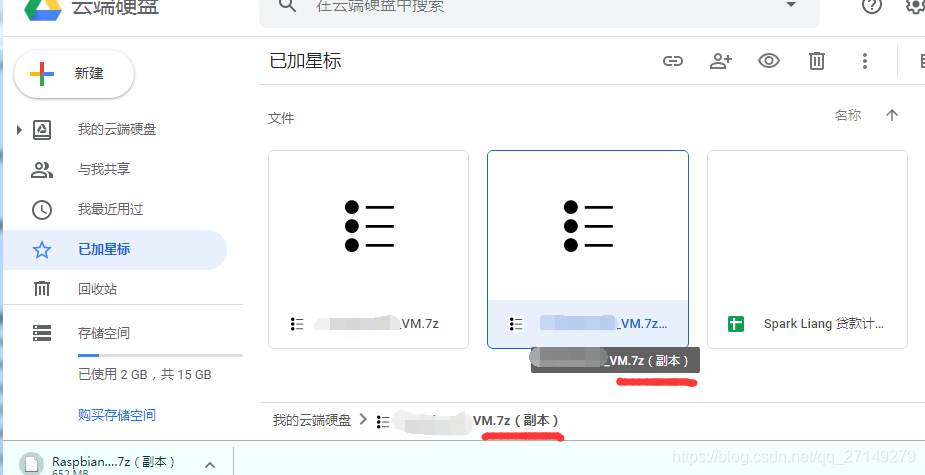
1, first star files: back to their own Google network disk, find just star files right-click – copy will produce a copy after it is copied
Select the copy and right-click – download
Create game scenes in Unity
Learn how to use Unity to create a 3D Beat Em Up game in this full tutorial from Awesome Tuts.
Learn how to create a 3D Beat Em Up game using Unity in the full tutorial on Awesome Tuts.
This tutorial covers everything you need to know to make a basic Beat Em Up game. You are even provided the 3D assets!
This tutorial covers everything you need to know to make a basic Beat Em Up game. You even get a 3D resource!
Here are the topics covered in the course:
The following topics are covered in this course:
According to the Animations, it is important to create a single Character Animation Script so that the players can’t Attack the shaping of Our Player To detect And deal with Damage to Character Animation Delegate Script, The Enemy Movement Script is configured to create Player Attack Points For Detecting And Dealing Damage to The Health Script Create healthy Script Knocking Down Enemy With Combos use combination Down Enemy Adding Sound FX In The Game In The Game To add Sound effects Camera Shake FX Camera vibration effect Enemy Attack Points And ‘Dealing Damage To Player attacking Enemy And The Enemy To The harm of The Player Manager Manager Script Script The Enemy Displaying the Health Stats With the UI using the UI display Health status
You can watch the full video on the freeCodeCamp.org YouTube Channel (4.5 Hour Watch).
You can watch the full video (4.5 hours) on the freeCodeCamp.org YouTube channel.
In general, pause(a) means that a program continues execution after a second has been paused, but sometimes there are instances where there is only pause. There is no parameter A, which means that the program is paused and any key is pressed to continue execution.