Author Archives: Robins

Ubuntu starts or restarts SSH service

To open SSH service, you first need to install the library to open SSH service:

sudo apt-get install openssh-server

Check the current SSH opening status:

ps -e |grep ssh

If SSHD is present, sSH-Server is already started. If there is only agent, it has not been started;
open SSH service:

/etc/init.d/ssh start

To start or want to restart SSH, modify the configuration and restart the SSH service:

vi /etc/ssh/sshd_config

Then you can see the configuration file and modify it according to the requirements.
restart SSH:

sudo /etc/init.d/ssh restart

Notes on atom editor_ (11) Editor previews HTML page in real time (add in: atom HTML preview)

Why looking for
Every time you preview an HTML page, you need to open a variety of browsers. Even if it’s not debugging, just to see what it looks like;
switch to switch, all kinds of refresh, feel a waste of time; I’ve used DW’s real-time preview before, and I think it’s a great feature.
is back in the atom plug-in repository…
Plug-in: atom – HTML – preview

A live preview tool for Atom Editor.
:A live preview tool for Atom Editor

access

    installs

from the command line
apm install atom-html-preview

    1. search

atom-html-preview

    install

via install inside the editor


Usage and effect
shortcuts
Default shortcut: CTRL + P, which will conflict with the built-in core plugin (switch files) – very difficult to modify: CTRL + F12(easy to use and no conflict shortcut)

#Live Browser Call Shortcuts
'atom-text-editor':
  'ctrl-F12':'atom-html-preview:toggle'

Tips:
is written in the keymap with the highest weight… Newer versions of Atom have the Dev Live Reload plug-in built in;
The purpose of this plug-in is to reload all styles and rules, similar to Linux source xx. Sh … The call shortcut is CTRL + SHIFT + ALT +R
Of course, closing Atom and then opening the Atom editor also reloads all the style rules…
rendering
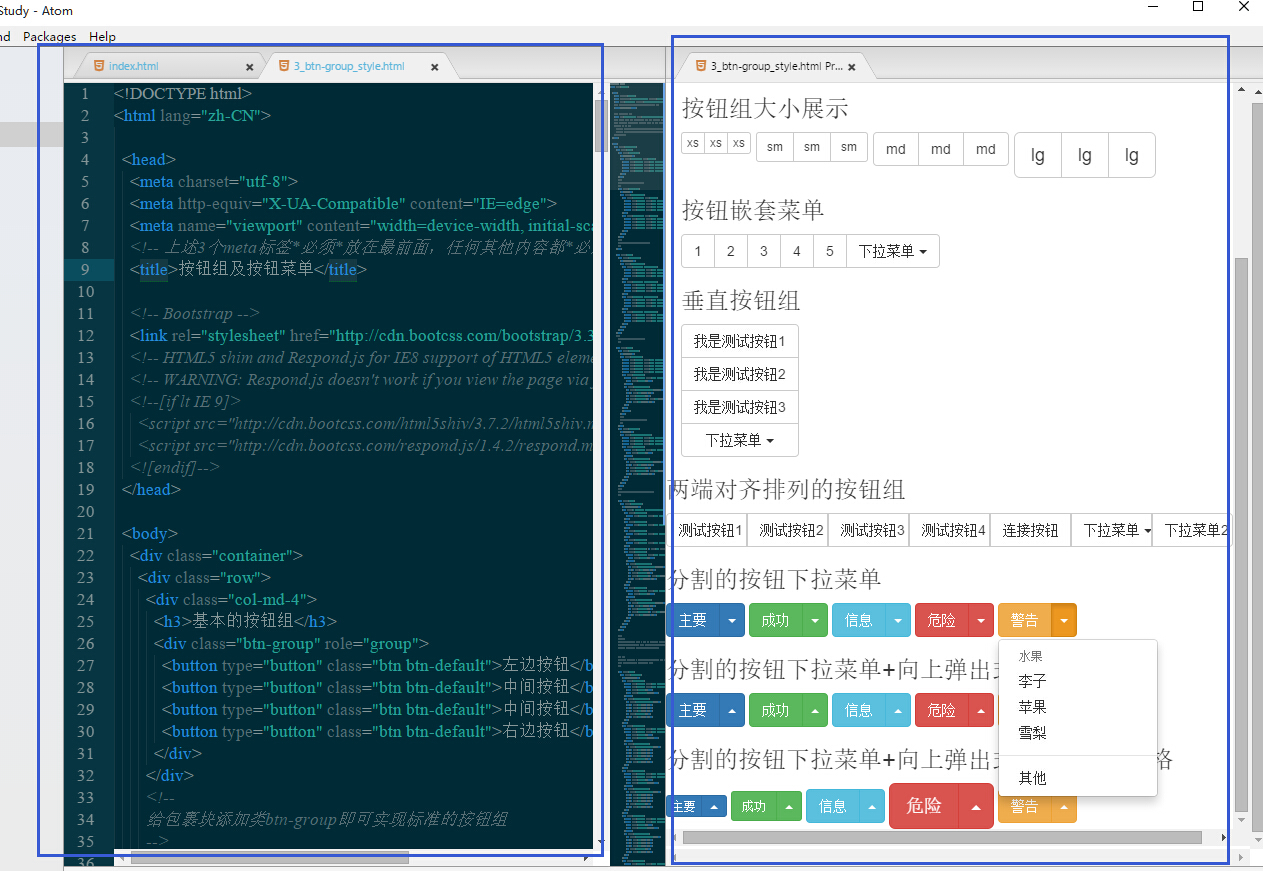
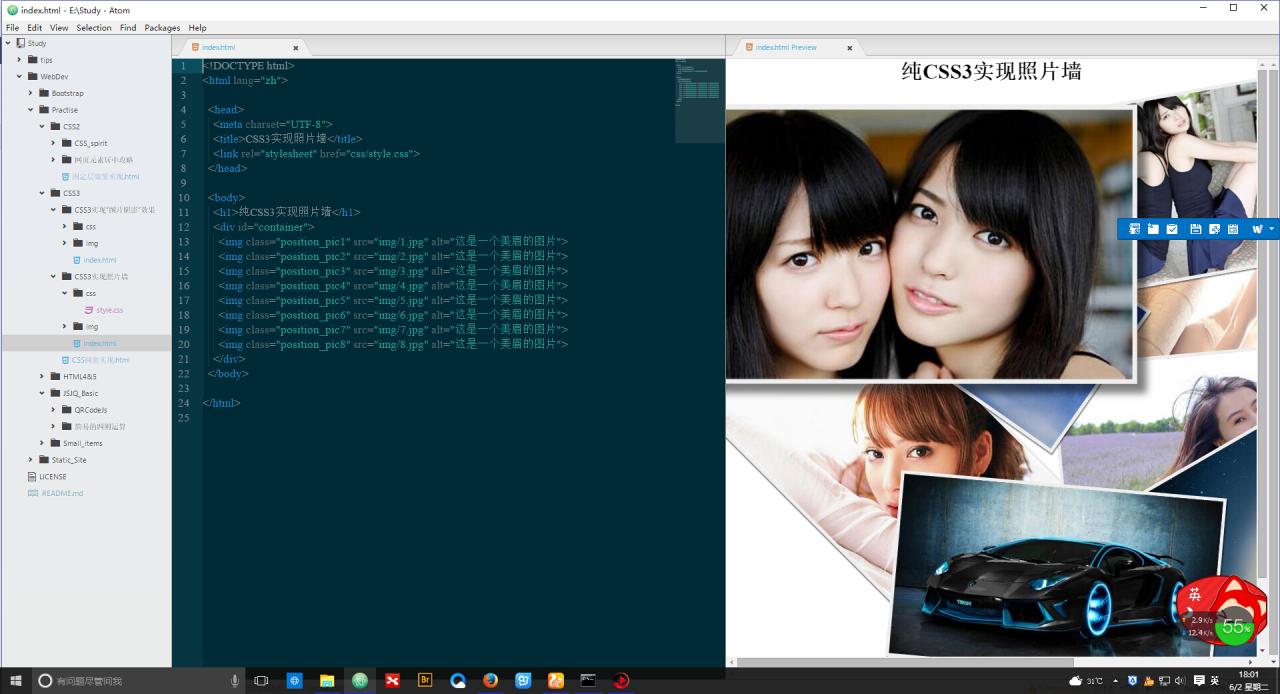
I used pages written by THE BS framework to test… Can be correctly previewed, internal CSS is CDN also can be correctly identified


Browser guess
When I went to the github repository page of the plug-in, I only saw some cson rules, no external browser was called…
So there’s only one answer… It’s chromium… So the kernel should also be blink
and below is atom which refers to the external description.

Web native applications

Atom is a web-based desktop application that, like other desktop applications, has its own ICONS, local menus, dialog boxes, and access to the entire file system.

Whether you’re tweaking Atom’s CSS interface or adding some of the main HTML and JavaScript features, it’s easy to control and easy to use.

Ha ha… Of course, if you’re wrong, everyone should be laughing… Just smile…
Soft bin address: Atom-HTML-Preview

Detailed steps for installing Visual Studio 2010 + Intel parallel studio Xe 2013 and configuring mpich2

Pre-installation Instructions
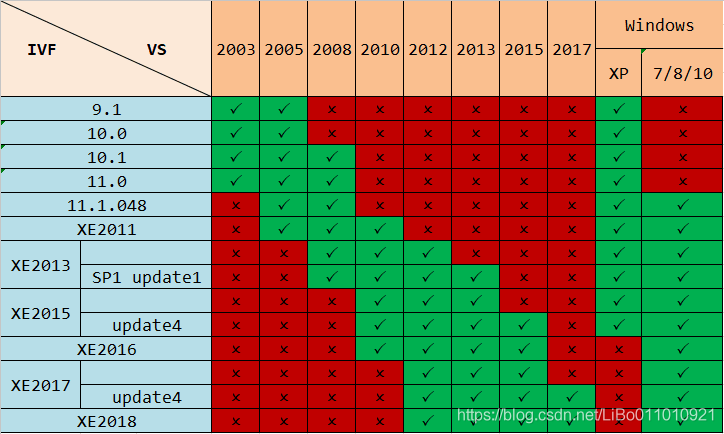
Before installation, it is necessary to determine whether your VS and IVF version matches, as shown in the figure below. Also, the MPICH version is very important, this article USES the 32-bit, if the installation of 64-bit cannot be configured, it will be mentioned later.

Install Visual Studio 2010

    download Visual studio 2010 unzip and double-click setup.exe “Next” until finished, select exit;

Install Intel Parallel Studio XE 2013

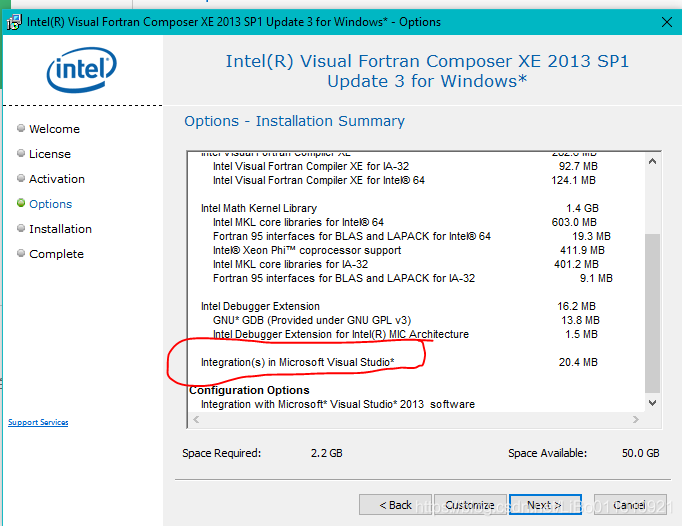
    close VS(otherwise cannot load ivf template) unzip w_fcompxe_novsshell_2013.2.149.zip double-click the installation file, open it, select license configuration, and select lic under the installation file; When it comes to Options, look at the Installation Summary list for instructions added to VS, which is the part with the red coil. If so, it means that after IVF you will be able to use Fortran in VS.
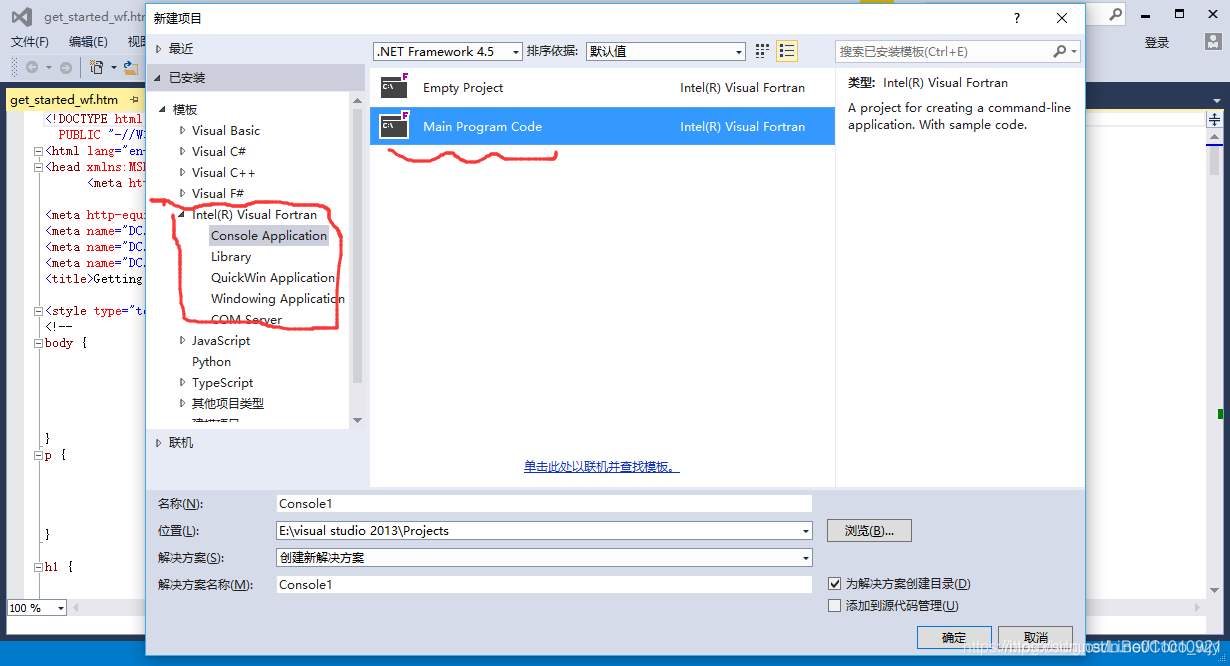
    starts the installation to check whether the FORTRAN module has been successfully added, as shown in the figure below

Install and configure MPICH2

    double-click and install mpich2-1.4.1p1-win-ia32.msi(the installation file provided in the network disk linked in this paper requires mpich of version 32, and the hosts of “Get setting” of the 64-bit version cannot be changed to green when wmpiconfig. Exe is used); After installation, strictly follow the configuration file (win7_vS2010_mpich2.pdf) given;

User CF itemcf collaborative filtering algorithm based on user and item

UserCF:
weight coefficient: the similarity between all non-target users and Target users, normalized (that is, the sum is 1).
calculates the score of the ith item by multiplying the score of the Target item by the weight factor of the non-target user.
considering that some users like high score and some like low score, decentralization + centralization strategy is often adopted.

1 2 3 4 5
A 10 9 9 8 10
B 7 4

6 6 5
C 10 7 10 10 10
D 10 9 7 7 9
E 6<10/td>

7

8

?

For here

S

E

.

5

S_{E,5}

SE, the value of 5:
1. Calculate the similarity of user 1-4 and 5 (use the value of goods A-> D);
2. Normalization of similarity, that is, the sum of 4 similarities is 1; 3. The ith similarity times (the ith user’s rating of item E – the ith user’s average rating of all items) (decentralize), sum the four results, and add the average rating of Target user (centralize). I = 1, 2, 3, 4.
ItemCF:
weight coefficient: similarity of non-target goods, and normalized (making the sum 1);
then multiply each non-target user’s rating of the Target product by the weight coefficient to get the Target user’s rating.
Ditto for

S

E

.

5

S_{E,5}

The value of SE,5:
1. Calculate the similarity of goods a-d and E (using 1-4 users with ratings);
2. Normalization of similarity coefficient; 3. The ith similarity multiplied by (user 5’s score for item j – user 5’s average score for all items) (decentralize), sum the four results, plus the average score for item E from user 1-4 (centralize). Ibid., j=A,B,C,D.

Free dynamic screen capture drawing tool under MAC: KAP

preface
If you want to take live screenshots on your MAC, here’s a free tool: KAP.
The address of the project: https://github.com/wulkano/Kap
download
1) homebrewCask installation (not recommended)
brew cask install kap
2) official website release
https://github.com/wulkano/kap/releases
3) My network disk sharing (fast and permanent)
Link: https://pan.baidu.com/s/1YGZ8p5HHN3Xsnp4dY-0a9A password: ficg
The installation
Double-click DMG to install directly
use
1. Click Kap in the docking station

2. Click the KAP icon in the top taskbar

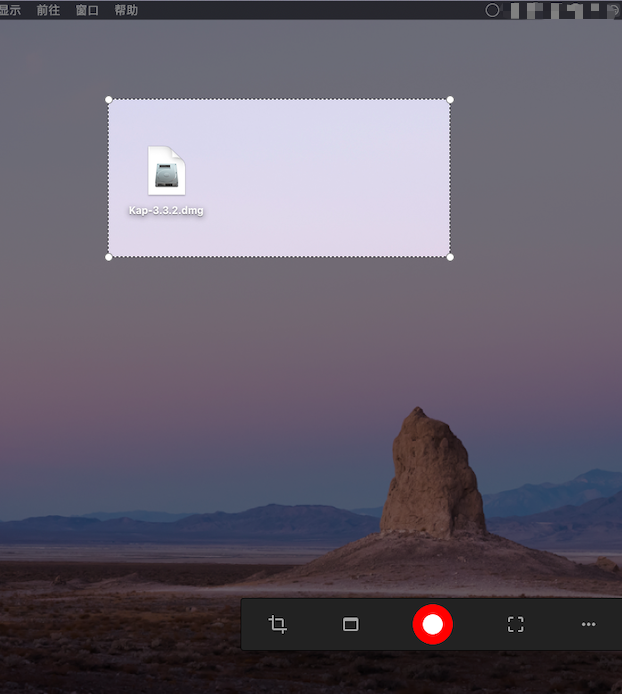
3. After the mouse becomes a cross, hold down and drag to select the range

5. After selecting the range, click the red circle button above to start recording the screen.
6. After recording, click the KAP icon (circle) in the top menu bar.
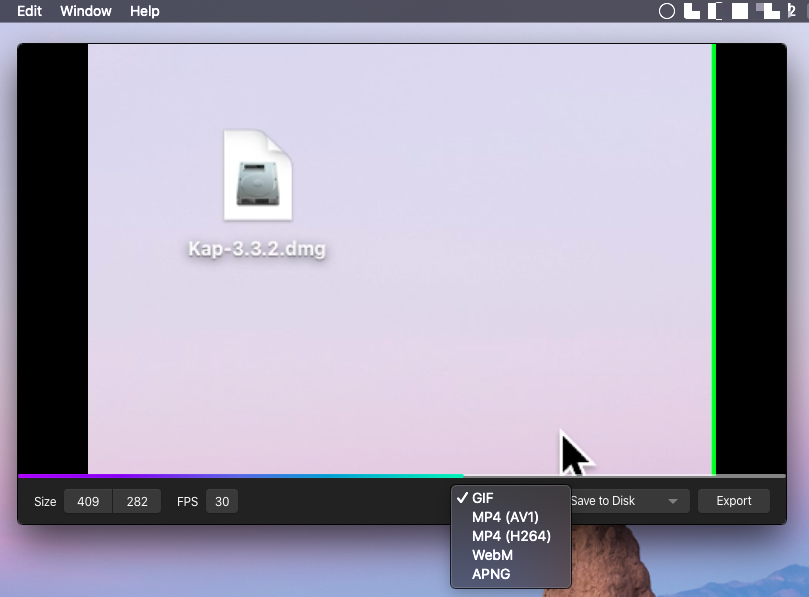
7. As shown in the figure below, you can choose to Export to GIF format. Click Export and select save path


Blogger: Test to make money
Motto: Focus on testing and automation, to improve the efficiency of RESEARCH and development; Through the test to complete the original accumulation, through reading financial management toward financial freedom.
csdn:https://blog.csdn.net/ccgshigao
Garden: blog https://www.cnblogs.com/qa-freeroad/
51 cto:https://blog.51cto.com/14900374


Python+OpenCV: How to Use Background Subtraction Methods

Python+OpenCV:How to Use Background Subtraction Methods
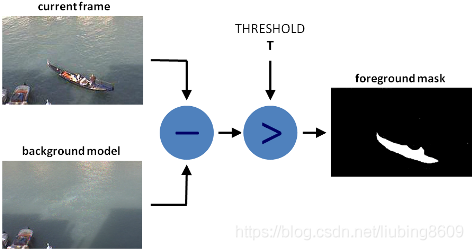
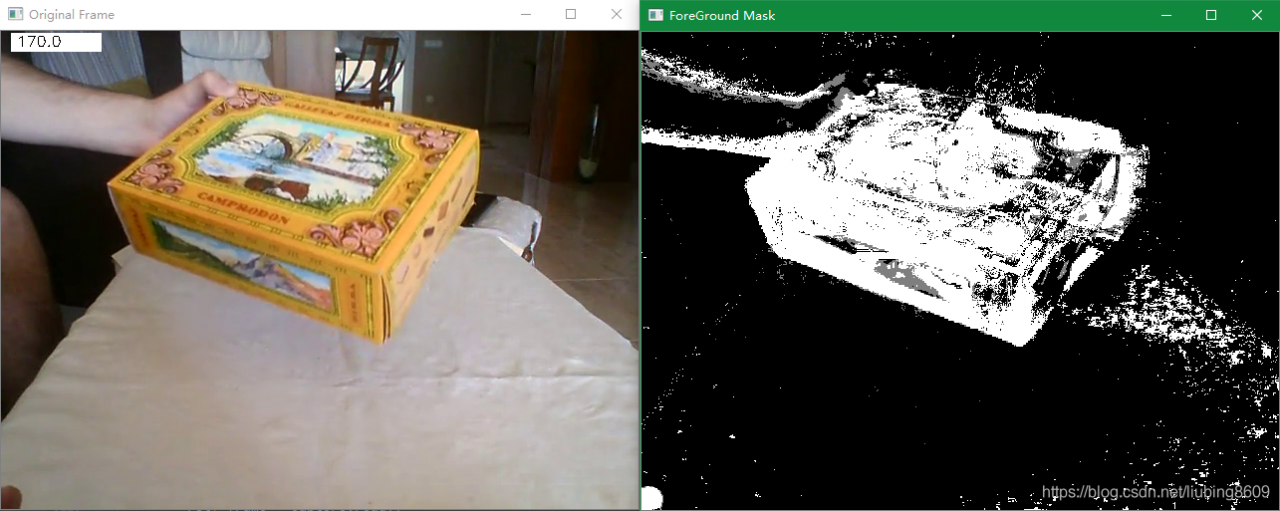
Background subtraction (BS) is a common and widely used technique for generating a foreground mask (namely, a binary image containing the pixels belonging to moving objects in the scene) by using static cameras. As the name suggests, BS calculates the foreground mask performing a subtraction between the current frame and a background model, containing the static part of the scene or, more in general, everything that can be considered as background given the characteristics of the observed scene.

Background modeling consists of two main steps:

    Background Initialization;Background Update.

In the first step, an initial model of the background is computed, while in the second step that model is updated in order to adapt to possible changes in the scene.
Background Subtraction in OpenCV

####################################################################################################
# 图像背景减法(Background Subtraction Methods)
def lmc_cv_background_subtraction():
    """
        Function: Background Subtraction Methods.
    """"

    # Read the vide
    parser = argparse.ArgumentParser(description='This program shows how to use background subtraction methods\
                                                provided by OpenCV. You can process both videos and images.')
    parser.add_argument('--input', type=str, help='Path to a video or a sequence of image.',
                        default='D:/99-Research/Python/Image/box.mp4')
    parser.add_argument('--algo', type=str, help='Background subtraction method (KNN, MOG2).', default='MOG2')
    args = parser.parse_args()
    # A lmc_cv::BackgroundSubtractor object will be used to generate the foreground mask.
    if args.algo == 'MOG2':
        back_sub = lmc_cv.createBackgroundSubtractorMOG2()
    else:
        back_sub = lmc_cv.createBackgroundSubtractorKNN()
    # A lmc_cv::VideoCapture object is used to read the input video or input images sequence.
    capture = lmc_cv.VideoCapture(lmc_cv.samples.findFileOrKeep(args.input))
    if not capture.isOpened:
        print('Unable to open: ' + args.input)
        exit(0)
    while True:
        ret, frame = capture.read()
        if frame is None:
            break
        # Every frame is used both for calculating the foreground mask and for updating the background.
        fg_mask = back_sub.apply(frame)
        # get the frame number and write it on the current frame
        lmc_cv.rectangle(frame, (10, 2), (100, 20), (255, 255, 255), -1)
        lmc_cv.putText(frame, str(capture.get(lmc_cv.CAP_PROP_POS_FRAMES)), (15, 15),
                       lmc_cv.FONT_HERSHEY_SIMPLEX, 0.5, (0, 0, 0))
        # show the current frame and the ForeGround masks
        lmc_cv.imshow('Original Frame', frame)
        lmc_cv.imshow('ForeGround Mask', fg_mask)
        # quit
        keyboard = lmc_cv.waitKey(30)
        if keyboard == 'q' or keyboard == 27:
            break
    return

MySQL automatically creates partitions through events

Automatic execution using mysql event timing

BEGIN
	set @table_name = concat('p', DATE_FORMAT(DATE_ADD(NOW(),INTERVAL 1 DAY),'%Y%m%d'));
	set @max_value  = DATE_FORMAT(DATE_ADD(NOW(),INTERVAL 1 DAY),'%Y%m%d');
	set @excutesql  = CONCAT('ALTER TABLE TITLE ADD PARTITION (PARTITION ',@table_name,' VALUES LESS THAN ("',@max_value,'"))');
	SELECT @excutesql;
	PREPARE stmt from @excutesql;
	EXECUTE stmt;
	DEALLOCATE PREPARE stmt;
END

Installing rabbitmq on alicloud server

1. Install Erlang
Because RabbitMQ is developed in the Erlang language, you install Erlang first

yum install erlang

Download the RPM package

 wget http://www.rabbitmq.com/releases/rabbitmq-server/v3.6.15/rabbitmq-server-3.6.15-1.el7.noarch.rpm

3. Install after downloading

yum install rabbitmq-server-3.6.15-1.el7.noarch.rpm

4. Restart the service after installation

service rabbitmq-server start

5. Check service status

service rabbitmq-server status

6. Install the plug-in

/sbin/rabbitmq-plugins enable rabbitmq_management 

Restart the service

service rabbitmq-server restart

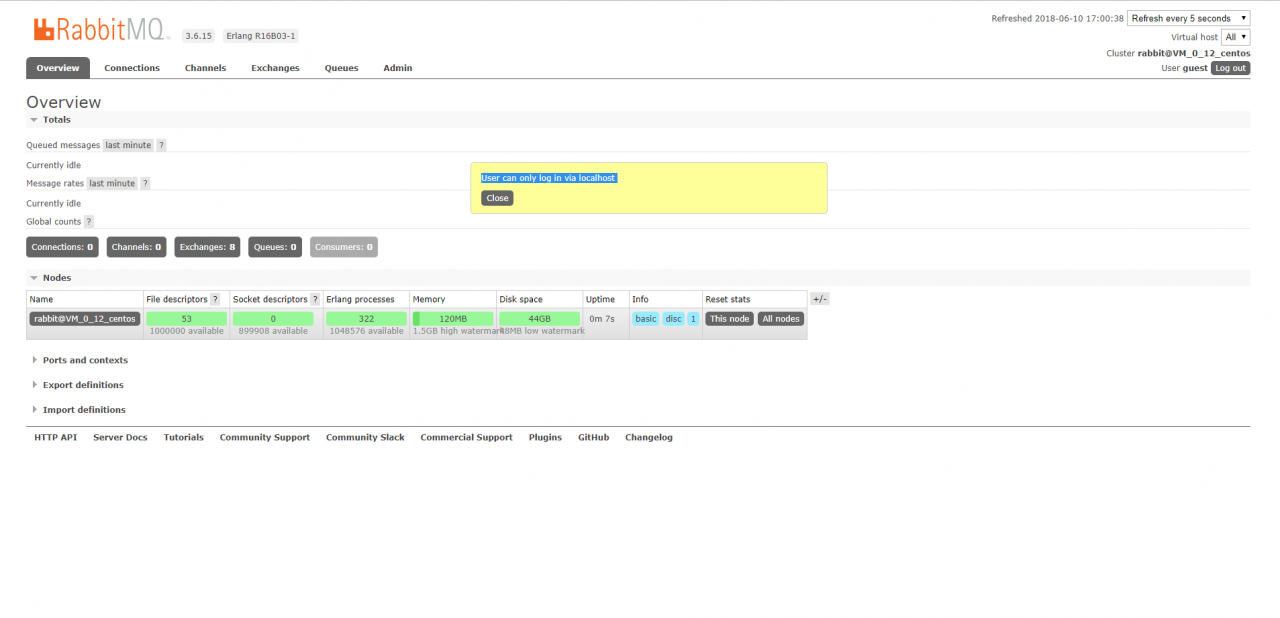
At this point, you can go to http://ip:15672 to access the page. The default password is “guest/guest”.
However, starting with version 3.3.0, access other than using guest/guest to log in to localhost is prohibited. The solution is to find
Rabbitmq_server-3.6.15 /ebin/ Rabbitmq_server-3.6.15 /ebin/ Rabbit.app

{loopback_users, [<<"guest">>]},

Is amended as:

{loopback_users, []},

Then restart it.
7. Access

Error: required request body is missing, @ requestbody annotation usage

RequestBody is a json formatted parameter converted to Java Type,
for receiving content-type application/json requests, data Type is json: {” aaa “:” 111 “, “BBB” : “222”}
When not using the @RequestBody annotation, one may receive data submitted in a Content-type application/ X-www-Form-urlencoded Type request, in a format of AAA =111& BBB =222,form form submission and jQuery’s.post() method send requests of this type.
JQuery’s $. Ajax (url, [Settings])
1. The default ContentType value is: Application/x-www-Form-urlencoded; Charset = utf-8
this format is the form submission format, the data is key1=value1& Key2 = value2 format
2. Although the ajax data attribute value format is :{key1:value1,key2:value2}, it will be changed to key1=value1& The key2=value2 format is submitted to the background
3. If Ajax wants to interact with SpringMVC, key1=value1& Key2 =value2 format, springMVC in the background only need to define the object or parameter, will be automatically mapped.
4. If springMVC parameters have @RequestBody annotation (receive JSON string format data), Ajax must convert the date property value to JSON string, not to JSON object (js object, automatically converted to key=value). Also, change the value of the contentType to: Application/JSON; Charset =UTF-8, so attributes annotated with @RequestBody are self-mapped to values
note that the requested parameters are not in json format, not in json format, and do not annotate with @requestbody

UnicodeEncodeError: ‘ascii’ codec can’t encode characters in position 0-2: ordinal not in range(128)

UnicodeEncodeError: ‘ASCII’ Codec can’t encode characters in position 0-2: ordinal not in range(128
Solution:
(1) set the environment variable LANG
, modify ~/.profile file, and execute:

export LANG=“en_US.UTF-8” >> ~/.profile
source ~/.bash_profile

(2) Add UTF-8 to the Python execution command, execute:

export PYTHONIOENCODING=utf-8 >> ~/.bashrc
source ~/.bashrc

Transfer: https://www.cnblogs.com/beile/p/12980149.html

How To Install WordPress with LAMP on Ubuntu 16.04

Introduction
WordPress is the most popular CMS (content management system) on the internet. It allows you to easily set up flexible blogs and websites on top of a MySQL backend with PHP processing. WordPress has seen incredible adoption and is a great choice for getting a website up and running quickly. After setup, almost all administration can be done through the web frontend.
In this guide, we’ll focus on getting a WordPress instance set up on a LAMP stack (Linux, Apache, MySQL, and PHP) on an Ubuntu 16.04 server.Prerequisites
In order to complete this tutorial, you will need access to an Ubuntu 16.04 server.
You will need to perform the following tasks before you can start this guide:
Create a sudo user on your server: We will be completing the steps in this guide using a non-root user with sudo privileges. You can create a user with sudo privileges by following our Ubuntu 16.04 initial server setup guide. Install a LAMP stack: WordPress will need a web server, a database, and PHP in order to correctly function. Setting up a LAMP stack (Linux, Apache, MySQL, and PHP) fulfills all of these requirements. Follow this guide to install and configure this software. Secure your site with SSL: WordPress serves dynamic content and handles user authentication and authorization. TLS/SSL is the technology that allows you to encrypt the traffic from your site so that your connection is secure. The way you set up SSL will depend on whether you have a domain name for your site.
If you have a domain name…  the easiest way to secure your site is with Let’s Encrypt, which provides free, trusted certificates. Follow our Let’s Encrypt guide for Apache to set this up. If you do not have a domain…  and you are just using this configuration for testing or personal use, you can use a self-signed certificate instead. This provides the same type of encryption, but without the domain validation. Follow our self-signed SSL guide for Apache to get set up.
When you are finished the setup steps, log into your server as your sudo user and continue below.Step 1: Create a MySQL Database and User for WordPress
The first step that we will take is a preparatory one. WordPress uses MySQL to manage and store site and user information. We have MySQL installed already, but we need to make a database and a user for WordPress to use.
To get started, log into the MySQL root (administrative) account by issuing this command:

mysql -u root -p

You will be prompted for the password you set for the MySQL root account when you installed the software.
First, we can create a separate database that WordPress can control. You can call this whatever you would like, but we will be using wordpress in this guide to keep it simple. You can create the database for WordPress by typing:

CREATE DATABASE wordpress DEFAULT CHARACTER SET utf8 COLLATE utf8_unicode_ci;

Note: Every MySQL statement must end in a semi-colon (;). Check to make sure this is present if you are running into any issues.
Next, we are going to create a separate MySQL user account that we will use exclusively to operate on our new database. Creating one-function databases and accounts is a good idea from a management and security standpoint. We will use the name wordpressuser in this guide. Feel free to change this if you’d like.
We are going to create this account, set a password, and grant access to the database we created. We can do this by typing the following command. Remember to choose a strong password here for your database user:

GRANT ALL ON wordpress. * TO ‘wordpressuser’@’localhost’ IDENTIFIED BY ‘password’;

You now have a database and user account, each made specifically for WordPress. We need to flush the privileges so that the current instance of MySQL knows about the recent changes we’ve made:

FLUSH PRIVILEGES;

Exit out of MySQL by typing:

EXIT;

Step 2: Install Additional PHP Extensions
When setting up our LAMP stack, we only required a very minimal set of extensions in order to get PHP to communicate with MySQL. WordPress and many of its plugins leverage additional PHP extensions.
We can download and install some of the most popular PHP extensions for use with WordPress by typing:

sudo apt-get updatesudo apt-get install php-curl php-gd php-mbstring php-mcrypt php-xml php-xmlrpc

Note

Each WordPress plugin has its own set of requirements. Some may require additional PHP packages to be installed. Check your plugin documentation to discover its PHP requirements. If they are available, they can be installed with apt-get as demonstrated above.
We will restart Apache to leverage these new extensions in the next section. If you are returning here to install additional plugins, you can restart Apache now by typing:

sudo systemctl restart apache2

Step 3: Adjust Apache’s Configuration to Allow for .htaccess Overrides and Rewrites
Next, we will be making a few minor adjustments to our Apache configuration. Currently, the use of . htaccess files is disabled. WordPress and many WordPress plugins use these files extensively for in-directory tweaks to the web server’s behavior.
Additionally, we will enable mod_rewrite, which will be needed in order to get WordPress permalinks to function correctly.
Enable .htaccess Overrides
Open the primary Apache configuration file to make our first change:

sudo nano /etc/apache2/apache2.conf

To allow . htaccess files, we need to set the AllowOverride directive within a Directory block pointing to our document root. Towards the bottom of the file, add the following block:

/etc/apache2/apache2.conf

. . .

<Directory /var/www/html/>
    AllowOverride All
</Directory>

. . .

When you are finished, save and close the file.
Enable the Rewrite Module
Next, we can enable mod_rewrite so that we can utilize the WordPress permalink feature:

sudo a2enmod rewrite

Enable the Changes
Before we implement the changes we’ve made, check to make sure we haven’t made any syntax errors:

sudo apache2ctl configtest

The output might have a message that looks like this:

Output

AH00558: apache2: Could not reliably determine the server's fully qualified domain name, using 127.0.1.1. Set the 'ServerName' directive globally to suppress this message
Syntax OK

If you wish to suppress the top line, just add a ServerName directive to the /etc/apache2/apache2. conf file pointing to your server’s domain or IP address. This is just a message however and doesn’t affect the functionality of our site. As long as the output contains Syntax OK, you are ready to continue.
Restart Apache to implement the changes:

sudo systemctl restart apache2

Step 4: Download WordPress
Now that our server software is configured, we can download and set up WordPress. For security reasons in particular, it is always recommended to get the latest version of WordPress from their site.
Change into a writable directory and then download the compressed release by typing:

cd /tmpcurl -O https://wordpress.org/latest.tar.gz

Extract the compressed file to create the WordPress directory structure:

tar xzvf latest.tar.gz

We will be moving these files into our document root momentarily. Before we do, we can add a dummy . htaccess file and set its permissions so that this will be available for WordPress to use later.
Create the file and set the permissions by typing:

touch /tmp/wordpress/.htaccesschmod 660 /tmp/wordpress/.htaccess

We’ll also copy over the sample configuration file to the filename that WordPress actually reads:

cp /tmp/wordpress/wp-config-sample.php /tmp/wordpress/wp-config.php

We can also create the upgrade directory, so that WordPress won’t run into permissions issues when trying to do this on its own following an update to its software:

mkdir /tmp/wordpress/wp-content/upgrade

Now, we can copy the entire contents of the directory into our document root. We are using the -a flag to make sure our permissions are maintained. We are using a dot at the end of our source directory to indicate that everything within the directory should be copied, including hidden files (like the . htaccessfile we created):

sudo cp -a /tmp/wordpress/. /var/www/html

Step 5: Configure the WordPress Directory
Before we do the web-based WordPress setup, we need to adjust some items in our WordPress directory.
Adjusting the Ownership and Permissions
One of the big things we need to accomplish is setting up reasonable file permissions and ownership. We need to be able to write to these files as a regular user, and we need the web server to also be able to access and adjust certain files and directories in order to function correctly.
We’ll start by assigning ownership over all of the files in our document root to our username. We will use sammy as our username in this guide, but you should change this to match whatever your sudo user is called. We will assign group ownership to the www-data group:

sudo chown -R sammy:www-data /var/www/html

Next, we will set the setgid bit on each of the directories within the document root. This causes new files created within these directories to inherit the group of the parent directory (which we just set to www-data) instead of the creating user’s primary group. This just makes sure that whenever we create a file in the directory on the command line, the web server will still have group ownership over it.
We can set the setgid bit on every directory in our WordPress installation by typing:

sudo find /var/www/html -type d -exec chmod g+s {} \;

There are a few other fine-grained permissions we’ll adjust. First, we’ll give group write access to the wp-content directory so that the web interface can make theme and plugin changes:

sudo chmod g+w /var/www/html/wp-content

As part of this process, we will give the web server write access to all of the content in these two directories:

sudo chmod -R g+w /var/www/html/wp-content/themessudo chmod -R g+w /var/www/html/wp-content/plugins

This should be a reasonable permissions set to start with. Some plugins and procedures might require additional tweaks.
Setting up the WordPress Configuration File
Now, we need to make some changes to the main WordPress configuration file.
When we open the file, our first order of business will be to adjust some secret keys to provide some security for our installation. WordPress provides a secure generator for these values so that you do not have to try to come up with good values on your own. These are only used internally, so it won’t hurt usability to have complex, secure values here.
To grab secure values from the WordPress secret key generator, type:

curl -s https://api.wordpress.org/secret-key/1.1/salt/

You will get back unique values that look something like this:
Warning!  It is important that you request unique values each time. Do NOT copy the values shown below!

Output

define('AUTH_KEY',         '1jl/vqfs<XhdXoAPz9 DO NOT COPY THESE VALUES c_j{iwqD^<+c9.k<J@4H');
define('SECURE_AUTH_KEY',  'E2N-h2]Dcvp+aS/p7X DO NOT COPY THESE VALUES {Ka(f;rv?Pxf})CgLi-3');
define('LOGGED_IN_KEY',    'W(50,{W^,OPB%PB<JF DO NOT COPY THESE VALUES 2;y&,2m%3]R6DUth[;88');
define('NONCE_KEY',        'll,4UC)7ua+8<!4VM+ DO NOT COPY THESE VALUES #`DXF+[$atzM7 o^-C7g');
define('AUTH_SALT',        'koMrurzOA+|L_lG}kf DO NOT COPY THESE VALUES  07VC*Lj*lD&?3w!BT#-');
define('SECURE_AUTH_SALT', 'p32*p,]z%LZ+pAu:VY DO NOT COPY THESE VALUES C-?y+K0DK_+F|0h{!_xY');
define('LOGGED_IN_SALT',   'i^/G2W7!-1H2OQ+t$3 DO NOT COPY THESE VALUES t6**bRVFSD[Hi])-qS`|');
define('NONCE_SALT',       'Q6]U:K?j4L%Z]}h^q7 DO NOT COPY THESE VALUES 1% ^qUswWgn+6&xqHN&%');

These are configuration lines that we can paste directly in our configuration file to set secure keys. Copy the output you received now.
Now, open the WordPress configuration file:

nano /var/www/html/wp-config.php

Find the section that contains the dummy values for those settings. It will look something like this:

/var/www/html/wp-config.php

. . .

define('AUTH_KEY',         'put your unique phrase here');
define('SECURE_AUTH_KEY',  'put your unique phrase here');
define('LOGGED_IN_KEY',    'put your unique phrase here');
define('NONCE_KEY',        'put your unique phrase here');
define('AUTH_SALT',        'put your unique phrase here');
define('SECURE_AUTH_SALT', 'put your unique phrase here');
define('LOGGED_IN_SALT',   'put your unique phrase here');
define('NONCE_SALT',       'put your unique phrase here');

. . .

Delete those lines and paste in the values you copied from the command line:

/var/www/html/wp-config.php

. . .

define('AUTH_KEY',         'VALUES COPIED FROM THE COMMAND LINE');
define('SECURE_AUTH_KEY',  'VALUES COPIED FROM THE COMMAND LINE');
define('LOGGED_IN_KEY',    'VALUES COPIED FROM THE COMMAND LINE');
define('NONCE_KEY',        'VALUES COPIED FROM THE COMMAND LINE');
define('AUTH_SALT',        'VALUES COPIED FROM THE COMMAND LINE');
define('SECURE_AUTH_SALT', 'VALUES COPIED FROM THE COMMAND LINE');
define('LOGGED_IN_SALT',   'VALUES COPIED FROM THE COMMAND LINE');
define('NONCE_SALT',       'VALUES COPIED FROM THE COMMAND LINE');

. . .

Next, we need to modify some of the database connection settings at the beginning of the file. You need to adjust the database name, the database user, and the associated password that we configured within MySQL.
The other change we need to make is to set the method that WordPress should use to write to the filesystem. Since we’ve given the web server permission to write where it needs to, we can explicitly set the filesystem method to “direct”. Failure to set this with our current settings would result in WordPress prompting for FTP credentials when we perform some actions.
This setting can be added below the database connection settings, or anywhere else in the file:

/var/www/html/wp-config.php

. . .

define('DB_NAME', 'wordpress');

/** MySQL database username */
define('DB_USER', 'wordpressuser');

/** MySQL database password */
define('DB_PASSWORD', 'password');

. . .

define('FS_METHOD', 'direct');

Save and close the file when you are finished.

Step 6: Complete the Installation Through the Web Interface
Now that the server configuration is complete, we can complete the installation through the web interface.
In your web browser, navigate to your server’s domain name or public IP address:

http://server_domain_or_IP

Select the language you would like to use:
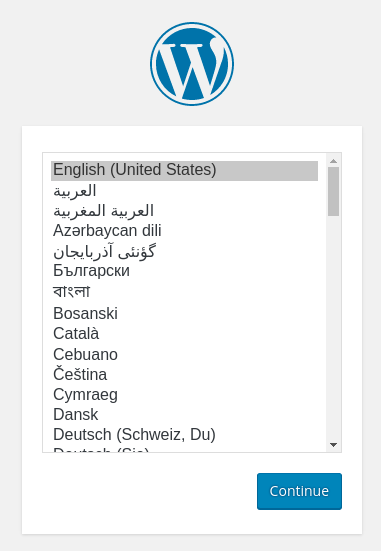
Next, you will come to the main setup page.
Select a name for your WordPress site and choose a username (it is recommended not to choose something like “admin” for security purposes). A strong password is generated automatically. Save this password or select an alternative strong password.
Enter your email address and select whether you want to discourage search engines from indexing your site:
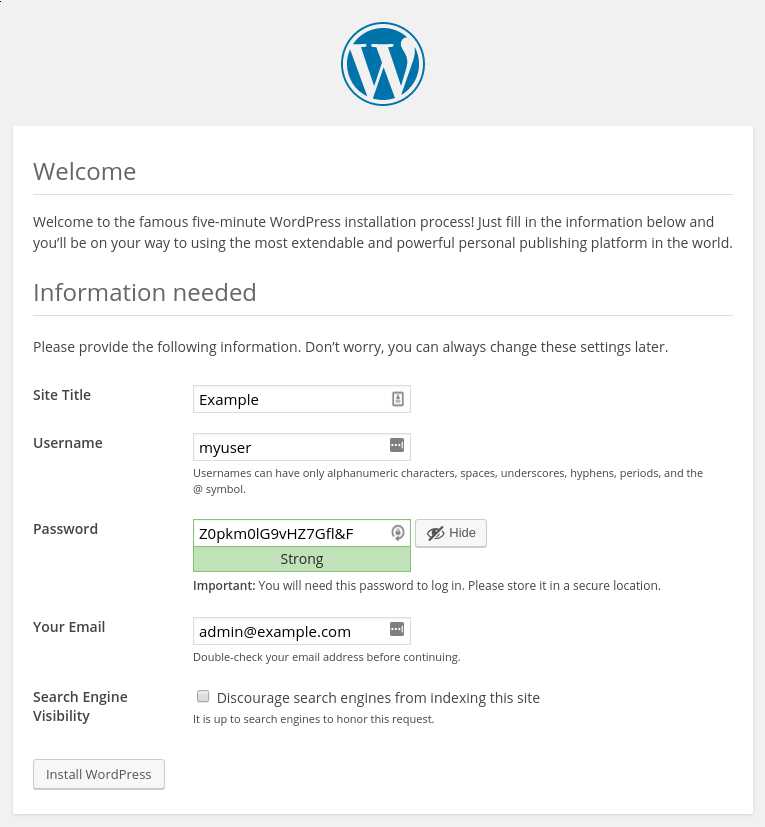
When you click ahead, you will be taken to a page that prompts you to log in:
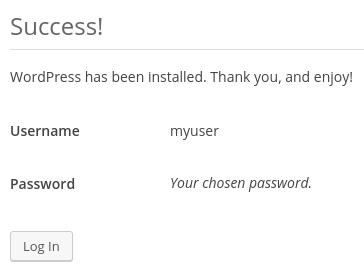
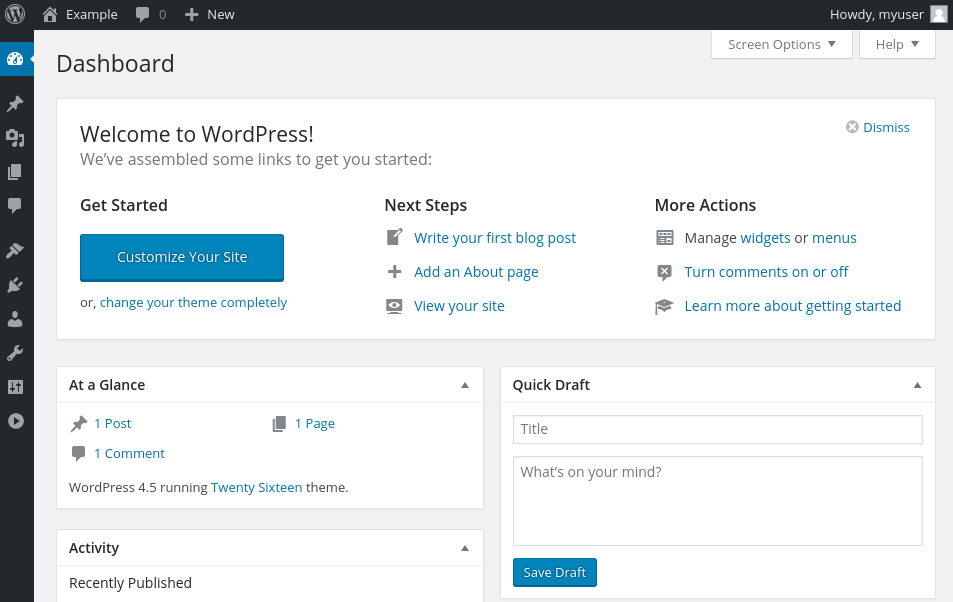
Once you log in, you will be taken to the WordPress administration dashboard:
Upgrading WordPress
As WordPress upgrades become available, you will be unable in install them through the interface with the current permissions.
The permissions we selected here are meant to provide a good balance between security and usability for the 99% of times between upgrading. However, they are a bit too restrictive for the software to automatically apply updates.
When an update becomes available, log back into your server as your sudo user. Temporarily give the web server process access to the whole document root:

sudo chown -R www-data /var/www/html

Now, go back the WordPress administration panel and apply the update.
When you are finished, lock the permissions down again for security:

sudo chown -R sammy /var/www/html

This should only be necessary when applying upgrades to WordPress itself.

Conclusion
WordPress should be installed and ready to use! Some common next steps are to choose the permalinks setting for your posts (can be found in Settings > Permalinks) or to select a new theme (in Appearance > Themes). If this is your first time using WordPress, explore the interface a bit to get acquainted with your new CMS.
How to Install MongoDB Community Edition Manually on mac and linux

Install MongoDB Community Edition Manually
Only install MongoDB Community Edition using this procedure if you cannot use homebrew.

1

Download the binary files for the desired release of MongoDB.
Download the binaries from https://www.mongodb.org/downloads.
For example, to download the latest release through the shell, issue the following:

curl -O https://fastdl.mongodb.org/osx/mongodb-osx-x86_64-3.2.19.tgz

2

Extract the files from the downloaded archive.
For example, from a system shell, you can extract through the tar command:

tar -zxvf mongodb-osx-x86_64-3.2.19.tgz

3

Copy the extracted archive to the target directory.
Copy the extracted folder to the location from which MongoDB will run.

mkdir -p mongodb
cp -R -n mongodb-osx-x86_64-3.2.19/ mongodb

4

Ensure the location of the binaries is in the PATH variable.
The MongoDB binaries are in the bin/ directory of the archive. To ensure that the binaries are in your PATH, you can modify your PATH.
For example, you can add the following line to your shell’s rc file (e.g. ~/.bashrc):

export PATH=<mongodb-install-directory>/bin:$PATH

Replace <mongodb-install-directory> with the path to the extracted MongoDB archive.

Run MongoDB

1

Create the data directory.
Before you start MongoDB for the first time, create the directory to which the mongod process will write data. By default, the mongod process uses the /data/db directory. If you create a directory other than this one, you must specify that directory in the dbpath option when starting the mongod process later in this procedure.
The following example command creates the default /data/db directory:

mkdir -p /data/db

2

Set permissions for the data directory.
Before running mongod for the first time, ensure that the user account running mongod has read and write permissions for the directory.

3

Run MongoDB.
To run MongoDB, run the mongod process at the system prompt. If necessary, specify the path of the mongod or the data directory. See the following examples.

Run without specifying paths
If your system PATH variable includes the location of the mongod binary and if you use the default data directory (i.e., /data/db), simply enter mongod at the system prompt:

mongod

Specify the path of the mongod
If your PATH does not include the location of the mongod binary, enter the full path to the mongodbinary at the system prompt:

<path to binary>/mongod

Specify the path of the data directory
If you do not use the default data directory (i.e., /data/db), specify the path to the data directory using the --dbpath option:

mongod --dbpath <path to data directory>

4

Begin using MongoDB.
To help you start using MongoDB, MongoDB provides Getting Started Guides in various driver editions. See Getting Started for the available editions.
Before deploying MongoDB in a production environment, consider the Production Notes document.
Later, to stop MongoDB, press Control+C in the terminal where the mongod instance is running.


Install MongoDB Community Edition on Red Hat Enterprise or CentOS Linux
Version 3.2 url: https://docs.mongodb.com/v3.2/tutorial/install-mongodb-on-red-hat/

On this page
OverviewPackagesInit ScriptsInstall MongoDB Community EditionRun MongoDB Community EditionUninstall MongoDB Community Edition

Overview
Use this tutorial to install MongoDB Community Edition on Red Hat Enterprise Linux or CentOS Linux versions 6 and 7 using .rpm packages. While some of these distributions include their own MongoDB packages, the official MongoDB Community Edition packages are generally more up to date.

PLATFORM SUPPORT
This installation guide only supports 64-bit systems. See Platform Support for details.
MongoDB 3.2 deprecates support for Red Hat Enterprise Linux 5.

Packages
MongoDB provides officially supported packages in their own repository. This repository contains the following packages:

mongodb-org metapackage that will automatically install the four component packages listed below.
mongodb-org-server Contains the mongod daemon and associated configuration and init scripts.
mongodb-org-mongos Contains the mongos daemon.
mongodb-org-shell Contains the mongo shell.
mongodb-org-tools Contains the following MongoDB tools: mongoimport bsondumpmongodumpmongoexportmongofilesmongooplogmongoperfmongorestoremongostat, and mongotop.

The default /etc/mongod. conf configuration file supplied by the packages have bind_ip set to 127.0.0.1 by default. Modify this setting as needed for your environment before initializing a replica set.

Init Scripts
The mongodb-org package includes various init scripts, including the init script /etc/rc.d/init.d/mongod. You can use these scripts to stop, start, and restart daemon processes.
The package configures MongoDB using the /etc/mongod. conf file in conjunction with the init scripts. See the Configuration File reference for documentation of settings available in the configuration file.
There are no init scripts for mongos. You can use the mongod init script to derive your own mongos init script for use in such environments. See the mongos reference for configuration details.
The default /etc/mongod. conf configuration file supplied by the packages have bind_ip set to 127.0.0.1 by default. Modify this setting as needed for your environment before initializing a replica set.

Install MongoDB Community Edition

NOTE
To install a version of MongoDB prior to 3.2, please refer to that version’s documentation. For example, see version 3.0.

This installation guide only supports 64-bit systems. See Platform Support for details.

1

Configure the package management system (yum).
Create a /etc/yum.repos.d/mongodb-org-3.2. repo file so that you can install MongoDB directly, using yum.

Changed in version 3.0: MongoDB Linux packages are in a new repository beginning with 3.0.

For the latest stable release of MongoDB
Use the following repository file:

[mongodb-org-3.2]
name=MongoDB Repository
baseurl=https://repo.mongodb.org/yum/redhat/$releasever/mongodb-org/3.2/x86_64/
gpgcheck=1
enabled=1
gpgkey=https://www.mongodb.org/static/pgp/server-3.2.asc

For versions of MongoDB earlier than 3.0
To install the packages from an earlier release series, such as 2.4 or 2.6, you can specify the release series in the repository configuration. For example, to restrict your system to the 2.6 release series, create a /etc/yum.repos.d/mongodb-org-2.6. repo file to hold the following configuration information for the MongoDB 2.6 repository:

[mongodb-org-2.6]
name=MongoDB 2.6 Repository
baseurl=http://downloads-distro.mongodb.org/repo/redhat/os/x86_64/
gpgcheck=0
enabled=1

You can find . repo files for each release in the repository itself. Remember that odd-numbered minor release versions (e.g. 2.5) are development versions and are unsuitable for production use.

2

Install the MongoDB packages and associated tools.
When you install the packages, you choose whether to install the current release or a previous one. This step provides the commands for both.
To install the latest stable version of MongoDB, issue the following command:

sudo yum install -y mongodb-org

To install a specific release of MongoDB, specify each component package individually and append the version number to the package name, as in the following example:

sudo yum install -y mongodb-org-3.2.19 mongodb-org-server-3.2.19 mongodb-org-shell-3.2.19 mongodb-org-mongos-3.2.19 mongodb-org-tools-3.2.19

You can specify any available version of MongoDB. However yum will upgrade the packages when a newer version becomes available. To prevent unintended upgrades, pin the package. To pin a package, add the following exclude directive to your /etc/yum.conf file:

exclude=mongodb-org,mongodb-org-server,mongodb-org-shell,mongodb-org-mongos,mongodb-org-tools

Run MongoDB Community Edition

Prerequisites

Configure SELinux

IMPORTANT
If you are using SELinux, you must configure SELinux to allow MongoDB to start on Red Hat Linux-based systems (Red Hat Enterprise Linux or CentOS Linux).

To configure SELinux, administrators have three options:
If SELinux is in enforcing mode, enable access to the relevant ports that the MongoDB deployment will use (e.g. 27017). See Default MongoDB Port for more information on MongoDB’s default ports. For default settings, this can be accomplished by running

semanage port -a -t mongod_port_t -p tcp 27017

Disable SELinux by setting the SELINUX setting to disabled in /etc/selinux/config.

SELINUX=disabled

You must reboot the system for the changes to take effect. Set SELinux to permissive mode in /etc/selinux/config by setting the SELINUX setting to permissive.

SELINUX=permissive

You must reboot the system for the changes to take effect. You can instead use setenforce to change to permissive mode.  setenforce does not require a reboot but is not persistent.
Alternatively, you can choose not to install the SELinux packages when you are installing your Linux operating system, or choose to remove the relevant packages. This option is the most invasive and is not recommended.

Data Directories and Permissions

WARNING
On RHEL 7.0, if you change the data path, the default SELinux policies will prevent mongod from having write access on the new data path if you do not change the security context.

The MongoDB instance stores its data files in /var/lib/mongo and its log files in /var/log/mongodb by default, and runs using the mongod user account. You can specify alternate log and data file directories in /etc/mongod.conf. See systemLog.path and storage. dbPath for additional information.
If you change the user that runs the MongoDB process, you must modify the access control rights to the /var/lib/mongo and /var/log/mongodb directories to give this user access to these directories.

Procedure

1

Start MongoDB.
You can start the mongod process by issuing the following command:

sudo service mongod start

2

Verify that MongoDB has started successfully
You can verify that the mongod process has started successfully by checking the contents of the log file at /var/log/mongodb/mongod. log for a line reading

[initandlisten] waiting for connections on port <port>

where <port> is the port configured in /etc/mongod. conf27017 by default.
You can optionally ensure that MongoDB will start following a system reboot by issuing the following command:

sudo chkconfig mongod on

3

Stop MongoDB.
As needed, you can stop the mongod process by issuing the following command:

sudo service mongod stop

4

Restart MongoDB.
You can restart the mongod process by issuing the following command:

sudo service mongod restart

You can follow the state of the process for errors or important messages by watching the output in the /var/log/mongodb/mongod.log file.

5

Begin using MongoDB.
To help you start using MongoDB, MongoDB provides Getting Started Guides in various driver editions. See Getting Started for the available editions.
Before deploying MongoDB in a production environment, consider the Production Notes document.
Later, to stop MongoDB, press Control+C in the terminal where the mongod instance is running.

Uninstall MongoDB Community Edition
To completely remove MongoDB from a system, you must remove the MongoDB applications themselves, the configuration files, and any directories containing data and logs. The following section guides you through the necessary steps.

WARNING
This process will completely remove MongoDB, its configuration, and all databases. This process is not reversible, so ensure that all of your configuration and data is backed up before proceeding.

1

Stop MongoDB.
Stop the mongod process by issuing the following command:

sudo service mongod stop

2

Remove Packages.
Remove any MongoDB packages that you had previously installed.

sudo yum erase $(rpm -qa | grep mongodb-org)

3

Remove Data Directories.
Remove MongoDB databases and log files.

sudo rm -r /var/log/mongodb
sudo rm -r /var/lib/mongo