Tag Archives: Cloud Server

Installing rabbitmq on alicloud server

1. Install Erlang
Because RabbitMQ is developed in the Erlang language, you install Erlang first

yum install erlang

Download the RPM package

 wget http://www.rabbitmq.com/releases/rabbitmq-server/v3.6.15/rabbitmq-server-3.6.15-1.el7.noarch.rpm

3. Install after downloading

yum install rabbitmq-server-3.6.15-1.el7.noarch.rpm

4. Restart the service after installation

service rabbitmq-server start

5. Check service status

service rabbitmq-server status

6. Install the plug-in

/sbin/rabbitmq-plugins enable rabbitmq_management 

Restart the service

service rabbitmq-server restart

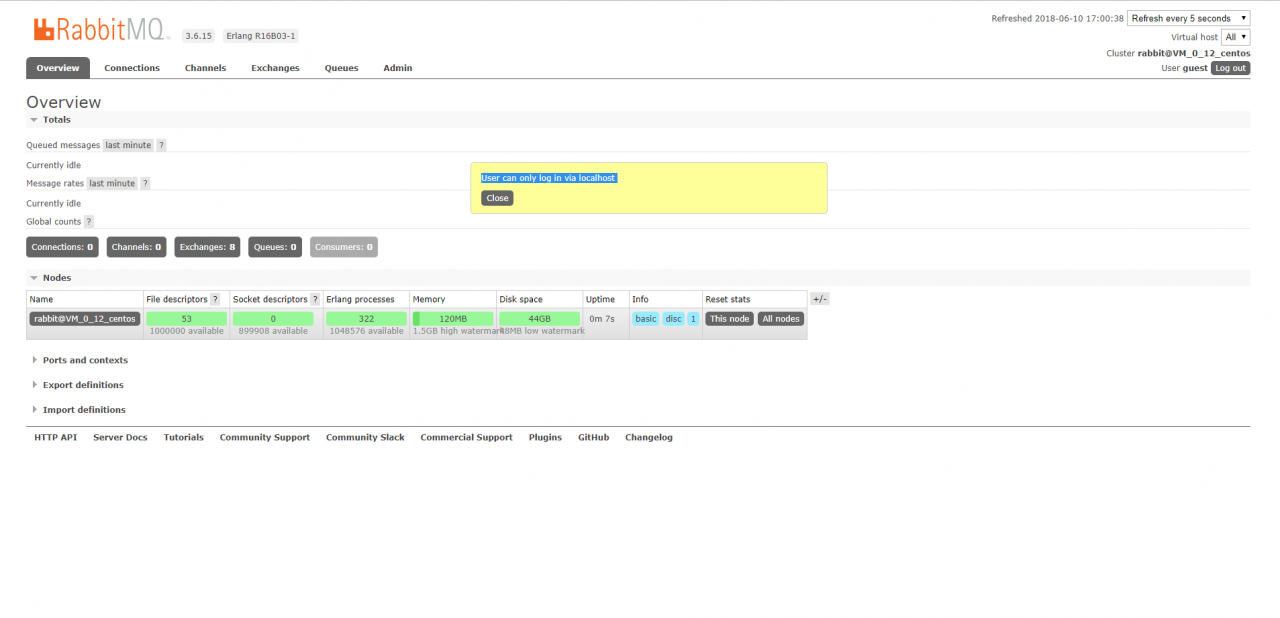
At this point, you can go to http://ip:15672 to access the page. The default password is “guest/guest”.
However, starting with version 3.3.0, access other than using guest/guest to log in to localhost is prohibited. The solution is to find
Rabbitmq_server-3.6.15 /ebin/ Rabbitmq_server-3.6.15 /ebin/ Rabbit.app

{loopback_users, [<<"guest">>]},

Is amended as:

{loopback_users, []},

Then restart it.
7. Access

Ubuntu 20.04 builds nginx 1.18.0 and MAC file transfer / download to server

Install Nginx, configure firewall and file structure; SFTP transfer download, SCP upload download.
// it is not clear here that it is very similar to the last one.

Nginx
Install Nginx
Apt get update
apt install nginx;
after installation, the service will be automatically executed,
verification: systemctl status nginx;
Configure the firewall
ufw allow 'Nginx;
verification :ufw status;
Successful execution interface

File structure

all Nginx configuration files are located in /etc/nginx directory.
the main configuration file for Nginx is /etc/nginx/nginx.conf. To make the Nginx configuration easier to maintain, it is recommended to create a separate configuration file for each domain. You can have as many server block files as you want.
Nginx server prevents files from being stored in the /etc/nginx/ locations-available directory. Nginx will not use the configuration files found in this directory unless they are linked to the /etc/nginx/ location-enabled directory.
to activate the server block, you need to create a symbolic link (pointer) from the configuration file site in the sites-available directory to the directory sites-enabled.
is recommended to follow standard naming conventions. For example, if your domain name is mydomain.com, then your configuration file should be named /etc/nginx/sites-available/mydomain.com.conf
the/etc/nginx/snippets directory contains can included in the configuration file from the server. If you use repeatable configuration segments, you can refactor these segments into fragments and include the fragment file in the server block.
Nginx log files (access.log and error.log) are located in the /var/log/ Nginx directory. It is suggested that there are different Access, and the error is the log file of each server module.
The MAC sends files to the server
SFTP transfer download
Create a new remote connection in the shell and send it using SFTP (prompted for server password) :

Use put to send command: put local file path remote path ; The
put command cannot upload a folder directly. Can be packaged for delivery.
use the get download command get remote path ;
use bye to exit SFTP :bye.
SCP upload and download
1, from the server to download file SCP username @ servername:/path/filename/Users/MAC/Desktop (local directory)
For example: SCP [email protected]:/root/zouzouzou. TXT/Users/MAC/Desktop is the server/root/zouzouzou. TXT/Users/MAC/downloaded to a local Desktop directory.
[email protected]: SCP - r/raid5 ZXX/my_download/zouzouzou.zip/users/zhuxiaoxia/Desktop
2. Upload local files to the server SCP /path/filename username@servername:/path;
For example, SCP/Users/MAC/Desktop/zouzouzou. TXT [email protected]:/root/
3. Download the whole directory scp-r username@servername:/root/ (remote directory) /Users/ MAC /Desktop (local directory)
For example : scp-r [email protected]:/root/ /Users/ MAC /Desktop/
4. Upload directory to server scp-r local_dir username@servername:remote_dir
For example: scp-r test [email protected]:/root/ upload the test directory under current directory to the server's /root/ directory
Reminder: The target server wants to enable write permission.

Tencent Cloud server encountered “Active: failed (Result: start-limit)” error when starting lightdm

I installed the GUI on Tencent Cloud server and failed to start LightDM:
[root @vm_0_11_centos GDM]# systemctl start lightdm
[root @vm_0_11_centos GDM]# systemctl status lightdm
● lightdm.service-light Display Manager
Loaded: loaded (/usr/lib/systemd/system/lightdm.service; enabled; Vendor presets: enabled)
Active: failed (Result: start-limit) since Sat 2020-04-04 12:02:18 CST; 6s ago
Docs: man:lightdm(1)
Process: 8495 ExecStart=/usr/sbin/lightdm (code=exited, status=1/FAILURE)
Main PID: 8495 (code=exited, status=1/FAILURE)
Apr 04 12:02:17 VM_0_11_centos systemd[1]: Unit lightdm.service entered failed state.
Apr 04 12:02:17 VM_0_11_centos systemd[1]: Triggering OnFailure= dependencies of lightdm.service.
Apr 04 12:02:17 VM_0_11_centos systemd[1]: lightdm.service failed.
Apr 04 12:02:18 VM_0_11_centos systemd[1]: lightdm.service holdoff time over, scheduling restart.
Apr 04 12:02:18 VM_0_11_centos systemd[1]: Stopped Light Display Manager.
Apr 04 12:02:18 VM_0_11_centos systemd[1]: start request repeated too quickly for lightdm.service
Apr 04 12:02:18 VM_0_11_centos systemd[1]: Failed to start Light Display Manager.
Apr 04 12:02:18 VM_0_11_centos systemd[1]: Unit lightdm.service entered failed state.
Apr 04 12:02:18 VM_0_11_centos systemd[1]: Triggering OnFailure= dependencies of lightdm.service.
Apr 04 12:02:18 VM_0_11_centos systemd[1]: lightdm.service failed.
Solution:
because the libdrm version is too low, so just update.
[root @vm_0_11_centos ~]# yum update libdrm
[root @vm_0_11_centos ~]# systemctl start lightdm
[root @vm_0_11_centos ~]# systemctl status lightdm
● lightdm.service-light Display Manager
the Loaded: the Loaded (/ usr/lib/systemd/system/lightdm. Service; enabled; Vendor presets: enabled)
Active: Active (running) since Sat 2020-04-04 22:21:33 CST; 6s ago

My cloud server instance type is a standard SA1, CENTOS 7.5-64-bit system.

Huawei cloud Kunpeng server docker installation VIM error

problem description

huawei cloud kunpeng server docker installation vim error, architecture is Arm64,

W: Failed to fetch http://ftp.tw.debian.org/debian/dists/jessie/Release  Unable to find expected entry 'main/binary-arm64/Packages' in Release file (Wrong sources.list entry or malformed file)

, I can’t find

root@d15291ceae43:/etc/mysql# apt-get install vim
Reading package lists... Done
Building dependency tree       
Reading state information... Done
E: Unable to locate package vim

and then update failed

root@d15291ceae43:/etc/mysql# apt-get update
Ign http://ftp.tw.debian.org jessie InRelease
Hit http://ftp.tw.debian.org jessie Release.gpg
Hit http://ftp.tw.debian.org jessie Release
W: Failed to fetch http://ftp.tw.debian.org/debian/dists/jessie/Release  Unable to find expected entry 'main/binary-arm64/Packages' in Release file (Wrong sources.list entry or malformed file)

solution, add source

printf "deb http://archive.debian.org/debian/ jessie main\ndeb-src http://archive.debian.org/debian/ jessie main\ndeb http://security.debian.org jessie/updates main\ndeb-src http://security.debian.org jessie/updates main" > /etc/apt/sources.list

update

apt-get update

installs

again

apt-get install vim

installed successfully