Port 4200 is already in use. Use ‘-port’ to specify a different port error Reasons
An existing application(not angular) in your system using the port number 4200. This is a very rare scenario. In this case, you need to change the port number of angular application as mentioned below.
You already ran ng serve and to exit the application you typed Control Z (Ctrl+Z), And then you typed ng serve then you will get port 4200 is already in use_ error. In this case, you need to kill the previous process
To close or terminate the angular instance always use Control+C (Ctrl+c)
And ng serve uses default port number 4200 to run the angular application. And our application URL will be http://localhost:4200. To avoid this error we need to change the port number to other port which is free.
According to RFC 793 port numbers is a 16-bit unassigned integer. The minimum value is 0 and the maximum value is 65535.
And, within this range, ports 0 – 1023 are reserved for specific purposes(mostly).
To change the port number for our angular application use the below command
ng serve –port 4201
Now type ng serve
Our angular application will be running on http://localhost:4201
To kill already existing angular process use the below commands
Fix Port 4200 is already in use. Use ‘-port’ to specify a different port error in Mac & Linux
To fix port 4200 is already in use error in In Mac & Linux OS (Ubuntu etc) use the following commands
sudo kill $(sudo lsof -t -i:4200) Or
sudo kill sudo lsof -t -i:4200 Or
sudo lsof -t -i tcp:4200 | xargs kill -9
Fix Port 4200 is already in use. Use ‘-port’ to specify a different port error in Window
In Window operating system open command prompt. Use the following command to fix port 4200 is already in use error.
netstat -a -n -o | findStr “4200”`
Take the process id and kill the process using the following command
taskkill -f /pid 11128
Author Archives: Robins
How to open an app from an unidentified developer
How to open an app from an unidentified developer
You can run apps that you’ve downloaded directly from the internet that aren’t registered with Apple. You just have to give the OK.
You can run apps that you’ve downloaded directly from the internet that aren’t registered with Apple. You just have to give the OK.
- After downloading an app from an unidentified developer, drag it to the Applicationsfolder.
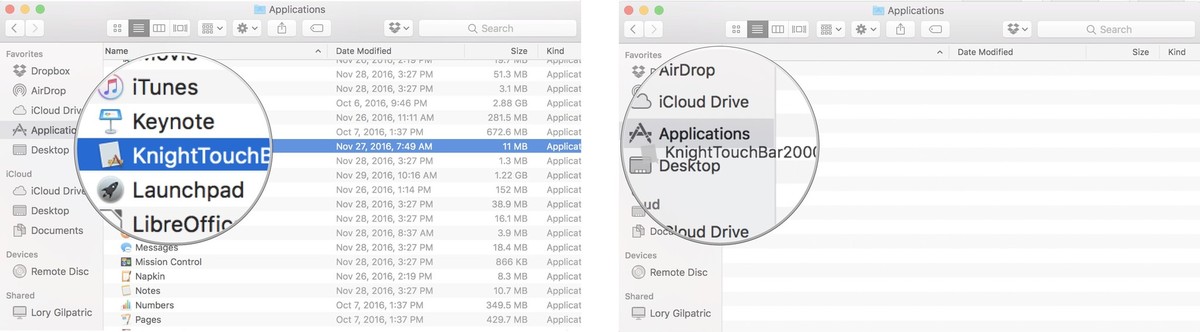 Select the app and right or control-click. Click on Open. Click on Open again to confirm you want to complete the action.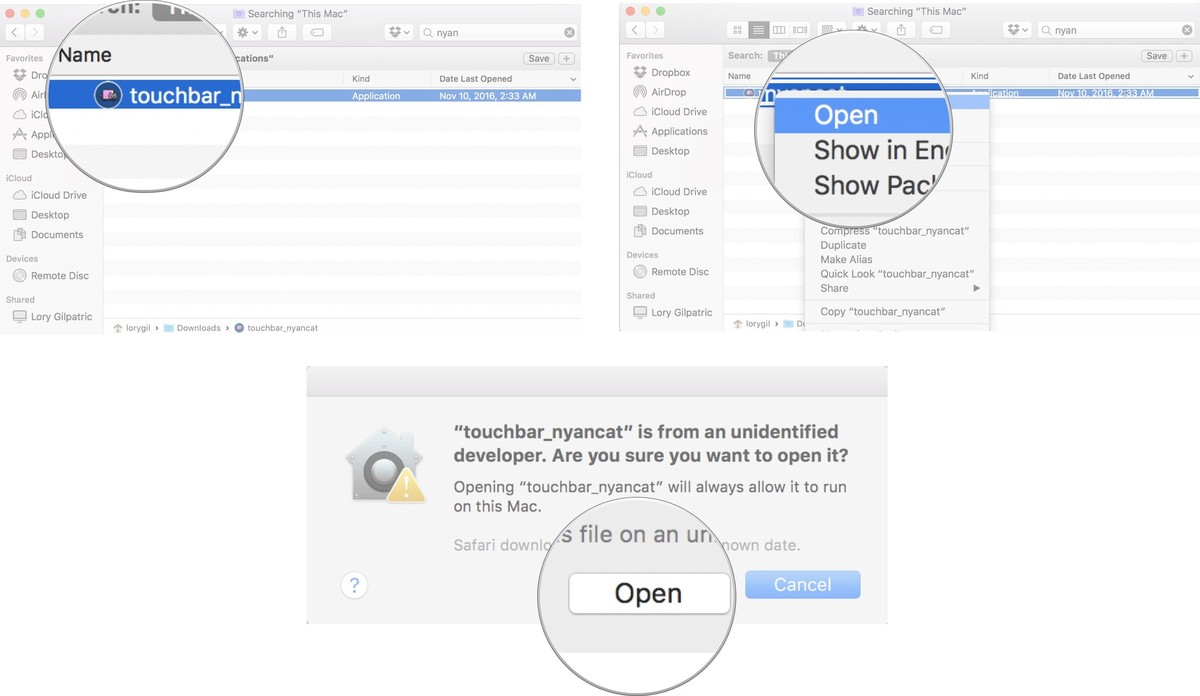
Opening an app from unidentified developer with a right or control-click overrides Gatekeeper for that specific app. From now on, you’ll always be able to open it without having to go through the process again.
How to reinstate the Anywhere setting in Gatekeeper
If the thought of having to right or control-click to open apps from unidentified developers seems arduous and tiresome, you can turn back time with Gatekeeper and bring back the ability to open apps from anywhere. All it takes is a bit of coding in Terminal.
- Close System Preferences on your Mac. Open Terminal. Type the following command: sudo spctl –master-disable Hit enter on your keyboard. Enter your administrator password. Hit enter on your keyboard.
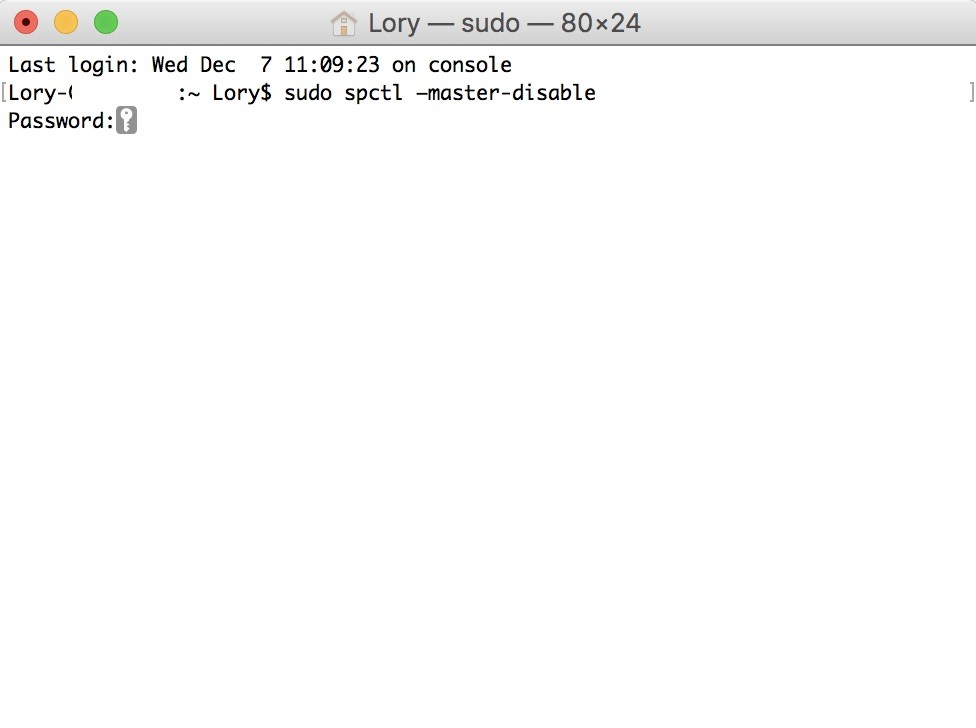
Gatekeeper’s “Anywhere” setting will now be restored. It will also be selected by default. You can confirm the changes by opening System Preferences and selecting Security & Privacy.
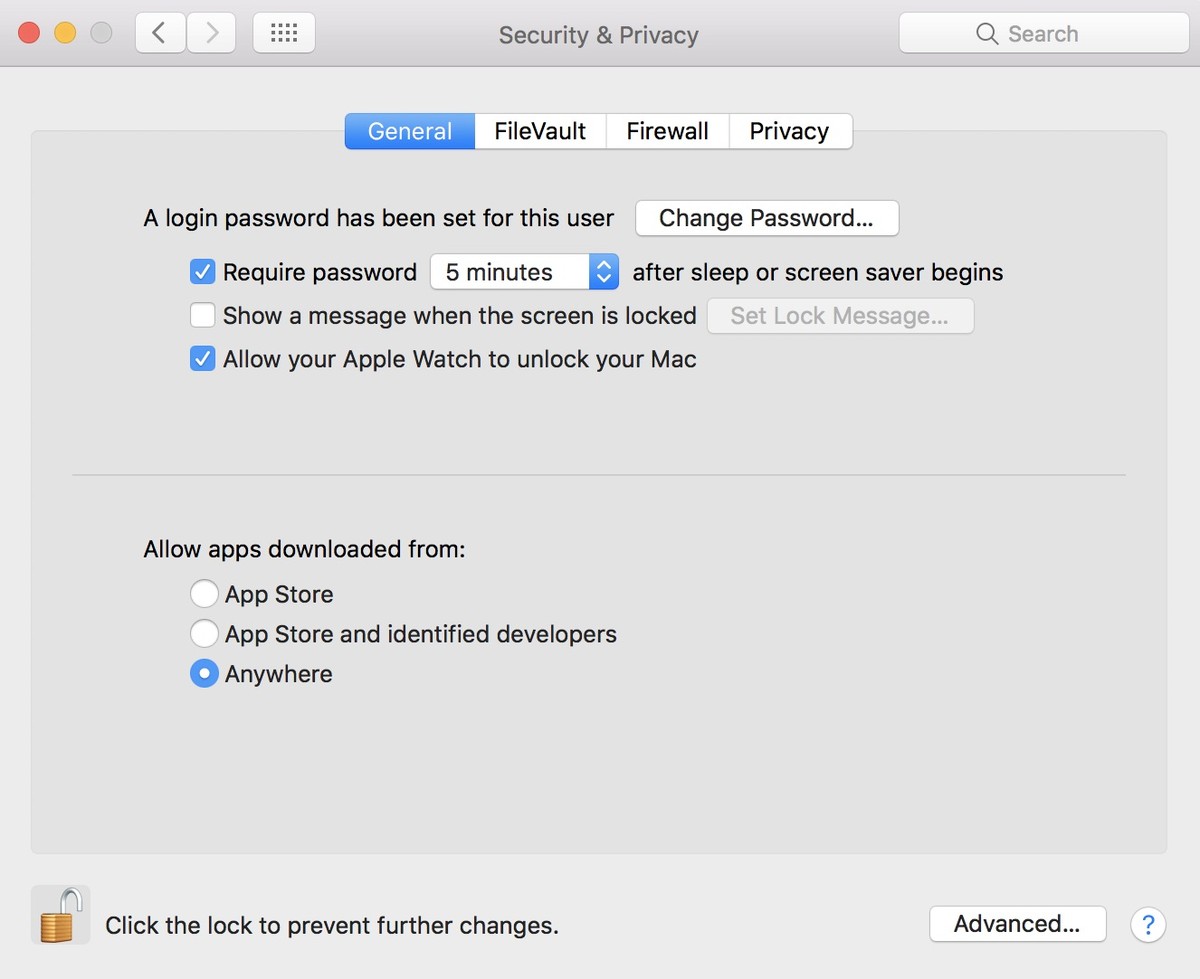
If you ever want to enable the macOS Sierra Gatekeeper settings again, type sudo spctl –master-enable into Terminal.
Weblogic heapdump configuration
The previous week, Weblogic in the production environment went down twice in a row and had to go back to log analysis on Sunday.
However, because the memory parameters are not configured with GC parameters, the HeapDump file before the crash was not generated. So you still need to configure the GC parameters to find the root of the problem next time.
Configuration memory parameters method, didn’t find in Weblogic console where you can configure the memory parameters, the method of directly only directly in bea/user_projects/domains/domain/bin/setDomainEnv. Sh on increase
“+ PrintGCDetails – – XX: XX: + PrintGCTimeStamps – XX: XX: + HeapDumpOnOutOfMemoryError – + HeapDumpOnCtrlBreak Xloggc: $$. Gc. Log”
The configuration is as follows:

GC – XX: + PrintGCDetails: used to track system details;
– Xloggc: $$. Gc. Log: will the gc event every time the record to a file.
-XX:+PrintGCTimeStamps: can be mixed with -XX:+ printGC-XX :+PrintGCDetails :11.851: [GC 98328K-& GT;93620K(130112K), 0.0082960 secs]
– XX: + HeapDumpOnOutOfMemoryError: the JVM when abnormal OOM to Dump the memory image file
– XX: + HeapDumpOnCtrlBreak: said can kill 3 & lt; pid> Generate DUMP files as needed
But pay attention to:
Oracle JVM version 6.0 removes the -xx :+HeapDumpOnCtrlBreak parameter. If you need to generate DUMP files, use the Jmap command. The command line format is as follows:
Jmap – dump: the format = b, the file = managed1_heapdump. Hprof & lt; pid>
Managed1_heapdump.hprof represents the name of the generated DUMP file and PID represents the Java process number.
# # # # # # # # # # # # # # # # # # # # # # # # # # # # # # # # # # # # # # # # # # # # # # # # # # # # # # # # # # # # # # # # # # # # # # # # # # # # # # #
The resulting.hprof file USES the HeapAnalyzer tool, an analysis tool for HeapDump, a memory text image of the IBM JDK.

However, because the memory parameters are not configured with GC parameters, the HeapDump file before the crash was not generated. So you still need to configure the GC parameters to find the root of the problem next time.
Configuration memory parameters method, didn’t find in Weblogic console where you can configure the memory parameters, the method of directly only directly in bea/user_projects/domains/domain/bin/setDomainEnv. Sh on increase
“+ PrintGCDetails – – XX: XX: + PrintGCTimeStamps – XX: XX: + HeapDumpOnOutOfMemoryError – + HeapDumpOnCtrlBreak Xloggc: $$. Gc. Log”
The configuration is as follows:
GC – XX: + PrintGCDetails: used to track system details;
– Xloggc: $$. Gc. Log: will the gc event every time the record to a file.
-XX:+PrintGCTimeStamps: can be mixed with -XX:+ printGC-XX :+PrintGCDetails :11.851: [GC 98328K-& GT;93620K(130112K), 0.0082960 secs]
– XX: + HeapDumpOnOutOfMemoryError: the JVM when abnormal OOM to Dump the memory image file
– XX: + HeapDumpOnCtrlBreak: said can kill 3 & lt; pid> Generate DUMP files as needed
But pay attention to:
Oracle JVM version 6.0 removes the -xx :+HeapDumpOnCtrlBreak parameter. If you need to generate DUMP files, use the Jmap command. The command line format is as follows:
Jmap – dump: the format = b, the file = managed1_heapdump. Hprof & lt; pid>
Managed1_heapdump.hprof represents the name of the generated DUMP file and PID represents the Java process number.
# # # # # # # # # # # # # # # # # # # # # # # # # # # # # # # # # # # # # # # # # # # # # # # # # # # # # # # # # # # # # # # # # # # # # # # # # # # # # # #
The resulting.hprof file USES the HeapAnalyzer tool, an analysis tool for HeapDump, a memory text image of the IBM JDK.
How to Configure Inter VLAN Routing on Layer 3 Switches?
With the development of technology, no matter how far you are away from families, you can communicate with them at any time in any places. The same is true to the optic communication, regardless of the physical locations of two hosts or the different VLANs they belong to, they can exchange with each other by inter VLAN routing. Then what is inter VLAN routing and how to configure inter VLAN routing on layer 3 switches?
What Is Inter VLAN Routing?
In figure 1, three computers connected to a gigabit Ethernet switch form a LAN (local area network) within a limited area. However, they cannot communicate with hosts in another LAN, because there is no connection between these Ethernet switches. Then there comes the VLAN which provides us with logical separation or segmentation of our networks to facilitate communication among hosts in different LANs. However, each VLAN is a unique broadcast domain, so computers on separate VLANs are unable to communicate with each other by default. There is a way to solve the problem, and that’s what we are going to shed light on—inter VLAN routing.
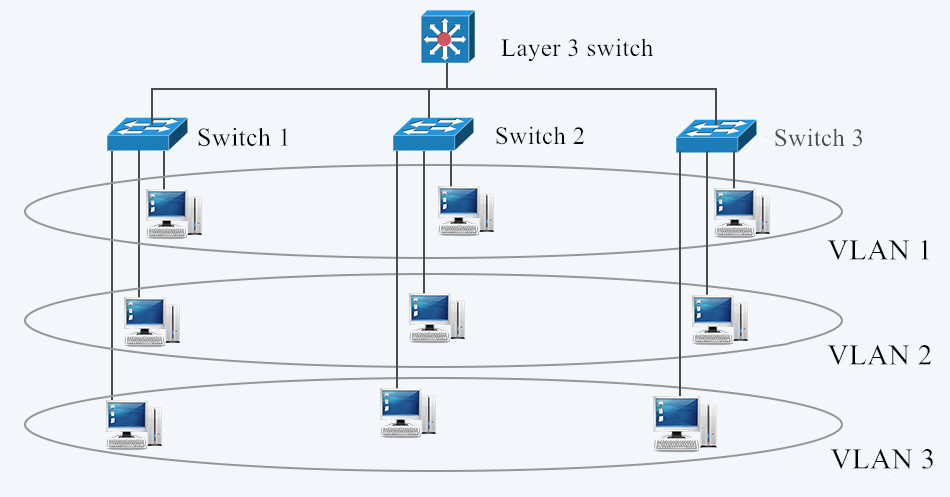 Fig. 1 LAN and VLAN in Networking
The process of forwarding network traffic from one VLAN to another VLAN using routing is known as inter-VLAN routing. One of the ways to carry out inter-VLAN routing is by connecting a router to the switch infrastructure. When using a router to facilitate inter-VLAN routing, the router interfaces can be connected to separate VLANs. Devices on those VLANs communicate with each other via the router. Apart from that, a more convenient way is introduced—configure inter VLAN routing on layer 3 switches. Layer 3 switching is more scalable than a router which only provides a limited number of available ports.
How to Configure Inter VLAN Routing on Layer 3 Switches?
To enable a layer 3 switch to perform routing functions, the switch must have IP routing enabled. 10gb Ethernet switch and 40gb Ethernet switch are recommended for working as layer 3 switch.
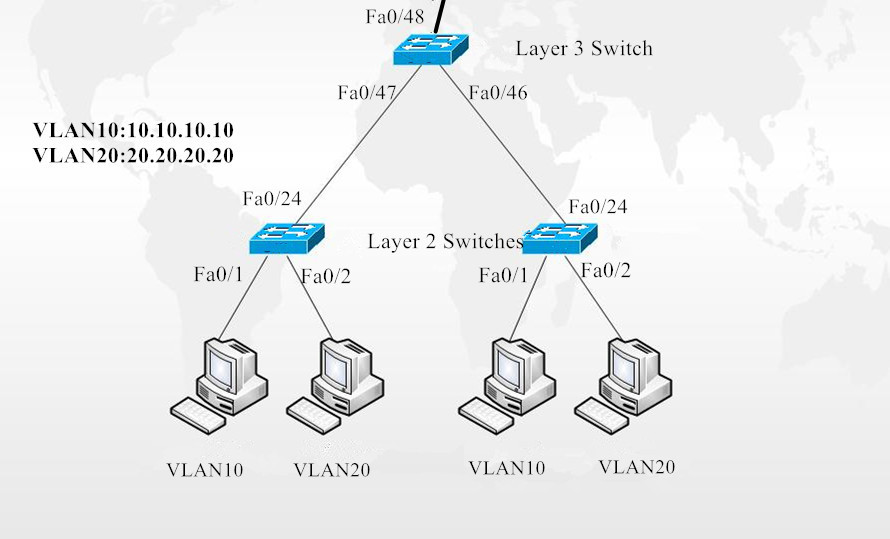
Fig.2 Inter VLAN Routing on Layer 3 Switches
In figure 2, layer 3 switch is configured with IP address 10.0.0.1. VLAN10 and VLAN20, with IP address 10.10.10.10 and IP address 10.20.20.20 respectively are configured on layer 2 switches. These two IP addresses will be the default gateway addresses for hosts belonging to VLAN10 and VLAN20 on the layer 2 switches respectively. Also, all interfaces connecting the three switches must be configured as trunk ports to allow VLAN10 and VLAN20 tagged frames to pass between switches. Traffic between VLAN10 and VLAN20 will be routed by the layer 3 switch after configuring inter VLAN routing. These steps can be achieved by VLAN configuration command below.
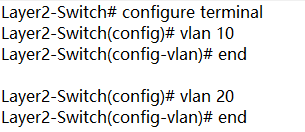
Create VLANs 10 and 20 in the switch database
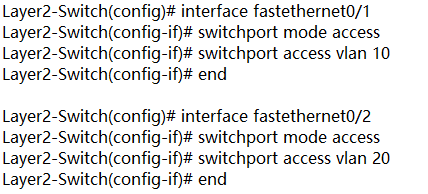
Assign port Fe0/1 in VLAN 10 and port Fe0/2 in VLAN 20
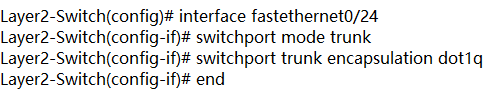
Create trunk port Fe0/24
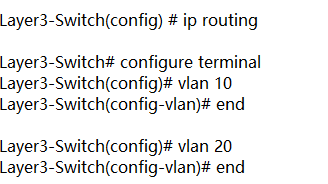
Enable layer 3 routing and create VLANs 10 and 20 in the switch database
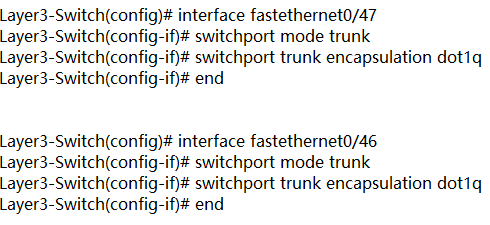
Create trunk ports Fe0/47 Fe0/46
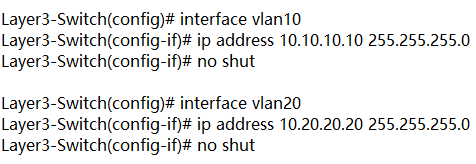
Configure Switch VLAN Interfaces (SVI) to acts as a virtual layer 3 interface on the layer 3 switch
Conclusion
VLAN is created to enable the communication among hosts in different LANs. Inter VLAN routing is developed to realize the exchange among hosts in different VLANs. Inter VLAN routing on layer 3 switch without a router is also approachable with the development of technology. For more configuration about network switches, please refer to our website www.fs.com.
What Is Inter VLAN Routing?
In figure 1, three computers connected to a gigabit Ethernet switch form a LAN (local area network) within a limited area. However, they cannot communicate with hosts in another LAN, because there is no connection between these Ethernet switches. Then there comes the VLAN which provides us with logical separation or segmentation of our networks to facilitate communication among hosts in different LANs. However, each VLAN is a unique broadcast domain, so computers on separate VLANs are unable to communicate with each other by default. There is a way to solve the problem, and that’s what we are going to shed light on—inter VLAN routing.
Fig. 1 LAN and VLAN in NetworkingThe process of forwarding network traffic from one VLAN to another VLAN using routing is known as inter-VLAN routing. One of the ways to carry out inter-VLAN routing is by connecting a router to the switch infrastructure. When using a router to facilitate inter-VLAN routing, the router interfaces can be connected to separate VLANs. Devices on those VLANs communicate with each other via the router. Apart from that, a more convenient way is introduced—configure inter VLAN routing on layer 3 switches. Layer 3 switching is more scalable than a router which only provides a limited number of available ports.
How to Configure Inter VLAN Routing on Layer 3 Switches?
To enable a layer 3 switch to perform routing functions, the switch must have IP routing enabled. 10gb Ethernet switch and 40gb Ethernet switch are recommended for working as layer 3 switch.
Fig.2 Inter VLAN Routing on Layer 3 Switches
In figure 2, layer 3 switch is configured with IP address 10.0.0.1. VLAN10 and VLAN20, with IP address 10.10.10.10 and IP address 10.20.20.20 respectively are configured on layer 2 switches. These two IP addresses will be the default gateway addresses for hosts belonging to VLAN10 and VLAN20 on the layer 2 switches respectively. Also, all interfaces connecting the three switches must be configured as trunk ports to allow VLAN10 and VLAN20 tagged frames to pass between switches. Traffic between VLAN10 and VLAN20 will be routed by the layer 3 switch after configuring inter VLAN routing. These steps can be achieved by VLAN configuration command below.
Create VLANs 10 and 20 in the switch database
Assign port Fe0/1 in VLAN 10 and port Fe0/2 in VLAN 20
Create trunk port Fe0/24
Enable layer 3 routing and create VLANs 10 and 20 in the switch database
Create trunk ports Fe0/47 Fe0/46
Configure Switch VLAN Interfaces (SVI) to acts as a virtual layer 3 interface on the layer 3 switch
Conclusion
VLAN is created to enable the communication among hosts in different LANs. Inter VLAN routing is developed to realize the exchange among hosts in different VLANs. Inter VLAN routing on layer 3 switch without a router is also approachable with the development of technology. For more configuration about network switches, please refer to our website www.fs.com.
Uninstall Ad-Aware Antivirus with WindowsUninstaller.Org Removal Tips
How to completely uninstall Ad-Aware Antivirus?If you are interested in absolute computer security from viruses and much more, you won’t get it wrong with Ad-Aware Antivirus Antivirus. Offering rock-solid security, basic usability, and effective using resources, it is a good solution. However, periodically it must always be uninstalled. Still, it isn’t easy to entirely uninstall Ad-Aware Antivirus.
You cannot depend on Windows built-in Add/Removal for just a clean Ad-Aware Antivirus removal or in addition, you can not eradicate Ad-Aware Antivirus by adding the newer Ad-Aware Antivirus version after which it uninstall it. The main basis for this is that only at that antivirus installation time there is no Ad-Aware Antivirus uninstall power installed. So how could you remove that?Even you think you’ve gotten rid on this antivirus, actually, many Ad-Aware Antivirus similar files and registry items remain hidden inside the nooks and corners of your respective registry and hard drives.
On the other hand, now you can depend on a good automate removal tool to completely uninstall Ad-Aware Antivirus with seconds. A good removal tool contains the features below:
It can fully uninstall programs which can not be removed by House windows built-in (Add/Remove) applet. It fully removes empty or corrupted registry entries. It forcibly uninstalls corrupted or hidden programs. It is quite a bit simpler and faster to work with than the (Add/Remove) Software programs functionality in Windows’ Manage Panel. It restores registry data.
There is in reality a fantastic removing software that will help people entirely uninstall Ad-Aware Antivirus together with fantastic achievements in addition to ensure that every one of the now-defunct Registry items in addition to similar data are generally removed on auto-pilot with a several keys to press. Apart from that computer software, it can also fully eliminate some other applications like Authentium, Norton, Craze Minuscule antivirus, Internet explorer, or Microsoft company Business office, in addition to similar applications.
You cannot depend on Windows built-in Add/Removal for just a clean Ad-Aware Antivirus removal or in addition, you can not eradicate Ad-Aware Antivirus by adding the newer Ad-Aware Antivirus version after which it uninstall it. The main basis for this is that only at that antivirus installation time there is no Ad-Aware Antivirus uninstall power installed. So how could you remove that?Even you think you’ve gotten rid on this antivirus, actually, many Ad-Aware Antivirus similar files and registry items remain hidden inside the nooks and corners of your respective registry and hard drives.
On the other hand, now you can depend on a good automate removal tool to completely uninstall Ad-Aware Antivirus with seconds. A good removal tool contains the features below:
It can fully uninstall programs which can not be removed by House windows built-in (Add/Remove) applet. It fully removes empty or corrupted registry entries. It forcibly uninstalls corrupted or hidden programs. It is quite a bit simpler and faster to work with than the (Add/Remove) Software programs functionality in Windows’ Manage Panel. It restores registry data.
There is in reality a fantastic removing software that will help people entirely uninstall Ad-Aware Antivirus together with fantastic achievements in addition to ensure that every one of the now-defunct Registry items in addition to similar data are generally removed on auto-pilot with a several keys to press. Apart from that computer software, it can also fully eliminate some other applications like Authentium, Norton, Craze Minuscule antivirus, Internet explorer, or Microsoft company Business office, in addition to similar applications.
Eclipse package explorer related problems and Solutions
Problems and Solutions:
Use case description: Right click on a project in the Package Explorer, select “Open in New Window”, close the previous Eclipse window, and close the new one
Problem: After opening Eclipse, the Package Explorer will always be in the project of open in new Window
Solutions: This solution personal feel very feasible, but may have a better way, my way is, direct delete/eclipse working directory workspace \. Metadata \. Plugins \ org. The eclipse UI. The workbench folder workbench. The XML file, then, the eclipse before some of the relevant Settings window will disappear, but this does not trouble, and this method can make the eclipse open load something small and open eclipse will fairly quickly
The
Problem and Solution ii:
Use case description: As mentioned in question 1 above, the project that opened in the new window was either deleted in Explorer or changed its name
Problem: The Package Explorer will always be empty
Solution: can be as a method to solve above problem, but there is a better, open the workbench. XML, find the input factoryID = “org. Eclipse. UI. Internal. Model. ResourceFactory”, change can be put behind the path values, the said the root directory “/”
Use case description: Right click on a project in the Package Explorer, select “Open in New Window”, close the previous Eclipse window, and close the new one
Problem: After opening Eclipse, the Package Explorer will always be in the project of open in new Window
Solutions: This solution personal feel very feasible, but may have a better way, my way is, direct delete/eclipse working directory workspace \. Metadata \. Plugins \ org. The eclipse UI. The workbench folder workbench. The XML file, then, the eclipse before some of the relevant Settings window will disappear, but this does not trouble, and this method can make the eclipse open load something small and open eclipse will fairly quickly
The
Problem and Solution ii:
Use case description: As mentioned in question 1 above, the project that opened in the new window was either deleted in Explorer or changed its name
Problem: The Package Explorer will always be empty
Solution: can be as a method to solve above problem, but there is a better, open the workbench. XML, find the input factoryID = “org. Eclipse. UI. Internal. Model. ResourceFactory”, change can be put behind the path values, the said the root directory “/”
Nexus 5x unlock bootloader + root
The self-use test machine suddenly failed root, the network looked for a lot of tutorials, finally found a reliable tutorial, hereby record, some mobile phones may also be applicable
Kingroot has always been used for root, but this time suddenly prompted me “Need root please unlock first”
Let’s start by unlocking:
note:
Unlocking the bootloader for the first time will erase all your data.
Take a look at what it looks like ununlocked:
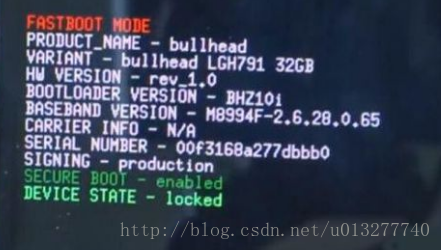
The unlocking steps are as follows:
1. Open the phone Settings – about the phone – click the version number 7 times to open the “Developer Options”
2. Back to the previous step, developer options – turn on USB debugging and turn on “Enable OEM Unlock”
3. Turn off your phone
4. Press and hold the power key & AMP; Volume down key, enter fastboot(Bootloader interface)
5. Connect the phone with usB-A data cable
6. Open DOS window and enter: Enter fastboot OEM unlock
If DOS prompts “not an internal or external command”, then you need to configure the environment variable
, find the path to your SDK, and add the path of platform-tools to the path
: D:\Android\ SDK \platform-tools
Because we are using the fastboot.exe execution file
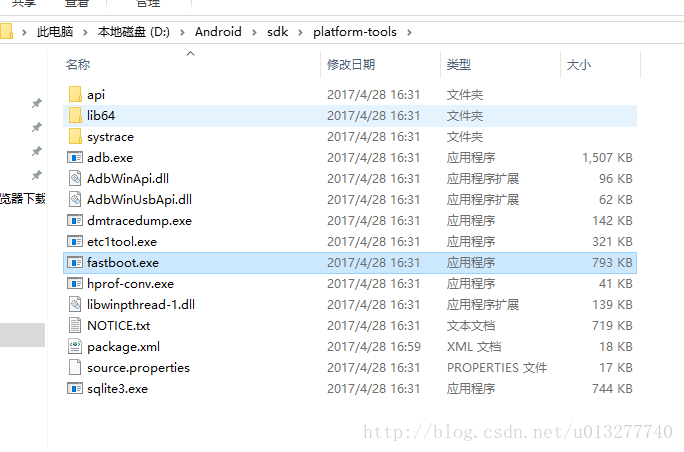
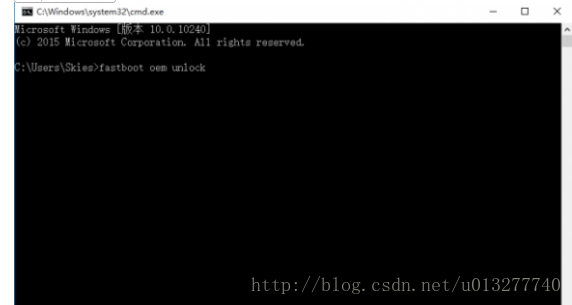
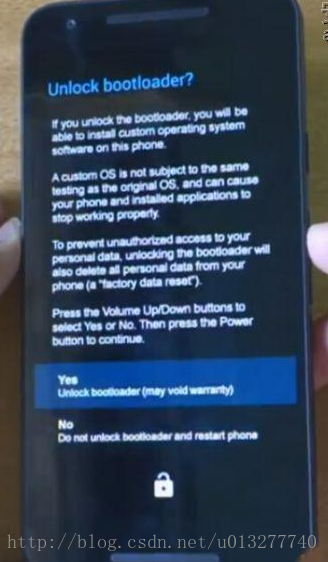
Then use the volume key to select “Yes” and press the “power” button to confirm. After success, it will be displayed as follows :(the red sentence at the bottom)
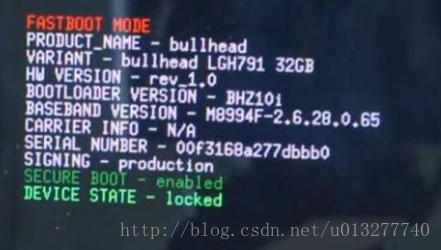
At this point, it has been unlocked. After unlocking, the opening machine has this prompt, which belongs to normal:
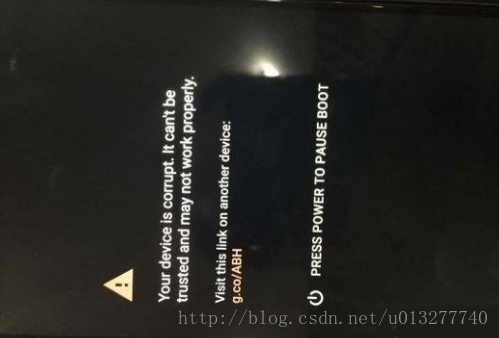
After the completion of unlocking the root operation will be performed, the use of kingroot, 360Root and other software was unsuccessful.
root download
Unlock the original
http://tieba.baidu.com/p/4232343051
Removing stop words —— Python Data Science CookBook
In text processing, we are interested in words or phrases that will help us differentiate the given text from the other text in the corpus. Let’s call these words or phrases as
key
phrases. Every text mining application needs a way to find out the key phrases. An information retrieval application needs key phrases for the easy retrieval and ranking of search results. A text classification system needs key phrases as its features that are to be fed to a classifier. This is where stop words come into the picture. “
Sometimes, some extremely common words which would appear to be of little value in helping select documents matching a user need are excluded from the vocabulary entirely. These words are called
stop words. ” Introduction to Information Retrieval By Christopher D. Manning, Prabhakar Raghavan, and Hinrich Schütze.
key
phrases. Every text mining application needs a way to find out the key phrases. An information retrieval application needs key phrases for the easy retrieval and ranking of search results. A text classification system needs key phrases as its features that are to be fed to a classifier. This is where stop words come into the picture. “
Sometimes, some extremely common words which would appear to be of little value in helping select documents matching a user need are excluded from the vocabulary entirely. These words are called
stop words. ” Introduction to Information Retrieval By Christopher D. Manning, Prabhakar Raghavan, and Hinrich Schütze.
Tip Remember that stop word removal is contextual and based on the application. If you are working on a sentiment analysis application on mobile or chat room text, emoticons are highly useful. You don’t remove them as they form a very good feature set for the downstream machine learning application. Typically, in a document, the frequency of stop words is very high. However, there may be other words in your corpus that may have a very high frequency. Based on your context, you can add them to your stop word list.
The Python NLTK library provides us with a default stop word corpus that we can leverage, as follows:
>>> from nltk.corpus import stopwords
>>> stopwords.words('english')
[u'i', u'me', u'my', u'myself', u'we', u'our', u'ours', u'ourselves',
u'you', u'your', u'yours', u'yourself', u'yourselves', u'he', u'him',
u'his', u'himself', u'she', u'her', u'hers', u'herself', u'it', u'its',
u'itself', u'they', u'them', u'their', u'theirs', u'themselves', u'what',
u'which', u'who', u'whom', u'this', u'that', u'these', u'those', u'am',
u'is', u'are', u'was', u'were', u'be', u'been', u'being', u'have', u'has',
u'had', u'having', u'do', u'does', u'did', u'doing', u'a', u'an', u'the',
u'and', u'but', u'if', u'or', u'because', u'as', u'until', u'while', u'of',
u'at', u'by', u'for', u'with', u'about', u'against', u'between', u'into',
u'through', u'during', u'before', u'after', u'above', u'below', u'to',
u'from', u'up', u'down', u'in', u'out', u'on', u'off', u'over', u'under',
u'again', u'further', u'then', u'once', u'here', u'there', u'when',
u'where', u'why', u'how', u'all', u'any', u'both', u'each', u'few',
u'more', u'most', u'other', u'some', u'such', u'no', u'nor', u'not',
u'only', u'own', u'same', u'so', u'than', u'too', u'very', u's', u't',
u'can', u'will', u'just', u'don', u'should', u'now']
example:
#!/usr/bin/env python2
# -*- coding: utf-8 -*-
"""
@author: snaildove
"""
# Load libraries
from nltk.corpus import stopwords
from nltk.tokenize import word_tokenize
import string
text = "Text mining, also referred to as text data mining, roughly equivalent to text analytics,refers to the process of deriving high-quality information from text. Highquality information is typically derived through the devising of patterns and trends through means such as statistical pattern learning. Text mining usually involves the process of structuring the input text (usually parsing, along with the addition of some derived linguistic features and the removal of others, and subsequent insertion into a database), deriving patterns within the structured data, and finally evaluation and interpretation of the output. 'High quality' in text mining usually refers to some combination of relevance, novelty, and interestingness.Typical text mining tasks include text categorization, text clustering, concept/entity extraction, production of granular taxonomies, sentiment analysis, document summarization, and entity relation modeling (i.e., learning relations between named entities).Text analysis involves information retrieval, lexical analysis to study word frequency distributions, pattern recognition, tagging/annotation,information extraction, data mining techniques including link and association analysis, visualization, and predictive analytics. The overarching goal is,essentially, to turn text into data for analysis, via application of natural language processing (NLP) and analytical methods.A typical application is to scan a set of documents written in a natural language and either model the document set for predictive classification purposes or populate a database or search index with the information extracted."
#Let’s now demonstrate the stop words removal process:
#we will tokenize the input text into words using the word_tokenize function. The words is now a list of all the words tokenized from the input.
words = word_tokenize(text)
# 2.Let us get the list of stopwords from nltk stopwords english corpus.
stop_words = stopwords.words('english')
print "Number of words = %d"%(len(words))
# 3. Filter out the stop words.
words = [w for w in words if w not in stop_words]
print "Number of words,without stop words = %d"%(len(words))
#Here, we will run another list comprehension in order to remove punctuations from our words.
words = [w for w in words if w not in string.punctuation]
print "Number of words,without stop words and punctuations = %d"%(len(words))
output :
Number of words = 257
Number of words,without stop words = 193
Number of words,without stop words and punctuations = 155
Tip Remember that
stop word removal is contextual and based on the application. If you are working on a sentiment analysis application on mobile or chat room text, emoticons are highly useful. You don’t remove them as they form a very good feature set for the downstream machine learning application. Typically, in a document, the frequency of stop words is very high. However, there may be other words in your corpus that may have a very high frequency. Based on your context, you can add them to your stop word list.
Maven skip unit test
You may want to configure Maven to skip unit tests entirely. Maybe you have a large system, unit tests take many minutes to complete, and you don’t want to wait for unit tests to complete before generating the final output. You may be working on a legacy system with a series of failed unit tests, and you may simply want to generate a JAR instead of fixing all the unit tests. Maven provides the ability to skip unit tests by using the Surefire plug-in’s skip parameter. On the command line, simply add the maven.test.skip attribute to any target:
$ mvn install -Dmaven.test.skip=true
…
[INFO] [compiler:testCompile]
[INFO] Not compiling test sources
[INFO] [surefire:test]
[INFO] Tests are skipped.
…
If maven.test.skip is set to true when the Surefire plug-in reaches the test target, it skips the unit tests. Another way to configure Maven to skip unit tests is to add this configuration to your project’s pom.xml. You need to add the plugin element to your build.
< project>
[…].
& lt; build>
& lt; plugins>
& lt; plugin>
& lt; groupId> org.apache.maven.plugins< /groupId>
& lt; artifactId> maven-surefire-plugin< /artifactId>
& lt; configuration>
& lt; skip> true< /skip>
& lt; /configuration>
& lt; /plugin>
& lt; /plugins>
& lt; /build>
[…].
< /project>
From http://blog.csdn.net/symgdwyh/article/details/4289080
How to disable Network Manager on Linux
origin: http://xmodulo.com/disable-network-manager-linux.html
Network Manager is a feature-rich network configuration service which is used by default in most Linux desktop environments nowadays. It provides automatic configuration of (wired/wireless) network interfaces, as well as VPN, mobile broadband and even Bluetooth connections. Network Manager is smart enough to automatically switch to the best (or the most recent) connection network, and can inform other applications of up-to-date network events via D-Bus API.
While Network Manager comes with various sophisticated features, you might just prefer the old plain network service. There could be several reasons to do so. For one, you may wish to have more control over network management, instead of relying on purely automatic configuration and switch-over, which may or may not suit your needs. Besides, Network Manager is not suitable for advanced networking setup, such as multi-homing to more than one wired connections, forwarding network traffic, configuring Linux bridge or aliases, etc.
In general, Network Manager is designed to keep a typical end-user Linux box connected at all times with the best possible connection with minimum intervention by users. If such automation is not needed in your Linux environment, you can turn off Network Manager.
This tutorial describes how to disable Network Manager in various Linux desktop environments. Be careful if you are trying to disable Network Manager on a remote host, as you will lose connectivity if you fail to set up its networking correctly in some other means.
Check Which Network Interfaces are Managed by Network Manager
To check if Network Manager is managing any network interface, you can use nmcli, which is a command line utility that comes with Network Manager.
Network Manager is a feature-rich network configuration service which is used by default in most Linux desktop environments nowadays. It provides automatic configuration of (wired/wireless) network interfaces, as well as VPN, mobile broadband and even Bluetooth connections. Network Manager is smart enough to automatically switch to the best (or the most recent) connection network, and can inform other applications of up-to-date network events via D-Bus API.
While Network Manager comes with various sophisticated features, you might just prefer the old plain network service. There could be several reasons to do so. For one, you may wish to have more control over network management, instead of relying on purely automatic configuration and switch-over, which may or may not suit your needs. Besides, Network Manager is not suitable for advanced networking setup, such as multi-homing to more than one wired connections, forwarding network traffic, configuring Linux bridge or aliases, etc.
In general, Network Manager is designed to keep a typical end-user Linux box connected at all times with the best possible connection with minimum intervention by users. If such automation is not needed in your Linux environment, you can turn off Network Manager.
This tutorial describes how to disable Network Manager in various Linux desktop environments. Be careful if you are trying to disable Network Manager on a remote host, as you will lose connectivity if you fail to set up its networking correctly in some other means.
Check Which Network Interfaces are Managed by Network Manager
To check if Network Manager is managing any network interface, you can use nmcli, which is a command line utility that comes with Network Manager.
$ nmcli dev status
DEVICE     TYPE              STATE
eth1      802-3-ethernet   connected
eth0      802-3-ethernet   connected
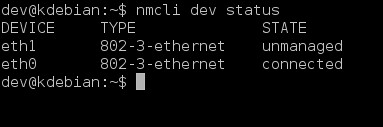
The above command will list all existing network interfaces along with their STATE. If STATE is shown as “unmanaged”, this means Network Manager is NOT controlling a corresponding interface. If STATE displays any other values (e.g., “connected”), it implies that a given interface is managed by Network Manager.
Disable Network Manager Completely
Here is how to disable Network Manager completely, so that Network Manager stops running on your Linux system.
To disable Network Manager on Debian 8 or later:
$ sudo systemctl stop NetworkManager.service
$ sudo systemctl disable NetworkManager.service
To disable Network Manager on Debian 7 or earlier:
$ sudo /etc/init. d/network-manager stop
$ sudo update-rc. d network-manager remove
To disable Network Manager on Ubuntu or Linux Mint:
$ sudo stop network-manager
$ echo “manual” | sudo tee /etc/init/network-manager.override
After disabling Network Manager on Debian or Ubuntu, use /etc/network/interfaces to configure network interfaces.
To disable Network Manager on Fedora or CentOS/RHEL 7 or later:
$ sudo systemctl stop NetworkManager.service
$ sudo systemctl disable NetworkManager.service
To disable Network Manager on CentOS/RHEL 6 or earlier:
$ sudo service NetworkManager stop
$ sudo chkconfig NetworkManager off
After disabling Network Manager on Fedora or CentOS, use /etc/sysconfig/network-scripts/ifcfg-ethX files to configure network interfaces.
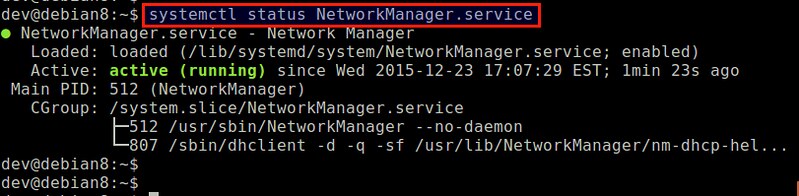
Disable Network Manager for a Particular Network Interface on Debian, Ubuntu or Linux Mint
To disable Network Manager only for eth1 on Debian, Ubuntu or Linux Mint, you can do the following.
First, open the Network Manager configuration file in /etc/NetworkManager with a text editor, and set “managed=false”, typically shown under [ifupdown].
$ sudo vi /etc/NetworkManager/NetworkManager.conf
[ifupdown]
managed=false
Then in /etc/network/interfaces, add information about the interface you want to disable Network Manager for. In this example, the interface is eth1, and we are using static IP configuration.
$ sudo vi /etc/network/interfaces
# The loopback network interface
auto lo
iface lo inet loopback

# network interface not managed by Network Manager
allow-hotplug eth1
iface eth1 inet static
address 10.0.0.10
netmask 255.255.255.0
gateway 10.0.0.1
dns-nameservers 8.8.8.8
Then Network Manager automatically ignore any interfaces specified in /etc/network/interfaces, and stop managing them.
After rebooting, verify that Network Manager is successfully disabled for eth1.
$ nmcli dev status
Disable Network Manager for a Particular Network Interface on Fedora or CentOS/RHEL
The following steps will disable Network Manager for eth1 on Fedora, CentOS or RHEL.
Create an interface configuration file for eth1 (if not exist), and add “NM_CONTROLLED=no”.
TYPE="Ethernet"
NAME="eth1"
BOOTPROTO="static"
IPADDR=10.0.0.10
NETMASK=255.255.255.0
GATEWAY=10.0.0.1
HWADDR="00:90:29:95:EA:57"
ONBOOT="yes"
DEFROUTE="yes"
NM_CONTROLLED=no
Now enable network service so that eth1 is activated by network service automatically upon boot.
On Fedora or CentOS/RHEL 7 or later:
$ sudo systemctl enable network.service
On CentOS/RHEL 6 or earlier:
$ sudo chkconfig network on
Upon rebooting, verify that Network Manager is successfully disabled for eth1 with nmcli command.
$ nmcli dev status
Modify the name after @ in Linux
Change the name of Linux
When we use Linux with long names, it’s hard for our ocd patients to change
to the name they want.
vi /etc/hostname
Delete the contents and replace them with the name you want. If (Alice)
, save and exit.
, restart and you will find that the modification is complete
Unicode encodeerror: ‘GBK’ codec can’t encode character solution
UnicodeEncodeError: ‘GBK’ codec can’t encode character ‘\ue615’ in position 488084: Illegal Multibyte Sequence
with open('baidu.html', 'w', encoding='utf-8') as f:
    f.write(data)