Author Archives: Robins

How To Install Java with Apt-Get on Ubuntu 16.04

Introduction
Java and the JVM (Java’s virtual machine) are widely used and required for many kinds of software. This article will guide you through the process of installing and managing different versions of Java using apt-get.Prerequisites
To follow this tutorial, you will need:
One Ubuntu 16.04 server. A sudo non-root user, which you can set up by following the Ubuntu 16.04 initial server setup guide.

Installing the Default JRE/JDK
The easiest option for installing Java is using the version packaged with Ubuntu. Specifically, this will install OpenJDK 8, the latest and recommended version.
First, update the package index.

sudo apt-get update

Next, install Java. Specifically, this command will install the Java Runtime Environment (JRE).

sudo apt-get install default-jre

There is another default Java installation called the JDK (Java Development Kit). The JDK is usually only needed if you are going to compile Java programs or if the software that will use Java specifically requires it.
The JDK does contain the JRE, so there are no disadvantages if you install the JDK instead of the JRE, except for the larger file size.
You can install the JDK with the following command:

sudo apt-get install default-jdk

Installing the Oracle JDK
If you want to install the Oracle JDK, which is the official version distributed by Oracle, you will need to follow a few more steps. If you need Java 6 or 7, which are not available in the default Ubuntu 16.04 repositories (not recommended), this installation method is also available.
First, add Oracle’s PPA, then update your package repository.

sudo add-apt-repository ppa:webupd8team/java
sudo apt-get update

Then, depending on the version you want to install, execute one of the following commands:
Oracle JDK 6 or 7
These are very old versions of Java which reached end of life in February 2013 and April 2015 respectively. It’s not recommended to use them, but they might still be required for some programs.
To install JDK 6, use the following command:

sudo apt-get install oracle-java6-installer

To install JDK 7, use the following command:

sudo apt-get install oracle-java7-installer

Oracle JDK 8
This is the latest stable version of Java at time of writing, and the recommended version to install. You can do so using the following command:

sudo apt-get install oracle-java8-installer

Oracle JDK 9
This is a developer preview and the general release is scheduled for March 2017. It’s not recommended that you use this version because there may still be security issues and bugs. There is more information about Java 9 on the official JDK 9 website.
To install JDK 9, use the following command:

sudo apt-get install oracle-java9-installer

Managing Java
There can be multiple Java installations on one server. You can configure which version is the default for use in the command line by using update-alternatives, which manages which symbolic links are used for different commands.

sudo update-alternatives –config java

The output will look something like the following. In this case, this is what the output will look like with all Java versions mentioned above installed.

Output

There are 5 choices for the alternative java (providing /usr/bin/java).

  Selection    Path                                            Priority   Status
------------------------------------------------------------
* 0            /usr/lib/jvm/java-8-openjdk-amd64/jre/bin/java   1081      auto mode
  1            /usr/lib/jvm/java-6-oracle/jre/bin/java          1         manual mode
  2            /usr/lib/jvm/java-7-oracle/jre/bin/java          2         manual mode
  3            /usr/lib/jvm/java-8-openjdk-amd64/jre/bin/java   1081      manual mode
  4            /usr/lib/jvm/java-8-oracle/jre/bin/java          3         manual mode
  5            /usr/lib/jvm/java-9-oracle/bin/java              4         manual mode

Press <enter> to keep the current choice[*], or type selection number:

You can now choose the number to use as a default. This can also be done for other Java commands, such as the compiler (javac), the documentation generator (javadoc), the JAR signing tool (jarsigner), and more. You can use the following command, filling in the command you want to customize.

sudo update-alternatives –config command

Setting the JAVA_HOME Environment Variable
Many programs, such as Java servers, use the JAVA_HOME environment variable to determine the Java installation location. To set this environment variable, we will first need to find out where Java is installed. You can do this by executing the same command as in the previous section:

sudo update-alternatives –config java

Copy the path from your preferred installation and then open /etc/environment using nano or your favorite text editor.

sudo nano /etc/environment

At the end of this file, add the following line, making sure to replace the highlighted path with your own copied path.

/etc/environment

JAVA_HOME="/usr/lib/jvm/java-8-oracle"

Save and exit the file, and reload it.

source /etc/environment

You can now test whether the environment variable has been set by executing the following command:

echo $JAVA_HOME

This will return the path you just set.

Conclusion
You have now installed Java and know how to manage different versions of it. You can now install software which runs on Java, such as Tomcat, Jetty, Glassfish, Cassandra, or Jenkins.
 

How to Install FFmpeg on Linux

How to Install FFmpeg on Linux
FFmpeg is an all in one multimedia codex which can convert audio and video into different formats. It is available as a command line tool. FFmpeg supports most audio and video formats. It can also edit and stream multimedia files. Here’s how you can install it onto your Linux based machine or VPS.
Here are some other FFmpeg features you can look forward to:
Extract audio from a series of video filesExtract only video with no audioResize video filesCut existing video into a smaller clipMerge videosConvert audio and video
Protip: If you want to install FFmpeg on your Linux VPS, connect to your machine via ssh before proceeding further.

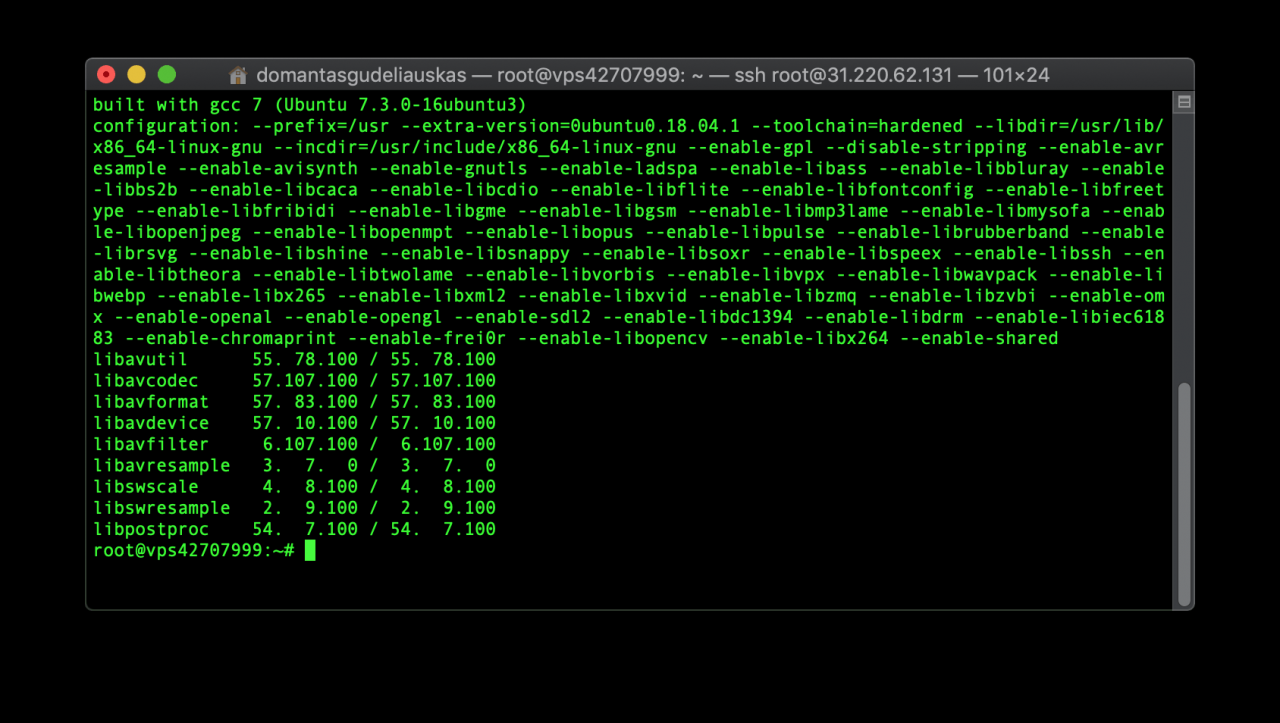
Remember, whatever version of Linux you use, you can check if FFmpeg is installed, or what version it’s running with the following command:

ffmpeg -version

A typical output of this command would look as shown below:

Install FFmpeg on Ubuntu
Installing FFmpeg 4 – the latest version – on Ubuntu 14. x and above is easy.
We will install FFmpeg from the mc3man ppa. PPA stands for Personal Package Archives which are supported by the Ubuntu community.
To add this PPA we need to execute:

sudo apt-get install -y software-properties-common
add apt-repository ppa:mc3man/trusty-media

Once the PPA is installed, move on to updating the repository by executing:

apt-get update
apt-get dist-upgrade

Lastly, to install ffmpeg we need to execute:

apt-get install ffmpeg

This completes the ffmpeg installation. To verify the version check using the following command:

ffmpeg -version

Install FFmpeg on Debian
To install FFmpeg on Debian 9 – Stretch, you need to be logged in as a root user. The FFmpeg package uses the apt package manager for installation. It’s available in the official Debian repository.
First, update the package list using:

apt update

After this we can execute the following command to install FFmpeg:

apt install ffmpeg

If you’re using Debian 8 – Jessie, FFmpeg won’t be available in the official repository. However, the Debian multimedia repository can be used to install the codex.
We will have to add the Debian multimedia repository. To add this, we need to edit the file /etc/apt/sources.list. This file contains the list of repositories APT uses. To edit this file, you can use a terminal editor such as nano or vi.
Open the file using the following command and press I (Insert) to start editing:

vi /etc/apt/sources.list

Add the lines listed below to the file:

deb http://www.deb-multimedia.org jessie main non-free

deb-src http://www.deb-multimedia.org jessie main non-free

# jessie-backports

deb http://ftp.debian.org/debian/ jessie-backports main

To save your edit on the vi editor press Esc. To exit the editor press : and execute q!
Next we will have to install the deb-multimedia-keyring package. First, we will update, then install, and update one more time. This makes sure that all the changes are correctly updated and noted.

apt update
apt install deb-multimedia-keyring
apt update

Once you’re done, install the FFmpeg package using:

apt install ffmpeg

To validate the installation on Debian use the following command:

ffmpeg -version

Install FFmpeg on CentOS, Fedora, and RHEL
CentOS does not provide an official repository for FFmpeg installation. This can be installed using third party nux dextop yum repo.
To install using CentOS 7 or 6, update the system using:

yum install epel-release -y
yum update -y

On CentOS 7 and RHEL 7 use the following command:

rpm --import http://li.nux.ro/download/nux/RPM-GPG-KEY-nux.ro
rpm -Uvh http://li.nux.ro/download/nux/dextop/el7/x86_64/nux-dextop-release-0-5.el7.nux.noarch.rpm

On CentOS/RHEL 6/5, the command is slightly different and refers to a different repository.

rpm --import http://li.nux.ro/download/nux/RPM-GPG-KEY-nux.ro
rpm -Uvh http://li.nux.ro/download/nux/dextop/el6/x86_64/nux-dextop-release-0-2.el6.nux.noarch.rpm

Next, we can install FFmpeg and its development packages using:

yum install ffmpeg ffmpeg-devel -y

This completes the installation.
To install FFmpeg on Fedora, use the RPMfusion repository. If you don’t have it installed use this command:

dnf install https://download1.rpmfusion.org/free/fedora/rpmfusion-free-release-$(rpm -E %fedora).noarch.rpm
dnf install https://download1.rpmfusion.org/nonfree/fedora/rpmfusion-nonfree-release-$(rpm -E %fedora).noarch.rpm

Next, we can install FFmpeg and its development package using a DNF package manager.

dnf install ffmpeg ffmpeg-devel

That’s it, you successfully added FFmpeg to your Fedora virtual machine.
Install FFmpeg on Arch Linux
For Arch Linux, we need to use the Pacman package manager. This is an Arch Linux repository. The official repository will give details of which version is available.
To update the DB, we can use the following command:

pacman -Sy vlc

Next, we can install FFmpeg using:

pacman -R ffmpeg4.0

To reflect these changes, update the system using:

pacman -Su

And you’re done! FFmpeg should be successfully added to your Arch Linux machine. To verify the installation, execute:

ffmpeg -version

Conclusion
Installing FFmpeg on a Linux machine is easy, and takes only a few minutes. Just log in as a root user and follow the guidelines for your OS. Each flavor of Linux – Ubuntu, Arch Linux, Debian, CentOS/RHEL, Fedora – have slight differences when installing FFmpeg. Start using this powerful codex!

How to uninstall Maya on a Mac

How to uninstall Maya on a Mac

Products and versions covered

By: 
Support

Jun 15 2018

SHARE

ADD TO COLLECTION

Issue: You want to know how to uninstall Maya from a Macintosh computer.

Solution: Maya doesn’t have an uninstall tool so you will need to manually delete it. You can use a Terminal with the Open command to easily delete files and folders as noted in the videos below:

    1. Delete the main Application. [Drag the folder into the trash. ]
    1. Maya includes Matchmover and Composite.  These applications are in:
    1. /Applications/Autodesk
    1.  Delete Backburner by removing these folders:
    1. /usr/discreet/backburner
    1. /usr/discreet/lib32/backburner
    1. Video:   Open-delete-hidden-folders
    1. /Library/LaunchDaemons/com.autodesk. *
    1.  Delete Network License Manager [NLM]:
    1. /usr/local/flexnetserver
    1. Video:   Open-delete-flexnetfolder
    1. /Library/StartupItems/adsknlm
    1.  Delete and backup licensing files/folders. You need to follow only one of the steps below depending on your type of install.
    1. Network:
    1. /var/flexlm/maya. lic or adsk_server. lic
    1. Standalone:
    1. /Library/Application Support/Autodesk/Adlm
    1. /Library/Preferences/FLEXnet Publisher/FLEXnet/adskflex_00691b00_tsf. data
    1. /Library/Preferences/FLEXnet Publisher/FLEXnet/adskflex_00691b00_tsf.data_backup. 001
    The Library folders in Mac OS 10.7 and higher is completely hidden so you can use the Go > Go to folder to access it.  You can also view the videos in steps 2 and 3 for further instructions.

Note: Deleting the standalone licensing files can affect AutoCAD and Smoke installation. If you delete these files, you will need to uninstall and reinstall AutoCAD and Smoke as well.
This method is easier than using adlmreg noted in the documentation, Maya_Install_FAQ_en.pdf >  [2012], on page 23. If you want to use the Terminal, the path to adlmreg is: /usr/bin/adlmreg.
When adlmreg does not found, see also Where is adlmreg for Maya?

See Also:
Autodesk BackBurner – Mac and VMWare Fusion – IP ConflictAutoCAD [2013-2012] for Mac: Where is the licpath. lic file?Reset Standalone licensing on the Mac [Time Machine]

How To Change ASM SYS PASSWORD

To change the ASM SYS Password
Things tried:
SQL> password
Changing password for SYS
Old password:
New password:
Retype new password:
ERROR:
ORA-00600: internal error code, arguments: [15051], [], [], [], [], [], [], []

SQL> select INSTANCE_NAME from v$instance;

INSTANCE_NAME
—————-
+ASM

SQL> ALTER USER sys IDENTIFIED BY <new_password> REPLACE <old_password>;
ALTER USER sys IDENTIFIED BY <new_password> REPLACE <old_password>
*
ERROR at line 1:
ORA-01109: database not open

The following error also might occur:
SQL> alter user sys identified by ;
alter user sys identified by
*
ERROR at line 1:
ORA-01031: insufficient privileges

Solution
We can not change the password for ASM databases via alter user command.
The password should be the one provided when the password file was created,also REMOTE_LOGIN_PASSWORDFILE should be set to EXCLUSIVE on all instances.

If you want to change the password then you would need to recreate the password file using the orapwd utility
Recreate the password file for the ASM instance as follows:
1.   Set the ORACLE_HOME and ORACLE_SID to the ASM instance
2.  connect /as sysdba from sqlplus
3.  If the value of the “remote_login_passwordfile” parameter in the pfile or spfile is EXCLUSIVE, you must shutdown your instance
4.  RENAME or DELETE the existing password file PWD<SID>. ora( In Windows) / orapw<SID> ( in UNIX)
5.  Issue the command:
WINDOWS:
orapwd file=<ORACLE_HOME>/database/PWD<SID>. ora password=<sys_password>

UNIX:
orapwd file=<ORACLE_HOME>/dbs/PWD<SID> password=<sys_password>

The passwordfile can be recreated for ASM while ASM instance is up. Usually for normal DB instances, we recommended that DB instances be shutdown before changing the passwordfile.

Extracting Data from XML (Using Python to Access Web Data)

Question:Extracting Data from XML
In this assignment, you will write a Python program somewhat similar to http://www.py4e.com/code3/geoxml.py. The program will prompt for a URL, read the XML data from that URL using urllib and then parse and extract the comment counts from the XML data, compute the sum of the numbers in the file.
We provide two files for this assignment. One is a sample file where we give you the sum for your testing and the other is the actual data you need to process for the assignment.
Sample data: http://py4e-data.dr-chuck.net/comments_42.xml (Sum=2553)Actual data: http://py4e-data.dr-chuck.net/comments_269101.xml (Sum ends with 14)
You do not need to save these files to your folder since your program will read the data directly from the URL.  Note: Each student will have a distinct data url for the assignment – so only use your own data url for analysis.
Data Format and Approach
The data consists of a number of names and comment counts in XML as follows:

<comment>
  <name>Matthias</name>
  <count>97</count>
</comment>

You are to look through all the <comment> tags and find the <count> values sum the numbers. The closest sample code that shows how to parse XML is geoxml.py. But since the nesting of the elements in our data is different than the data we are parsing in that sample code you will have to make real changes to the code.
To make the code a little simpler, you can use an XPath selector string to look through the entire tree of XML for any tag named ‘count’ with the following line of code:

counts = tree.findall('.//count')

Take a look at the Python ElementTree documentation and look for the supported XPath syntax for details. You could also work from the top of the XML down to the comments node and then loop through the child nodes of the comments node.
Sample Execution

$ python3 solution.py
Enter location: http://py4e-data.dr-chuck.net/comments_42.xml
Retrieving http://py4e-data.dr-chuck.net/comments_42.xml
Retrieved 4189 characters
Count: 50
Sum: 2...

Relevant program given by the teacher (Geoxml.py) :

import urllib.request, urllib.parse, urllib.error
import xml.etree.ElementTree as ET
import ssl

api_key = False
# If you have a Google Places API key, enter it here
# api_key = 'AIzaSy___IDByT70'
# https://developers.google.com/maps/documentation/geocoding/intro

if api_key is False:
    api_key = 42
    serviceurl = 'http://py4e-data.dr-chuck.net/xml?'
else :
    serviceurl = 'https://maps.googleapis.com/maps/api/geocode/xml?'

# Ignore SSL certificate errors
ctx = ssl.create_default_context()
ctx.check_hostname = False
ctx.verify_mode = ssl.CERT_NONE

while True:
    address = input('Enter location: ')
    if len(address) < 1: break

    parms = dict()
    parms['address'] = address
    if api_key is not False: parms['key'] = api_key
    url = serviceurl + urllib.parse.urlencode(parms)
    print('Retrieving', url)
    uh = urllib.request.urlopen(url, context=ctx)

    data = uh.read()
    print('Retrieved', len(data), 'characters')
    print(data.decode())
    tree = ET.fromstring(data)

    results = tree.findall('result')
    lat = results[0].find('geometry').find('location').find('lat').text
    lng = results[0].find('geometry').find('location').find('lng').text
    location = results[0].find('formatted_address').text

    print('lat', lat, 'lng', lng)
    print(location)

My solution:
import urllib.request, urllib.parse, urllib.error
import xml.etree.ElementTree as ET
url = ‘http://py4e-data.dr-chuck.net/comments_269101.xml’
uh = urllib.request.urlopen(url)
data = uh.read()
tree = ET.fromstring(data)
counts = tree.findall(‘.//count’)
counts_list = [int(count.text) for count in counts]
print(sum(counts_list))
What I want to say:
1. The title is very simple, and the iterative expression is very sweet.
2, I mainly records the teacher give the program inside a decode (), and I want to remember the decode and encode () () the difference is the role of decode other encoded string converted to unicode, is the role of encode unicode into other encoded string (https://blog.csdn.net/qq_40134903/article/details/80710882).
Supplement:
200226: In the last class, the teacher talked carefully about decode (which converts a byte into a String) & Encode (convert strings to Bytes) :
String (Unicode)= encode()=> Bytes (UTF-8)= send()=> socket==> network
String (Unicode) < = Bytes ()= Bytes (UTF-8) < =recv()=socket< ==network

Raspberry PI install VIM editor


Raspberry Pi installs the ViM editor

1. Delete default VI editor
sudo apt-get remove vim-common

[setupvars.sh] OpenVINO environment initialized
pi@raspberrypi:~ $ sudo apt-get remove vim-common
Reading the package list... Finished...
Dependency tree of the package being analyzed        
Reading status information... Finished...       
The following packages were automatically installed and are no longer required.
  vim-runtime
Use 'sudo apt autoremove' to uninstall it (them).
The following packages will be [uninstalled].
  vim vim-common vim-tiny
0 packages upgraded, 0 new packages installed, 3 packages to uninstall, and 0 packages not upgraded.
After unzipping, 3,053 kB of space will be free.
Do you wish to continue? [Y/n] Y
(Reading the database ... There are currently 84686 files and directories installed on the system).
Uninstalling vim (2:8.0.0197-4+deb9u1) ...
update-alternatives: Use /usr/bin/vim.tiny to provide /usr/bin/vi (vi) in automatic mode.
update-alternatives: Use /usr/bin/vim.tiny to provide /usr/bin/view (view) in automatic mode.
update-alternatives: Use /usr/bin/vim.tiny to provide /usr/bin/ex (ex) in automatic mode.
update-alternatives: Use /usr/bin/vim.tiny to provide /usr/bin/rview (rview) in automatic mode.
Uninstalling vim-tiny (2:8.0.0197-4+deb9u1) ...
Uninstalling vim-common (2:8.0.0197-4+deb9u1) ...
Working with triggers for mime-support (3.60) ...
Processing triggers for desktop-file-utils (0.23-1) ...
Processing triggers for man-db (2.7.6.1-2) ...
Working with triggers for gnome-menus (3.13.3-9) ...
Processing triggers for hicolor-icon-theme (0.15-1) ...
pi@raspberrypi:~ $ 

2. Install the VIm editor
sudo apt-get install vim

pi@raspberrypi:~ $ sudo apt-get install vim
Reading the package list... Finished...
Dependency tree of the package being analyzed        
Reading status information... Finished...       
The following software will be installed at the same time.
  vim-common
Recommended Installation.
  ctags vim-doc vim-scripts
The following [new] packages will be installed.
  vim vim-common
0 packages upgraded, 2 new packages installed, 0 packages to uninstall, 0 packages not upgraded.
Need to download 159 kB/949 kB of archives.
Decompression consumes 2,203 kB of extra space.
Do you wish to continue? [Y/n] Y
Get:1 http://mirrors.tuna.tsinghua.edu.cn/raspbian/raspbian stretch/main armhf vim-common all 2:8.0.0197-4+deb9u1 [159 kB]                                                
Downloaded 159 kB in 20 seconds (7,672 B/s)           
The unselected package vim-common is being selected.
(Reading database ... The system currently has 84619 files and directories installed.)
Preparing to unpack ... /vim-common_2%3a8.0.0197-4+deb9u1_all.deb ...
Unpacking vim-common (2:8.0.0197-4+deb9u1) ...
Unselected package vim is being selected.
Preparing to unpack ... /vim_2%3a8.0.0197-4+deb9u1_armhf.deb ...
Unpacking vim (2:8.0.0197-4+deb9u1) ...
Working with triggers for mime-support (3.60) ...
Working with triggers for desktop-file-utils (0.23-1) ...
Working on vim-common (2:8.0.0197-4+deb9u1) ...
Working with triggers for man-db (2.7.6.1-2) ...
Working with triggers for gnome-menus (3.13.3-9) ...
Working with triggers for hicolor-icon-theme (0.15-1) ...
Setting up vim (2:8.0.0197-4+deb9u1) ...
update-alternatives: Use /usr/bin/vim.basic to provide /usr/bin/vim (vim) in automatic mode.
update-alternatives: Use /usr/bin/vim.basic to provide /usr/bin/vimdiff (vimdiff) in automatic mode.
update-alternatives: Use /usr/bin/vim.basic to provide /usr/bin/rvim (rvim) in automatic mode.
update-alternatives: Use /usr/bin/vim.basic to provide /usr/bin/rview (rview) in automatic mode.
update-alternatives: Use /usr/bin/vim.basic to provide /usr/bin/vi (vi) in automatic mode.
update-alternatives: Use /usr/bin/vim.basic to provide /usr/bin/view (view) in automatic mode.
update-alternatives: Use /usr/bin/vim.basic to provide /usr/bin/ex (ex) in automatic mode.
pi@raspberrypi:~ $

How to Cancel pending transactions on Ethereum


Transactions model
Ethereum transactions model is vastly different from Bitcoin. Instead of using UTXO (unspent transaction outputs) transaction uniqueness and order are achieved using transaction nonce. It is an integer (uint256) counter which is incremented for each transaction of an account. Its value is effectively the number of transactions sent from a given address and its value must be included in every transaction.
There are two rules:
transactions must be processed in order (transaction with a nonce of 1 must be processed before the transaction with a nonce of 2)no skipping (transaction with a nonce of 4 cannot be included in a block until transactions with nonces of 123 are processed)
This way the network is able to identify duplicates of transactions and enforce their order (which is essential for smart contracts).
Gas price and transaction fees
Each transaction must set gas price which directly affects transaction fees. Miners optimize their profits by including transactions with a high gas price first.
If gas price is low the transaction will wait for a long time until it is mined. Eventually, it will be mined (sometimes many hours later) or dropped (miners have limited resources to queue pending transactions). However, even if the transaction is dropped by miners it may still await in pendingTransaction list of your client and artificially increase your nonce.
You can explore the list of pending transactions on Etherscan.
Blocked account
When a transaction is waiting for being mined all subsequent transactions are blocked. They cannot be included in a block until the previous one is included (it is determined by mentioned nonce value). Even if subsequent transactions have a very high gas price they cannot be processed as it would break the order of transactions and produce different state than expected.  This makes the account effectively blocked.
How to cancel pending transaction
A single transaction with a low gas price renders the whole account unusable for many hours. The easiest and often most viable solution is to cancel the transaction. But wait, there is no such method in wallets or even API for that!
Fortunately, it is possible. The solution is not obvious but quite logical.  A transaction can be overridden with a different transaction that is more attractive to miners.
The solution is to send another transaction with the same nonce and higher gas price. But what kind of transaction can act as a NOP (no operation)?
It turns out that transaction of sending 0 ether to itself (from == to) is a perfect candidate without any side effects. Obviously, the transaction must be signed by the same account as the one that sent the pending transaction.
Let’s start geth console

geth attach

The first step is to identify pending transaction hash. You can list pending transactions using geth specific call:

eth.pendingTransactions

Also, you can locate it in the list of transactions from your account on Etherscan.
Next, we need to unlock the account to sign the transaction.

personal.unlockAccount('<YOUR_ACCOUNT>')
Unlock account <YOUR_ACCOUNT>
Passphrase:
true

When we unlocked the account and identified the pending transaction nonce and previous gasPrice, we can send zero value transaction fromand to your account using more reasonable gas price and the same nonce as the pending transaction.
The gas price should be at least 10% higher than previously but I suggest checking ETH Gas Stations for the recommended gas price which varies depending on the network congestion.
gasPrice should be expressed in wei units (smallest Ethereum unit 10e-18).
You can use web3 helpers to convert Ethereum units, for example, web3. toWei(21, 'gwei').

eth.sendTransaction({
    from: '<YOUR_ACCOUNT>',
    to: '<YOUR_ACCOUNT>',
    value: 0,
    gasPrice: <NEW_HIGHER_GAS_PRICE>,
    gasLimit: 24000,
    nonce: '<NONCE_OF_YOUR_PENDING_TRANSACTION>'
});

A long way ahead of GUI wallets
One can very easily block the account by sending a transaction with a low gas price. It may happen even if the price is reasonable but the network is experiencing congestion. Unfortunately, at the time of writing, Ethereum clients (official Wallet, Mist, MetaMask etc.) do not support canceling transactions nor increasing the gas price after transaction broadcast. I hope that such low-level solution will not be needed in the future as it may cause a lot of issues for the beginners.

How do I download or save a YouTube video to my computer?

Getting the YouTube file to your computer
Today, there are several online websites that allow you to enter the URL of the video you wish to save to your computer, and get a link to download the file. Below is a short list of some of the more popular free websites.
http://www.savevid.com/
http://keepvid.com/
Below is a brief description of how to save a video using Savevid. These steps are often very similar with other services used to save YouTube and other flash videos online.

    Go to the YouTube video page and copy the URL of the video you wish to save. For example, below is a URL to a video on YouTube.

    http://www.youtube.com/watch?v=R3ymHMgFAps
     Once this address has been copied, visit SaveVid and paste that URL into the URL text field, then click the Submit or Download button. If done properly, the page should open a new window or display a link to each of the video formats that can be saved. Savevid will give you the option to save the video as FLV, 3GP, MP4 and WebM format. If you’re wanting to watch this video on the computer we recommend saving the video as MP4 format.

Watching a FLV video on your computer
Once the .flv file has been downloaded to your computer, you’ll need a player that supports .flv files. Below are a few suggestions.
VLC media player
http://www.videolan.org/
FLV Player
http://www.martijndevisser.com/blog/flv-player/
Windows Media Player
Microsoft Windows users also have the ability of playing FLV files in Windows Media player with the right codec. Downloading and installing the CCCP codec will install this codec, as well as many other codecs you’ll likely need in the future.
Converting the YouTube video to a different movie format
There are dozens of different software programs and online services available that will allow you to convert FLV files into another format. Below is a short listing of some of the free services and products we recommend.
Media Convert – An excellent online service that can convert FLV files into dozens of other formats.
http://www.media-convert.com/
Vixy – Another great online service that allows you to download and save YouTube video files to another format.
http://vixy.net/

Resolve warning: could’t clear Tomcat cache java.lang.NoSuchFieldException: resourceEntries

Warning: couldn't clear tomcat cache
java.lang.NoSuchFieldException: resourceEntries
    at java.lang.Class.getDeclaredField(Class.java:1882)
    at com.opensymphony.xwork2.util.LocalizedTextUtil.clearMap(LocalizedTextUtil.java:835)
    at com.opensymphony.xwork2.util.LocalizedTextUtil.clearTomcatCache(LocalizedTextUtil.java:818)
    at com.opensymphony.xwork2.util.LocalizedTextUtil.reloadBundles(LocalizedTextUtil.java:797)
    at com.opensymphony.xwork2.util.LocalizedTextUtil.reloadBundles(LocalizedTextUtil.java:780)
    at com.opensymphony.xwork2.util.LocalizedTextUtil.findDefaultText(LocalizedTextUtil.java:205)
    at com.opensymphony.xwork2.util.LocalizedTextUtil.getDefaultMessage(LocalizedTextUtil.java:654)
    at com.opensymphony.xwork2.util.LocalizedTextUtil.findText(LocalizedTextUtil.java:534)
    at com.opensymphony.xwork2.TextProviderSupport.getText(TextProviderSupport.java:253)
    at com.opensymphony.xwork2.ActionSupport.getText(ActionSupport.java:130)
    at org.apache.struts2.util.TextProviderHelper.getText(TextProviderHelper.java:75)
    at org.apache.struts2.components.Text.end(Text.java:160)
    at org.apache.struts2.views.jsp.ComponentTagSupport.doEndTag(ComponentTagSupport.java:42)
    at org.apache.jsp.ognl.OgnlAction_jsp._jspx_meth_s_005ftext_005f0(OgnlAction_jsp.java:494)
    at org.apache.jsp.ognl.OgnlAction_jsp._jspService(OgnlAction_jsp.java:182)
    at org.apache.jasper.runtime.HttpJspBase.service(HttpJspBase.java:70)
    at javax.servlet.http.HttpServlet.service(HttpServlet.java:731)
    at org.apache.jasper.servlet.JspServletWrapper.service(JspServletWrapper.java:439)
    at org.apache.jasper.servlet.JspServlet.serviceJspFile(JspServlet.java:395)
    at org.apache.jasper.servlet.JspServlet.service(JspServlet.java:339)
    at javax.servlet.http.HttpServlet.service(HttpServlet.java:731)
    at org.apache.catalina.core.ApplicationFilterChain.internalDoFilter(ApplicationFilterChain.java:303)
    at org.apache.catalina.core.ApplicationFilterChain.doFilter(ApplicationFilterChain.java:208)
    at org.apache.catalina.core.ApplicationDispatcher.invoke(ApplicationDispatcher.java:747)
    at org.apache.catalina.core.ApplicationDispatcher.processRequest(ApplicationDispatcher.java:485)
    at org.apache.catalina.core.ApplicationDispatcher.doForward(ApplicationDispatcher.java:410)
    at org.apache.catalina.core.ApplicationDispatcher.forward(ApplicationDispatcher.java:337)
    at org.apache.struts2.dispatcher.ServletDispatcherResult.doExecute(ServletDispatcherResult.java:164)
    at org.apache.struts2.dispatcher.StrutsResultSupport.execute(StrutsResultSupport.java:186)
    at com.opensymphony.xwork2.DefaultActionInvocation.executeResult(DefaultActionInvocation.java:374)
    at com.opensymphony.xwork2.DefaultActionInvocation.invoke(DefaultActionInvocation.java:278)
    at org.apache.struts2.interceptor.debugging.DebuggingInterceptor.intercept(DebuggingInterceptor.java:256)
    at com.opensymphony.xwork2.DefaultActionInvocation.invoke(DefaultActionInvocation.java:249)
    at com.opensymphony.xwork2.interceptor.DefaultWorkflowInterceptor.doIntercept(DefaultWorkflowInterceptor.java:176)
    at com.opensymphony.xwork2.interceptor.MethodFilterInterceptor.intercept(MethodFilterInterceptor.java:98)
    at com.opensymphony.xwork2.DefaultActionInvocation.invoke(DefaultActionInvocation.java:249)
    at com.opensymphony.xwork2.validator.ValidationInterceptor.doIntercept(ValidationInterceptor.java:265)
    at org.apache.struts2.interceptor.validation.AnnotationValidationInterceptor.doIntercept(AnnotationValidationInterceptor.java:68)
    at com.opensymphony.xwork2.interceptor.MethodFilterInterceptor.intercept(MethodFilterInterceptor.java:98)
    at com.opensymphony.xwork2.DefaultActionInvocation.invoke(DefaultActionInvocation.java:249)
    at com.opensymphony.xwork2.interceptor.ConversionErrorInterceptor.intercept(ConversionErrorInterceptor.java:138)
    at com.opensymphony.xwork2.DefaultActionInvocation.invoke(DefaultActionInvocation.java:249)
    at com.opensymphony.xwork2.interceptor.ParametersInterceptor.doIntercept(ParametersInterceptor.java:211)
    at com.opensymphony.xwork2.interceptor.MethodFilterInterceptor.intercept(MethodFilterInterceptor.java:98)
    at com.opensymphony.xwork2.DefaultActionInvocation.invoke(DefaultActionInvocation.java:249)
    at com.opensymphony.xwork2.interceptor.ParametersInterceptor.doIntercept(ParametersInterceptor.java:211)
    at com.opensymphony.xwork2.interceptor.MethodFilterInterceptor.intercept(MethodFilterInterceptor.java:98)
    at com.opensymphony.xwork2.DefaultActionInvocation.invoke(DefaultActionInvocation.java:249)
    at com.opensymphony.xwork2.interceptor.StaticParametersInterceptor.intercept(StaticParametersInterceptor.java:190)
    at com.opensymphony.xwork2.DefaultActionInvocation.invoke(DefaultActionInvocation.java:249)
    at org.apache.struts2.interceptor.MultiselectInterceptor.intercept(MultiselectInterceptor.java:75)
    at com.opensymphony.xwork2.DefaultActionInvocation.invoke(DefaultActionInvocation.java:249)
    at org.apache.struts2.interceptor.CheckboxInterceptor.intercept(CheckboxInterceptor.java:90)
    at com.opensymphony.xwork2.DefaultActionInvocation.invoke(DefaultActionInvocation.java:249)
    at org.apache.struts2.interceptor.FileUploadInterceptor.intercept(FileUploadInterceptor.java:243)
    at com.opensymphony.xwork2.DefaultActionInvocation.invoke(DefaultActionInvocation.java:249)
    at com.opensymphony.xwork2.interceptor.ModelDrivenInterceptor.intercept(ModelDrivenInterceptor.java:100)
    at com.opensymphony.xwork2.DefaultActionInvocation.invoke(DefaultActionInvocation.java:249)
    at com.opensymphony.xwork2.interceptor.ScopedModelDrivenInterceptor.intercept(ScopedModelDrivenInterceptor.java:141)
    at com.opensymphony.xwork2.DefaultActionInvocation.invoke(DefaultActionInvocation.java:249)
    at com.opensymphony.xwork2.interceptor.ChainingInterceptor.intercept(ChainingInterceptor.java:145)
    at com.opensymphony.xwork2.DefaultActionInvocation.invoke(DefaultActionInvocation.java:249)
    at com.opensymphony.xwork2.interceptor.PrepareInterceptor.doIntercept(PrepareInterceptor.java:171)
    at com.opensymphony.xwork2.interceptor.MethodFilterInterceptor.intercept(MethodFilterInterceptor.java:98)
    at com.opensymphony.xwork2.DefaultActionInvocation.invoke(DefaultActionInvocation.java:249)
    at com.opensymphony.xwork2.interceptor.I18nInterceptor.intercept(I18nInterceptor.java:176)
    at com.opensymphony.xwork2.DefaultActionInvocation.invoke(DefaultActionInvocation.java:249)
    at org.apache.struts2.interceptor.ServletConfigInterceptor.intercept(ServletConfigInterceptor.java:164)
    at com.opensymphony.xwork2.DefaultActionInvocation.invoke(DefaultActionInvocation.java:249)
    at com.opensymphony.xwork2.interceptor.AliasInterceptor.intercept(AliasInterceptor.java:192)
    at com.opensymphony.xwork2.DefaultActionInvocation.invoke(DefaultActionInvocation.java:249)
    at com.opensymphony.xwork2.interceptor.ExceptionMappingInterceptor.intercept(ExceptionMappingInterceptor.java:187)
    at com.opensymphony.xwork2.DefaultActionInvocation.invoke(DefaultActionInvocation.java:249)
    at org.apache.struts2.impl.StrutsActionProxy.execute(StrutsActionProxy.java:54)
    at org.apache.struts2.dispatcher.Dispatcher.serviceAction(Dispatcher.java:510)
    at org.apache.struts2.dispatcher.ng.ExecuteOperations.executeAction(ExecuteOperations.java:77)
    at org.apache.struts2.dispatcher.ng.filter.StrutsPrepareAndExecuteFilter.doFilter(StrutsPrepareAndExecuteFilter.java:91)
    at org.apache.catalina.core.ApplicationFilterChain.internalDoFilter(ApplicationFilterChain.java:241)
    at org.apache.catalina.core.ApplicationFilterChain.doFilter(ApplicationFilterChain.java:208)
    at org.apache.catalina.core.StandardWrapperValve.invoke(StandardWrapperValve.java:218)
    at org.apache.catalina.core.StandardContextValve.invoke(StandardContextValve.java:122)
    at org.apache.catalina.authenticator.AuthenticatorBase.invoke(AuthenticatorBase.java:505)
    at org.apache.catalina.core.StandardHostValve.invoke(StandardHostValve.java:169)
    at org.apache.catalina.valves.ErrorReportValve.invoke(ErrorReportValve.java:103)
    at org.apache.catalina.valves.AccessLogValve.invo
ke(AccessLogValve.java:956)
    at org.apache.catalina.core.StandardEngineValve.invoke(StandardEngineValve.java:116)
    at org.apache.catalina.connector.CoyoteAdapter.service(CoyoteAdapter.java:442)
    at org.apache.coyote.http11.AbstractHttp11Processor.process(AbstractHttp11Processor.java:1082)
    at org.apache.coyote.AbstractProtocol$AbstractConnectionHandler.process(AbstractProtocol.java:623)
    at org.apache.tomcat.util.net.AprEndpoint$SocketProcessor.doRun(AprEndpoint.java:2517)
    at org.apache.tomcat.util.net.AprEndpoint$SocketProcessor.run(AprEndpoint.java:2506)
    at java.util.concurrent.ThreadPoolExecutor$Worker.runTask(ThreadPoolExecutor.java:886)
    at java.util.concurrent.ThreadPoolExecutor$Worker.run(ThreadPoolExecutor.java:908)
    at org.apache.tomcat.util.threads.TaskThread$WrappingRunnable.run(TaskThread.java:61)
    at java.lang.Thread.run(Thread.java:619)

I used Apache-Tomcat-7.0.70. Although it did not affect my use, I was not used to the obsessive-compulsive disorder. According to the Suggestions on the Internet, it could be solved by changing the lower version of Tomcat.
solution 1: use apache-tomcat-7.0.55 (pro test feasible)
solution 2: upgrade struts version, struts2.0.9==> Struts2.3.20 (Have not tried, can try)

Eclipse reset annotation shortcuts

I recently switched to a virtual machine and found that eclipse Settings on someone else’s virtual machine were a little bit bad. The biggest problem was that Ctrl+/ (keypad) was disabled, but Ctrl+/ (query key) can still be commented quickly.
I checked online blogs, and using what they said was the way to change the Toggle Comment Settings still didn’t work when writing C++
When I checked the Ctrl+/ setting, It turned out it wasn’t Toggle Comment, it was Comment/Uncomment
Process:
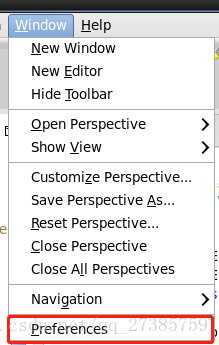
1. Click Window-& gt; preferences

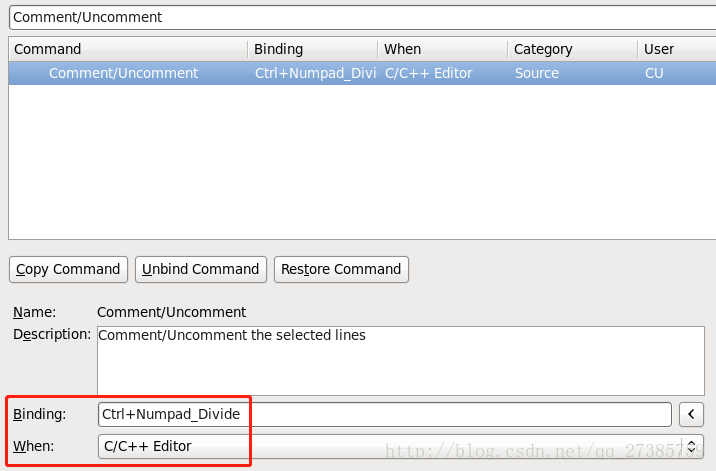
2. Search for Comment/Uncomment, bind related keys in binding, and define when to take effect in when

There’s a weird thing here, Ctrl+/ (keypad) in the binding is Ctrl+ numpad_divide
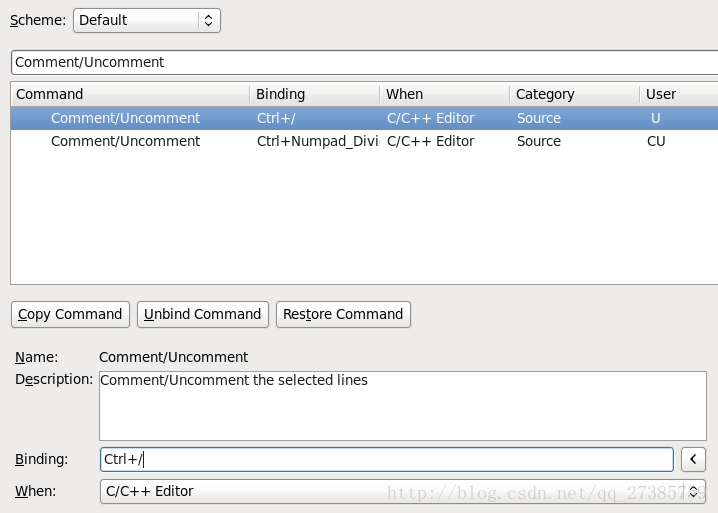
Click copy Command, you can copy the same comment command, you can add your own shortcut to comment, I’ll add Ctrl+/ (big keyboard key) here

This allows you to annotate the
code with Ctrl+/ (small keyboard) and Ctrl+/ (large keyboard)

Ubuntu 12.04 installation and use of airtrack ng tutorial

The original address: http://www.maybe520.net/blog/1744/
wireless code 1 ` backtrack is the most appropriate, then from the U disk to start the backtrack system very convenient also 2 ` BT5 system in virtual machine to crack the password needed to external USB wireless network card 3 ` with ubuntu to crack password
and open a terminal, enter the following command to install it
sudo apt – get the install Aircrack-ng
first install two extensions
sudo apt-get install build-essential
sudo apt-get install libssl-dev then go to http://download.aircrack-ng.org/aircrack-ng-1.1.tar.gz to download the latest version of aircrack-ng, Unzip it

after saving, start compiling and installing
make
sudo make install

how to use ubuntu aircrack-ng to crack the wireless password?

ubuntu aircrack-ng use tutorial
1, start the monitoring mode of wireless network card, input: sudo airmon-ng start wlan0
(wlan0 is the port of wireless network card, can be viewed by ifconfig)
sudo airodump-ng mon0
(mon0 is the port of the wireless network after starting the monitoring mode)
to see which of the wep encrypted AP online, then press CTRL +c to stop, do not close the terminal. 3. Grab packet
open another terminal and input:
sudo airodump -ng-c 6 — bssid AP’s mac-w wep mon0 — br> (-c followed by 6 is the AP working channel to crack, -bissid followed by AP ‘sMAC is the MAC address of the AP to crack, -w followed by wep is the file name of the DATA packet captured and saved. Change the channel and MAC address according to the online AP in step 2. DATA, save the file name can literally) 4, establish the virtual connection with AP
to open a new terminal, input:
sudo aireplay – ng – 1 0 – a AP ‘s MAC – h My MAC mon0
(- h followed by My MAC is own wireless network card MAC address, namely the ifconfig command wlan0 under the corresponding MAC address) 5, after injection of
success to establish a virtual connection type:
sudo aireplay -ng-2-f-p 0841-c ff:ff:ff:ff:ff:ff: ff-b AP’s mac-h My MAC mon0
now look back to see if the terminal in step 3 is DATA starting to soar! 6, decrypt
collect more than 15,000 DATA, open another terminal, switch to aircrack-ng-1.1 directory, execute the following command
sudo aircrack-ng wep*. Cap
for decrypting
(if not calculated, continue to wait, aircrack-ng will automatically run again after every 15,000 more DATA is added, until the password is calculated as 7, stop work
after cracking the password, enter sudo airmon-ng stop mon0 in the terminal to close the monitoring mode, otherwise the wireless network card will always be injected to the AP just, CTRL +c to exit or directly close the terminal is not ok. If you want to uninstall aircrack-ng on ubuntu, you can switch to aircrack-ng-1.1 directory, execute
sudo make uninstall
and manually delete the directory and everything under it.

How to Delete New Memory in Vector

Look at my error sample code:

std::vector<CObject*> ObjectSet = std::vector<CObject*>(3000);
CObject* pDataSet = new CObject[3000]();//To avoid memory fragmentation, allocate continuous memory first.
for (unsigned int i=0; i<ObjectSet.size(); ++i)
    {
        ObjectSet[i] = pDataSet + i;
        //ObjectSet[i] = & pDataSet[i]; //The effect is equivalent to the previous line. 
    }
//Freeing Memory
    for (unsigned int i=0; i<ObjectSet.size(); ++i)
    {
        delete ObjectSet[i];
    }

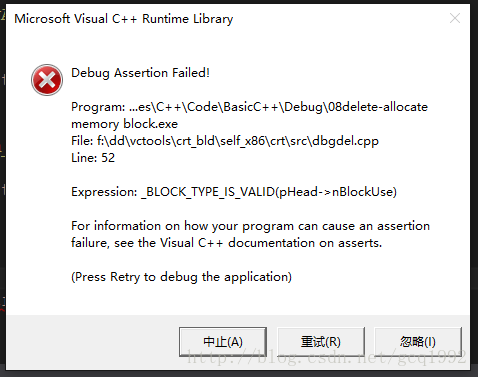
The result is a runtime error. Pointer in delete second Vector is wrong:

does not understand the mechanism of dynamic memory allocation and release. This is a runtime error.
example above, dynamic memory request, but free 3000 times!!!! No wonder you report an error.
“CObject* pDataSet = New CObject[3000] ();” The bottom line is this: allocate 3000 * sizeof(CObject) size memory from the heap and call CObject’s constructor 3000 times to initialize the allocated dynamic memory. Note: When allocating memory, the associated dynamic storage management data structure (free linked lists or bitmaps) records the first address and size of the dynamic memory you requested. Moreover, this memory can only be released once! Because the data structure records such a first address and size. When freed, memory of a specified size in the data structure is continuously returned to free storage, starting at the first address, and then the destructor is called.
The difference between DELETE and DELETE [] : If you create an array of objects dynamically, delete can only call the destructor on the 0th object element of the data, and no other object elements can be called. Delete [] calls the destructor on all object elements in the array. If an object in an array is also dynamically created when its members are created, using DELETE is bound to leak memory.
Delete ObjectSet[I]; Repeated execution, multiple release of dynamic memory, the second loop, inevitable error.
You can’t just read programming books, operating systems, and data structures if you want to get ahead. That’s what dynamic storage management in operating systems is all about.
Memory leaks:
_CrtDumpMemoryLeaks(); // detect memory leak
//_CrtSetBreakAlloc(173); // Locate memory leaks