Tag Archives: Software Installation

How to Solve ModuleNotFoundError Error After pip-autoremove Installed

The pip-autoremove tool is very convenient for managing the dependencies in the environment, when uninstalling a Package, you can uninstall it together with the dependencies installed at that time. However, after version 0.10.0, using pip-autoremove will report an error:

pip-autoremove packege_name
> ModuleNotFoundError: No module named 'pip_autoremove'

This is because in this version, pip-autoremove is treated as a Module. now there is a new commit on github that fixes this problem, but at the moment the direct installation via pip still does not work. In this case, you can force the installation of the fixed version to solve the problem.

pip3 install --force git+https://github.com/imba-tjd/pip-autoremove@ups

Error response from daemon: OCI runtime exec failed: exec failed: container_linux.go:345:

        An error was reported when using docker to enter the specified container today. The screenshot of the error is as follows:

        After careful verification, the command is correct, but it can’t get into the container. After checking the data, it is realized that there is a problem with the docker. It can be understood in combination with the error report:

Error response from daemon: OCI runtime exec failed: exec failed: container_linux.go:345: starting container process caused "exec: \"/bin/bash\": stat /bin/bash: no such file or directory": unknown

        The above is complete error reporting information, of which the key information is as follows:

"/bin/bash\": stat /bin/bash: no such file or directory": unknown

        That is, there is no directory/bin/bash, so an error will be reported when you want to enter the container according to the initial command.

        You can enter by using the following command. The screenshot is as follows:

docker exec -it mqtt /bin/sh

      Perfect solution, record notes!


Error in installing paddlenlp on pip on Windows

1. PIP installation paddlenlp reports an error

An error is reported when PIP installs paddlenlp on windows, as follows:

 distutils.errors.DistutilsError: Command '['C:\\Users\\yuanyangping\\.conda\\envs\\yyp_paddle\\python.exe', '-m', 'pip', '--disable-pip-version-check', 'wheel', '--no-deps', '-w', 'C:\\Users\\YUANYA~1\\AppData\\Local\\Temp\\tmphix_2c5i', '--quiet', 'setuptools_scm']' returned non-zero exit status 1.

Some methods to solve the problem are queried, but they are not effective, so they are not listed one by one.

2. Solutions

Pay attention to one detail. It is normal to download paddlenlp, but an error is reported only after downloading seqeval, as follows:

Collecting paddlenlp
  Downloading http://mirrors.aliyun.com/pypi/packages/b0/7d/6c24cda54d018d350ee342f715523ade7871660444ed95f3d3e753d6f388/paddlenlp-2.0.8-py3-none-any.whl (571 kB)
     |████████████████████████████████| 571 kB 467 kB/s
Collecting seqeval
  Downloading http://mirrors.aliyun.com/pypi/packages/9d/2d/233c79d5b4e5ab1dbf111242299153f3caddddbb691219f363ad55ce783d/seqeval-1.2.2.tar.gz (43 kB)
     |████████████████████████████████| 43 kB 656 kB/s
    ERROR: Command errored out with exit status 1:
     command: 'C:\Users\yuanyangping\.conda\envs\yyp_paddle\python.exe' -c 'import sys, setuptools, tokenize; sys.argv[0] = '"'"'C:\\Users\\YUANYA~1\\AppData\\Local\\Temp\\pip-install-n4_d0gwa\\seqeval_6f8ecdc805df4aa092ecc3df7994196f\\setup.py'"'"'; __file__='"'"'C:\\Users\\YUANYA~1\\AppData\\Local\\Temp\\pip-install-n4_d0gwa\\seqeval_6f8ecdc805df4aa092ecc3df7994196f\\setup.py'"'"';f=getattr(tokenize, '"'"'open'"'"', open)(__file__);code=f.read().replace('"'"'\r\n'"'"', '"'"'\n'"'"');f.close();exec(compile(code, __file__, '"'"'exec'"'"'))' egg_info --egg-base 'C:\Users\YUANYA~1\AppData\Local\Temp\pip-pip-egg-info-zp58k0dh'

Therefore, can you install seqeval first and then paddlenlp, and execute two commands in succession, as follows:

pip install seqeval
pip install paddlenlp

Then paddlenlp is successfully installed
If an error is still reported, specify the version of seqeval as 0.0.3

3. Extension

The above reason should be that there is a problem with the configuration information when downloading and installing seqeval
therefore, if similar error reports occur when installing other software, you can install the software where the error is reported first, and then install the main software you want to install.
[Solved] There is a problem with mysql8.0 without password in Navicat connection

There is a problem with mysql8.0 without password in Navicat connection

**Problem: * * connect to mysql8.0 with Navicat, but the test connection fails
* * reason: * * when installing mysql8.0, there is no password set, and there is no random password under data in the MySQL installation directory

Solutions:
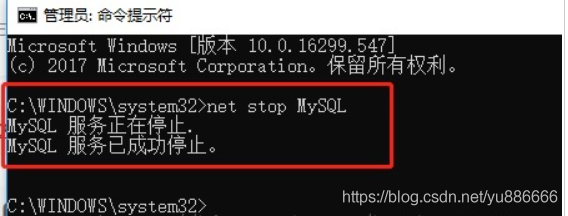
1. Stop the MySQL service
open the CMD as an administrator and close it or close the windows service page

C:\Users\xxx>net stop mysql`

2. As an administrator, open the CMD page and enter the following command to start MySQL without password

C:\Users\xxx>mysqld --console --skip-grant-tables --shared-memory

Take a look at the following screen:

3. Open a new CMD page and enter the following statement:

mysql> flush privileges; -- Modify Permissions
Query OK, 0 rows affected (0.16 sec)
 
mysql> ALTER USER "root"@"localhost" IDENTIFIED BY "123456"; -- Modify Password
Query OK, 0 rows affected (0.08 sec)

Then the login password is 123456

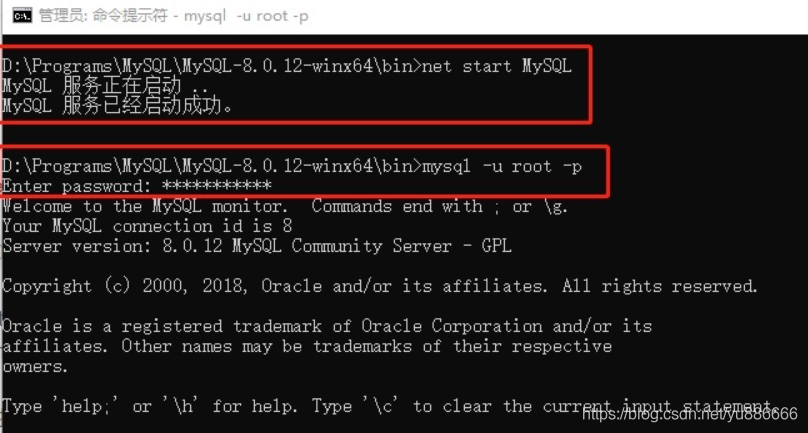
4. After setting, start the MySQL service normally, and use the user name and password to verify whether the setting is successful

How to install postman tool in Ubuntu 16.04

Ubuntu16.04 postman installation: basic steps:

1) : official website to download software package: https://www.getpostman.com/apps

2) : unzip the installation:

sudo tar -xzf Postman-linux-x64-6.0.10.tar.gz

3): Enter the unzipped PostMan folder to open the terminal and start PostMan

./Postman/Postman

4): Create startup icon for quick startup
Create a soft link to create Postman from the extracted Postman file in /usr/bin/

sudo ln -s  /home/c/Downloads/Postman/Postman   /usr/bin/


Flash back of running program in Visual Studio 2017

Just a little bit of a problem, write it down first
VS Window Flashback, I have two situations so far
Solution 1:
Right-click on Project –>; Property – & gt; Configure properties –> Connector – & gt; System – & gt; Subsystem (on the right side of window) –>; SUBSYSTEM:CONSOLE Drop down SUBSYSTEM selection CONSOLE
If you still back off
Solution 2:
Do not click on the green symbol, that is the local debugger, the debugger runs and ends, the console will not appear,
Direct Ctrl + F5 to run!

Configuring OpenGL environment with code blocks16.0 in Windows 10

The article directories
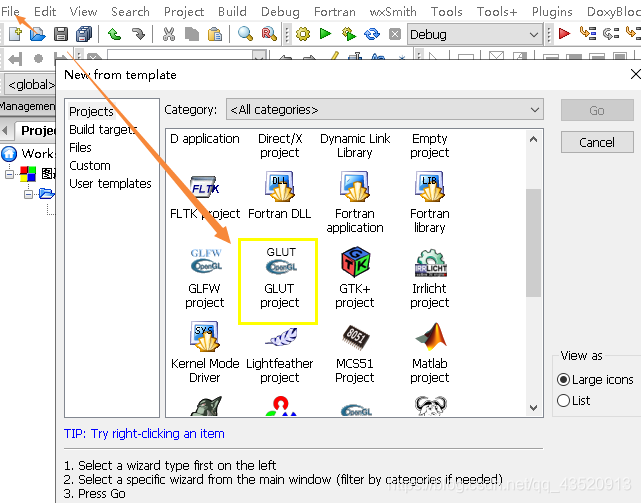
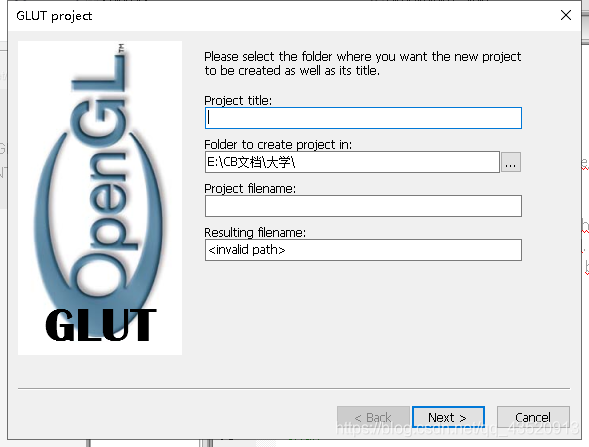
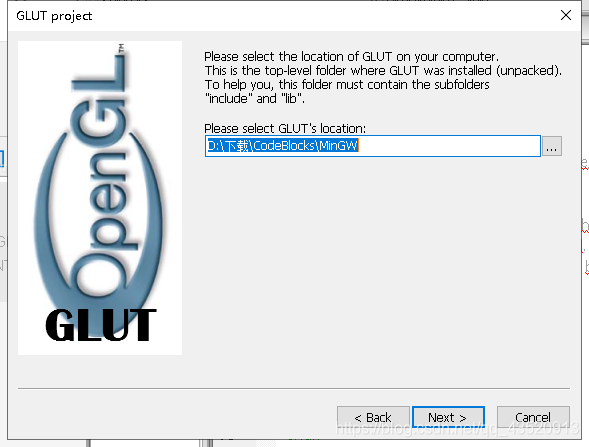
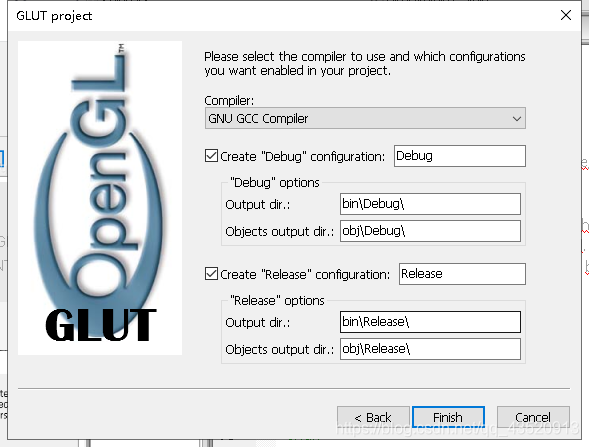
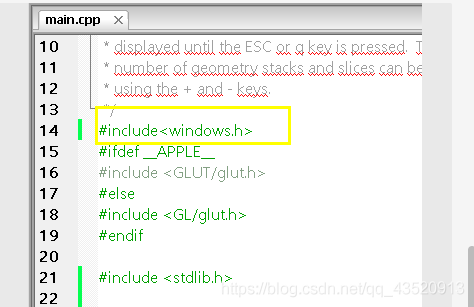
Download the Glut package, configure the environment, create a project and select File to create a new project, select Glut to fill in the project name and go to the Mingw folder in the root of your Codeblock directory and select Finish and add this header to your main file and it will run

One: Download the GLUT package
Download link
Two: Configure the environment
(1) Copy GLUT. DLL and GLUT 32. DLL from the GLUT package to C:\Windows\SysWOW64;
(2) : Copy Glut. h to MinGW\include\GL in the Codeblocks installation directory, for example: D:\ Codeblocks \MinGW\include\GL;
(3) : Copy Glut.lib, Glut32.lib to \MinGW\lib in the Codeblocks installation directory, for example: D:\CodeBlocks\MinGW\lib;
Three: the establishment of the project
Select File to create a new project, and select Glut

Fill in project name

Select the MinGW folder in the root directory where your codeblock resides

Select finish

Add this header to the main file and you’ll be ready to run

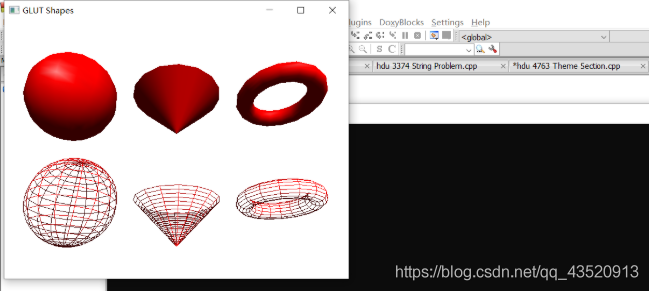
This represents that the environment is configured

VTK installation

1. Install visual cmake-gui
sudoapt-get install cmake-curses-gui
2 install Qt5
See Section 3.1 of the following link for the installation process
http://blog.csdn.net/lql0716/article/details/54564721
3 to install X11
sudoapt-get install libx11-dev libxext-dev libxtst-dev libxrender-dev libxmu-devlibxmuu-dev
4 to install OpenGL
sudoapt-get install build-essential libgl1-mesa-dev libglu1-mesa-dev libglut-dev

sudo apt-get install freeglut3-dev
5 compile VTK6.3
After download VTK6.3 and extract, extract the file name is commonly VTK – 6.3.0
download url: http://www.vtk.org/download/
open cmake – GUI interface in terminal input: cmake – GUI in cmake – GUI interface does the following:
1. Set the path of “Where is the source code:” to the path of the folder vtk-6.3.0, such as /home/vtk-6.3.0; 2. Set the path “Where to build the binaries:” to /home/vtk-6.3.0/build. Create a new folder called build under /home/vtk-6.3.0. 3. Click “Configure” and select “Current Generator” as “UNIX Makefiles” in the pop-up dialog box. When completed, it will prompt “Configuring Done”. 4. Because you are installing QT5 and VTK-6.3.0 default is Qt 4, you need to find Qt Version after the completion of Step 3, change 4 to 5, and then click “Configure” again. It will prompt “Configuring done” after completion. 5. Click “Generate”, and it will prompt “Generate done” after completion; 6, the terminal into the folder under the build path, type the following command:
sudo make
sudo make install 7, here is the
here refer to the following opencv icon after performing the above steps, VTK – 6.3.0 installation is complete.

ActiveMQ installation, deployment and running

The Windows version
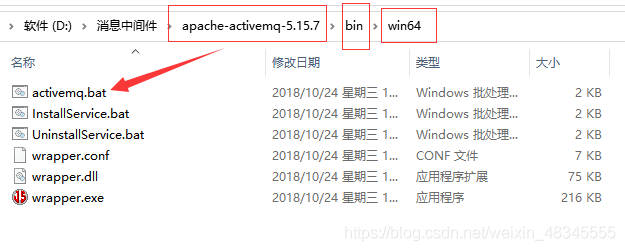
Download The Windows version of ActiveMQ, unzip and run Activemq.bat. It’s similar in Linux.
http://activemq.apache.org/activemq-580-release.html
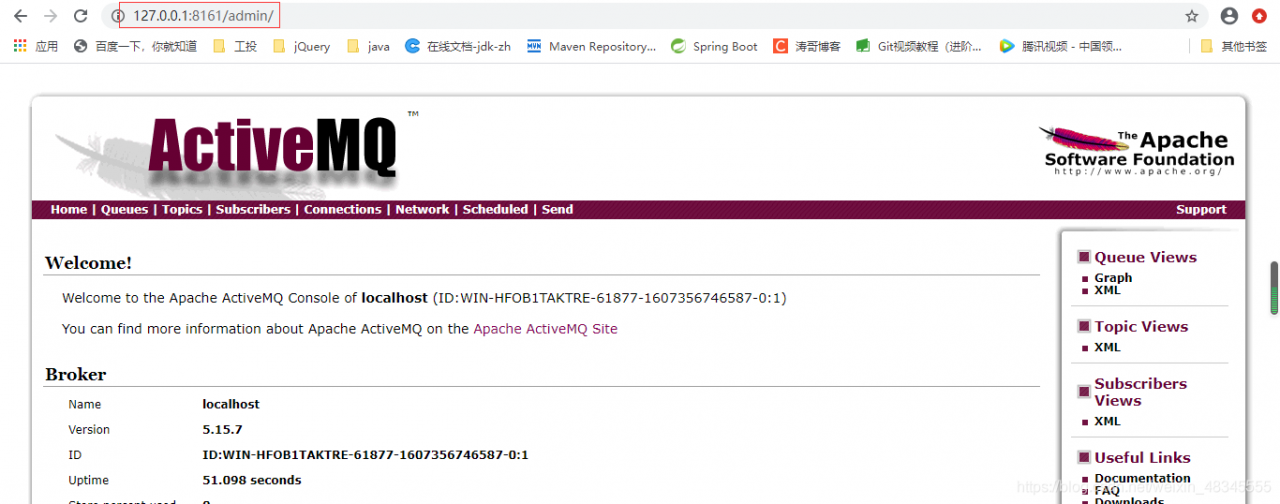
After running in the browser to http://127.0.0.1:8161/admin, can appear the following picture, user name and password: admin/admin
In ActiveMQ, the default 61616 is the service port 8161 as the administrative console port
After unzipping run

enter username and password admin/admin

Atom live server plug-in installation

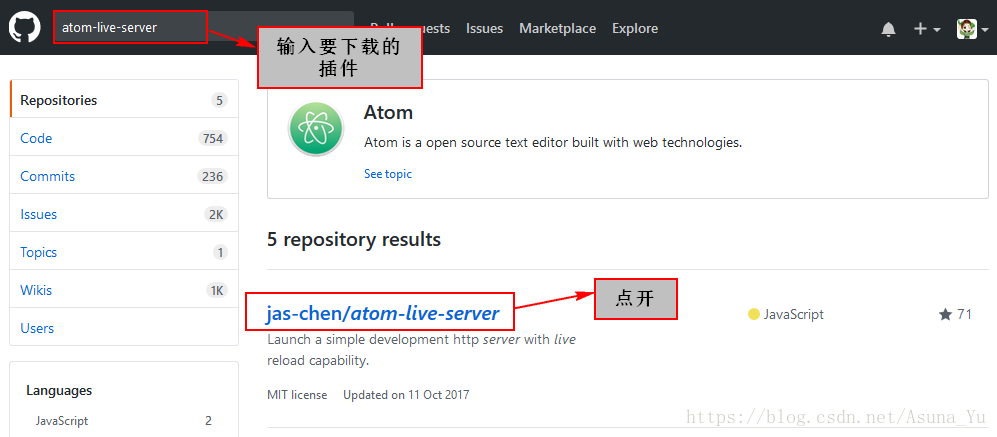
Github search plugin

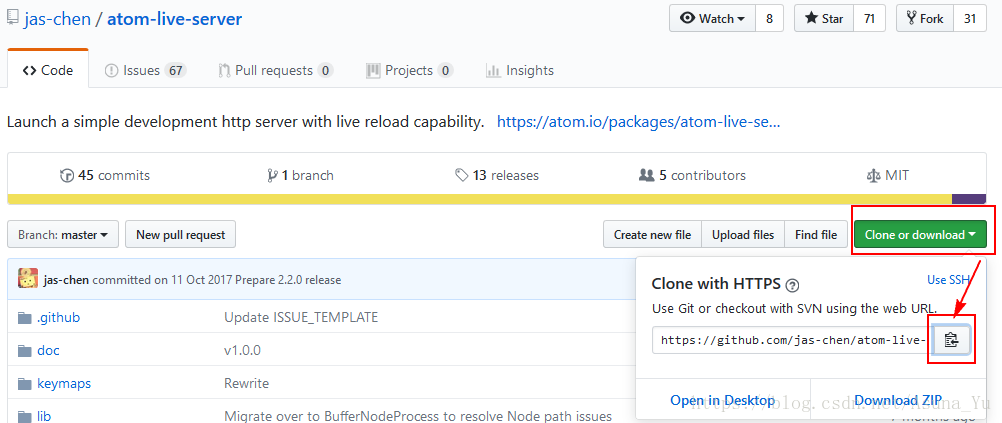
copy plugin address:
The default directory is: C:\Users\14041\.atom\packages
Win +R — CMD goes to the command line.
Enter CD C:\Users\14041\.atom\packages enter the installation directory.
Enter git clone https://github.com/jas-chen/atom-server.git (where the first step of the plugin is copied), return to the car, and start to download.
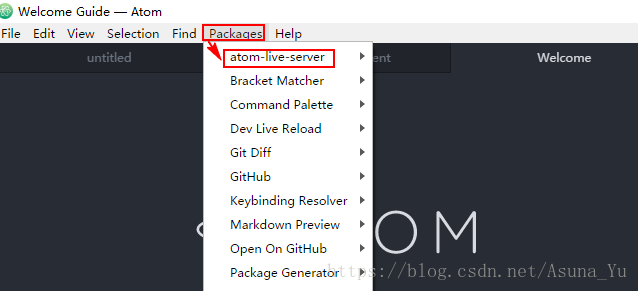
once downloaded, the packages directory contains an additional atom-lie-server folder:
3. The first installation requires node. js environment configuration
. Download the official website address: node. js
.
4, install
into the directory of plug-ins: CD C:\Users\14041\ atom\packages\atom-live-server
enter: NPM install

Successful installation. Atom shows

Adobe Photoshop CS6 download and installation and error:16 The solution of

Here to share a simplified version of PS download and installation, the following is the installation package of Baidu Cloud address ~~
Link: https://pan.baidu.com/s/1c3IdnZa password: q3lk
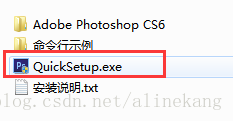
Installation method is very simple, unzip downloaded installation package, there is an installation instructions, do not see can, directly find. Exe file double-click can be installed

One thing to note in the installation instructions: It says to turn off other Adobe products when installing Ps, or you may fail to install.

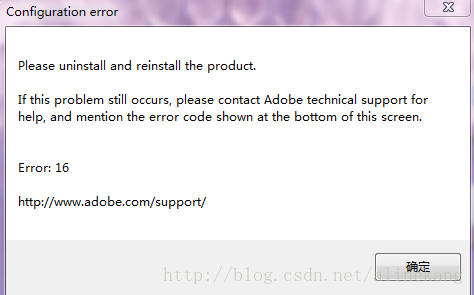
After installation, there will be a shortcut on the desktop. Double-click it. When I double-click to open it, it fails and gives me an error


I thought there were Adobe products running during the installation process, and then I uninstalled and reinstalled, but still failed. Later, I found out that it was a configuration problem, so please remember after the installation is completed
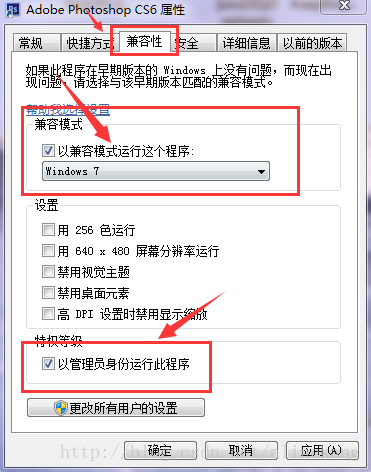
Configure!! Hit the point!!

Right – click shortcut -& GT; Property – & gt; compatibility

Rerun is ok ~~