Tag Archives: linux

SELinux solution to Apache SSL failure

The blogger today plans to configure a multi-certificate Apache so that multiple domain names can be accessed via https://***. According to the online tutorial, just add multiple < VirtualHost *:443> You can do that. But restarting HTTPD always prompts:

Job for httpd.service failed because the control process exited with error code. See "systemctl status httpd.service" and "journalctl -xe" for details.

Journalctl-xe examines with the command:

systemd[1]: Unit httpd.service entered failed state.
systemd[1]: httpd.service failed.
polkitd[475]: Registered Authentication Agent for unix-process:7076:2357584 (system bus name :1.219 [/usr/bin/pkttyagent -.....

It’s hard to see what’s wrong (at this point the blogger doesn’t know that HTTPD has an error_log, face-covering)
After a long time, I finally opened /var/log/ HTTPD /error_log

AH02312: Fatal error initialising mod_ssl, exiting.
SELinux policy enabled; httpd running as context system_u:system_r:httpd_t:s0
AH01232: suEXEC mechanism enabled (wrapper: /usr/sbin/suexec)
Permission denied: AH02201: Init: Can't open server certificate file 

When the blogger saw this error message, he immediately understood that it was SELinux!! A lot of potholes on the SELinux before. So the first thing that comes to mind is that the SSL certificate file, the private key file, is not in the right context. Turning SELinux off directly would certainly solve the problem. But this is just a once-and-for-all approach that will cause more problems.
The solution
Three files are required to configure SSL:
2_domain.com.crt
3_domain.com.key
1_root_bundle.crt
Let’s say they’re all under /usr/local/apache/conf/

cd /usr/local/apache/conf/ 

Displays the current context of each file

ll -Z

Change context

chcon -u system_u -r object_r -t cert_t 1_root_bundle.crt
chcon -u system_u -r object_r -t cert_t 2_domain.com.crt
chcon -u system_u -r object_r -t cert_t 3_domain.com.key

The context configuration is not unique. If this setting doesn’t work, try something else.
Python TCP socket programming: send returns broken pipe error?

One of the most common mistakes in socket programming is the ECONNRESET error that I mentioned in this article. Another mistake that is rarely encountered is the EPIPE error that I will talk about today. This error can occur when sending data when the send function is called, and the program throws the following exception:

socket.error: [Errno 32] Broken pipe

Why this error?First, take a look at the official man 2 write document describing this error:

EPIPE
fd is connected to a pipe or socket whose reading end is closed. When this happens the writing process will also receive a SIGPIPE signal. (Thus, the write return value is seen only if the program catches, blocks or ignores this signal.)

Above, when writing data to a closed reader pipe or socket, the program receives a SIGPIPE signal. We have seen the example of a pipeline in this article.
Today, we’ll take a simple socket example to explore why this error occurs.
The client code is as follows:

import socket
import time

s = socket.socket(socket.AF_INET, socket.SOCK_STREAM)
s.connect(('127.0.0.1', 2222))

s.send('hello')
time.sleep(1)
s.send('hello')
s.send('hello')

s.close()

The server code is as follows:

import socket

s = socket.socket(socket.AF_INET, socket.SOCK_STREAM)
s.setsockopt(socket.SOL_SOCKET, socket.SO_REUSEADDR, 1)
s.bind(('127.0.0.1', 2222))
s.listen(5)

c, addr = s.accept()

c.recv(1024)

c.close()

After 1 second of running the client program, the Broken pipe error occurs:

[root@localhost python]# python client.py 
Traceback (most recent call last):
  File "client.py", line 10, in <module>
    s.send('hello')
socket.error: [Errno 32] Broken pipe

The results are as follows:

03:51:51.137047 IP 127.0.0.1.50870 > 127.0.0.1.2222: Flags [S], seq 2737957170, win 32792, options [mss 16396,sackOK,TS val 39403123 ecr 0,nop,wscale 5], length 0
03:51:51.137055 IP 127.0.0.1.2222 > 127.0.0.1.50870: Flags [S.], seq 2751472309, ack 2737957171, win 32768, options [mss 16396,sackOK,TS val 39403123 ecr 39403123,nop,wscale 5], length 0
03:51:51.137061 IP 127.0.0.1.50870 > 127.0.0.1.2222: Flags [.], ack 1, win 1025, options [nop,nop,TS val 39403123 ecr 39403123], length 0
03:51:51.137083 IP 127.0.0.1.50870 > 127.0.0.1.2222: Flags [P.], seq 1:6, ack 1, win 1025, options [nop,nop,TS val 39403123 ecr 39403123], length 5
03:51:51.137089 IP 127.0.0.1.2222 > 127.0.0.1.50870: Flags [.], ack 6, win 1024, options [nop,nop,TS val 39403123 ecr 39403123], length 0
03:51:51.137158 IP 127.0.0.1.2222 > 127.0.0.1.50870: Flags [F.], seq 1, ack 6, win 1024, options [nop,nop,TS val 39403123 ecr 39403123], length 0
03:51:51.139348 IP 127.0.0.1.50870 > 127.0.0.1.2222: Flags [.], ack 2, win 1025, options [nop,nop,TS val 39403137 ecr 39403123], length 0
03:51:52.140421 IP 127.0.0.1.50870 > 127.0.0.1.2222: Flags [P.], seq 6:11, ack 2, win 1025, options [nop,nop,TS val 39404140 ecr 39403123], length 5
03:51:52.140444 IP 127.0.0.1.2222 > 127.0.0.1.50870: Flags [R], seq 2751472311, win 0, length 0

It was observed that the error occurred as follows:

    client during sleep, the server has closed the connection normally. After the client is awakened, the first call to send to send data causes the socket to receive RST message. The second call send and then send the data causes the program to receive the SIGPIPE signal, and the Broken pipe error occurs.

Therefore, we can draw the conclusion that if the opposite end closes the connection normally and then RST message is received on the socket, then when send is called on the socket, the Broken pipe error will occur!
This error is usually caused by a bug in the program code, but it is not a serious error and can usually be avoided by ignoring the SIGPIPE signal.

git clone https:// gnutls_handshake() failed: The TLS connection was non-properly terminated.

This problem occurred to me especially behind corporate firewall after updating ubuntu to 18.04 LTS. I tried all possible approaches before coming across solution to compile GIT with openssl rather than gnutls. Copy+Pasting below that resolved the problem(Reference link: here)…

sudo apt-get update
sudo apt-get install build-essential fakeroot dpkg-dev libcurl4-openssl-dev
sudo apt-get build-dep git
mkdir ~/git-openssl
cd ~/git-openssl
apt-get source git
cd git-2.17.0/
vim debian/control    # replace all libcurl4-gnutls-dev with libcurl4-openssl-devvim debian/rules      # remove line "TEST =test" otherwise it takes longer to build the package

sudo dpkg-buildpackage -rfakeroot -b -uc -us   # add "-uc -us" to avoid error "gpg: No secret key"
sudo dpkg -i ../git_2.17.0-1ubuntu1_amd64.deb

Note 1: I got “OpenSSL SSL_connect: SSL_ERROR_SYSCALL in connection to proxy” when doing “git clone https://…” after steps above, which turns out to be a problem about git proxy setting. It can be fixed by:

git config --global http.proxy http://proxy.server.com:8080
git config --global https.proxy https://proxy.server.com:8080

Note that it’s better to verify the proxy & port works well first in browsers like Chrome.  Reference link: here.
Note 2: I accidentally removed libcurl4-gnutls-dev when trying different approaches, unfortunately, lots of dependent libs are removed as well, including the network manager and GDM3. As a result, the network can’t work any more and the whole display UI was messed up(it switched to lightdm for display manager). I managed to fix the mess with “sudo apt install gdm3”.
So as a lesson learn, don’t remove libcurl4-gnutls-dev for this issue.

[/ usr / share / Doc / pcre-8.32/makefile] error 127 solution

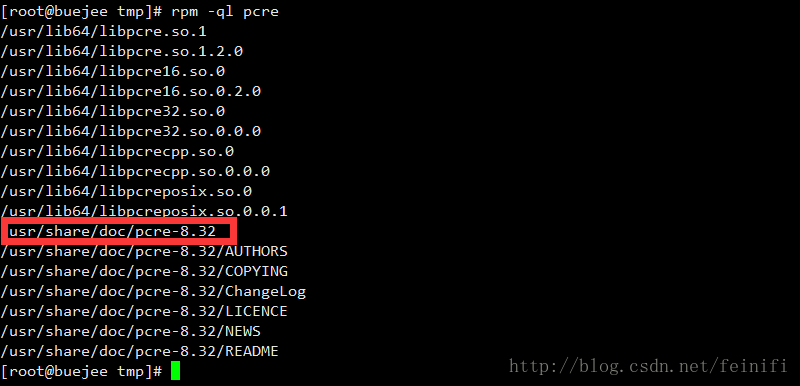
The installation of Nginx prompts the need for pcRE library, which needs to be specified by the parameter — with-PCRE. Check that the system has installed PCRE through the RMP-QL command, as shown in the figure below:

When configuring the nginx option with configurer, specifying the pcRE directory as /usr/share/doc/pcre-8.32 will not make an error, as shown in the question. The reason for this error is that — with-PCRE requires you to specify the source directory of the PCRE, not the installation directory, download the PCRE, unzip it, and then configurer specifies it to the unzip it, and when you run make again, it passes.
Zlib depends on libraries in the same way. Zlib is installed in the system, but the zlib specified by configurer cannot be /usr/share/doc/zlib-1.2.7.

You need to download Zlib and unzip it, specifying –with-zlib=/path/to/zlib-source at configurer

Error 1406: could not write value installpath to key

 
http://hi.baidu.com/tianxingacer/blog/item/7b2ec88893e59da30e2444cd.html
Before, a VMware was installed on the computer. Later, the system was reinstalled and VMware could not be used. Fortunately, the file of LINUX was imported
It works. Today, install VMware into the same directory of the old files, and report when it is almost finished:
Error 1406: could not write value installpath to key/soft ware/vmware, inc/vmwareconverter hosted verify that you have sufficient access to that key or contalt your support personnel “this Error.
I received it online, and the netizen said it was reasonable that the old VMware registry value was not deleted last time. I did not delete it at all, but directly overwrote it.
The reason may be that the old VMware registry key was not deleted clean before installation, so the current installation cannot write the registry file of registry Software/VMware. The solution is simple: find HKEY_LOCAL_MACHINE–> Software-> VMware, Inc., delete the whole thing, close the registry, and re-run the VMware installation file. Then the problem can be solved.
If the same problem cannot be installed after the above operation, the stupid (and most effective) method is to find the registry, delete all the key values related to VMware, repeat Ctrl+F to find “VMware” and then delete. In order to avoid misoperation, it is recommended to backup the registry in advance.
 
PS. After deleting this key, retry can be installed normally.

How to solve the problem of error 15: file not found when Linux starts

Today, the Linux machine starts and the system prompts:


Root (hd0, 0)
Filesystem type is ext2fs, partition type 0x83
Kernel /bzImage_1360×768 RO root=LABEL=/ video…
Error 15: File not found
Press any key to continue…


The reason may be that the system boot configuration was corrupted, causing the boot kernel image to be unable to be found
Solutions:
1. Press any key to return to the boot menu, such as grub menu.
2. Press ‘C’ in the menu interface to enter the GRUB command line interface.
3. Grub> Root (hd0, 0)
4. Grub> Kernel (HD0,0)/vmlinuz-2.6.18-371.el5 (Press TAB during input to get prompt)
5. grub> The initrd (hd0, 0)/initrd – 2.6.18-371. El5. Img
6. grub> boot

The above (HD0,0)vmlinuz-2.6.18-371.el5 InitRd-2.6.18-371. el5.IMg shall be modified according to the actual situation of the machine. You can use TAB for completion selection.

Reference: http://blog.csdn.net/guanzhongs/article/details/2511740
I cannot boot/ in this document directory. Removing boot as I wrote will solve the problem.
                   

Modify the VDI path of VirtualBox on MacOSX, and transfer the virtual machine


Modify the VDI path of Virtualbox on MacOSX, virtual machine migration

Target: Virtual machine hard disk path from

/Volumes/exFat/XP/XP-30G.vdi

to

/Volumes/exFat2/XP/XP-30G.vdi

error: Cannot register the hard disk ‘/Volumes/exFat2/XP/XP-30G.vdi’ {c547a9be-4373-4a4a-a0cf-3a6dbb606908} because a hard disk ‘/Volumes/exFat/XP/XP-30G.vdi’ with UUID {c547a9be-4373-4a4a-a0cf-3a6dbb606908} already exists.

return code:

NS_ERROR_INVALID_ARG (0x80070057)

component:

VirtualBoxWrap

interface:

IVirtualBox {0169423f-46b4-cde9-91af-1e9d5b6cd945}

called RC:

VBOX_E_OBJECT_NOT_FOUND (0x80BB0001)

solution (OSX/Linux) : 0. Close VirtualBox
1. Copy virtual machine files to other places (generally from /Users/{your user name}/VirtualBox VMs/{virtual machine name}/)
2. Open the command line Terminal

3. Input command:
(Figure below)

1) CD/Applications/VirtualBox. App/Contents/MacOS

2) VBoxManage internalcommands sethduuid /exFat2/XP/ xp-30g. vdi

[note that the path of command 2 is your new target path]

you will see the result of UUID changed to: 77590535-9162-4b2d-8032-11c312042814

4. Reopen VirtualBox
5. Right click, set, store, controller: IDE on the specified virtual machine, click the. Vdi file in the list, find the right side of the virtual hard disk row of the most right icon, click, select a virtual hard disk, modify ok

6. Save and start the virtual machine

The solution (Windows) : http://blog.csdn.net/zhang854429783/article/details/6672199

Cannot remove : Input/output error

In an ext3 root file system, there is a temporary file in it.

$ sudo rm -f .rc.local.swp 
rm: cannot remove ‘.rc.local.swp’: Input/output error

Also reported an error when ls:

$ ls -la
ls: cannot access .rc.local.swp: Input/output error
total 11
drwxr-xr-x  3 root    root    1024 Sep 12 23:20 .
drwxrwxr-x 18 charles charles 1024 Sep  8 01:05 ..
-rw-r--r--  1 root    root     980 Jan  2  2014 bootchartd.conf
-rw-r--r--  1 root    root     293 Sep 12 23:15 fstab
-rw-r--r--  1 root    root      44 Dec 16  2013 group
drwxr-xr-x  2 root    root    1024 Sep 12 23:05 init.d
-rw-r--r--  1 root    root     153 Dec 16  2013 inittab
-rw-r--r--  1 root    root     118 Dec 16  2013 passwd
-rw-r--r--  1 root    root     128 Dec 22  2013 profile
-rwxr-xr-x  1 root    root     502 Sep 12 23:20 rc.local
-????????? ??      ?         ?           ?.rc.local.swp

The solution is to fix the file system using FSCK:

$ fsck.ext3  rootfs.img 
e2fsck 1.42.9 (4-Feb-2014)
rootfs.img contains a file system with errors, check forced.
Pass 1: Checking inodes, blocks, and sizes
Pass 2: Checking directory structure
Entry '.rc.local.swp' in /etc (119889) has deleted/unused inode 119892.  Clear<y>?yes
Pass 3: Checking directory connectivity
Pass 4: Checking reference counts
Pass 5: Checking group summary information
Block bitmap differences:  -7170 -(485381--485388) -(488452--488455)
Fix<y>?yes
Free blocks count wrong for group #0 (7655, counted=7656).
Fix<y>?yes
Free blocks count wrong for group #59 (7896, counted=7908).
Fix<y>?yes
Free blocks count wrong (438258, counted=438271).
Fix<y>?yes
Inode bitmap differences:  -119892
Fix<y>?yes
Free inodes count wrong for group #59 (2020, counted=2021).
Fix<y>?yes
Free inodes count wrong (127446, counted=127447).
Fix<y>?yes

rootfs.img: ***** FILE SYSTEM WAS MODIFIED *****
rootfs.img: 569/128016 files (2.6% non-contiguous), 73729/512000 blocks

Later, remount the filesystem and discover that the file has been deleted.

SH script reports error “Eval: Line 1: syntax error: terminated quoted string”

There was a script that had been working properly, and suddenly it reported an error

eval: line 1: syntax error: unterminated quoted string

Eval is a simple eval. After filtering the contents of the script, I found a suspected code.

eval $(echo $line 2>/dev/null |awk '{print "iosOs="$13";iosDev="$14}')

Looked at the

l

i

n

e

this

a

change

The amount

.

in

one

some

love

Besides,

Under the

and

no

There are

the

?

more

word

Period of

.

on

surface

life

make

to

o

single

a

The variable line, in some cases, does not have as many fields as the above command requires

Line is a variable that, in some cases, does not have as many fields. The above command requires a single line to have at least 14 fields. If not, an error will be reported.
after the code or to do enough fault tolerance, when the external input will change, cut.

In depth analysis of mysq exceeding the number of connections error 1040 (HY000): too many connections

ERROR 1040 (HY000): Too many connections indicates that mysql has more than one connection
The first solution (not recommended) :
Need to wait for a period of time (quite long), let the existing connection timeout automatically released; Or restart mysql (CentOS7: SystemCTL Restart Mysqld.Service)
The second option (use with caution) :
Login to mysql: mysql-uroot-p your root password
Look at the maximum number of connections mysql is currently setting. In general, the default number of connections to mysql is over 100, and the maximum number can be set to 16384 (2 ^ 14)
show variables like ‘%max_connections%’;
Set the maximum number of connections as needed, so I’m going to set 1000 here
set GLOBAL max_connections = 1000;

Note: This is used with caution because once the server or mysql service is restarted, the Settings will not take effect and the default Settings will be restored
 
The third option (the conditions allow the recommended use) :
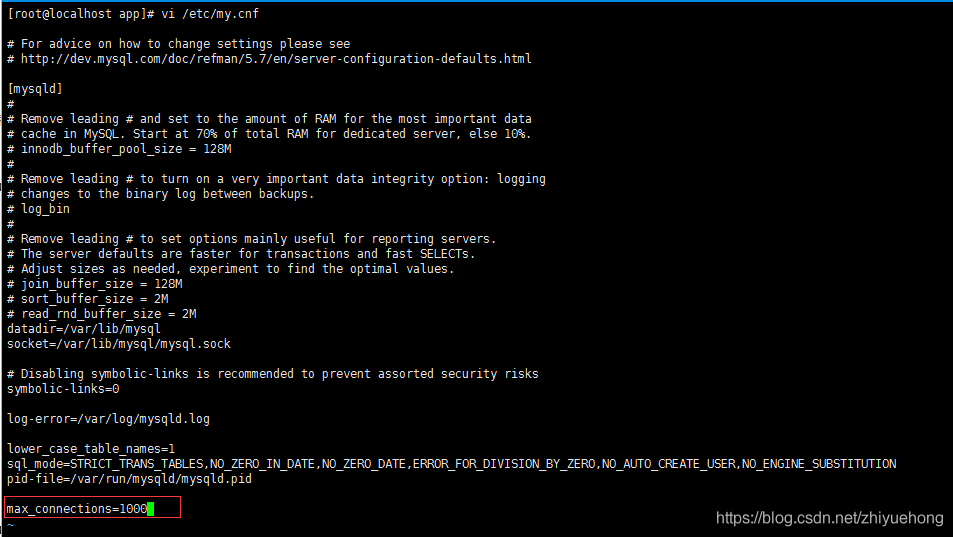
Add or modify the max_connections parameter in the mysql configuration file
Linux (centos7) environment:
Windows environment:
Find my.ini in the installation directory. If you don’t have it, find My-default.ini, make a copy and rename it my.ini. Add or modify the max_connections parameter
After setting parameters, restart mysql service.
 
Resources:
FAQ for Installing Mysql5.7 and mysql under Linux(Centos7)