Tag Archives: VirtualBox

[Solved] Win10 install Ubuntu error: wslregisterdistribution failed with error: 0x8007019e

This article is reproduced in \ Author: Buyan \ original text: win10 installs Ubuntu system and reports the error wslregisterdistribution failed with error: 0x8007019e – jova – blog Garden (cnblogs. Com)

When installing the Ubuntu system in the windows app store, the error wslregisterdistribution failed with error: 0x8007019e is reported

1. Error reporting:

Installing, this may take a few minutes... Installation Failed! Error: 0x8007019e Press any key to continue...

2. Cause: Windows subsystem support is not installed.

3. Solution:

1. Win + X, select windows PowerShell (administrator)

2. Input: enable windowsoptionalfeature – Online – featurename Microsoft Windows subsystem Linux

3. Enter, enter y, restart!

4. Reopen the installed subsystem, wait a few minutes, and enter the account and password.

**


[Solved] VirtualBox + Vagrant Error: VirtualBox host only Ethernet adapter

VirtualBox and vagrant are installed in the win10 system, but the virtual machine cannot be started when it is started later. The error code “VirtualBox host only Ethernet adapter” appears

Solution:

In the control panel = => network and Internet = => network and sharing center = => change adapter settings = => there is a VirtualBox host only Ethernet adapter inside. After finding it, disable it first, and then right-click the properties to find the VirtualBox ndis6 bridged networking driver, uncheck it, highlight it, enable it again, check it, and then exit.

MAC: How to Solve VirtualBox cannot open Issues

Mac solves the problem that VirtualBox cannot open and reports an error

You must specify a machine to start, using the command line.

Solution:

Open MAC terminal
1. cd to the directory where VBox is installed
2. VBoxManage list vms lists virtual machine directories
3. VirtualBoxVM –startvm (space) + the number of the virtual machine you want to open

So you can open it

Handling VirtualBox error in super3hardenedwinrespawn

The reason is that after using the virtual machine, the host only network created automatically by VirtualBox makes the detection of inode multi network cards fail, and inode can access the Internet normally after it is disabled in the network

After that, after the host only network is enabled, the virtual device will automatically create a new host only network when the genymotion is opened. After the virtual device is started, an error will be reported. When the virtual box is used to start, the error cannot be & lt; device name & gt; Create a new task, set IP to 196.168.56.1 according to the online instructions, the problem still can not be solved, and report an error VirtualBox error in super3hardenedwinrespawn, uninstall the current version of VBox, and reload the latest version


VirtualBox failed to start, prompt failed to open a session for the virtual machine windoze 7

1 environment:

Desktop system: Ubuntu 16.04 * x86

VirtualBox version: 5.0.36

Virtual machine installation system: win7 x86

2 phenomenon: unable to start. The following is the detailed information:

Failed to open a session for the virtual machine Windoze 7.

The device helper structure version has changed.

If you have upgraded VirtualBox recently, please make sure you have terminated all VMs and upgraded any extension packs. If this error persists, try re-installing VirtualBox. (VERR_ PDM_ DEVHLPR3_ VERSION_ MISMATCH).

Result Code: NS_ ERROR_ FAILURE (0x80004005) Component: Console

Interface: IConsole {db7ab4ca-2a3f-4183-9243-c1208da92392}

3 solution

① Reference link https://askubuntu.com/questions/386150/virtualbox-fails-to-start-machine-after-installing-extensions

② The command I used was sudo apt get — re install install VirtualBox ext pack, which successfully solved the problem

After entering the command, you will enter the confirmation interface, use the tab key to select the confirmation button, press enter, and then wait for him to finish the prompt

Successfully installed “Oracle VM VirtualBox Extension Pack”

[solved] genymotion, “unable to load VirtualBox engine”

System: win10 64bit

Genymotion version: 2.5.4
version

VirtualBox version: 5.0.4

Today, I plan to try the simulator of genymotion, and then download the latest version from the official website: https://www.genymotion.com/#!/download

However, the following error occurred after the installation:

Virtualization engine not found. Plugin loading aborted.

Locate the log directory according to the prompt and open the log file: general- genymotion.log

As shown in the figure below:

Progress state: E_ FAIL

VBoxManage.exe : error: Failed to create the host-only adapter

VBoxManage.exe : error: Querying NetCfgInstanceId failed (0x00000000)

VBoxManage.exe : error: Details: code E_ FAIL (0x80004005), component HostNetworkInterfaceWrap, interface IHostNetworkInterface

VBoxManage.exe : error: Context: “enum RTEXITCODE __ cdecl handleCreate(struct HandlerArg *)” at line 71 of file VBoxManageHostonly.cpp “
October 25 17:36:13 [genomic] [error] failed to create host only interface
October 25 17:36:13 [genomic] [error]” failed to load vboxmanage plugin from D / program files / genomicle / genomiction / plugins / “
October 25 17:36:13 [genomic] [error] VM Engine failed to load
October 25 17:36:13 [genomic] [error] unable to find VM engine. Plug loading above.
engine failed to load
October 25 17:36:13 [genomic] [error] unable to find VM engine

According to the prompt, there is an error in setting host network adapter in VBox. The possible reason is that VBox does not get administrator permission, so it installs genymotion-2.5.4- vbox.exe

This program must be run as an administrator, and then all the way to next…

Currently downloading the virtual device, (‘◡’)

If not, please refer to the following steps. I’ve tried it again and it’s completely feasible.

    Run VirtualBox as administrator (By default is installed in C:\Program Files\Oracle\VirtualBox)Go to File -> Preferences -> Network (Left Navigation List) -> Host-only Networks (on the right tab)Select an adapter and click edit (the small screwdriver on the right)On “Adapter” tab set

    IPv4 Address: 192.168.1.201IPv4 Network Mask: 255.255.255.0 On DHCP Server Tab set

    Server Address: 192.168.1.100Server Mask: 255.255.255.0Lower Address Bound: 192.168.1.101Upper Address Bound: 192.168.1.199 Click Ok (Host-only Network details), click Ok (VM Settings)Open Genymotion (as Admin), install a new virtual device (you have deleted all past devices) and start it

The above steps are quoted from: http://stackoverflow.com/questions/31709084/genymotion-problems-in-windows-10

VirtualBox + CentOS 7 virtual machine setting static IP address of host only NIC

I am not familiar with the use of VirtualBox. Every time I start the virtual machine, it will be automatically assigned a dynamic IP address (hosting-only), which is very inconvenient for me to use Hadoop and so on. I skipped this problem before, but it took me half a day to solve it finally today.
Specific treatment methods are as follows:
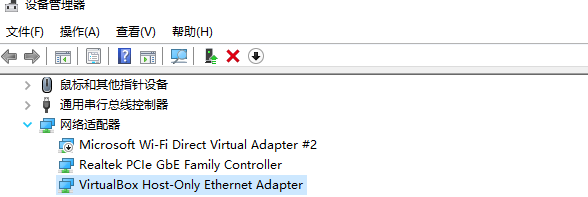
1. Start VirtualBox and select “Administration” –>; “Global Settings”, in the pop-up window, select “Network”, and then in the right window, select the “Host-only Network” TAB, as shown below;

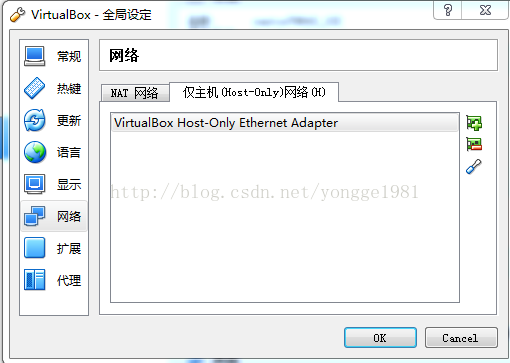
If you don’t have a VirtualBox Host-only Ethernet Adapter, you can add it by clicking “+” on the right.
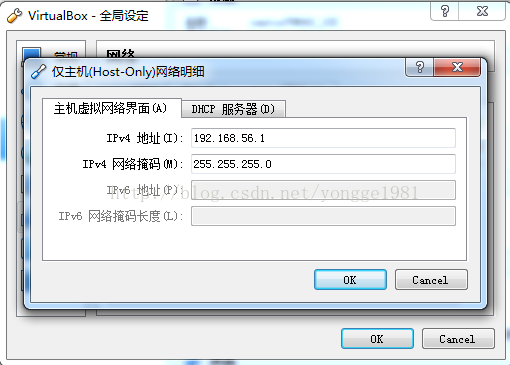
Then double-click the VirtualBox Host-Only Ethernet Adapter and the following image will pop up:

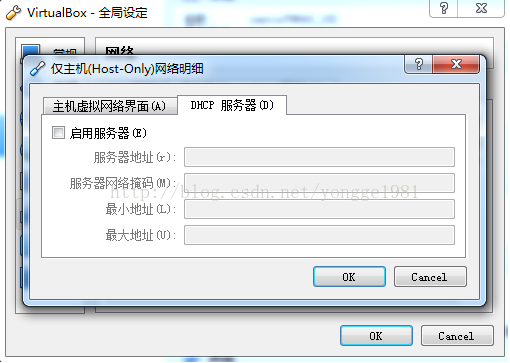
Select “DHCP Server” and uncheck the “Enable Server” status.


2. Start the virtual machine
Enp0s3 and enp0s8 represent two network cards: Enp0s3 and enp0s8 represent two network cards:
[hadoop@xhp1s2 ~]$ ifconfig
enp0s3: flags=4163< UP,BROADCAST,RUNNING,MULTICAST> MTU 1500
inet6 fe80::a00:27ff:fe4c:2f5b prefixlen 64 scopeid 0x20< link>
ether 08:00:27:4c:2f:5b TXQueuelen 1000 (Ethernet)
Packets 28 bytes 3361 (3.2 Kib)
R>rors 0 dropped 0 overruns 0 frame 0
Tx Pack>58 Bytes 6795 (6.6kib)
errors 0 dropped 0 overruns 0 carrier 0 Collision-losing 0
br> <>bb3 enp0s8: flags=4163< UP,BROADCAST,RUNNING,MULTICAST> MTU 1500
inet6 Fe80 :: A00:27ff: Fe46: D7F8 Prefixlen 64 scopeid 0x20< link>
ether 08:00:27:46: D7: F8 TXQueuelen 1000 (Ethernet)
Packets 24 bytes 6616 (6.4Kib)
R>rors 0 dropped 0 overruns 0 frame 0
Tx Pack>81 9555 bytes (9.3 KiB)
the TX errors 0 dropped overruns carrier collisions 0 0 0 0

In the directory CD /etc/sysconfig/network-scripts, you will see the presence of IFCFG-ENP0S3 file, copy a copy and change the name to IFCFG-ENP0S8, then edit IFCFG-ENP0S8, the final file contents are as follows:
TYPE=Ethernet
HWADDR= 08:00:27.46 :d7:f8 This indicates that the virtual network card address)
BOOTPROTO = static (here to change into the static)
DEFROUTE = yes
PEERDNS = yes
PEERROUTES = yes
IPV4_FAILURE_FATAL = no
IPV6INIT = yes
IPV6_AUTOCONF = yes
IPV6_DEFROUTE = yes
IPV6_PEERDNS = yes
IPV6_PEERROUTES = yes
IPV6_FAILURE_FATAL = no
NAME = enp0s8
UUID = 3 d54f693 – c56 bbef – 4-8984 – e0495a7c21s2 (this unlike enp0s3 coding)
DEVICE = enp0s8
ONBOOT = yes
IPADDR = 192.168.56.103
NETMASK = 255.255.255.0
GATEWAY = 192.168.56.1
Once this is done, start Service Network Restart and everything is OK.

A solution to the default invalid host only mode of CentOS virtual machine in VirtualBox

Because the network card is not activated at boot time.
Go to /etc/sysconfig/network-scripts/
Inside is the network card configuration file. Usually the hostonly configuration file name is: IFCFG-ENP0S8
If you open this file, you can see the ONBOOT=no line configuration. Change it to ONBOOT=yes and restart the virtual machine.

Shortcut to exit zoom mode in VirtualBox [off]

Shortcut to exit scale mode in VirtualBox [closed] Shortcut to exit scale mode in VirtualBox [closed]
In Oracle VirtualBox, what is the shortcut to exit zoom mode on a Windows 7 host?


# 1/f,
Reference: https://stackoom.com/question/ixxD/ in VirtualBox exit zoom mode shortcuts – shut down


# 2 floor
To exit Scale Mode, press: To exit Scale Mode, please press:
Right Ctrl (Host Key) + c Right Ctrl (Host Key) + c


Note that your (Host Key) may be different from . please Note that your (Host Key) may be different from your Right Ctrl0. To check the current binding, go to VirtualBox Preferences > Input > Virtual Machine > Host Key Combination. to check the current binding, go to VirtualBox Preferences > Input > Virtual Machine > The Host Key Combination .


The # 3 floor
If Right Ctrl ( Host Key) + C does not work (there have been some issues on Ubuntu), If the right Ctrl ( host key) + C does not work (there have been some problems in Ubuntu), please do the following:
1) File > Preferences > Input on the Virtual Machine which is stuck in Scale Mode 1) file > Preferences & gt; The input card on the virtual machine is in proportional mode
2) Change or Reset the Host Key. 2) Change or Reset the Host Key. There's no need to even save after changing the Settings do not need to save after changing the Settings
3) Re-open the Virtual Machine and it should be reset! 3) reopen the virtual machine, it should be reset!


# 4 floor
Yeah it sucks to get stuck in Scale View. yes, it sucks to get stuck in Scale View.
Host + Home will popup the Virtual machine Settings.Host + Home0 will popup the Virtual machine Settings. (by default Host is Right Control) (by default Host is Right Control)
From there you can change the view Settings, as the Menu bar is hidden in Scale view. From there you can change the view Settings because the Menu bar is hidden in the Scale view.
Had the same issue, especially when you checked the box not to show the 'Switch to Scale view' dialog. will have the same issue, especially if you check the box and it does not display the 'Switch to zoom view' dialog.
This you can do while the VM is running. This can be executed while the VM is running.


The # 5 floor
I arrived at this page looking to turn off scale mode for good, so I look at the time I would share what I found: , I look at the time I go to bed. Now I want to turn off the zoom mode, so I think I'll share what I've found:

VBoxManage setextradata global GUI/Input/MachineShortcuts "ScaleMode=None"

Running this in my host's terminal worked like a charm for me. Running this in my host's terminal worked like a charm for me.
Source: https://forums.virtualbox.org/viewtopic.php?f=8& T = 47821 source: HTTPS:// forums.virtualbox.org/viewtopic.php?F = 8&t = 47821


# 6 building
The other solution (poor one) is to exit the VM Box and save the desktop (top option), and reboot to bring back the screen just as before rezooming.

Modify the VDI path of VirtualBox on MacOSX, and transfer the virtual machine


Modify the VDI path of Virtualbox on MacOSX, virtual machine migration

Target: Virtual machine hard disk path from

/Volumes/exFat/XP/XP-30G.vdi

to

/Volumes/exFat2/XP/XP-30G.vdi

error: Cannot register the hard disk ‘/Volumes/exFat2/XP/XP-30G.vdi’ {c547a9be-4373-4a4a-a0cf-3a6dbb606908} because a hard disk ‘/Volumes/exFat/XP/XP-30G.vdi’ with UUID {c547a9be-4373-4a4a-a0cf-3a6dbb606908} already exists.

return code:

NS_ERROR_INVALID_ARG (0x80070057)

component:

VirtualBoxWrap

interface:

IVirtualBox {0169423f-46b4-cde9-91af-1e9d5b6cd945}

called RC:

VBOX_E_OBJECT_NOT_FOUND (0x80BB0001)

solution (OSX/Linux) : 0. Close VirtualBox
1. Copy virtual machine files to other places (generally from /Users/{your user name}/VirtualBox VMs/{virtual machine name}/)
2. Open the command line Terminal

3. Input command:
(Figure below)

1) CD/Applications/VirtualBox. App/Contents/MacOS

2) VBoxManage internalcommands sethduuid /exFat2/XP/ xp-30g. vdi

[note that the path of command 2 is your new target path]

you will see the result of UUID changed to: 77590535-9162-4b2d-8032-11c312042814

4. Reopen VirtualBox
5. Right click, set, store, controller: IDE on the specified virtual machine, click the. Vdi file in the list, find the right side of the virtual hard disk row of the most right icon, click, select a virtual hard disk, modify ok

6. Save and start the virtual machine

The solution (Windows) : http://blog.csdn.net/zhang854429783/article/details/6672199