Tag Archives: Android studio

[Solved] Project Upgrade Gradle error (Bugly is integrated)

What went wrong: A problem occurred configuring project ‘:app’.
Failed to notify project evaluation listener.
No signature of method: org.gradle.api.internal.file.DefaultFilePropertyFactory$DefaultDirectoryVar.getFiles() is applicable for argument types: () values: [] Possible solutions: getAsFile(), getOrElse(java.lang.Object), getOrElse(java.lang.Object), getClass(), getType(), file(java.lang.String) > can’t find tinkerProcessReleaseManifest, you must init tinker plugin first!

Solution:
Go back to the original Gradle setup
Check the build.gradle file in the project

    dependencies {
        classpath 'com.android.tools.build:gradle:3.5.2'
        classpath "com.tencent.bugly:tinker-support:1.1.5"
    }

Put classpath “classpath ‘com.android.tools.build:gradle:3.5.2’’ is modified to the original version [modified at this time]
bugly is not compatible with the higher version of gradle. Basically, it should be in 3 X version
also, check the gradle folder under the app directory, open the wrapper folder, and find the gradle-wrapper.properties file
changes the distributionurl to the original version.

error: resource android:attr/lStar not found? [How to Solve]

Solution

// The module created before, by default, is appcompat:1.3.1, which corresponds to androidx.core:core:1.5.0
implementation 'androidx.appcompat:appcompat:1.3.1'

// The module created today, the template of the idea was changed to 1.4.0, corresponding to core:1.7.0
implementation 'androidx.appcompat:appcompat:1.4.0'

Change back to 1.3 1 can run

[Solved] Android 12 error: Manifest merger failed : android:exported needs to be explicitly specified for .

Error Messages:
Manifest merger failed : android:exported needs to be explicitly specified for <activity>. Apps targeting Android 12 and higher are required to specify an explicit value for `android:exported` when the corresponding component has an intent filter defined.


Solution:
1.AndroidManifest.xml set according to the following document, Not Work.
https://developer.android.com/guide/topics/manifest/activity-element#exported
2. Not Work
3. Modify the parameters in the red box under the premise of the above operation, Worked!

[Solved] Android Studio Error: Use of undeclared identifier ‘cv‘

Problem description

This error occurs when I use the opencv3.4.16 official so file in Android studio

Sort by Pvalue from smallest to largest

Change the build.gradle file

Change arguments “- dandroid_stl = C + + _shared”
to arguments “- dandroid_stl = gnustl_shared”

Possible causes:

Opencv3.4.16 officially uses the gun compiler, so it is specified as gnustl_shared

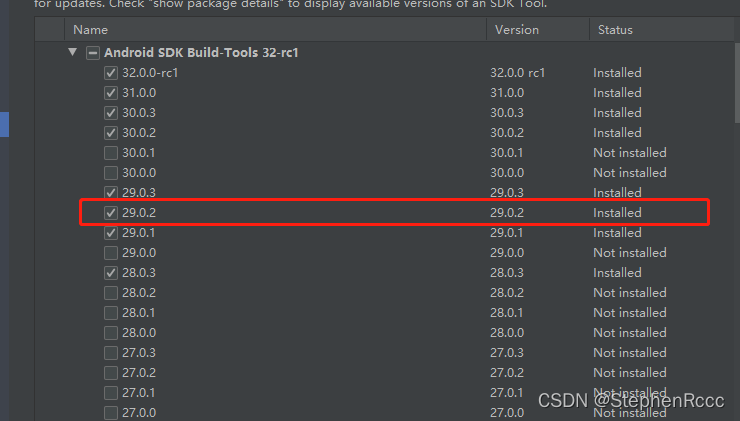
[Solved] Flutter compile error: Failed to find Build Tools revision 29.0.2

Could not determine the dependencies of task ‘:app:compileDebugJavaWithJavac’.
> Failed to find Build Tools revision 29.0.2

This question:

1. Is this version available in the build tools in the SDK? If not, install

2. Your sdk directory has been modified, if you modify it, you need to re-define the sdk path for flutter

flutter config --android-sdk E:/Android_SDK

The E:/Android_SDK at the back is my modified sdk path. After running, restart the compiler and you can compile normally in flutter run

[Solved] Android Studio Compile Error: Invalid main APK outputs : EarlySyncBuildOutput

Invalid main APK outputs : EarlySyncBuildOutput(type=com.android.build.gradle.internal.scope.InternalArtifactTypeKaTeX parse error: Undefined control sequence: \work at position 65: …on=0, output=F:\ ̲ w ̲ o ̲ r ̲ k ̲\ MobileWMS\app\… APK@1c2249b8 , apkType=MAIN, filtersData=[], version=0, output=F:\work\MobileWMS\app\build\outputs\apk\debug\output-metadata.json)

An error is reported when the version is too low. An error is reported when compiling again
after modifying the gradle version, an error is reported when compiling again, which is caused by the previously compiled APK

Solution:
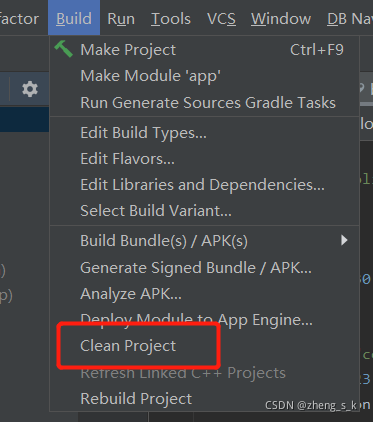
Click clean project under the build directory to clear the previously compiled data

clear and then compile!

[Solved] Android gradle Error: gradle project sync failed. Please fix your project and try again

Another error was reported during Android development. This is a version error. The first step is to synchronize the versions
error message:
Android studio error: gradle project sync failed. Please fix your project and try again

1. Version synchronization:

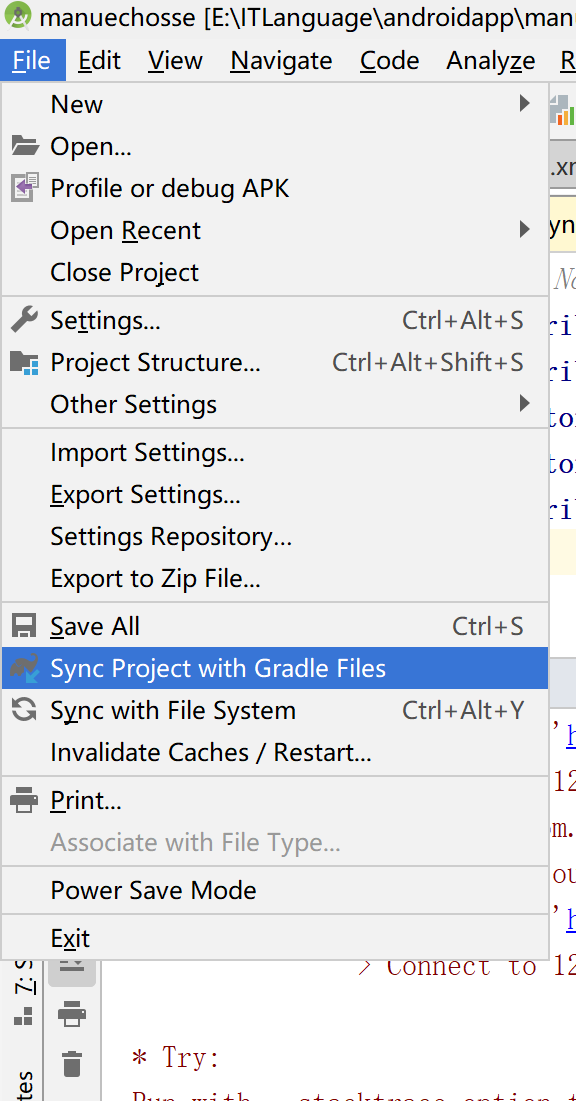
1.1 file> sync project with android gradle

If you succeed, you don’t have to look at the following

1.2 error reporting:

It can be seen or not solved:

It should be the version problem. If we can’t download it, we can download it directly manually (check the network first, and the agent has no problem, but it still can’t be solved)

2. Modify proxy parameters:

Agent:

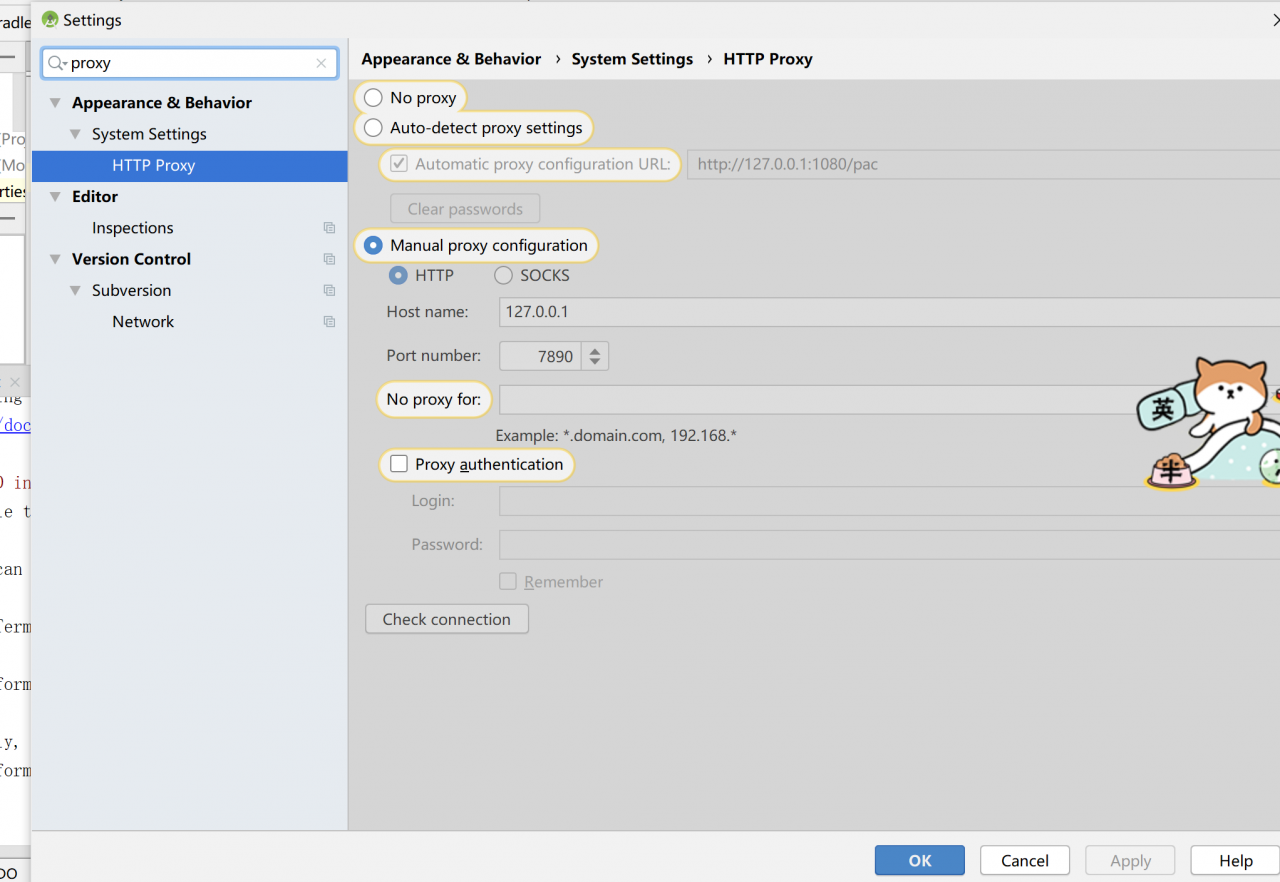
2.1 open file> setting> Search proxy

2.2 configuration information

The address and port of the agent shall be filled in as follows:

URL: http://127.0.0.1:1080/pac

2.3 check whether the Ping is connected

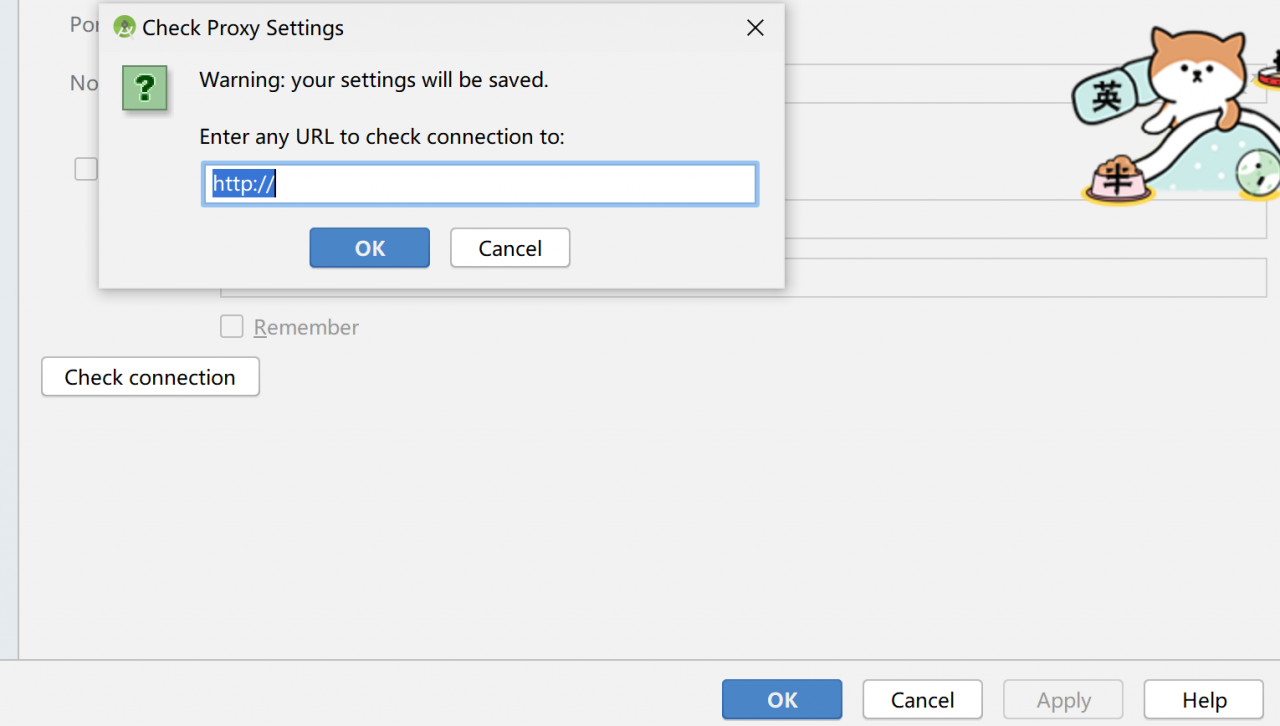
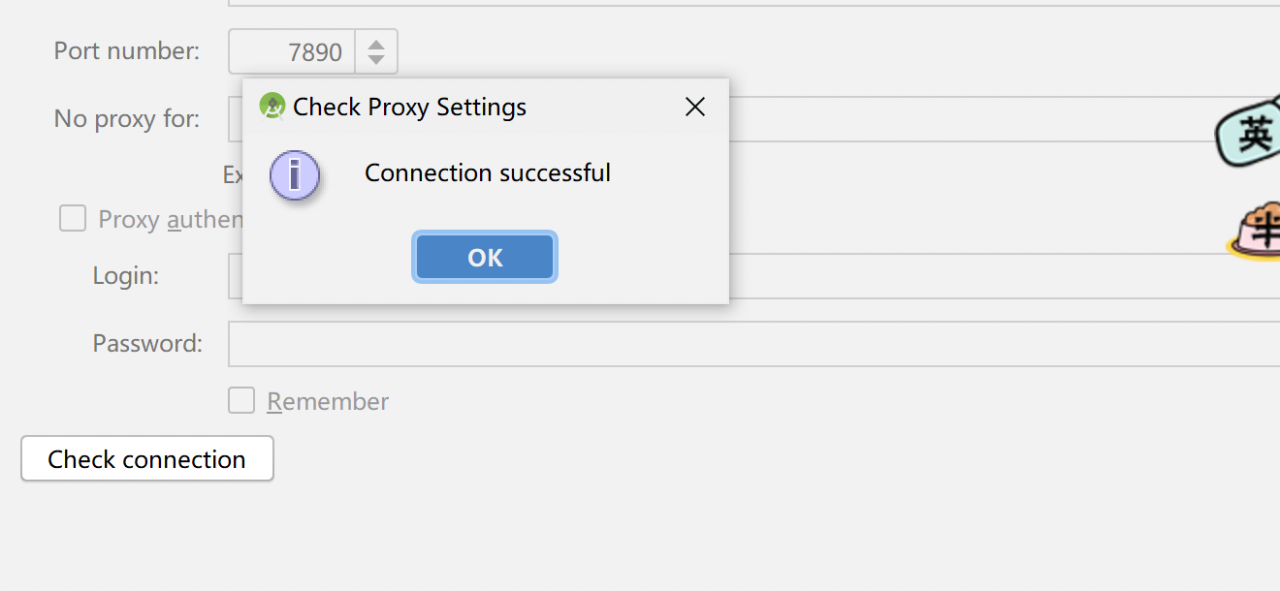
    1. use check connection

      1. enter a website to test: www.baidu.com, and then test: </ OL>

Still not!

3. Manual Download

So let’s continue:

3.1 open the gradle wrapper properties file

3.2 download

Download the gradle in the last line of the website. Note that the version must be consistent. Download whatever he puts down.

3.3 modifying environment variables

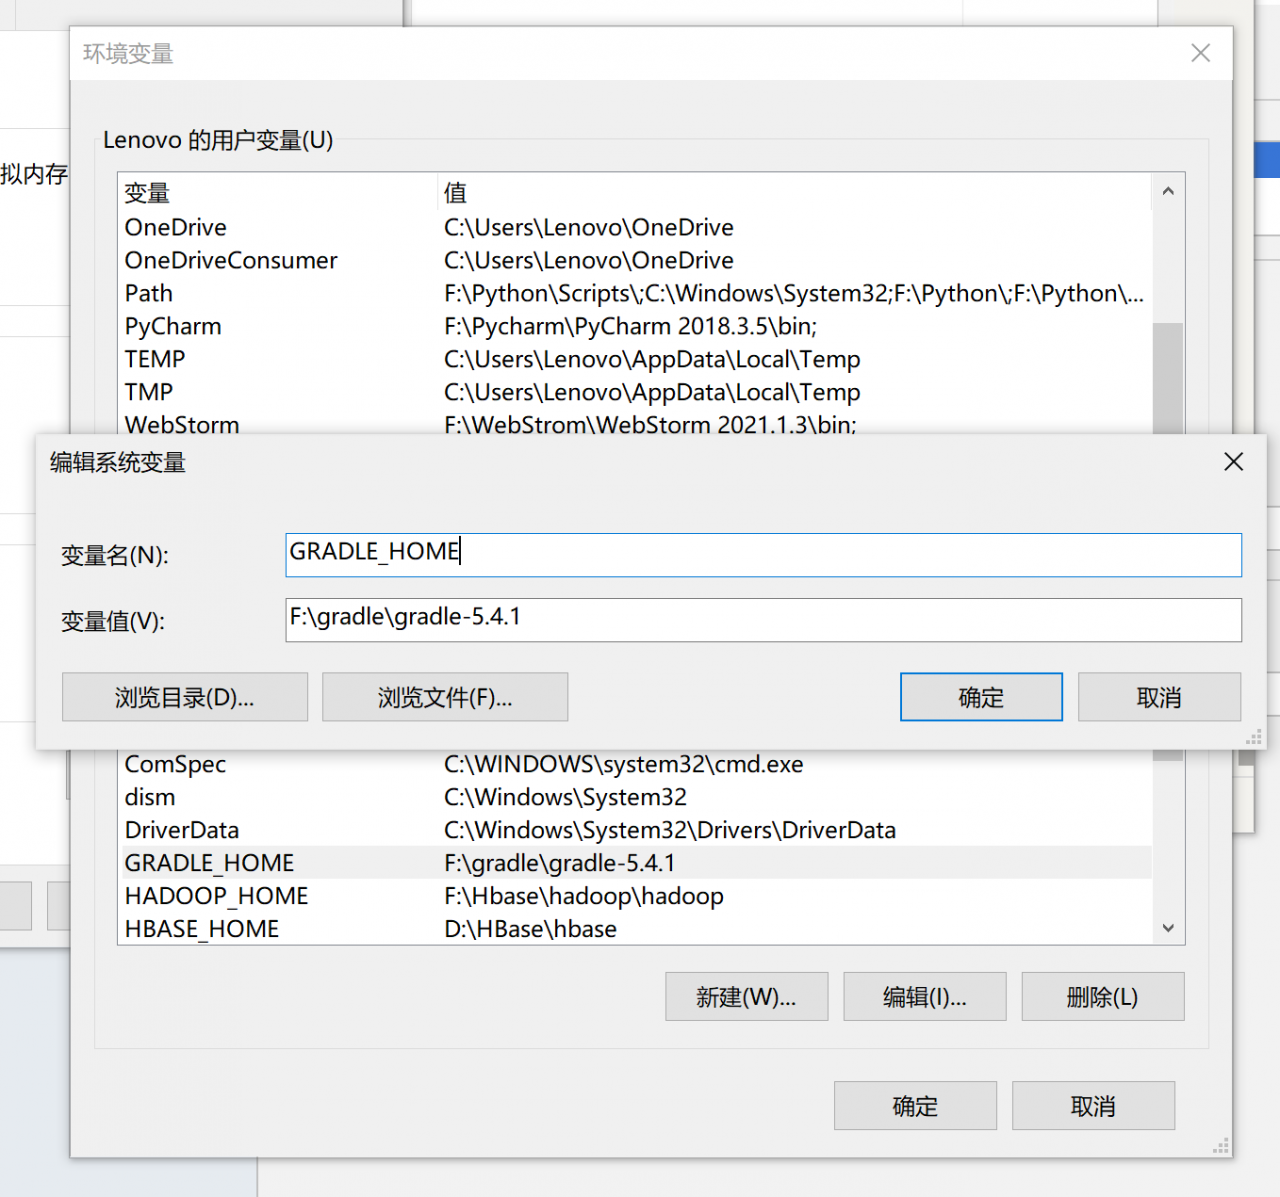
Remember to modify the gradle environment variable in the computer:

        1. system environment variable:

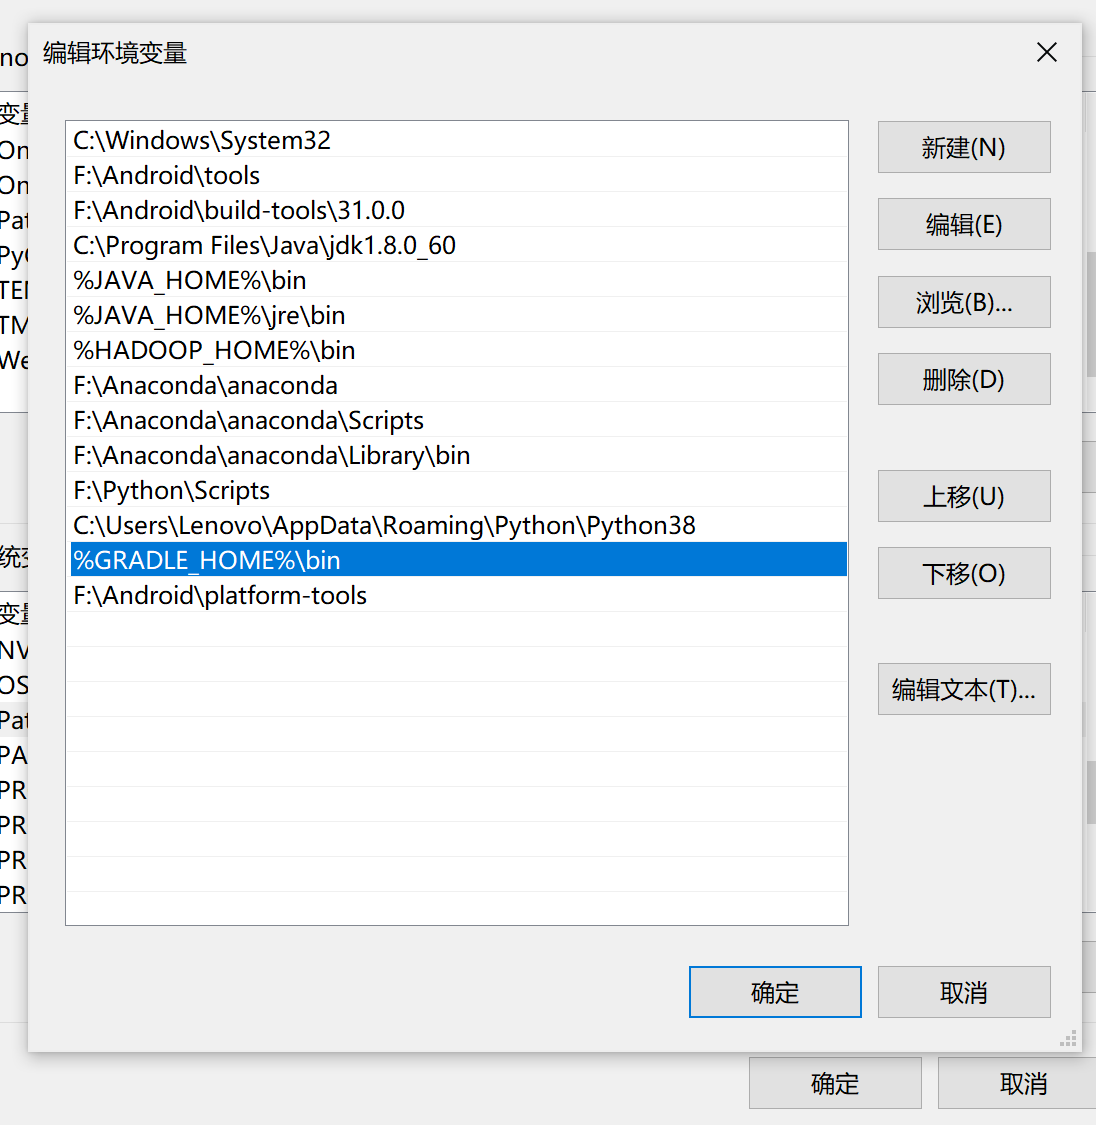
          1. path:

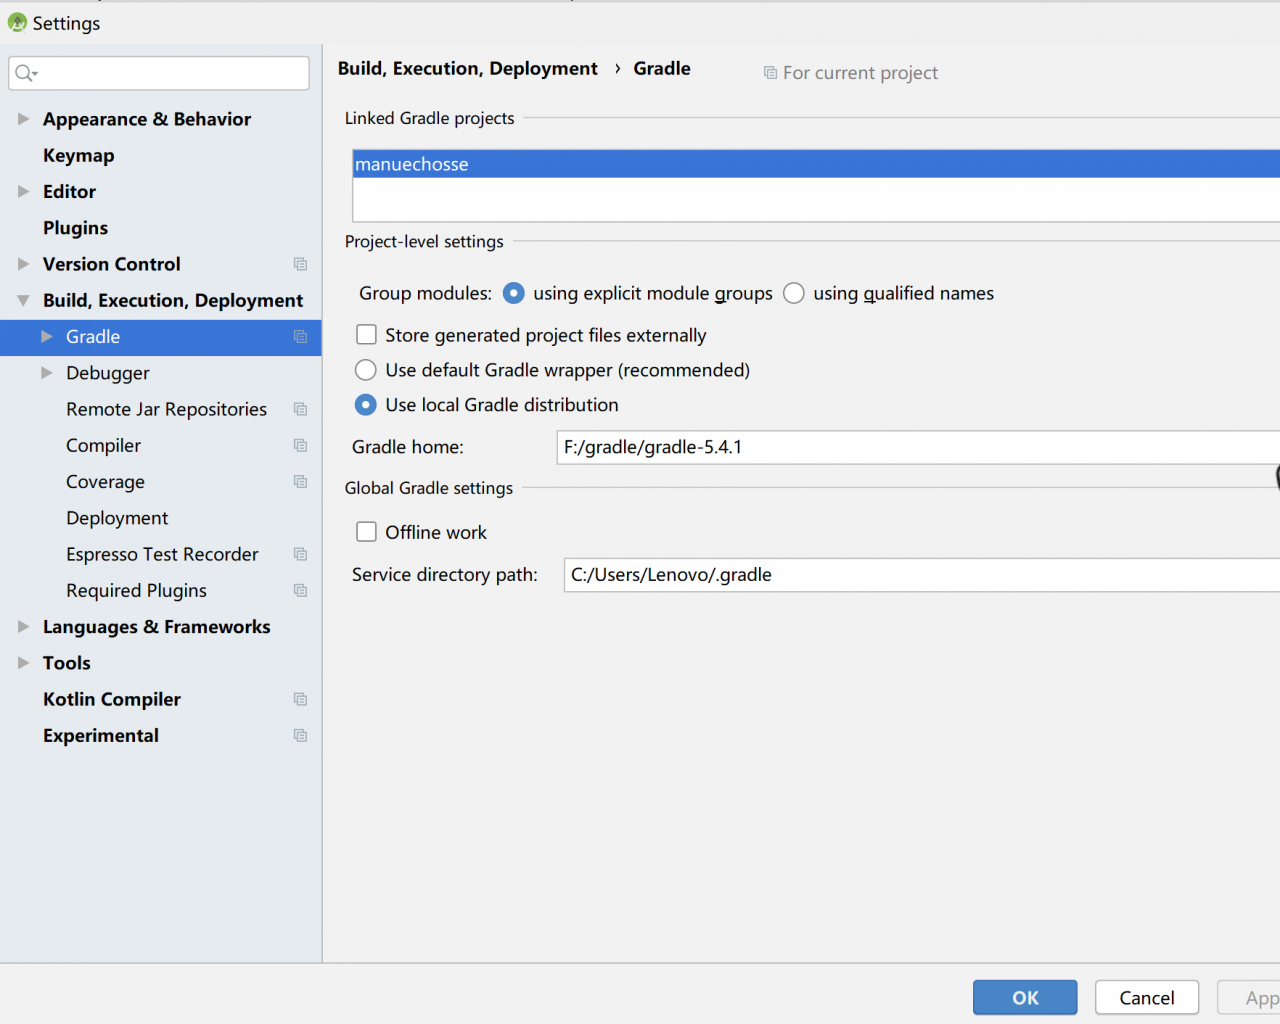
3.4 modify the compilation environment configuration

Then unzip it, modify the gradle configuration in the environment, and it’s OK.

You can see that my environment is OK now:

[Solved] Flutter Amap plug-in amap_location error: AmapLocationPlugin.java:287: error

1. Foreword

Plug in amap in use_ The location suddenly reported an error today. The project cannot run. The error prompt is as follows:

2. Error prompt

.../amaplocation/AmapLocationPlugin.java:287:Error: Unreported exception error Exception; it must be caught or declared in order to throw locationClient = new AMapLocationClient(getApplicationContext());

3. Cause investigation

After modifying the one-to-one communication without results and one-to-one search for information, I accidentally saw the discussion in the group and knew that it was caused by the problem of privacy policy. The temporary solution is not to use the latest Gaode com.amap.api: location. The latest privacy policy is available. The best solution should be to access the latest policy, which has not been implemented

4. Solution

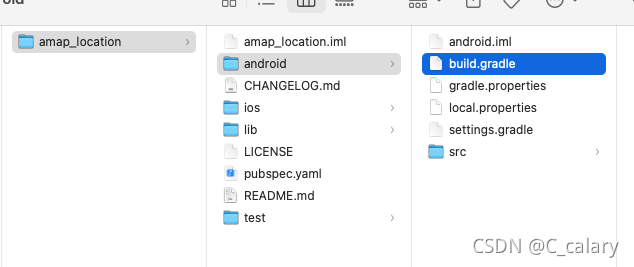
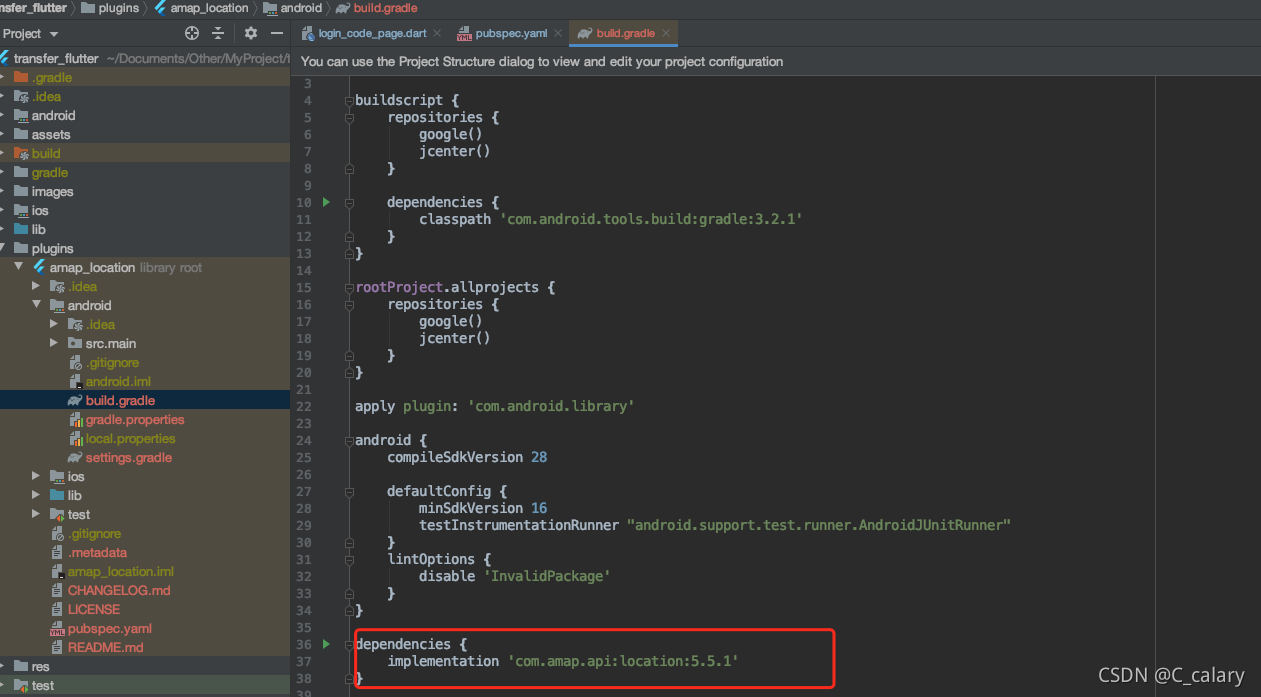
1. Find AutoNavi’s amap_location package according to the above path, in flutter/.pub-cache/hosted/…, and copy it after getting it, and change the latest dependency in android/build.gradle. At present, I Here is changed to 5.5.1


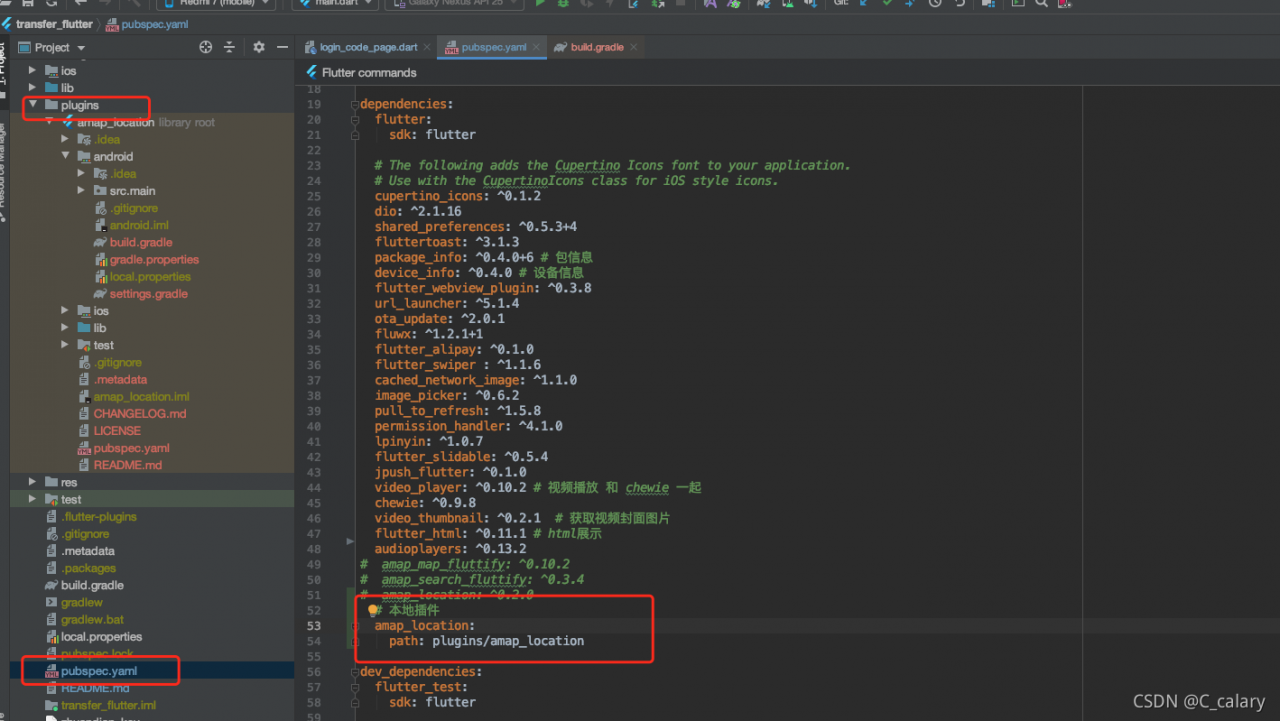
2. Delete the example in the package, create the local plug-in file plugins in the project, put the plug-in package into yaml, and import the local plug-in

Execute pub get, the error disappears, and the project can run

Android studio does not prompt error messages [How to Solve]

Solution

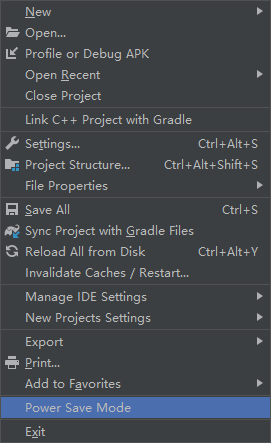
1.After the as is upgraded, it is set to the power saving mode by default. If it is set to the power saving mode, the as will disable many auxiliary functions to achieve the purpose of power-saving. Therefore, automatic code prompt and error prompt are also prohibited.

Turn off power saving mode: File—> Remove the tick √ in front of power save mode

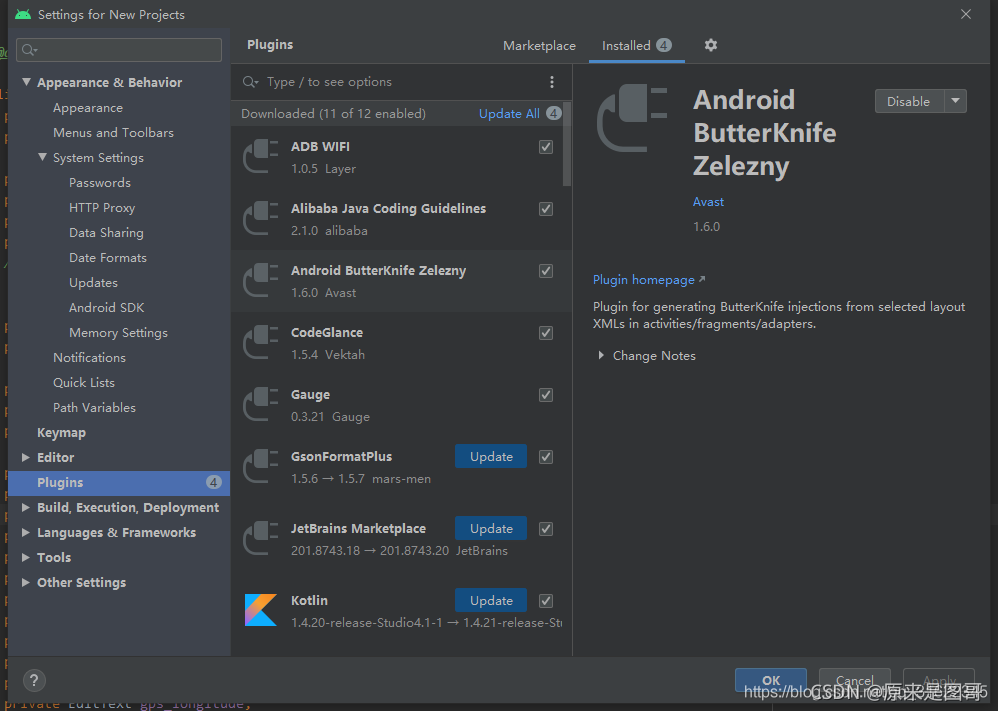
2.Your Android studio has installed the plug-in of butterknife. Open file — > Setting—> Plugins—> Find butterknife — > Right-click uninstall delete to uninstall and restart it. After restarting studio, open the project. It’s ok because now butterknife is no longer used. It is recommended to use viewbinding.

Solutions to errors in virtual machine running in Android studio

When starting the virtual machine in Android studio, there may be an error message in the “event log” of the main interface. At this time, the virtual machine can still run.

1. Solution to failed to open/qemu.conf

“Emulator: error | failed to open/qemu.conf, err: 2” (Figure 1 ②) is displayed in “event log” (Figure 1 ①), and the error message is “failed to open qemu.conf file”.

1.1 qemu.conf file

QEMU is a set of simulation software that can simulate another set of operating system in Windows operating system. Because it can simulate a virtual CPU in the system, and then hand over the operating system to be simulated to the virtual CPU for processing, it can achieve the purpose of executing two operating systems on the same platform at the same time.

Qemu.conf is the configuration file of Android studio virtual machine. When the virtual machine starts, you need to read the information of the configuration file. By default, the configuration file is in the root directory of drive C.

1.2 solutions

Create qemu.conf file in the root directory of drive C. First, open “this computer” on the desktop, click “view” in the toolbar (Figure 2 ①), and then select “file extension” (Figure 2 ②). The purpose of this operation is to display the file extension so that the file extension is changed to “conf”.


Figure 2 shows the file extension

Then, create a new text file in the root directory of drive C and rename it “QEMU. Conf”, as shown in Figure 3.
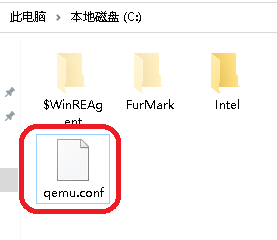
Figure 3 qemu.conf file

Run the simulator again at this time, and the above error prompt will not appear again.

2. Solution to unexpected system image feature string

When the simulator is running, “emulator: warning | unexpected system image feature string. Emulator may not function correctly.please try updating the emulator” is displayed in “event log”. The prompt means “unexpected system image feature string. The virtual machine may not work properly. Please update the virtual machine.”


Figure 4 warning message

For such error messages, you can lower the API level of the virtual machine. For example, if the API level of the current virtual machine is 30 and the above warning information will be displayed, delete the virtual machine and create a virtual machine with API level 29, as shown in Figure 5.


Figure 5 virtual machine API level