Tag Archives: system

[Solved] svn: OPTIONS of ‘https://xxx/svn/xxx’: SSL handshake failed: SSL error: Key usage violation in certificate has been detected.

svn SSL handshake failed: SSL error

Use the SVN server for version management, and suddenly use the version browser to report an error. svn: OPTIONS of ‘ https://xxx/svn/xxx ’: SSL handshake failed: SSL error: Key usage violation in certificate has been detected. (https://xxx), Then you cannot export or import files


Solution:

1. My is win2012 32-bit English version system. First modify the registry and add a value
[HKEY_LOCAL_MACHINE\SOFTWARE\Wow6432Node\VisualSVN\VisualSVN Server] "CreateGnuTLSCompatibleCertificate"=dword:00000001

2. VisualSVN Server Manager

Action -> Properties -> Certificate-> Change certificate, and then go to the next step

if it still doesn’t work, change the login method, check HTTPS and then http. Then log in and you can solve the problem

How to Solve Java Runtime (class file version 53.0)ERROR

libs/granite/ui/components/shell/header/user/User has been compiled by a more recent version of the Java Runtime (class file version 53.0), this version of the Java Runtime only recognizes class file versions up to 52.0

Specific corresponding version:

JDK 1.1 = 45
JDK 1.2 = 46
JDK 1.3 = 47
JDK 1.4 = 48
Java SE 5.0 = 49
Java SE 6.0 = 50
Java SE 7 = 51
Java SE 8 = 52
Java SE 9 = 53
Java 10 = 54
Java 11 = 55
Java 12 = 56
…


So the question is, how to replace the version?
First of all, the easiest way is to check whether java has been installed through the command: java -version
View the java package of yum source: yum list java*
Install java108jdk software: yum -y install java-1.8.0-openjdk****
Verify that the installation is successful, check the java version: java -version

Solutions to errors in virtual machine running in Android studio

When starting the virtual machine in Android studio, there may be an error message in the “event log” of the main interface. At this time, the virtual machine can still run.

1. Solution to failed to open/qemu.conf

“Emulator: error | failed to open/qemu.conf, err: 2” (Figure 1 ②) is displayed in “event log” (Figure 1 ①), and the error message is “failed to open qemu.conf file”.

1.1 qemu.conf file

QEMU is a set of simulation software that can simulate another set of operating system in Windows operating system. Because it can simulate a virtual CPU in the system, and then hand over the operating system to be simulated to the virtual CPU for processing, it can achieve the purpose of executing two operating systems on the same platform at the same time.

Qemu.conf is the configuration file of Android studio virtual machine. When the virtual machine starts, you need to read the information of the configuration file. By default, the configuration file is in the root directory of drive C.

1.2 solutions

Create qemu.conf file in the root directory of drive C. First, open “this computer” on the desktop, click “view” in the toolbar (Figure 2 ①), and then select “file extension” (Figure 2 ②). The purpose of this operation is to display the file extension so that the file extension is changed to “conf”.


Figure 2 shows the file extension

Then, create a new text file in the root directory of drive C and rename it “QEMU. Conf”, as shown in Figure 3.

Figure 3 qemu.conf file

Run the simulator again at this time, and the above error prompt will not appear again.

2. Solution to unexpected system image feature string

When the simulator is running, “emulator: warning | unexpected system image feature string. Emulator may not function correctly.please try updating the emulator” is displayed in “event log”. The prompt means “unexpected system image feature string. The virtual machine may not work properly. Please update the virtual machine.”


Figure 4 warning message

For such error messages, you can lower the API level of the virtual machine. For example, if the API level of the current virtual machine is 30 and the above warning information will be displayed, delete the virtual machine and create a virtual machine with API level 29, as shown in Figure 5.


Figure 5 virtual machine API level  


Difference between vs code user and system version

Difference between vs code user and system version

Recently, the version of win10 LTSC has been re installed, and the new version of visual studio code has just come out.
However, the official website provides user and system versions. Simple installation is tried.

For installation

The

    user version can’t create the default folder in the system partition (disk) Microsoft vs Code , which shows that the permissions are insufficient. The solution is to name the self created folder in the directory
    in advance, and then click next, For example, vs Code , in order to synchronize the path box, you need to delete the default Microsoft, as shown in figure

    For the system version, there is no such problem, but the next step is the same as other software

    Language problems (win10 LTSC Chinese language)

      I'm not sure whether this is just me or a common problem. For the user version of the installation program and vscode program, the default is English. It seems that the system language environment can't be read. The system version is the Chinese installation program directly, and the Chinese display panel user version uses the Chinese method

        open vs code, enter Ctrl + Shift + P , and enter configure display in the search box Language , click open to change the quotation mark en to 'zh CN', or delete the quotation mark "en" to the colon, and enter Z to complete it as "locale": "zh CN" click the plug-in, click the bottom icon on the left side of the software, and then search Chinese , download the language pack, install and restart

        Concluding remarks

          at present, I don't know the specific difference between the two versions.
          in stakoverflow's Q & A, some people said that there are differences between the two versions. I don't know for the moment. I may need to understand the good intentions of Microsoft. The software is also divided into users and system administrators, for ordinary users, in order to avoid unnecessary trouble, it is recommended to use the system version. For reference only

Modify grub to solve computer startup error: error 17

Modify grub to solve computer startup error: error 17

The original computer has C, D, e, F, G. C disk, windows system disk and G disk are installed with CentOS. Later, due to the need to compress the volume of the way from the D disk compressed out of an H disk. Then when I started the computer again, I encountered an error: error 17

The reason:
is that windows is installed first and then Linux is installed. In this way, grub is booted by CentOS on disk g. now a new logical partition is divided before the partition, which causes the disk system symbol to move backward by one bit. Therefore, grub fails.
Solution:
1, burn a Linux Installation U disk, enter BIOS, modify boot items, and boot from U disk.
2. I use RedHat 7.0. After the U disk is started, enter the troubleshooting option, and then enter the rescue a @ #% $%. Enter all the way to shell mode.
3. In shell mode, use fdisk – L to view all partitions of the computer, and find that the original CentOS partition is sdb9. Grub command enters grub, root (hd1,8) command specifies partition, setup (HD1) installs grub to corresponding partition, and quit grub.

At this time, boot the hard disk again, and you can already see grub. But only windows can start, CentOS will report error, error 17, cannot mount

4. Start the U disk again and enter the shell mode under rescue. Check the grub configuration file of Linux system to see if there is any problem. I have a look, and there is no problem.

#mkdir linux
#mount /dev/sdb9 linux
#cd linux
#cd grub
#vi grub.conf

5. Start the hard disk, enter grub interface, move the cursor to the startup option of Linux, press e key to modify the startup sequence. Change the root (hd0,7) option to root (hd0,8) and enter. It’s ready to start.

New skills get!

Solution of VS2008 unable to open GL / glaux. H header file

2011-04-15 wcdj
 
I don’t know why there is no OpenGL header file in SDK after VS2008. Here is a summary for this problem.
 
In Lesson 6 of learning Nehe’s texture mapping, I initially needed to use the header file containing gl/glaux. H, but found that I didn’t have this header file on my system. There are two header paths in the compiler that reference OpenGL:
C:/Program Files/Microsoft SDKs/Windows/v6.0 A/include/gl/gl h (the default)
C:/Program Files/Microsoft Visual Studio 9.0/VC/include/gl/glut. H (the new gl manually folder)

Googled the solution.

thod 1: Find the most used solution, but I do not have VS2003 or VS2005 installed on my system, so I cannot copy it.
I have been porting old openGL program to VS2008. I have solved the problem by copying the “include/gl/glaux.h” and “lib/glaux.lib” from the VS2005 Platform SDK located on “C:/Program Files/Microsoft Visual Studio 8/VC/PlatformSDK” To the PlatformSDK of VS2008 located on “C:/Program Files/Microsoft SDKS /Windows/ V6.0a “


Based on the reply to https://forums.microsoft.com/MSDN/ShowPost.aspx?PostID=1065518& SiteID=1, it looks like glaux. Lib is deprecated. Instead link to kernel32.lib, user32.lib, gdi32.lib and advapi32.lib


The easiest way to sort this out is to:
) Install Glut3.6 or newer as directed.
2>pen Visual Studio 2008 and create a new project
3) Cho>C ++ -Empty solution
4) Import Al> the files from your previous OpenGL project
5) delete all headers i.e.
#include < gl/glu.h>
#include < gl/gluax.h>
and any other GL headers
6) then replace with #include < gl/glut.h>
7) recompile.

this worked for all of my 2003 & 2005 Solutions.

thod 4: Download Missing Files.
1: download the source CSDN download
OpenGL installation package download required documents:

http://d.download.csdn.net/down/2560229/ssagnn23 include:
GL. H GLAUX. H GLU. H glut.
H GLAUX. LIB GLU32. LIB glut32. LIB glut. LIB OPENGL32. LIB
GLAUX. DLL GLU32. DLL glut32. DLL glut. DLL OPENGL32. DLL

VS2008 without GL. H, H, glu.h, GLAUX. Lib, glu32.lib, opengl32.lib.

1) Copy GLUX. DLL, GLUT32.DLL, GLU32.DLL and GLU32.DLL to C:/WINDOWS/system32, which should already have OpenGL32.DLL and GLU32.DLL.
. (2) the GL H, GLAUX. J H, glu. H, glut. H a copy to the C:/Program Files/Microsoft Visual Studio 9.0/VC/include/GL
. (3) the GLAUX LIB and Glu32. LIB, glut32. LIB, Opengl32. LIB, C:/Program Files/Microsoft Visual Studio 9.0/VC/lib

br>>
nehe SRC – cn – nehe OpenGL tutorials Chinese version and the code download

http://code.google.com/p/nehe-src-cn/downloads/list nehe OpenGL tutorial Chinese version and the code download

http://www.yakergong.com/nehe/ provides each Lesson # sample code and the file you need.

4 according to the method, after downloading the file and configure, recompile, without the previous mistakes, documents found, but the following mistakes.
error C2664: “auxdibimageLoadw” : Cannot convert parameter 1 from “char *” to “LPCWSTR”
is is because I am building a Unicode character set based project, so I want to use wide characters. It is also possible not to use Unicode character sets in the property page ->; Configure properties ->; You can modify it in general. Select not to use the Unicode character set here; that is, select Unset. And then recompile it. OK!

br>>

reference:
missing glaux. H in v6.0 a SDK?

http://social.msdn.microsoft.com/Forums/en/windowssdk/thread/b66e5f7a-91f6-4dbe-b388-0c131008b08f project under VS2003 under VS2008 compilation, however, Can’t find the gl/glaux. H

http://topic.csdn.net/u/20070930/15/6a900f21-8e41-4325-862f-f6df3a425f36.html VS 2008 OpenGL configuration

http://lujun5918.blog.163.com/blog/static/287227712011013114410553/ Load images generated texture opengl program
http://topic.csdn.net/u/20070823/19/4497cb18-be2a-464f-ad20-b12191a61b26.html


Windows 7 system, start to run input CMD, the window flashed by, disappeared

First of all, my system is Windows 7, this is also suitable for other systems, because my computer is Windows 7 of this problem, so I just in Windows 7, my computer is likely to be used with the first of a virus or Trojan and later killed and incomplete, but kill may have this problem, for example I will use the CMD window to view the IP ah, see ping network speed ah of what, don’t have the CMD feel very uncomfortable, but every time I enter CMD, one black car window is a flash is automatically shut down, no time to lose anything, Through checking the information, fumbled to find a solution, if you also have a similar problem, according to the following methods do not prevent to try.

The CMD command window is used in some special cases, such as PING to see if the network is connected. If you run commands such as Disk Format Conversion in the CMD window, enter CMD Enter and the black box of the CMD command will flash out and disappear, please refer to the following solution.

a, first check the C: \ WINDOWS \ SYSTEM32 of CMD EXE exists, the document date is normal;
test result is normal, same as other system file date, should not be this problem.

br>

%SystemRoot%;
view after found (if there is no need to add)

3, it is not in the above two common problems, should be modified is the registry.
registry:
ey_local_machine \Software\Microsoft\Command Processor\AutoRun
HKEY_LOCAL_MACHINE\Software\Microsoft\Command Processor\AutoRun
registry:
HKEY_LOCAL_MACHINE\Software\Microsoft\Command Processor\AutoRun (There is no numerical value, but a flash may be eXist, it can be cleared.)

, if it still doesn’t work, try using CMD /k, for example “CMD /k ipconfig /all” in the “Run” window.

VS2010 debugging window flash solution

These days the development integration environment has been changed to VS2010, just started to use, some places are not very understand, by consulting the relevant documents, is now solved.
Take the VS2010 debugging window flash through the solution is as follows:
#include < iostream>
using namespace std;
void main()
int add(int,int,int);
float business (int);
int x, y, z, sum;
cout< < “Input x, y, z:”;
cin> > x> > y> > z;
the sum = add (x, y, z);
cout< <” sum=”< < sum< < endl;
cout< <” average=”< < average(sum)< < endl;
// system (” pause “);
}
}
Int add (int a, int b, int c)
{return (a+b+c); }
float business (int s)
{return (s/3.0); }
This is the test code.
The solution is as follows:
If you are compiling (F5), you can run the program (Ctrl+F5). If it is still flashing, use the following method to solve it.
method one:
1. If the c + + files, in the final to write a program before (return) add: system (” pause “);
= #include”stdlib.h”;
= #include”stdlib.h”; Then add: system(“pause”) at the end of the program (before the return).
Method 2:
. Right click on the current project – Properties
2> 3. Change the SUBSYSTEM configuration in System Options, select the first ‘/ CONSOLE’ in the drop-down menu and then select ‘Start Executing (Don’t Debug)’, that is Ctrl +F5;
This solves the flash window problem once and for all.
 

Three methods of how to remove the flashback of running result box in VS

First of all, we will often encounter the situation of running the results after coding in VS, and then suddenly flashing back, which is very bad, high for half a day, nothing to see. And I don’t know how to solve it.
Now, here are three ways to do it:
The first two, you probably know.
1 & gt; That’s when return 0; I’m going to do a getchar (); Getchar is waiting for input, so it effectively stops the result screen running;
2 & gt; Similar to the first method, in return 0; Pause a system(“pause”); The statement;
3 & gt; This is a little bit trickier. So first let’s go over how to create a C file. This is a simple one, but it will be used in this method: Go to New – Project – Win32 Console Empty Project – Type File Name – View – Solution Explorer – Source Files – Type Name, C. And when we get there, we’re done. Solution in the solution explorer, right-click the solution explorer, select properties – configuration properties – linker – system – a SUBSYSTEM, the SUBSYSTEM to CONSOLE (\ SUBSYSTEM: the CONSOLE), with respect to ok, this does not need to input, the SUBSYSTEM click on the right side of the blank area, there will be a drop-down options, then click “ok” to continue to write files, continues to run, you will find that yi, amazing.
The advantage of the third method is that it is more cross-platform. If your computer has this problem and someone else doesn’t, it will inevitably run wrong. But the disadvantage of this is that every time you write a file you have to change it.
I hope I can help you.

OpenGL program running prompt glut32.dll missing problem

Today debug OpenGl source program, compiled through, but a running tips, computer lost glut32. DLL files, not depressed, search under the Internet provide most of the practice are more, copying the file to download this file to C: \ WINDOWS \ system in 32, but did so after found that still doesn’t work, after a long afternoon, suddenly realized that may be about my new WINDOWS 7 system, but also for loading is 64 – bit, then, Try to copy this glut32.dll to your SysWOW64 folder in C:\ Windows, and it will all be OK. Here’s a special note to remind everyone who installed Windows 7 and VC ++ 6.0 to pay attention to it.
PS: When you first start to contact OpenGL, you will inevitably encounter some problems, these problems may have nothing to do with the program, just some compile environment Settings and the installation of header files, special sorting, as follows:
PS
(1) Copy gult32.dll, Glut. DLL to Windows system system32(if Windows 7 is a 64-bit operating system, it is in C:\ Windows SysWOW64 file)
(2) Copy gult32.lib, Glut. lib to VC lib directory
(3) Copy ULT. H to include\GL of VC

Configuring OpenGL in VS

 
VS2010
GLUT Download Address:
http://www.opengl.org/resources/libraries/glut/glutdlls37beta.zip
Glut. H – & gt; C:/Program Files (x86)/Microsoft SDKs/Windows/v7.0 A/Include/gl
glut.dll,glut32.dll —> C:/Windows/ SYSWOW64 (Windows 7 64-bit operating system)
– & gt; C:/Windows/System32 (Windows 7 32-bit operating system)
glut.lib,glut32.lib —> C:/Program Files (x86)/Microsoft Visual Studio 10.0/VC/lib
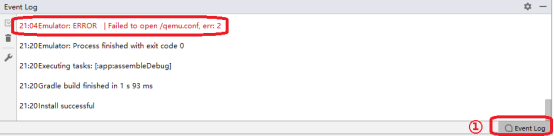
!!!!! No!!!!! With # define macros GLUT_DISABLE_ATEXIT_HACK
So a lot of people Glut. h didn’t know where to put it, and they created a new folder, and a lot of people Glut. h said,
To search the GL folder, place Glut. h in the GL folder that contains the two files Glut. h and Glut. h.
Direct copy of the following routine compilation can be passed
Routine as follows
#include < gl/glut.h>
Void myDisplay (void)
{
glClear (GL_COLOR_BUFFER_BIT);
glRectf(-0.5f, -0.5f, 0.5f, 0.5f);
glFlush ();

} int main (int arg c, char * argv [])
{
glutInit (& amp; argc, argv);
glutInitDisplayMode (GLUT_RGB | GLUT_SINGLE);
glutInitWindowPosition (100, 100);
glutInitWindowSize (400, 400);
GlutCreateWindow (” First OpenGL program “);
glutDisplayFunc (& amp; myDisplay);
glutMainLoop ();
return 0;
}
VS2008
The first step is to choose a compilation environment
now the mainstream of Windows compiled environment have Visual Studio, Broland c + + Builder, Dev – c + +, etc., they are all support OpenGL.

I chose Visual Studio 2008 and VC6++ as the environments to learn OpenGL.

Second, install the GLUT toolkit

Glutters
Glutters
Glutters
Glutters
Glutters
Glutters
Glutters
Glutters

Windows GLUT download address :(size about 150K)

http://www.opengl.org/resources/libraries/glut/glutdlls37beta.zip

cannot be downloaded from the above address, please use the links below:

http://upload.programfan.com/upfile/200607311626279.zip

install GLUT for Windows:

2, Search for “gl.h” in “My Computer” and find the folder in which it is located

If it is VC++6, then Glut.h should be copied in “D:/Program Files/
MicrosoftVisualStudio/VC98/Include/GL folder “). If it’s VisualStudio2008, copy Glut.h to
X :/Program Files/Microsoft/Visual Studio 9.0/VC/include/GL X is the disk symbol that you use to install VS. If you install VC++, there is a GL file in it. Visual Studio 2008 needs to go to it yourself
Create a new one)

3, let the glut of decompression. Lib and glut32 lib on static libraries in the folder (that is, with the include side by side under the lib folder).

4, let the glut of decompression. DLL and glut32 DLL in the operating system directory under the system32 folder. (Typical location: C:/Windows/System32)

Step 3: Set up an OpenGL project

VisualStudio2008 or VC++6:

choose File – & gt; New-> The Project, and then
Select Win32 Console Application, (not Win32 Application). Select a name and press OK. Click Application Settings on the left side of the resulting dialog box, locate the Empty Project, check it, and select Finish. Then add a code file to the project, called “opengl.c”, and note that you end the file with.c.

is done, just like any other project.


include <

#include < GL/glut.h>

#pragma comment(lib, “opengl32.lib”)

#pragma comment(lib, “glu32.lib”)

#pragma comment(lib, “glut32.lib”)


rst OpenGL program

A simple OpenGL program is as follows:
(Note that if you need to compile and run, GLUT needs to be installed correctly, as described above.)

# include & lt; GL/glut.h>

void myDisplay (void)

{

glClear (GL_COLOR_BUFFER_BIT);

glRectf(-0.5f, -0.5f, 0.5f, 0.5f);

glFlush ();

}

int main(int argc, char *argv[])

{

glutInit (& amp; Arg c, argv);

glutInitDisplayMode (GLUT_RGB | GLUT_SINGLE);

glutInitWindowPosition (100, 100);

glutInitWindowSize (400, 400);

GlutCreateWindow (” First OpenGL program “);

glutDisplayFunc (& amp; myDisplay);

glutMainLoop ();

return 0;

}

This program draws a white rectangle in the center of a black window. Each of the statements is explained below.

First, you need to include the header file #include
; GL/glut.h> So this is the header file for GLUT.

GL/gl.h> And & lt; GL/glu.h> , but both files are automatically included in the GLUT header file and do not need to be included again.

then look at the main function.

int main(int argc, char *argv[])
int main(int argc, char *argv[]) Comrades who have not seen it, please read the book more, and then look down when you understand.

Notice that all statements in main begin with GLUT, except for the return at the end.
The functions that begin with GLUT are all functions provided by the GLUT toolkit, and the functions used are described below.

1, glutInit (GLUT) — This function must be called once before another GLUT is used. Glutinit (& Arg C, Arg V.

2, glutInitDisplayMode, set the display mode, including GLUT_RGB said using RGB color, and the matching and GLUT_INDEX (using the index color). GLUT_single means to use a single buffer, as does GLUT_DOUBLE (to use a double buffer). For more information, please Google yourself. Of course, there will be some explanations in future tutorials.

>
>
>
>
>
>
>
>

>
>
>
>

5, GlutCreateWindow, create the window based on the information set above. Parameters will be used as the title of the window. Note: The window is not immediately displayed on the screen after it is created. You need to call glutMainLoop to see the window.

6, glutDisplayFunc, set up a function, when the need for drawing, this function will be invoked. (This statement is not accurate, but the accurate statement may not be easy for beginners to understand, so say for the time being).

(This may not be obvious to beginners, but for now it is enough to know that this function displays a window and waits for the window to close before returning.)

in glutDisplayFunc function, we set up “when need drawing, please call myDisplay function”. So myDisplay function is going to be used to draw the graph. When you look at the three function calls in MyDisplay, you see that they all start with GL.
Functions that start with GL are standard OpenGL functions, and the ones we use are described below.

GL_Color_BUFFER_BIT clears the color, and glClear clears other things, but I won’t cover them here.

2, Glrectf, draw a rectangle. The four parameters represent the horizontal and vertical coordinates of the two points located on the diagonal.

3, Glflush, which ensures that previous OpenGL commands are executed immediately (rather than having them wait in the buffer). It works similarly to fflush(stdout).