Abnormal
The errors reported by JUnit unit test are as follows:
java.lang.Exception: No runnable methods

	at org.junit.runners.BlockJUnit4ClassRunner.validateInstanceMethods(BlockJUnit4ClassRunner.java:191)
	at org.junit.runners.BlockJUnit4ClassRunner.collectInitializationErrors(BlockJUnit4ClassRunner.java:128)
	at org.junit.runners.ParentRunner.validate(ParentRunner.java:416)
	at org.junit.runners.ParentRunner.<init>(ParentRunner.java:84)
	at org.junit.runners.BlockJUnit4ClassRunner.<init>(BlockJUnit4ClassRunner.java:65)
	at org.junit.internal.builders.JUnit4Builder.runnerForClass(JUnit4Builder.java:10)
	at org.junit.runners.model.RunnerBuilder.safeRunnerForClass(RunnerBuilder.java:59)
	at org.junit.internal.builders.AllDefaultPossibilitiesBuilder.runnerForClass(AllDefaultPossibilitiesBuilder.java:26)
	at org.junit.runners.model.RunnerBuilder.safeRunnerForClass(RunnerBuilder.java:59)
	at org.junit.internal.requests.ClassRequest.getRunner(ClassRequest.java:33)
	at org.junit.internal.requests.FilterRequest.getRunner(FilterRequest.java:36)
	at com.intellij.junit4.JUnit4IdeaTestRunner.startRunnerWithArgs(JUnit4IdeaTestRunner.java:50)
	at com.intellij.rt.junit.IdeaTestRunner$Repeater.startRunnerWithArgs(IdeaTestRunner.java:33)
	at com.intellij.rt.junit.JUnitStarter.prepareStreamsAndStart(JUnitStarter.java:221)
	at com.intellij.rt.junit.JUnitStarter.main(JUnitStarter.java:54)
error code
import org.junit.Test;

public class Test01 {

    @Test
    public void test(){
        System.out.println("hello world");
    }
}
reason
There is no problem with the code @ test annotation is placed on the method, and the @test annotation is also from the package org.junit.Test
Simulate the environment where the problem code occurs: Maven project, with a main/Java/test01.Java and test/Java/test01.Java class
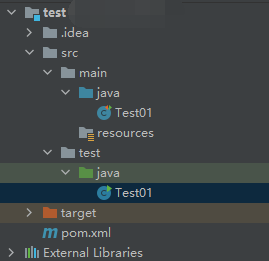
main/java/Test01.java
import org.junit.Test;

public class Test01 {
    @Test
    public void test01() {
        System.out.println("hello world - main/java/Test01.java");
    }
}
test/java/Test01.java
public class Test01 {
    public static void main(String[] args) {
        System.out.println("hello world - test/java/Test01.java");
    }
}
To solve the above problems, the following conditions must be met:
1.The same path. It means that the path of the class must be at the same level. If the test/java/Test01.javaand mian/java/Test01.javais the same level, the test/java/Test01.javaand mian/java/hello/Test01.javais not the same level , and there will be no conflict.
2.Same class name. Refer to the same class name in the same path as test/java/Test01.javathe main/java/Test01.javasame path and is both the name of the same class, test/java/Test02.javawith the main/java/Test01.javaconflict although the same path but different class name, it will not happen.
3.Use @Testcomments or not. In the case where the path and class name are the same, if main/java/Test01.javathere is an @Testannotated method in it, and test/java/Test01.javathere must be no @Testannotated method in it, this conflict will occur. If there is an @Testannotated method and the method name is different, it will be reported to use Junit Unit test error “No tests found matching Method test01(Test01) from ClassRequest@5387f9e0” .
After the above conditions are met, the above error will be reported by executing the test method with @test annotation under main/Java .
Solution:
Make their class paths different.
Make their class names different
Under test/Java, there must be methods using @test annotations
In short, it is recommended not to write test methods with @test comments under main/Java, let alone conflict them.