Tag Archives: install

[Solved] fbprophet Install Error: command ‘x86_64-apple-darwin13.4.0-clang‘ failed with exit status 254

There are several different errors in the process of installing prophet. Record them

1) Error: ModuleNotFoundError: No module named ‘pystan’

Please install pystan before installing prophet

2) Error: command ‘x86_64-apple-darwin13.4.0-clang’ failed with exit status 254

To execute the following two sentences on the command line

export CC=gcc
export CXX=g++

3) Error: command ‘x86_64-apple-darwin13.4.0-clang’ failed with exit status 1

export CXX=clang

ClobberError: The package ‘xxx‘ cannot be installed due to a path collision for ‘xx‘ This path alre

Original link: https://stackoverflow.com/questions/51217876/conda-update-anaconda-fails-clobbererror?newreg=2c51dd84b04b42c49294714471612f07

The reason for this problem is that the versions of related packages such as CONDA and pip are too low to be updated automatically. Solution: enter the following command on the command line:

conda clean --all
conda update --all

ls: cannot access /usr/sbin/smartctl: No such file or directory /usr/sbin/smartctl not found

When installing 11g RAC, an error was reported when installing cvuqdisk-1.0.9-1.rpm package

Oracle version: 11.2.0.4 RAC
operating system version: Oracle_ Linux7.9

# rpm -ivh cvuqdisk-1.0.9-1.rpm 
Preparing...                          ################################# [100%]
ls: cannot access /usr/sbin/smartctl: No such file or directory
/usr/sbin/smartctl not found.
error: %pre(cvuqdisk-1.0.9-1.x86_64) scriptlet failed, exit status 1
error: cvuqdisk-1.0.9-1.x86_64: install failed

Reason: lack of smartctl command
solution: install Smartmontools toolkit : Yum install - y Smartmontools installation

The output is as follows:

# yum install -y smartmontools
Loaded plugins: ulninfo
Resolving Dependencies
--> Running transaction check
---> Package smartmontools.x86_64 1:7.0-2.el7 will be installed
--> Processing Dependency: mailx for package: 1:smartmontools-7.0-2.el7.x86_64
--> Running transaction check
---> Package mailx.x86_64 0:12.5-19.el7 will be installed
--> Finished Dependency Resolution

Dependencies Resolved

=======================================================================================================
 Package                    Arch                Version                    Repository             Size
=======================================================================================================
Installing:
 smartmontools              x86_64              1:7.0-2.el7                ol7_base              546 k
Installing for dependencies:
 mailx                      x86_64              12.5-19.el7                ol7_base              244 k

Transaction Summary
=======================================================================================================
Install  1 Package (+1 Dependent package)

Total download size: 790 k
Installed size: 2.4 M
Downloading packages:
(1/2): mailx-12.5-19.el7.x86_64.rpm                                             | 244 kB  00:00:00     
(2/2): smartmontools-7.0-2.el7.x86_64.rpm                                       | 546 kB  00:00:00     
-------------------------------------------------------------------------------------------------------
Total                                                                  5.5 MB/s | 790 kB  00:00:00     
Running transaction check
Running transaction test
Transaction test succeeded
Running transaction
  Installing : mailx-12.5-19.el7.x86_64                                                            1/2 
  Installing : 1:smartmontools-7.0-2.el7.x86_64                                                    2/2 
  Verifying  : mailx-12.5-19.el7.x86_64                                                            1/2 
  Verifying  : 1:smartmontools-7.0-2.el7.x86_64                                                    2/2 

Installed:
  smartmontools.x86_64 1:7.0-2.el7                                                                     

Dependency Installed:
  mailx.x86_64 0:12.5-19.el7                                                                           

Complete!
# 

Perform the installation again:

# rpm -ivh cvuqdisk-1.0.9-1.rpm 
Preparing...                ########################################### [100%]
Using default group oinstall to install package
   1:cvuqdisk               ########################################### [100%]

Termux installing redis

When I compile and install redis under termux, there are such errors as use of undeclared identifier.. my CC compiler and its dependent components are the latest version, but there are still problems. The reason is unknown. It indicates that the method is not declared at compile time. It is estimated that the CPU is weak and the compile execution order is related. It is just a guess.

Use the following solution directly:

apt install redis

That’s it. The bin executor is placed in usr/bin by default, and the configuration file is in usr/etc.

When installing pyaudio, an error is reported: failed error: portaudio. H: there is no such file or directory

When installing pyaudio, an error is reported: failed error: portaudio. H: there is no such file or directory

 
The operation of pyaudio depends on the portaudio library. You should first install a portaudio library

Portaudio installation steps:

A) Download PortAudio Library http://portaudio.com/download.html , select the latest tgz, upload it to Linux or termux and place it where you want to install it. Termux: I put it in/data/data/com.termux/files/usr/share, and CD it to this directory

B) tar – zxvf file name         Unzip the downloaded files without tar, such as apt get install tar

C) enter the decompressed portaudio file and execute the following commands in turn:

    ./configure

(configure command)

This step is generally used to generate makefile to prepare for the next step of compilation. You can control the installation by adding parameters after configure. For example, the code:./configure – prefix =/usr means to install the software under/usr, and the executable file will be installed in/usr/bin (instead of the default/usr/local/bin), The resource file will be installed in/usr/share (instead of the default/usr/local/share). At the same time, some software configuration files can be set by specifying the – sys config = parameter. Some software can also add – with, – enable, – without, – disable and other parameters to control the compilation. You can view the detailed instructions and help by allowing./configure – help.

In termux, this step is set to

./configure –prefix=/data/data/com.termux/files/usr

    make     compile

    make install     Installation

4. Install pyaudio library, PIP3 install pyaudio

[extremely simple and effective] installing docker under centos6. X

1. Upgrade Linux kernel

    rpm –import https://www.elrepo.org/RPM-GPG-KEY-elrepo.org


    rpm -Uvh http://www.elrepo.org/elrepo-release-6-8.el6.elrepo.noarch.rpm     


    yum –enablerepo=elrepo-kernel install kernel-lt -y

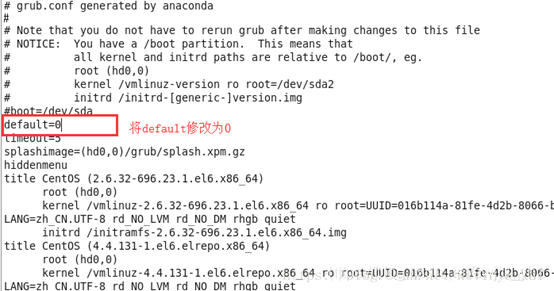
2. Modify default startup order

   vim /etc/ grub.conf

Restart the server

shutdown -r now

3. Disable SELinux

4. Offline installation of docker with static binary files

reference resources https://docs.docker.com/install/linux/docker-ce/binaries/#install -static-binaries

This installation method is the most simple and correct, the rest of the online reference rpm, yum installation all have a variety of problems.


1. Download static binary file

go to https://download.docker.com/linux/static/stable/ (or change stable to edge or test), select your hardware platform, and then download. Tgz files related to the docker CE version to be installed.


2. Decompress

$ tar –xzvf docker-18.06.3- ce.tgz For this, please install it on demand

Required: move the binary file to a directory on the executable path, such as/usr/bin /.

——–Without this step, it is invalid to call docker under the docker file

$ sudo cp docker/* /usr/bin/

3. Start the docker daemon:

$ sudo dockerd&

Note: if the following error occurs when starting the daemons:

The reason is that CGroup is not mounted on the host computer. To add a mount, the solution is as follows:

vim /etc/fstab

none        /sys/fs/cgroup        cgroup        defaults    0    0

Save and restart.

4. Start the docker command test

docker -v

[error] error handling of IntelliJ idea

ClassNotFoundExceptionEmpty test suitejavalangNoClassDefFoundError


ClassNotFoundException

Error report:
once IntelliJ idea is running, it will report an error, and no class can be found
in the system java.lang.ClassNotFoundException

Solution:
open project structures (ALT + Ctrl + Shift + s) to check whether the directory set by project – out and module – path – out exists.
Generally, the module – path – out is set under the target directory, but if there is no target directory at the first run, it must be generated by Maven build, so either change the out path or run Maven build first.


Empty test suite

Error:
JUnit running times cannot find the test group
process finished with exit code 1
class not found:“ XXX.XXXTest ”Empty test suite.

Solution:
Run Maven test and download relevant jar packages

java.lang.NoClassDefFoundError

Error:
minaserver logger – & gt; error{ ContextLoader.java:336 }-Context initialization failed java.lang.NoClassDefFoundError : Lcom/cebbank/gage/dao/UserDao;

Solution:
if you want to change the project name, remember to delete all the configuration files (. IML,. Idea, etc.) and leave only the folder and folder of the project code pom.xml File, and then re import the Maven project.

Installing Theano :Windows Installation Instructions

 Theano
 
Windows Installation Instructions
Warning
If you want to install the bleeding-edge or development version of Theano from GitHub, please make sure you are reading the latest version of this page.
Requirements
Note
We only support the installation of the requirements through conda.

Python == 2.7* or ( >= 3.4 and < 3.6 )
The conda distribution is highly recommended. Python 2.4 was supported up to and including the release 0.6. Python 2.6 was supported up to and including the release 0.8.2. Python 3.3 was supported up to and including release 0.9.
NumPy >= 1.9.1 <= 1.12
Earlier versions could work, but we don’t test it.
SciPy >= 0.14 < 0.17.1
Only currently required for sparse matrix and special functions support, but highly recommended. SciPy >=0.8 could work, but earlier versions have known bugs with sparse matrices.
BLAS installation (with Level 3 functionality)
Recommended: MKL, which is free through Conda with mkl-service package. Alternatively, we suggest to install OpenBLAS, with the development headers (-dev-devel, depending on your Linux distribution).

Optional requirements

GCC compiler with g++ (version >= 4.2.*), and Python development files
Highly recommended.  Theano can fall back on a NumPy-based Python execution model, but a C compiler allows for vastly faster execution.
nose >= 1.3.0
Recommended, to run Theano’s test-suite.
Sphinx >= 0.5.1, pygments
For building the documentation.  LaTeX and dvipng are also necessary for math to show up as images.
pydot-ng
To handle large picture for gif/images.
NVIDIA CUDA drivers and SDK
Highly recommended Required for GPU code generation/execution on NVIDIA gpus. See instruction below.
libgpuarray
Required for GPU/CPU code generation on CUDA and OpenCL devices (see: GpuArray Backend).
pycuda and skcuda
Required for some extra operations on the GPU like fft and solvers. We use them to wrap cufft and cusolver. Quick install pip install pycuda scikit-cuda. For cuda 8, the dev version of skcuda (will be released as 0.5.2) is needed for cusolver: pip install pycuda; pip install git+https://github.com/lebedov/scikit-cuda.git#egg=scikit-cuda.
warp-ctc
Required for Theano CTC implementation. It is faster then using an equivalent graph of Theano ops.

Requirements installation through Conda (recommended)
Install Miniconda
Follow this link to install Miniconda.
Note
If you want fast compiled code (recommended), make sure you have g++ installed.
Install requirements and optional packages

conda install numpy scipy mkl-service libpython <m2w64-toolchain> <nose> <sphinx> <pydot-ng> <git>

Note
Arguments between <…> are optional. m2w64-toolchain package provides a fully-compatible version of GCC and is then highly recommended. git package installs git source control through conda, which is required for the development versions of Theano and libgpuarray
Package parameterized is also optional but may be required for unit testing. It is available via pip.

pip install parameterized

Install and configure the GPU drivers (recommended)
Warning
OpenCL support is still minimal for now.
Install CUDA drivers
Follow this link to install the CUDA driver and the CUDA Toolkit.
You must reboot the computer after the driver installation.
Installation
Stable Installation
With conda
If you use conda, you can directly install both theano and pygpu. Libgpuarray will be automatically installed as a dependency of pygpu.

conda install theano pygpu

Warning
Latest conda packages for theano (>= 0.9) and pygpu (>= 0.6*) currently don’t support Python 3.4 branch.
With pip
If you use pip, you have to install Theano and libgpuarray separately.
theano
Install the latest stable version of Theano with:

<sudo> pip install <--user> Theano[test, doc]

Any argument between <…> is optional. Use sudo for a root installation. Use user for a user installation without admin rights. It will install Theano in your local site-packages. [test] will install the requirements for testing. [doc] will install the requirements in order to generate the documentation.
If you encountered any trouble, head to the Troubleshooting page.
The latest stable version of Theano is 0.9.0 (tagged with rel-0.9.0).
libgpuarray
For the stable version of Theano you need a specific version of libgpuarray, that has been tagged v0.6.9. Download it with:

git clone https://github.com/Theano/libgpuarray.git
cd libgpuarray
git checkout tags/v0.6.5 -b v0.6.9

and then follow the Step-by-step instructions.
Bleeding-Edge Installation (recommended)
Install the latest, bleeding-edge, development version of Theano with:

<sudo> pip install <--user> <--no-deps> git+https://github.com/Theano/Theano.git#egg=Theano

Any argument between <…> is optional. Use sudo for a root installation. Use user for a user installation without admin rights. It will install Theano in your local site-packages. Use no-deps when you don’t want the dependencies of Theano to be installed through pip. This is important when they have already been installed as system packages.
If you encountered any trouble, head to the Troubleshooting page.
libgpuarray
Install the latest, development version of libgpuarray following the Step-by-step instructions.
Note
Currently, you need libgpuarray version 0.7.1 that is not in conda default channel. But you can install it with our own channel mila-udem (that support only Python 2.7 and 3.5):

conda install -c mila-udem pygpu

Developer Installation
Install the developer version of Theano with:

git clone git://github.com/Theano/Theano.git
cd Theano
<sudo> pip install <--user> <--no-deps> -e .

Any argument between <…> is optional. Use sudo for a root installation. Use user for a user installation without admin rights. It will install Theano in your local site-packages. Use no-deps when you don’t want the dependencies of Theano to be installed through pip. This is important when they have already been installed as system packages. -e makes your installation editable, i.e., it links it to your source directory.
If you encountered any trouble, head to the Troubleshooting page.
libgpuarray
See instructions for bleeding-edge installation about libgpuarray.
Instructions for other Python distributions (not recommended)
If you plan to use Theano with other Python distributions, these are generic guidelines to get a working environment:

Look for the mandatory requirements in the package manager’s repositories of your distribution. Many distributions come with pip package manager which use PyPI repository. The required modules are Python (of course), NumPy, SciPy and a BLAS implementation (MKL or OpenBLAS). Use the versions recommended at the top of this documentation. If the package manager provide a GCC compiler with the recommended version (see at top), install it. If not, you could use the build TDM GCC which is provided for both 32- and 64-bit platforms. A few caveats to watch for during installation:

    Install to a directory without spaces (we have placed it in C:\SciSoft\TDM-GCC-64)If you don’t want to clutter your system PATH un-check add to path option. Enable OpenMP support by checking the option openmp support option.

Install CUDA with the same instructions as above. Install the latest, development version of libgpuarray following the Step-by-step instructions.
When nodejs is installed: the error code is 2503

When installing Nodejs under Windows, you always report an error:

The installer has encountered an unexpected error installing this package. This may indicate a problem with this package. The error code is 2503.

There are three ways to try it:

    “Run as administrator” obtains administrator authority to Run the installation file. In Linux, you can prefix the command line with sudo. Open the “Start” menu in the lower left corner of the computer and type CMD in the search bar of the popup menu bar.
    in the top list, right-click [CMD] and select [run as administrator];
    enter the command line interface, find the directory of the program to be installed, and copy the path in the address bar;
    , for example, want to install the node-v6.9.1-x64.msi file under D disk;
    type D:\node-v6.9.1-x64.msi on the CMD command line;
    (be sure to have the full address, including the name of the installer); Right-click on the package and select the properties option.
    enter the properties dialog box, click the “security” option at the top, then select the current computer user, and click the lower right corner;
    enter the edit bar, check [full control] at the permissions below, and then click ok to install.

Author: leedaning
this address: http://blog.csdn.net/leedaning/article/details/53138664

Error 1045 (28000): solution to access denied for user ‘root’ @’localhost ‘(using password: no)


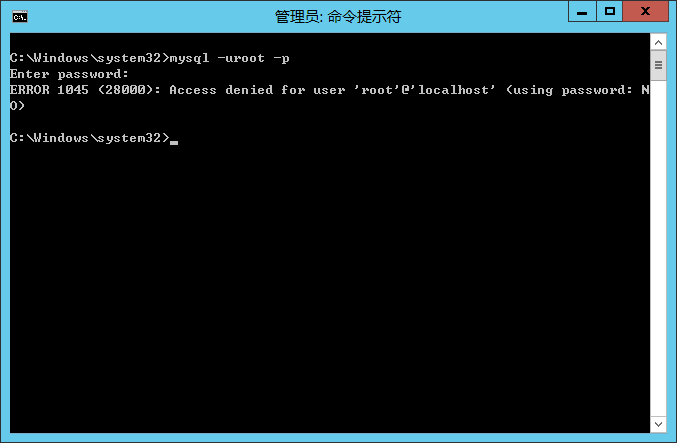
This problem was encountered when installing MySQL service under Windows, which was installed with MySQL green version. After installation, when connecting to MySQL service, enter the command “mysql-uroot-p”. Because the password was not set for the first login, the error message was as follows:
“ERROR 1045 (28000): Access Denied for user ‘root’@’localhost’ (using password: NO)”

The diagram below:

Solutions:
First you need to turn off the MySQL service and enter the command:
mysql> net stop MySQL
To start the local MySQL service in safe mode (note: launch the CMD window as an administrator), enter the command “MySQld — Defaults file=”G:\Install_Applications\ mysql.8.0.11 \ My.ini” –console –skip-grant — tables “to start the MySQL service, the cursor will stop without any output, which indicates that the MySQL service has been started.

Start the CMD window, and enter the command “mysql-uroot-p” to directly enter and log in to the mysql server, and then modify, you can enter the command:
(before 5.7.11) & GT; update user set password=password(“123456″) where user=”root”;

(5.7.11 or later) & GT; update user set authentication_string=password(“123456″) where user=”root”;
Here I’m using:
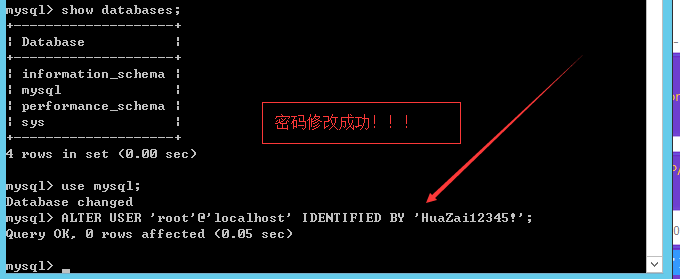
mysql> ALTER USER ‘root’@’localhost’ IDENTIFIED BY ‘HuaZai12345! ‘;
The diagram below:

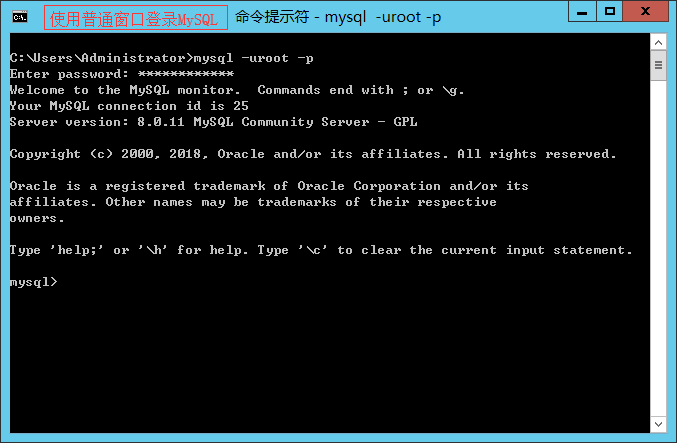
Now exit, enter the command “mysql-uroot-p” and enter the password just set, and you can log in to the mysql server normally, as shown in the figure below:

Ok, this is the solution for ERROR 1045 (28000): Access Denied for user ‘root’@’localhost’ (using password: NO). If you have any questions, please feel free to leave me a message.

: “learn together, make progress together”, I also hope that we will pay more attention to the IT community of CSND.

Internal error 2203 C:\windows\Installer

Reference articles; http://blog.csdn.net/carolbaby/article/details/1440733
———————————————————————————————————————————-
The following error message appeared today when installing the software:
Internal error 2203 C:\windows\installer\1bbe2ab.ipi
// Screenshot below

 
I found the reason, it turned out that there was a problem with the environment variable of the user I logged in to the system. Strangely enough, the environment variable was the same when I installed it before
In this case, TEMP=I:\ TMP=I:\ // I is the disk character name
Change them back to:
TEMP=%USERPROFILE%/Local Settings/Temp
TMP=%USERPROFILE%/Local Settings/Temp
// Screenshot below

 
It is not clear why this problem did not occur when the TEMP and TMP paths were changed.


Windows Visual C + + 2005 redistributable error 1935 solution

The reason: in the control panel, the wrong operation has deleted the vcredist_x86 2005
phenomenon: QQ2010 cannot be used, Nero 10 cannot be used, installation Arcgis10 failed!
solution, downloaded the vcredist_x86 sp1 installation on the Internet, the problem then appeared, the installation process is also very slow ~~~ finally appeared “Error 1935. PublicKeytoken =”1fc8b3b9a1e18e3b”,processirArchitecture=”x86″

, it turned out that the Windows service “Windows Installer service” did not start properly.
solve “Windows Installer service” launch exception, “error 1450: system resources insufficient, unable to complete the requested service”,
After analysis and search, it was found that it was caused by the residual installation of Arcgis9.3. The main reason was that the registration space was limited
error modification method after installation of Arcgis9.3:
1, in the run enter regedit to open registry editor
2, find HKEY_LOCAL_MACHINE\System\CurrentControlSet\Control
3, change the RegistrySizeLimit (REG_DWORD type) value to FFFFFFFF (base 10 is 4294967295)
4, restart the computer
Start the “Windows Installer Service” again, OK
Run vcredist_x86 2005 SP1 as administrator again (be careful not to put it in the Chinese directory and clear the contents of the TEMP folder), OK
QQ, Nero, Arcgis and other software, due to the VCR caused by abnormal start, need to delete clean (use makeup removal software to clear the cache), and then install it is OK