Tag Archives: x86

SSD [failed] failed to mount / sysRoot solution

[Failed] Failed to mount /sysroot [Failed] Failed to mount /sysroot

[  OK  ] Reached target Remote File Systems (Pre).
[  OK  ] Reached target Remote File Systems.
[8.901016] SGI XFS with ACLs, security attributes, no debug enabled
[8.912417] XFS (nvme0n1p3): Mounting V5 Filesystem
[8.960550] XFS (nvme0n1p3): Starting recovery (logdev: internal)
[8.973696] XFS (nvme0n1p3): Metadata corruption detected at __write_verify+0xfd/0x110 [xfs], xfs_dir3_leaf1 block 0x1900a00
[8.984887] XFS (nvme0n1p3): Unmount and run xfs_repair
[8.990104] XFS (nvme0n1p3): First 64 bytes of corrupted metadata buffer:
[8.996876] ffff9d79d0a6e000: 00 00 00 00 00 00 00 00 3d f1 00 00 17 bf 25 cb  ........=.....%.
[9.005544] ffff9d79d0a6e010: 00 00 00 00 01 90 0a 00 00 00 00 26 00 00 a2 aa  ...........&....
[9.014214] ffff9d79d0a6e020: 11 51 07 ca d1 a4 47 1a a2 a5 c6 99 86 e3 c6 6d  .Q....G........m
[9.022885] ffff9d79d0a6e030: 00 00 00 00 02 00 00 42 01 f0 00 2d 00 00 00 00  .......B...-....
[9.031560] XFS (nvme0n1p3): xfs_do_force_shutdown(0x8) called from line 1391 of file fs/xfs/xfs_buf.c.  Return address = 0xffffffffc063afb7
[9.044120] XFS (nvme0n1p3): Corruption of in-memory data detected.  Shutting down filesystem
[9.052618] XFS (nvme0n1p3): Please umount the filesystem and rectify the problem(s)
[9.060415] XFS (nvme0n1p3): log mount/recovery failed: error -117
[9.066595] XFS (nvme0n1p3): log mount failed
[FAILED] Failed to mount /sysroot.
See 'systemctl status sysroot.mo
Generating "/run/initramfs/rdsosreport.txt"

Baidu the online method under the
# code xfs_repair - v - L/dev/dm - 0
on failure, seemingly equipment is wrong, the dm to nvme0n1p3 0, perform OK, the following figure

:/# xfs_repair -v -L /dev/nvme0n1p3
Phase 1 - find and verify superblock...
        - block cache size set to 3003408 entries
Phase 2 - using internal log
        - zero log...
zero_log: head block 42497 tail block 42014
ALERT: The filesystem has valuable metadata changes in a log which is being
destroyed because the -L option was used.
        - scan filesystem freespace and inode maps...
out-of-order bno btree record 9 (289310 2) block 0/1
block (0,289310-289310) multiply claimed by bno space tree, state - 1
agi unlinked bucket 2 is 1214018 in ag 2 (inode=68322882)
agi unlinked bucket 10 is 1215178 in ag 2 (inode=68324042)
agi unlinked bucket 13 is 1140429 in ag 2 (inode=68249293)
agi unlinked bucket 14 is 1213902 in ag 2 (inode=68322766)
agi unlinked bucket 15 is 1215183 in ag 2 (inode=68324047)
agi unlinked bucket 17 is 1140433 in ag 2 (inode=68249297)
agi unlinked bucket 18 is 1215186 in ag 2 (inode=68324050)
agi unlinked bucket 20 is 1140436 in ag 2 (inode=68249300)
agi unlinked bucket 26 is 157018 in ag 2 (inode=67265882)
agi unlinked bucket 29 is 1214045 in ag 2 (inode=68322909)
agi unlinked bucket 30 is 1214430 in ag 2 (inode=68323294)
agi unlinked bucket 37 is 1213989 in ag 2 (inode=68322853)
agi unlinked bucket 39 is 1213991 in ag 2 (inode=68322855)
agi unlinked bucket 40 is 1213992 in ag 2 (inode=68322856)
agi unlinked bucket 41 is 1213993 in ag 2 (inode=68322857)
agi unlinked bucket 44 is 1213996 in ag 2 (inode=68322860)
agi unlinked bucket 49 is 1214001 in ag 2 (inode=68322865)
agi unlinked bucket 54 is 1214006 in ag 2 (inode=68322870)
sb_ifree 254, counted 228
sb_fdblocks 10399804, counted 10408087
        - found root inode chunk
Phase 3 - for each AG...
        - scan and clear agi unlinked lists...
        - process known inodes and perform inode discovery...
        - agno = 0
data fork in ino 1797907 claims free block 238369
imap claims a free inode 2180228 is in use, correcting imap and clearing inode
cleared inode 2180228
        - agno = 1
imap claims in-use inode 33968729 is free, correcting imap
        - agno = 2
        - agno = 3
        - process newly discovered inodes...
Phase 4 - check for duplicate blocks...
        - setting up duplicate extent list...
        - check for inodes claiming duplicate blocks...
        - agno = 0
        - agno = 1
        - agno = 2
        - agno = 3
entry "default.hostsfile" in shortform directory 565517 references free inode 2180236
junking entry "default.hostsfile" in directory inode 565517
Phase 5 - rebuild AG headers and trees...
        - agno = 0
        - agno = 1
        - agno = 2
        - agno = 3
        - reset superblock...
Phase 6 - check inode connectivity...
        - resetting contents of realtime bitmap and summary inodes
        - traversing filesystem ...
        - agno = 0
        - agno = 1
        - agno = 2
        - agno = 3
entry "tmp" in directory inode 100786852 not consistent with .. value (34441335) in inode 2180231,
junking entry
        - traversal finished ...
        - moving disconnected inodes to lost+found ...
disconnected dir inode 2180231, moving to lost+found
disconnected inode 67265882, moving to lost+found
disconnected inode 67313620, moving to lost+found
disconnected inode 68249293, moving to lost+found
disconnected inode 68249297, moving to lost+found
disconnected inode 68249300, moving to lost+found
disconnected inode 68322766, moving to lost+found
disconnected inode 68322853, moving to lost+found
disconnected inode 68322855, moving to lost+found
disconnected inode 68322856, moving to lost+found
disconnected inode 68322857, moving to lost+found
disconnected inode 68322860, moving to lost+found
disconnected inode 68322865, moving to lost+found
disconnected inode 68322870, moving to lost+found
disconnected inode 68322882, moving to lost+found
disconnected inode 68322909, moving to lost+found
disconnected inode 68322910, moving to lost+found
disconnected inode 68323294, moving to lost+found
disconnected inode 68324042, moving to lost+found
disconnected inode 68324047, moving to lost+found
disconnected inode 68324050, moving to lost+found
Phase 7 - verify and correct link counts...
resetting inode 33554498 nlinks from 451 to 452
resetting inode 100786852 nlinks from 3 to 2
resetting inode 2180228 nlinks from 2 to 3
resetting inode 2180237 nlinks from 1 to 2
Maximum metadata LSN (38:42014) is ahead of log (1:2).
Format log to cycle 41.

        XFS_REPAIR Summary    Thu Jan 19 06:06:46 2017

Phase		Start		End		Duration
Phase 1:	01/19 06:06:46	01/19 06:06:46	
Phase 2:	01/19 06:06:46	01/19 06:06:46	
Phase 3:	01/19 06:06:46	01/19 06:06:46	
Phase 4:	01/19 06:06:46	01/19 06:06:46	
Phase 5:	01/19 06:06:46	01/19 06:06:46	
Phase 6:	01/19 06:06:46	01/19 06:06:46	
Phase 7:	01/19 06:06:46	01/19 06:06:46	

Total run time: 
done
:/# 

Then perform

:/# xfs_repair dev/nvme0n1p3

The results are as follows

Phase 1 - find and verify superblock...
Phase 2 - using internal log
        - zero log...
        - scan filesystem freespace and inode maps...
        - found root inode chunk
Phase 3 - for each AG...
        - scan and clear agi unlinked lists...
        - process known inodes and perform inode discovery...
        - agno = 0
        - agno = 1
        - agno = 2
        - agno = 3
        - process newly discovered inodes...
Phase 4 - check for duplicate blocks...
        - setting up duplicate extent list...
        - check for inodes claiming duplicate blocks...
        - agno = 0
        - agno = 1
        - agno = 2
        - agno = 3
Phase 5 - rebuild AG headers and trees...
        - reset superblock...
Phase 6 - check inode connectivity...
        - resetting contents of realtime bitmap and summary inodes
        - traversing filesystem ...
        - traversal finished ...
        - moving disconnected inodes to lost+found ...
Phase 7 - verify and correct link counts...
done
:/# 

Mount can succeed, too

:/# mount -o rw dev/nvme0n1p3 /data0
[  853.650067] XFS (nvme0n1p3): Mounting V5 Filesystem
[  853.777152] XFS (nvme0n1p3): Ending clean mount
:/# cd data0/
:/data0# ls
bin   compass  etc   lib    lost+found	mnt  proc  run	 srv  tmp   usr
boot  dev      home  lib64  media	opt  root  sbin  sys  upan  var
:/data0# 

Let’s try that again

CentOS Linux 7 (Core)
Kernel 3.10.0-862.11.6.el7.x86_64 on an x86_64

localhost login: 

done

QT learning 3: configuration and testing of QT creator 2.4.1 development environment

1. System environment
Host operating system: Ubuntu 10.04
Host compiler: gcc4.4.3,
Cross compiler: arm-linux-gcc-4.3.2
Prerequisites: build three compiled versions of Qt4.6.3: PC,X86, ARM
 
2. Install
Qt_SDK_Lin32_offline_v1_2_en.run
Download address: http://www.developer.nokia.com/dp?uri=http%3A%2F%2Fsw.nokia.com%2Fid%2F8ea74da4-fec1-4277-8b26-c58cc82e204b%2FQt_SDK_Lin32_offline
 
Run it directly and follow the default steps to install it. It’s included
Qt creator — against 2.4.1
 
3. Configuration of Qt-Creator development environment
1. Start Qt-Creator.
2. In the QT-Creator menu bar Tools–>; Options opens the Options window.
3. On the left side of the Options screen, click Build & Run—> The right side of QtVersions displays the QTVersions setting interface.

 
4. Click Add on the right side to Add the path of qmake:

At this point, Qt- Creator is configured.


5 sample
Here is divided into two parts, first compiled under x86, and run under QVFB, and then compiled under ARM, moved to the development board to run.
From/usr/local/Trolltech QtEmbedded 4.6.3/demos copy books routines to root under/TMP folder.
 
5.1×86 compilation and debugging
5.1.1 Start Qt-Creator, File–>; Open File or Project,
Open the root/TMP/books/books. Pro.
 
5.1.2 Select Compiler

Click Finish and the screen appears

The lower on the left allows you to modify compiler-specific configurations at any time
 
5.1.3 Modify the configuration
Click and add the -qws parameter, because you want to run under QVFB

 
5.1.3 compile

5.1.3 run
Start the QVFB
#qvfb -width800 -height 480 &
Run

So this is the result
 
5.2 Compiling and debugging under ARN
Leave it on hold


Reference:
1. Qt embedded environment construction and transplantation
http://blog.chinaunix.net/uid-26119896-id-3141782.html
= = = = = = = = = = = = = = = = = = = = = = = = = = = = = = = = = = = = = = = = = = = = = = = = = = = = = = = = = = =
Make :arm-linux-g++:Command Not Found Make :arm-linux-g++:Command Not Found Make :arm-linux-g++:Command Not Found: Make :arm-linux-g++:Command Not Found: Make :arm-linux-g++:Command Not Found

It will appear as soon as it is turned on BTServer.exe -Application error (0xc0150002)

I have nothing to uninstall VS2015, looking at the C disk space is only a little, began to look for a large software uninstall, did not expect to uninstall some runtime library,
The result is a “Btserver.exe – application error” at 0xc0150002.
I continued to search for solutions, reinstalled the runtime, patched Microsoft Visual C++ 2005 SP1 Redistributable Package (x86) and Microsoft Visual C++ 2008, and
still didn’t work.
Later I saw Baidu know there is a method, uninstall the Bluetooth Driver that program, restart, it is good, then reinstall the Bluetooth Driver, then boot did not appear.

Attach the original author advice website: https://zhidao.baidu.com/question/1691955593795084148.html

Windows Visual C + + 2005 redistributable error 1935 solution

The reason: in the control panel, the wrong operation has deleted the vcredist_x86 2005
phenomenon: QQ2010 cannot be used, Nero 10 cannot be used, installation Arcgis10 failed!
solution, downloaded the vcredist_x86 sp1 installation on the Internet, the problem then appeared, the installation process is also very slow ~~~ finally appeared “Error 1935. PublicKeytoken =”1fc8b3b9a1e18e3b”,processirArchitecture=”x86″

, it turned out that the Windows service “Windows Installer service” did not start properly.
solve “Windows Installer service” launch exception, “error 1450: system resources insufficient, unable to complete the requested service”,
After analysis and search, it was found that it was caused by the residual installation of Arcgis9.3. The main reason was that the registration space was limited
error modification method after installation of Arcgis9.3:
1, in the run enter regedit to open registry editor
2, find HKEY_LOCAL_MACHINE\System\CurrentControlSet\Control
3, change the RegistrySizeLimit (REG_DWORD type) value to FFFFFFFF (base 10 is 4294967295)
4, restart the computer
Start the “Windows Installer Service” again, OK
Run vcredist_x86 2005 SP1 as administrator again (be careful not to put it in the Chinese directory and clear the contents of the TEMP folder), OK
QQ, Nero, Arcgis and other software, due to the VCR caused by abnormal start, need to delete clean (use makeup removal software to clear the cache), and then install it is OK

PCIe Lane flip and PN flip (Lane reverse and polarity)

For the convenience of wiring, PCIE supports lane rollover and PN rollover, but the following principles must be followed:
1. PN rollover has no restrictions, it can roll over part of lane, or only TX or RX
. PN rollover is the characteristic of the receiving end, which will perform PN rollover on the received data after detecting PN rollover.
Polarity inversion is a function of the receiver and not the transmitter. The trans-mitter never inverts its data. During link training, the receiver examines symbols 6 through 15 of the TS1 and TS2 ordered sets for inversion of the PExRP[n] and PExRN[n] signals. If an inversion is detected, then logic for the receiving lane automatically inverts received data. Polarity inversion is a lane function and not a link function. Therefore, it is possible for some lanes of link to be inverted and for others not to be
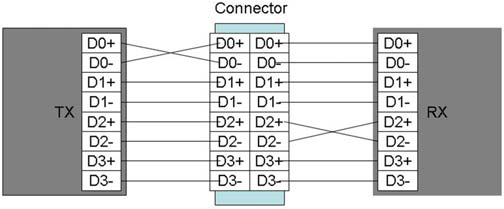
2, turn lane must turn over all, Part can’t flip
3, lane to flip the TX/RX must turn at the same time, You cannot just flip TX or RX
4, lane flip and PN flip can exist at the same time

Android studio simulator architecture choose arm or x86 to solve the problem of missing libraryexception

first of all, if your APP can be installed normally including third-party or self-compiled, then use x86, because the architecture of the virtual machine is very fast; If, like me, the so in the compiled APK is ARM, then an ARM-architecture virtual machine is required, otherwise the following error will be reported. X86 compatibility is not enough, many apps can not be installed or installed to play. Most emulators on the market are x86, so if you can’t install them, consider the reason why they don’t support the x86 architecture. Google official emulator, Intel x86 system mirror, opened KVM acceleration, the result installed several applications failed, such as qq various versions, jingdong client, touch input method, etc. The message is Failure [INSTALL_FAILED_NO_MATCHING_ABIS], presumably because these applications are not compatible with x86 devices. Baidu Takeaway and X-Plore were installed successfully.

after using the simulator to install the application software to run today, an error was found as follows:

MissingLibraryException: lib/x86/libgnustl_shared. So

02-07 02:53:39.122 7607-7639/com.gala.video E/AndroidRuntime: FATAL EXCEPTION: jobmanager-5-12
Process: com.gala.video, PID:>

02-07 02:53:39. 7607
com. Getkeepsafe. Relinker. MissingLibraryException: Lib/x86/libgnustl_shared. So
the at com. Getkeepsafe. Relinker. ApkLibraryInstaller. InstallLibrary (ApkLibraryInstaller. Java: 85)
the at Com. Getkeepsafe. Relinker. ReLinkerInstance. LoadLibraryInternal (ReLinkerInstance. Java: 180)
the at com. Getkeepsafe. Relinker. ReLinkerInstance. LoadLibrary (ReLinkerInstance. Java: 136)
the at com.getkeepsafe.relinker.ReLinkerInstance.loadLibrary(ReLinkerInstance.java:92)

my emulator is the default Android studio configuration when it was created and is an x86 architecture emulator. Why is the system an emulator of this architecture by default?Before Windows installed virtual machines, we had to turn on the BIOS virtual device switch: HAXM was needed to speed up the AVD emulator on an Intel CPU host.

  • step 1: enter the BIOS to enable VT (Virtualization Technology) option; Step 2: download Intel x86 Emulator Accelerator(HAXM install)

from the SDK Manager of Android studio

after we create an emulator, the default configuration is the x86 architecture, which has the advantage of fast speed. However, it has a big disadvantage of insufficient compatibility, which results in many applications compiled with ARM architecture cannot be installed, or the boot error is reported after installation. The above error means that the emulator you have turned on is x86, so the relevant SO library in your APP is also x86. However, in your packaged APP, only the SO library of ARM was found, so the error was reported. So what we’re going to do is create an ARM architecture virtual machine:

we configure an ARM processor architecture virtual machine as shown in the figure below:

select ARM virtual machine, lower right corner will prompt, this is more than 10 times slower than x86, pro test, may be more than 10 times slower.

of course you can increase the virtual machine memory a little bit:

after the above completion, start our ARM virtual machine, try to install apk can