Tag Archives: termux

Termux setting path environment variable

Problem description

When using termux, it is found that the permissions are not enough by using commands. After switching to root by using Su, it is found that many previous commands cannot be used

First, echo $path to view the environment variable of root

Results: in/SBIN/Su/Su/bin/Su/xbin/system/bin/system/xbin

It is found that these three are all in the root path, without/data/data/com.termux/files/usr/bin, so the command here can’t be executed naturally

Exit switch to normal user.

Echo $path view environment variables

The value is/data/data/com. Termux/files/usr/bin/data/data/com. Termux/files/usr/bin/applets

That is to say, you just need to tell root the variables of ordinary users

Here is the solution——————————————————————————————-

In order to ensure the security of the system, the temporary variable is used to save the error

export PATH=/data/data/com.termux/files/usr/bin:/data/data/com.termux/files/usr/bin/applets:$PATH

(tell root the executable

Note that there is no space beside the equal sign, the colon in English: segmentation, the front part is the path value of ordinary users: the Lib path of ordinary users (because some commands also need the library files we download), just paste it

export LD_ LIBRARY_ PATH=/data/data/com.termux/files/usr/lib

(link LIB)

be careful!! For the sake of safety, the operation I posted is temporary. Exit will restore the original identity or turn it off or reopen it. But it’s absolutely safe.

For your convenience, you can create a script to quickly use the downloaded function.

Cd ~ (home directory)

VIM getmytermuxorders (create a file)

Enter the following:

#!/bin/bash
export PATH=/data/data/com.termux/files/usr/bin:/data/data/com.termux/files/usr/bin/applets:$PATH
export LD_LIBRARY_PATH=/data/data/com.termux/files/usr/lib
echo "LYM_nb" 

: WQ save exit

Then exit returns to the original user

When you want to use the root permission again in the future:

Su or TSU comes to root

Run the source command directly in the home directory

source getMyTermuxOrders

If output lym_ NB means that all bin functions of termux have been obtained

You can also use export, echo $path, env and other commands to confirm
Playing audio in termux

I have tried all kinds of apt install software, using Python library to write code to run (all kinds of libraries are not available), using java to write code to run (using Android’s own API), all failed. The reasons all point to one point: there is no default audio.

Analysis: because the execution environment is termux, there is no default setting in termux. Android is the real system of the outer system of termux. As long as the sound card, driver, default device and so on are set in termux, they can also be executed after setting.

Here’s a simpler way:

Premise: tinyalsa, root identity, a 44.1KHz audio, turn on the volume

Play command:

./tinyalsa play ~/test.wav

 
View command:

/tinyalsa tinymix

./tinyalsa tinypcminfo -D /proc/asound/cards

cat /proc/asound/cards

 
Set the output device to speaker:

/tinyalsa tinymix 0 SPK

 
Write the play command into a script, give him permission, you can play and use it freely!

After a variety of searches, a better solution was found:

Better and simpler solutions

CANNOT LINK EXECUTABLE: cannot locate symbol

This problem occurs in termux. You can’t locate the link library, that is, you can’t find the dependent library file. You just need to put the corresponding library in the environment variable.

If his error message contains   Referenced by/system/lib64 /, then add the corresponding location to the environment variable and execute the following command

export LD_LIBRARY_PATH=$LD_LIBRARY_PATH:/system/lib64/


Termux installing redis

When I compile and install redis under termux, there are such errors as use of undeclared identifier.. my CC compiler and its dependent components are the latest version, but there are still problems. The reason is unknown. It indicates that the method is not declared at compile time. It is estimated that the CPU is weak and the compile execution order is related. It is just a guess.

Use the following solution directly:

apt install redis

That’s it. The bin executor is placed in usr/bin by default, and the configuration file is in usr/etc.

termux Failed to initialize runtime

Failed to initialize runtime solution appears when using ECJ or DX command in termux

The error report said that I had to check the log. Because I didn’t know much about Android system, I chose to check what ECJ did

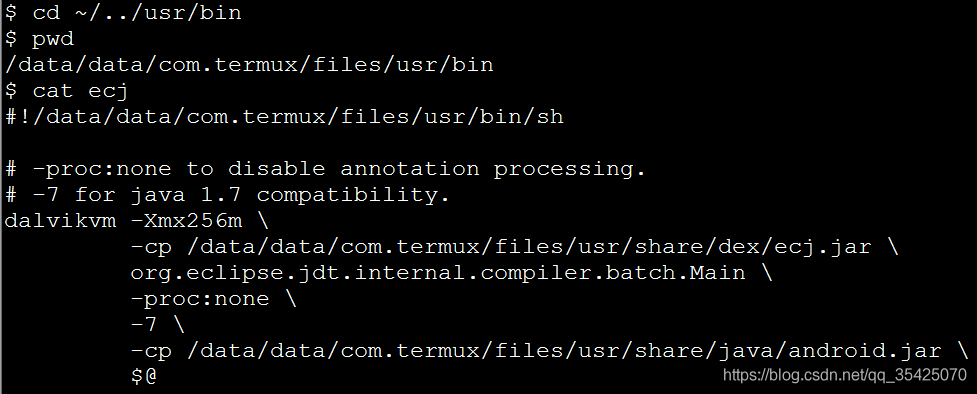
Enter the path as shown in the figure

cd ~/../usr/bin

Cat ECJ later found that he was actually executing the command dalvikvm

So cat dalvikvm finds the following in this command

The two lines I marked had no comments

Open dalvikvm through VI or vim and comment out the above two lines. You can use it normally

Note out the following two lines

export ANDROID_ DATA=/data/data/com.termux/files/usr/var/android/
mkdir -p $ANDROID_ DATA/dalvik-cache

)You can use ECJ

Cause analysis:

Because the directory will exist after being used, the execution fails

 
Here is the original: https://github.com/termux/termux-packages/issues/1107

Mobile phone code termux

Recommend two apps, termux and better terminal, and search directly in the app store.

The purpose of using this app is to let beginners experience learning Linux system, or let you have a portable server, intranet penetration and so on.

Below is how to turn on SSH

———————

With termux, you can easily convert your mobile phone into Linux to practice or learn

If you feel inconvenient, you can use Google input method or hacker input method

Feel not used to external keyboard, OTG adapter can be used, about five dollars look, very convenient, you can also read and write U disk

If you think the screen is small, you can use SSH to connect your mobile phone. You can use any SSH tool on your computer to connect your mobile phone

Common shortcut keys for mobile phone to operate termux——————–

The Ctrl key is a key commonly used by end users – but most touch keyboards don’t have it. To do this, termux uses the volume down button to simulate the Ctrl key.  
for example, on the touch keyboard, press to decrease the volume button+   L sends the same input as pressing Ctrl + L on the hardware keyboard.

Ctrl+A  -& gt; Move the cursor to the beginning of the line Ctrl + C  -& gt; Abort the current process Ctrl + d  -& gt; Log off terminal session Ctrl + e  -& gt; Move the cursor to the end of the line Ctrl + k  -& gt; Delete from cursor to end of line Ctrl + L  -& gt; Clear terminal Ctrl + Z  -& gt; Suspend (send sigtstp to) the current process

The volume up key can also be used as a special key to generate a specific input

volume + e  -& gt; ESC key volume + T  -& gt; Tab volume + 1  -& gt; F1 (and volume increase + 2 → F2, etc.) volume increase + 0  -& gt; F10 volume + B  -& gt; Alt + B, use readLine to return a word volume plus + F  -& gt; Alt + F, forward a word when using readLine volume + x  -& gt; Alt + x volume + W  -& gt; Up arrow key volume + a  -& gt; Left arrow key volume + s  -& gt; Down arrow key volume + d  -& gt; Right arrow key volume + L  -& gt; | ( Pipe character) volume plus + H  -& gt; 〜( Wave character) volume plus + U  -& gt; _ ( Underline character) volume plus + P  -& gt; Previous volume plus + n  -& gt; Next page volume up +.  -& gt; CTRL + \ \ (sigquit) volume + V  -& gt; Display volume control volume plus + Q  -& gt; Show additional key view

Suggestions———————————————————————–

It is recommended that beginners do not always run as root. If you want to use root, you can

su

After the command is switched to root

exit

Return to the original identity

 
Openssh needs to be installed in termux. As we all know, Linux has two major distributions.

General Command

uname -a

You can view the kernel information of this machine. For more details, execute the following command

 cat /proc/version 

For the convenience of operation, I use SSH to connect my Android phone,

Open SSH: I’m afraid this is the most detailed one for termux to open SSH

https://blog.csdn.net/qq_ 35425070/article/details/84789078


When installing pyaudio, an error is reported: failed error: portaudio. H: there is no such file or directory

When installing pyaudio, an error is reported: failed error: portaudio. H: there is no such file or directory

 
The operation of pyaudio depends on the portaudio library. You should first install a portaudio library

Portaudio installation steps:

A) Download PortAudio Library http://portaudio.com/download.html , select the latest tgz, upload it to Linux or termux and place it where you want to install it. Termux: I put it in/data/data/com.termux/files/usr/share, and CD it to this directory

B) tar – zxvf file name         Unzip the downloaded files without tar, such as apt get install tar

C) enter the decompressed portaudio file and execute the following commands in turn:

    ./configure

(configure command)

This step is generally used to generate makefile to prepare for the next step of compilation. You can control the installation by adding parameters after configure. For example, the code:./configure – prefix =/usr means to install the software under/usr, and the executable file will be installed in/usr/bin (instead of the default/usr/local/bin), The resource file will be installed in/usr/share (instead of the default/usr/local/share). At the same time, some software configuration files can be set by specifying the – sys config = parameter. Some software can also add – with, – enable, – without, – disable and other parameters to control the compilation. You can view the detailed instructions and help by allowing./configure – help.

In termux, this step is set to

./configure –prefix=/data/data/com.termux/files/usr

    make     compile

    make install     Installation

4. Install pyaudio library, PIP3 install pyaudio