The OpenGL Super Bibliography (Fifth Edition) and the OpenGL Programming Guide (Eighth Edition) are two practical OpenGL learning books. The difference is that the former has more examples and is easier to follow step by step, while the latter focuses on the API, so it’s best to read the former first.
OpenGL class library configuration has been troubled by many beginners, I browse the configuration methods of various reference articles, found that in VS2015 configuration encountered many problems, after a few days of groping finally solved.
This article mainly refer to https://www.cnblogs.com/zpcdbky/p/6724772.html
http://blog.csdn.net/brillianteagle/article/details/51623208
http://www.it165.net/pro/html/201504/38164.html
Thanks to the contributions of the authors.
In this paper, all the resources have been packaged well, download address: http://download.csdn.net/download/shs1992shs/10142198
I. GLEW configuration
Glew’s official website: http://glew.sourceforge.net/
glew making official homepage: https://github.com/nigels-com/glew
glew is a cross-platform OpenGL extensions library, supporting multiple operating system, the url has to provide the latest version of glew.

1. Download Source and Binaries respectively, where the Binaries version is the compiled glew file and the Source is the Source.
2. Find the VS2015 installation directory, if it is installed in C disk, most is similar to C: Program Files(x86)\Microsoft Visual Studio 15.0 such path (the next is Microsoft Visual Studio 14.0), can also be in other disk directory; For the convenience of expression, the following will be explained according to the directory “D:\ Software Installation \VS2015”.
3. Locate the C++ header directory, such as “D:\ software installation \VS2015\VC\include”, and create a new GL folder under the include directory (if there is none).
4. Page 1 Binaries glew – 2.1.0/include/GL folder 4 header files are copied to 3 GL in the folder.
5. Copy glew32.dll from Binaries version to D:\ software installation \VS2015\VC\bin.
6. Copy the Binaries version of glew-2.1.0\lib\Release\Win32 to the directory D:\ software installation \VS2015\VC\lib.
Note that it is not necessary to copy the DLL file to C:\Windows\System32 or C:\Windows\SysWOW64.
At this point, glew is configured.
FreeGLUT configuration
1. GLEW obtains the latest version of OpenGL API. The FreeGLUT is used to replace the GLUT library. So, the glew and freeGLUT libraries are configured to completely replace the glu and GLUT libraries, and the latest version of the API is available for Shader programming.
f
The latest stable version of ReeGLUT is 3.0, which can be downloaded at:
http://freeglut.sourceforge.net/
Open the page and see the following section:
Download the Prepackaged version of MSVC and click the red button to get to the next page
Click on the red box to download the file named FreeGlut-MSVC-3.0.0-2.MP.zip
2.
“FreeGlut-MSVC-3.0.0-2.MP.zip” to extract the FreeGlut-MSVC-3.0.0-2.MP.zip folder.
There are four header files in the FreeGLUT /include/GL directory. Copy the three header files except GLUT. H to the D:\ software installation \VS2015\VC\include\GL directory.
Copy the FreeGlut. DLL file from FreeGlut. bin to D:\ software installation \VS2015\VC\bin.
4. Copy the FreeGlut. lib file to D:\ software installation \VS2015\VC\lib.
At this point, the FreeGLUT is configured.
Third, GLUT configuration
The GLUT library is old and hasn’t been updated since 2000, and many of them can be downloaded online or packaged with the resource bundles I uploaded.
Glut.h, Glut.dll, Glut32.dll, Glut.lib, Glut32.lib. Glut.h, Glut.dll, Glut32.dll, Glut.lib, Glut32.lib
2. Copy Glut. h to D:\ software installation \VS2015\VC\include\GL.
3. Copy ULT. DLL, GLUT32.DLL to D:\ software installation \VS2015\VC\bin.
4. Copy Glut. lib and Glut32. lib to D:\ VS2015\VC\lib.
At this point, GLUT is configured.
Note: When using the OpenGL Super Bibliotheca example, you need to add #pragma comment(lib,”gltools.lib”) to the beginning of the program. Used to connect to gltools.lib.
Four, GLTools configuration
The GLTools library is provided by the author of the OpenGL Super Bibliome. It is cumbersome to configure. I can use the files packaged in my resource pack, or I can compile them myself.
1. Copy all 11 header files from the gltools\include directory to the D:\ software installation \VS2015\VC\include directory (note the include directory, not the GL subdirectory).
2. Copy gltools.lib to D:\ software installation \VS2015\VC\lib.
> At this point, GLTools is configured.
> At this point, OpenGL is configured.
Self-compilation method:
Unzip the resource bundle and get the gltools folder. This folder has two folders, include and SRC, in its directory. Since GLTools compilations depend on glew, you can see that GLTools \include\GL is a version of the glew header, and GLTools \ SRC has the glew.c source.
Since you have already used the latest version of glew-2.1.0, you need to replace all the header files in the gltools\include\GL directory and select
with
Glew-2.1.0 version glew.c source file replaces glew.c in gltools\ SRC. (The Source version of glew-2.1.0\ SRC \glew.c as mentioned earlier).
Note 1: GLTools in the resource pack is all packaged and does not need to be changed. Readers who need to update the resource pack should follow the above method.
Note 2: when using the OpenGL super treasure dian example, found that transformation pipeline header file GLGeometryTransform. H compile error, a large number of can’t find the identifier, so the revised, if readers encounter such problems, in the resource bundle of gltools within a folder GLGeometryTransform – fix GLGeometryTransform. H header file to replace to D: \ software \ VS2015 VC \ \ the include directory, can be normal use.
Generate gltools. Lib
1. Copy all 11 header files from the gltools\include directory to the D:\ software installation \VS2015\VC\include directory (note the include directory, not the GL subdirectory).
2.
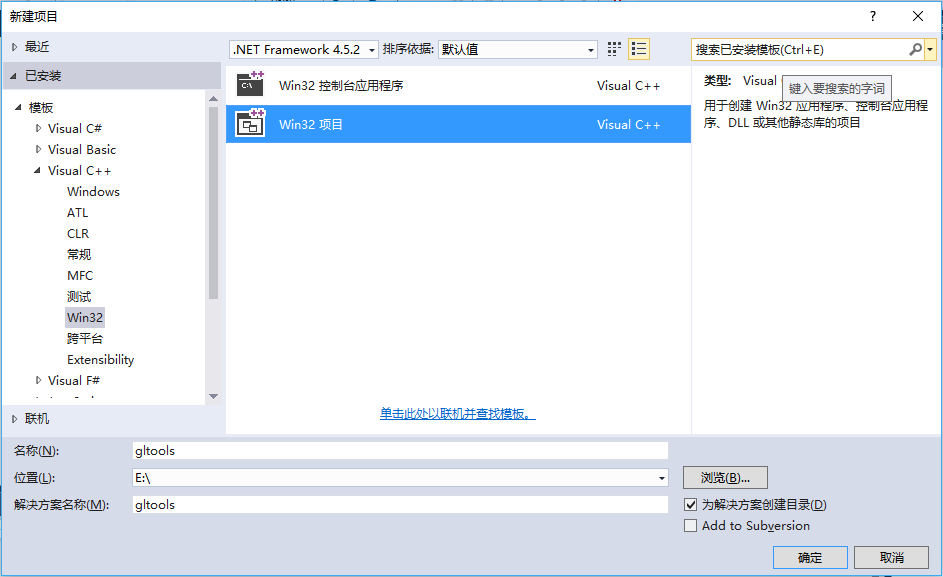
Start VS2015 and create a Win32 application called GLTools.
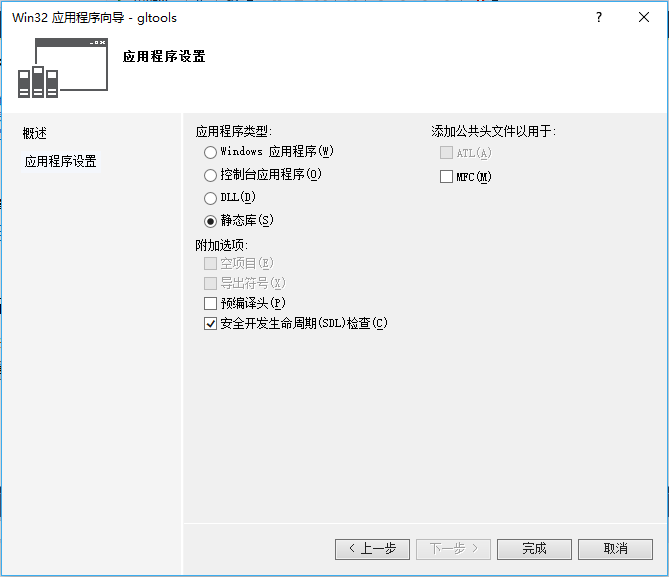
3. Select “Static Library” and uncheck the “Precompiled Header” box.
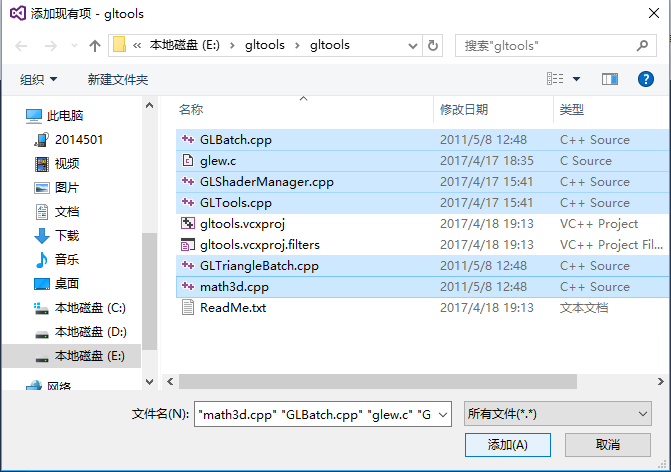
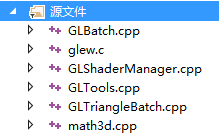
4. Copy the six files in the gltools\ SRC directory to the project directory you just created (for example, E: gltools\gltools).
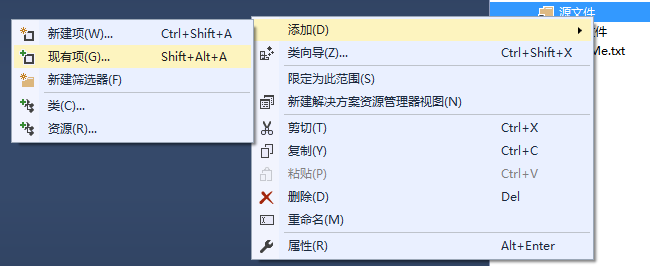
5. Right-click ‘Source File’ –>; “Add”, & gt; “Existing Items”, add 6 of the 4 files to the project.
C/C++ > C/C++ > C/C++ > Add _CRT_SECURE_NO_WARNINGS to the preprocessor definition to the right of the preprocessor,
Otherwise, the function will be warned that it is not safe to use and will not compile successfully.

7. To generate – & gt; Generate gltools
I have seen a compilation in Release mode and a compilation in Debug mode in different articles, so far I can’t see the specific difference, just to be safe, I can compile in both modes.
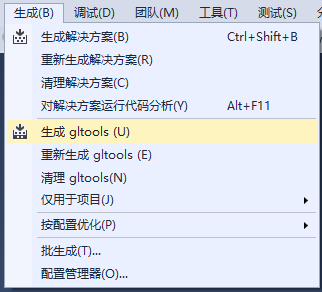
There were a bunch of “DLL link inconsistencies” warnings on the compile, but the compilation was successful.
8. The generated gltools.lib files can be found in the E: gltools\Debug directory and the E: gltools\Release directory respectively. To copy the gltools.lib file from the Release file, refer to the lib file placement format of FreeGLUT. You can copy the gltools.lib file from the Release file to the D:\ software installation \VS2015\VC\lib directory.
At this point, you are done.
Read More:
- Vs2015 configuring OpenGL development environment: configuration of glfw library and glad Library
- Vs configuration of OpenGL development environment: configuration of glfw library and glad Library
- Configuration of OpenGL development environment under Windows environment, win10 + vs2019 + glfw + glad
- OpenGL environment configuration under VS2010 / vs2012 / vs2015
- Configuring OpenGL development environment in win10 + vs2015 (including the method of installing 32-bit and 64 bit libraries)
- Construction of vs2015 OpenGL configuration environment
- Vs2015 OpenGL environment configuration
- Vs2015 + OpenGL environment configuration
- Problems encountered in vs2015 configuration using OpenGL environment
- On the configuration of OpenGL Red Book eighth edition environment in vs2013
- Vs2015 + PCL. 1.8.1 (win10) environment configuration
- Simple configuration of glfw + glad in vs2015 OpenGL development environment
- OpenGL + vs2015 environment configuration problem solving
- (64 bit) OpenGL configuration + vs2017 + glew + glfw
- Configure OpenGL development environment (vs2015)
- The solution of using OpenGL’s Glu Library in qt5.2 under win7
- Vs2015 configuring OpenGL (glfw Library)
- PCL environment configuration (pcl1.8.1, vs2017, win10)
- OpenGL environment configuration
- [VTK] vtk8.2.0 + vs2015 + win10 compilation and configuration