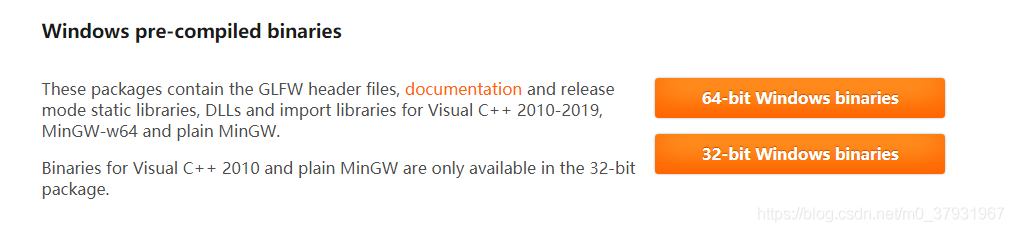
GLFW library configuration 1. The first step, look up a lot of tutorials are selected directly on the web site to download GLFW source code, and then use CMake program compiled, but I don’t know why I always make mistakes during compilation, so finally give up this way, choose directly on the website to download the 64 – bit Windows precompiled binary 】, the diagram below
After you download it, copy the included file and the corresponding version of the library (because mine is vs2019) lib-vc2019 and place it in a fixed location (create a new folder to put both of them in it), such as my location under the path C: Program Files\OpenGL
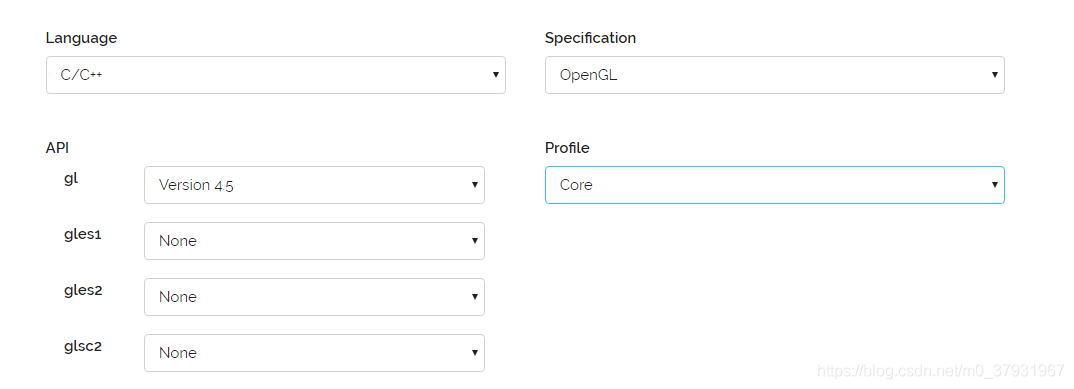
2. The second step is the configuration of GLAD. Go to the GLAD online service page and select the corresponding options after entering it, as shown in the picture
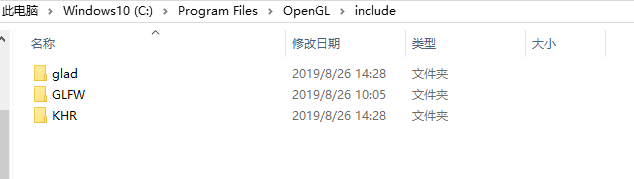
You will get a Glad. Zip file. Download it and unzip it. Copy the two Files Glad and Khr in the include folder and place them in the C:\Program Files\OpenGL\ Include folder in the path of our first step
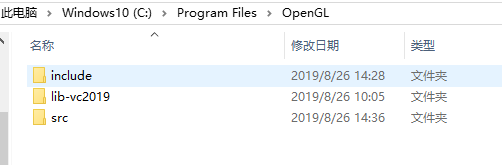
Copy the SRC folder to the path C: Program Files\OpenGL, as shown in the figure
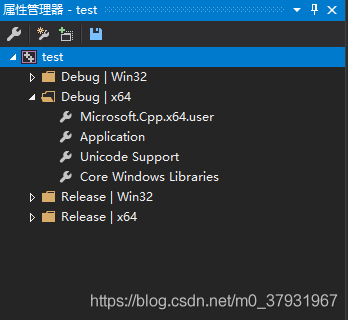
3. Next, open VS2019 and create a new blank item. Click “Other Window” in “View” in the menu bar to find “Property Manager”, as shown in the figure below
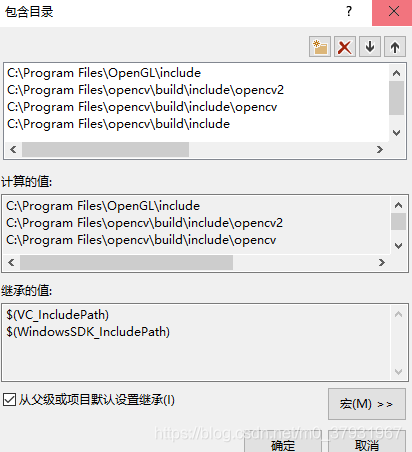
Double click the Debug | x64 “folder” Microsoft. Cpp. X64. User], click on the vc + + directories add directory contains 】 【 in 】 directory, add, the following figure, OpenCV everyone here don’t tube, just add the OpenGL.
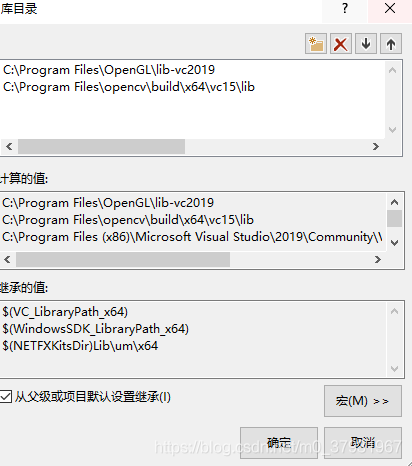
Configuration engineering library catalog, is also a double click the Debug | x64 】 in the folder. Microsoft. Cpp x64. User 】 【, click on the vc + + library directory 】 【 in 】 to add, as shown, also don’t tube of OpenCV.
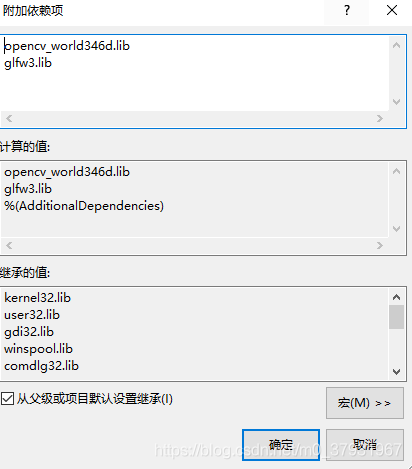
Link library configuration, is also a double click the Debug | x64 】 in the folder. Microsoft. Cpp x64. User 】 【, click on the “input” of the “connector”, is added in the “additional dependencies” library Files and library Files in the C: \ Program Files \ OpenGL \ lib – vc2019, copy and paste the name to the “additional dependencies”, as shown in figure
At this point, our OpenGL environment is configured, but each time we create a new project, we need to add the glad.c file under the path C: Program Files\OpenGL\ SRC to the source of our project, and that’s it.
4. Test
The code is as follows:
After you download it, copy the included file and the corresponding version of the library (because mine is vs2019) lib-vc2019 and place it in a fixed location (create a new folder to put both of them in it), such as my location under the path C: Program Files\OpenGL
2. The second step is the configuration of GLAD. Go to the GLAD online service page and select the corresponding options after entering it, as shown in the picture
You will get a Glad. Zip file. Download it and unzip it. Copy the two Files Glad and Khr in the include folder and place them in the C:\Program Files\OpenGL\ Include folder in the path of our first step
Copy the SRC folder to the path C: Program Files\OpenGL, as shown in the figure
3. Next, open VS2019 and create a new blank item. Click “Other Window” in “View” in the menu bar to find “Property Manager”, as shown in the figure below
Double click the Debug | x64 “folder” Microsoft. Cpp. X64. User], click on the vc + + directories add directory contains 】 【 in 】 directory, add, the following figure, OpenCV everyone here don’t tube, just add the OpenGL.
Configuration engineering library catalog, is also a double click the Debug | x64 】 in the folder. Microsoft. Cpp x64. User 】 【, click on the vc + + library directory 】 【 in 】 to add, as shown, also don’t tube of OpenCV.
Link library configuration, is also a double click the Debug | x64 】 in the folder. Microsoft. Cpp x64. User 】 【, click on the “input” of the “connector”, is added in the “additional dependencies” library Files and library Files in the C: \ Program Files \ OpenGL \ lib – vc2019, copy and paste the name to the “additional dependencies”, as shown in figure
At this point, our OpenGL environment is configured, but each time we create a new project, we need to add the glad.c file under the path C: Program Files\OpenGL\ SRC to the source of our project, and that’s it.
4. Test
The code is as follows:
#include <glad/glad.h>
#include <GLFW/glfw3.h>
#include <iostream>
using namespace std;
void framebuffer_size_callback(GLFWwindow* window, int width, int height);
int main() {
glfwInit();
//glfwWindowHint(GLFW_CONTEXT_VERSION_MAJOR, 3);
//glfwWindowHint(GLFW_CONTEXT_VERSION_MINOR, 1);
//glfwWindowHint(GLFW_OPENGL_PROFILE, GLFW_OPENGL_CORE_PROFILE);
GLFWwindow* window = glfwCreateWindow(800, 600, "LearnOpenGL", NULL, NULL);
if (window == NULL) {
cout << "Failed to create GLFW window" << endl;
glfwTerminate();
return -1;
}
glfwMakeContextCurrent(window);
if (!gladLoadGLLoader((GLADloadproc)glfwGetProcAddress)) {
std::cout << "Failed to initialize GLAD" << std::endl;
return -1;
}
glViewport(0, 0, 800, 600);
glfwSetFramebufferSizeCallback(window, framebuffer_size_callback);
while (!glfwWindowShouldClose(window)) {
glfwSwapBuffers(window);
glfwPollEvents();
}
glfwTerminate();
return 0;
}
void framebuffer_size_callback(GLFWwindow* window, int width, int height) {
glViewport(0, 0, width, height);
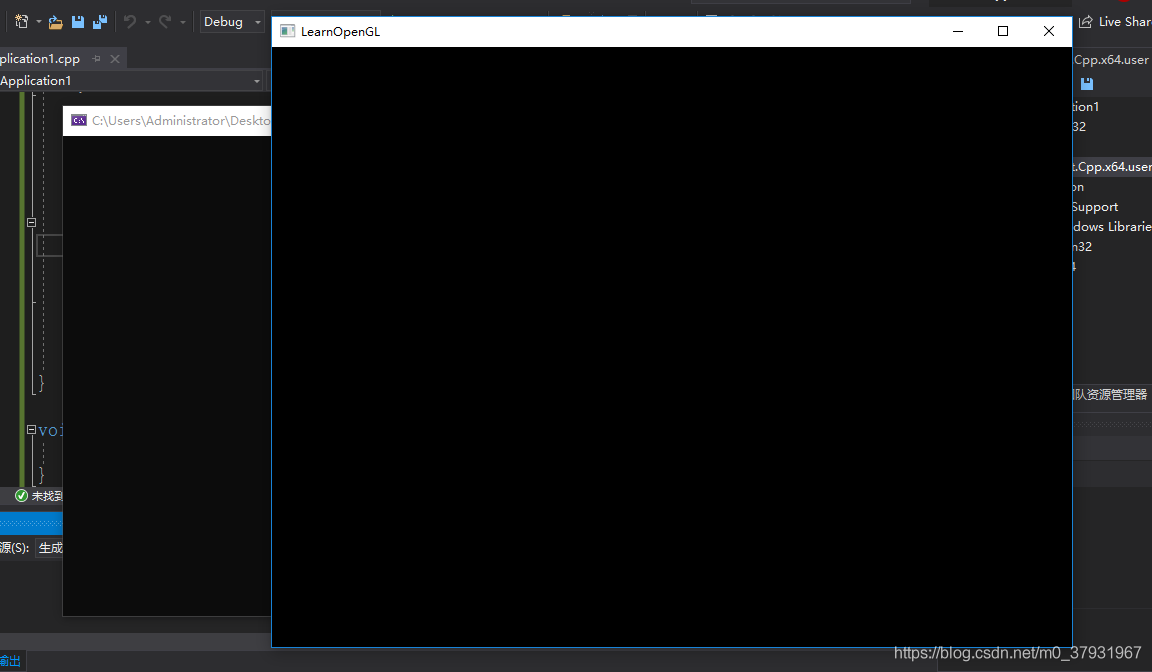
}The results show that the configuration was successful.
Read More:
- Simple configuration of glfw + glad in vs2015 OpenGL development environment
- Vs configuration of OpenGL development environment: configuration of glfw library and glad Library
- Vs2015 configuring OpenGL development environment: configuration of glfw library and glad Library
- Configure OpenGL development environment (glfw3 + glad) once and for all with visual studio
- Vs2013 + glfw + glew configure OpenGL development environment
- Vs2015 OpenGL environment configuration
- Configuring OpenGL development environment in win10 + vs2015 (including the method of installing 32-bit and 64 bit libraries)
- OpenGL class library and environment configuration under win10 and vs2015
- Construction of vs2015 OpenGL configuration environment
- Clion MinGW super fast configuration OpenGL development environment
- OpenGL development environment configuration [vs2017] + common problems
- Configure OpenGL development environment (vs2015)
- OpenGL environment configuration under VS2010 / vs2012 / vs2015
- Vs2015 + OpenGL environment configuration
- The simplest way to configure OpenGL development environment with vs2015
- On the configuration of OpenGL Red Book eighth edition environment in vs2013
- (64 bit) OpenGL configuration + vs2017 + glew + glfw
- A series of problems in configuring OpenGL development environment in vs2015
- Configuring glfw library and glad Library in opengl-vs2015
- Vs2015 + PCL. 1.8.1 (win10) environment configuration