[resolved] error running Eclipse: Failed to load the JNI Shared library
January 23, 2013 1:57 PM
crifan
has 113,516 onlookers
4 comments
[question]
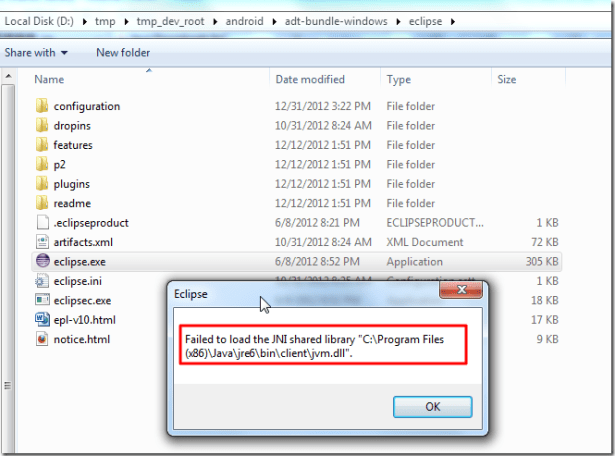
running Android ADT, that is, Eclipse error:
Failed to load the JNI shared library
C:\Program Files (x86)\Java\jre6\bin\client\jvm.dll
where the background is:
1. It has been able to run normally before, that is, it has installed JRE6 normally.
2. JRE6 was later deleted.
3. Just went to reinstall JRE6, the result is still the same error.
4. And has been determined:
C:\Program Files (x86)\Java\jre6\bin\client\jvm.dll
exists.
[solution]
1. Now try to figure out why it still doesn’t work.
do you need to restart the computer??
2. Take a casual look at the current eclipse configuration:
D:\tmp\tmp_dev_root\android\adt-bundle-windows\eclipse\eclipse.ini
is:
The
| – Dosgi. RequiredJavaVersion = 1.6
is clearly a requirement that Java be version 1.6. . Reference: http://aquilo.diandian.com/post/2012-05-27/21832516 doesn’t feel very helpful. 4. http://dongdong1314.blog.51cto.com/389953/490211 and make sure that the JDK installed earlier is jdk-6-windows-amd64.exe is indeed 64-bit. It still doesn’t work. 5. Reinstall jdk-6-windows-amd64.exe let’s try that. . 6. There’s definitely a problem with that. because it says C:\Program Files (x86)\ means eclipse wants 32-bit Java. so, again, it looks like we need to find, is it somewhere, the environment variable, or is it this path that’s left in the registry, to delete it and update it to the latest C:\Program Files\ Java path is ok. 7. Sure enough, in the PATH environment variable, you see that there are two java-related paths:
, so that’s easy. to delete the old path: C:\Program Files (x86)\Java\jre6\bin turns out to be the same problem. 8. Finally, it turns out that the environment variable is JAVA_HOME=C:\Program Files (x86)\Java\jre6 so, you never find the corresponding value, now change it to: JAVA_HOME = C: \ Program Files \ Java \ jdk1.6.0 and, in PATH, we already have: %JAVA_HOME%\bin , that should do it. to try, and sure enough, you can normally run Eclipse, here ADT: when running something java-based, here is Eclipse (ADT for developing Android), if it appears:
If it’s or something like that, it’s easy, to:
0
in addition, hint: 64-bit (Win7) system, the corresponding software installation directory:
Read More:
|