Category Archives: How to Fix

Centos7 installing Kafka

Download kafka
website: http://kafka.apache.org/
enter the url: http://kafka.apache.org/downloads
System environment
1, the operating system: 64 CentOS7
2, JDK version: 1.8.0 comes with _271 version
3, they are: they are – 3.4.6
4, three server deployment success: 192.168.192.150; 192.168.192.152; 192.168.192.155;
Pre-setting:

[root@localhost /]# timedatectl set-timezone Asia/Shanghai
root@localhost /]# timedatectl
[root@localhost /]# timedatectl
[root@localhost /]# timedatectl
[root@localhost /]# timedatectl

[root@master /]# yum-y install NTP
p1
[>daoplaceholder1 /]# ntpdate ntp1.aliyun.com
hostname ectl set-hostname master
stname ectl set-hostname node1
h>ame ectl set-hostname node2
hostname ectl set-hostname node2

192.168.192.150 master
2.168.192.152 node1
1>68.192.155 node2
192.168.192.155

127.0.0.1 localhost
: 1 localhost
1>68.93.150 master
192.168>152 node1
192.168.93.15>de2
192.168.93.155 node2

192.168.93.155 nod> br> If you change the hosts in Windows 10, you can copy this file to the desktop and add the above contents. Then replace the hosts file under C:\Windows\System32\ Drivers \etc with
.

props. Put (consumerConfig. Bootstrap_servers_config,”node1:9092,node2:9092″);
tar-zxvf /usr/local/soft/kafka_2.11-2.2.0.tgz -c /usr/local/ kafka
tar-zxvf /usr/local/soft/kafka_2.11-2.2.0.tgz -c /usr/local/
2, configuration, kafka
[root @ localhost] # vi/usr/local/kafka_2. 11-2.2.0/config/server properties
Kafka’s configuration information is configured in server.properties
Find the following two lines of code and comment them separately
#broker.id=0
#zookeeper.connect=localhost:2181
Modify the directory where the logs are stored
The log. The dirs =/kafka_2. 11-2.2.0/kafka – logs
Add the following three configurations at the bottom of the file:
Broker. Id = 1
zookeeper. Connect = 192.168.192.150:2181192168 192.152:2181192168 192.155:2181

Listeners = PlainText :// Master :9092 Listeners :// Master :9092

[root@localhost local]# CD kafka2.11-2.2.0 /
root@localhost kafka2.11-2.2.0]# mkdir kafka-logs
[root@localhost local]# CD kafka2.11-2.2.0 /
[root@localhost kafka2.11-2.2.0]# mkdir kafka-logs

Note: If it is a stand-alone version, the default is fine, we do not need to change anything. Now we are configuring the cluster, so we need to configure some parameters
1), Broker. id: Each machine cannot be the same
2), ZooKeeper. Connect: Since I have 3 ZooKeeper servers, I set ZooKeeper. Connect to 3 servers and must add all of them
3), Listeners: Listeners must be set when configuring the cluster, otherwise the leader error will not be found for future operations
WARN [Producer clientId = console – Producer] Error while fetching the metadata with the correlation id 40: {test = LEADER_NOT_AVAILABLE} workClient (org.apache.kafka.clients.Net)
4) Notice that the two servers, ZooKeeper. Connect, are configured the same as here, but the Broker. ID and Listeners cannot be configured the same
5 copies, kafka to two other servers
[root @ localhost config] # SCP – r/usr/local/kafka_2. 11-2.2.0 [email protected]:/usr/local/
[root @ localhost config] # SCP – r/usr/local/kafka_2. 11-2.2.0 [email protected]:/usr/local /
You will be asked to enter the password of the target machine. Just follow the instructions and modify the Broker. id and Listeners of the two servers as follows:
6, 192.168.192.152
[root @ localhost] # vi/usr/local/kafka_2. 11-2.2.0/config/server properties
Then a change on the broker. Id = 2 and listeners = PLAINTEXT:// 192.168.192.152:9092, the zookeeper. Connect don’t need to change are the same
Broker.
id = 2 zookeeper. Connect = 192.168.192.150:2181192168 192.152:2181192168 192.155:2181
listeners = PLAINTEXT:// node1:9092
7, 192.168.192.155
[root @ localhost] # vi/usr/local/kafka_2. 11-2.2.0/config/server properties
Then a change on the broker. Id = 3 and listeners = PLAINTEXT:// 192.168.192.155:9092, the zookeeper. Connect don’t need to change are the same
Broker. Id = 3
zookeeper. Connect = 192.168.192.150:2181192168 192.152:2181192168 192.155:2181
listeners = PLAINTEXT:// 2:9092
If the firewall has been turned off, it can be ignored.
All three machines must be turned on. Kafka communication is conducted through port 9092 by default, which is the Listed Listeners we have provided above
[root@localhost config]# firewall-cmd –zone=public –add-port=9092/tcp –permanent
[root@localhost config]# firewall-cmd –reload

[root@localhost /]# /usr/local/ ZooKeeper -3.4.6/bin/ zkserver.sh start
[root@localhost /]# /usr/local/ ZooKeeper -3.4.6/bin/ zkserver.sh start
[root@localhost /]# /usr/local/ ZooKeeper -3.4.6/bin/ zkserver.sh start
10, start, kafka,
three is to launch the
[root @ localhost /] #/usr/local/kafka_2. 11-2.2.0/bin/kafka – server – start. Sh – daemon/usr/local/kafka_2. 11-2.2.0/config/server properties

[root@localhost /]# JPS
87 JPS
9>kafka
9224 Kafka
9224 Kafka
[root@localhost /]# CD /usr/local/kafka_2.11-2.2.0/
root@localhost kafka_2.11-2.2.0]# bin/ kafka-Topics. Sh –create — ZooKeeper 192.168.192.150:2181 –replication-factor 1 –partitions 1 –topic test
Created topic test.
If successful, it outputs: Created Topic “test”.
13, see the topic
while 192.168.192.150 created on the topic, but the other two machine also can see that the 192.168.192.152 client
[root@localhost /]# CD /usr/local/kafka_2.11-2.2.0/
[root@localhost kafka_2.11-2.2.0]# bin/ kafka-Topics — List — ZooKeeper 192.168.192.152:2181
st
Note: The IP here can be 192.168.192.150, 192.168.192.152, 192.168.192.155. Themes can be seen on any of the three servers


root@localhost kafka_2.11-2.2.0]# bin/kafka-console-producer.sh –broker — list 192.168.192.150:9092 –topic test
>> a
> b
> c
# bin/kafka-console-consumer.sh –bootstrap-server 192.168.192.152:9092 — Topic test –from — Beginning
a

c>

Running course of Kafka in Windows Environment

Start ZooKeeper, run CMD and type
zkserver

E:\kafka\kafka_2.12-2.3.0
en run
.\> \ Windows \kafka-server-start.bat.\config\server.properties

CMD
: \kafka\kafka_2.12-2.3.0
<>> kafka-t>s. Bat –create –zookeeper localhost:2181 –replication-factor 1 –partitions 1-topic test
Producer
run CMD, enter kafka bin\ Windows folder
: \kafka\kafka_2.12-2.3.0\bin\ Windows
t>run
kafka-c>le-producer.bat — broke-list localhost:9092 –topic test

E:\kafka\kafka_2.12-2.3.0\bin\ Windows
en run
k>-console-consumer.bat –bootstrap-server localhost:9092 –topic test –from — beginning

There is no windows solution in dual system Ubuntu grub startup

I am a dual system installed with UEFI+GPT. Computer: Lenovo R720 System: Windows10 +Ubuntu16.04
After installing Ubuntu16.04, Win10 from the GRUB menu was somehow missing. (If you don’t even have GRUB on display, click on Windows 10 to install Ubuntu.)
Goal: Access Win10 from Ubuntu GRUB.
Implementation:
The terminal executes the following commands in turn

sudo grub-install /dev/sda
sudo chmod -x /etc/grub.d/30_os-prober
sudo gedit /etc/grub.d/40_custom

Enter the following in the 40_custom file that opens:

menuentry 'Win10' {
insmod part_gpt
insmod chain
insmod ntfs
set root='(hd0,gpt1)'
chainloader /EFI/Microsoft/Boot/bootmgfw.efi
}

The terminal continues to execute sudo update-grub
The file /boot/grub/grub.cfg has been changed.
After rebooting, the Win10 option appears in the GRUB menu.
More:
If need to modify the order of the grub or modify grub background:
this is grub Customizer installation method: https://www.tuziang.com/combat/635.html

How to disable icloud drive on Mac?

ICloud Drive is a very useful feature that makes it easy to share files and documents between your devices (including other Macs, iPhones, and iPads) by automatically synchronizing and copying files between devices, so you should only disable iCloud Drive if you don’t have it enabled. So how to disable the iCloud drive on the Mac, there is a need for friends to welcome the reference!

Please note that this is disabling iCloud Drive completely on the Mac, not just disabling the iCloud desktop and documents that only store these two directories in iCloud.
Before attempting this step, make sure your Mac has a valid Internet connection.
The specific methods are as follows
1. Go to the Apple icon in the menu bar and select “System Preferences”.
2. Select “iCloud Settings”.
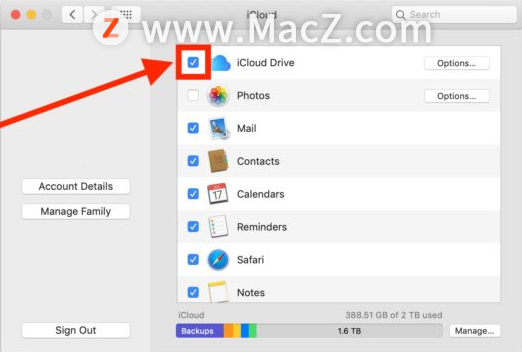
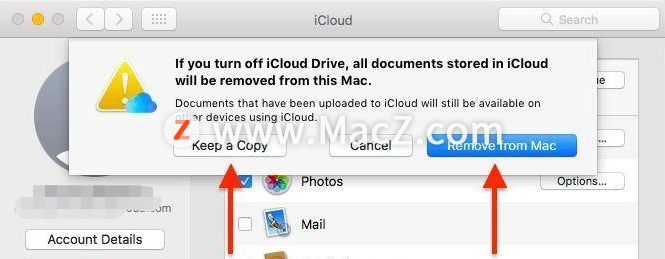
3. Uncheck the iCloud drive next to this check box.

4. Make sure to disable the iCloud drive and remove the iCloud files from your Mac.
You now have two options to choose what you want to do with your iCloud file.
Keep a copy – This keeps a downloaded copy of the iCloud files on the Mac. This option is recommended if you want to access the files offline later. This option works for most Mac users.
Delete from Mac – Selecting this option will remove all files from the iCloud drive on your Mac, and you will no longer be able to access these files on your computer.

5. Once you have selected the desired options, exit System Preferences on your Mac.
When you close the iCloud drive on your Mac, you’ll notice that the iCloud options disappear from the sidebar of the Finder, as well as from the Dock or anywhere else on your system. This is because you have completely disabled iCloud Drive from your Mac. You will not be able to save, copy, move, or upload files from your Mac on your iCloud drive.
To re-enable iCloud Drive, go back to System Preferences and select the iCloud Drive box.

Clion compiles and runs a single C / cpp file

C/CPP is all right, but you need to create a new project first. You can only have one main at a time, so you need to be able to let it compile and execute a single file
Installing a plug-in

in the Settings to find the plug-in installation, after the completion of the open folder, you first create a new Cmakelist files, and right click on the need to perform the c file

choose the bottom of the add, you will see the main function on the left side of a small arrow, direct execution

Restoring web applications from an installatron backup on my Linux host

If by the United States Center for Domain name US Domain Center: http://www.usdomaincenter.com/ Installatron installed in the Linux host account application, you can use Installatron backup these applications. You can then use these backups to restore your application to its previous state.
Required: Installatron does not automatically create a backup file for your application – you must have created the backup file manually and then follow these steps.

    Go to the US Domain Center product page. Under Web Hosting, select Manage next to the Linux Hosting account you want to use. In the Accounts Dashboard (control panel), select CPanel Admin (CPanel Administrator). On the cPanel home page, select Web Applications, and then under My Applications, select the Web application that you want to restore (for example, WordPress in the screenshot below). On the installed page, in the top right corner, click My Backup. Next to the backup you want to use, click the icon below Restore to the original location, and click Continue. Click Restore.

Development board cannot be mounted, uboot has a lot of JFFS2: alert information

References and materials:
“Uboot sf command usage” kickxxx
When running the development board, it prompts the following alarm:

cp: can't stat '/progs/rec/*': No such file or directory
/dev/mtdblock5
jffs2: jffs2_scan_eraseblock(): Magic bitmask 0x1985 not found at 0x00000010: 0xdde4 instead
jffs2: jffs2_scan_eraseblock(): Magic bitmask 0x1985 not found at 0x00000014: 0x9a31 instead
jffs2: jffs2_scan_eraseblock(): Magic bitmask 0x1985 not found at 0x00000018: 0x2648 instead
jffs2: jffs2_scan_eraseblock(): Magic bitmask 0x1985 not found at 0x0000001c: 0xb317 instead
jffs2: jffs2_scan_eraseblock(): Magic bitmask 0x1985 not found at 0x00000020: 0xe2ae instead
jffs2: jffs2_scan_eraseblock(): Magic bitmask 0x1985 not found at 0x00000024: 0x36f7 instead
jffs2: jffs2_scan_eraseblock(): Magic bitmask 0x1985 not found at 0x00000028: 0xe9f5 instead
jffs2: jffs2_scan_eraseblock(): Magic bitmask 0x1985 not found at 0x0000002c: 0xecb9 instead
jffs2: jffs2_scan_eraseblock(): Magic bitmask 0x1985 not found at 0x00000030: 0xc0b5 instead
jffs2: jffs2_scan_eraseblock(): Magic bitmask 0x1985 not found at 0x00000034: 0x5339 instead
jffs2: Further such events for this erase block will not be printed
………… ………… …………
………… ………… …………
………… ………… …………
jffs2: Empty flash at 0x00072000 ends at 0x00072010
jffs2: Empty flash at 0x00074000 ends at 0x00074004
jffs2: Empty flash at 0x00074008 ends at 0x00074010
jffs2: Empty flash at 0x00076000 ends at 0x00076010
jffs2: Empty flash at 0x00078000 ends at 0x0007800c
jffs2: Empty flash at 0x0007a000 ends at 0x0007a010
jffs2: Empty flash at 0x0007c000 ends at 0x0007c010
jffs2: Empty flash at 0x0007e000 ends at 0x0007e010
jffs2: Cowardly refusing to erase blocks on filesystem with no valid JFFS2 nodes
jffs2: empty_blocks 0, bad_blocks 0, c->nr_blocks 8
mount: mounting /dev/mtdblock5 on /etc/conf.d/ failed: Input/output error
/home/bashrc.sh: line 38: can't create /proc/sys/vm/extra_free_kbytes: nonexistent directory

probe 0x0;
SF probe 0x0; sf erase 0x780000 0x800000


SF read erase
read erase
SF read erase
SF read erase
SF read>se
SF read erase>r> SF write erase
SF read erase
SF read erase
SF read erase
SF read erase
SF write

command

explain

use example

meaning

sf, the probe [[bus:] cs] [hz] [mode]

init flash device on given SPI bus and chip Select

sf, read addr offset len

read 'len bytes starting at "offset" to the memory at "addr"

sf, read 0x82000000 0x10000 0x20000 ash offset 0x10000(64KB), length 0x20000(128KB), 0x82000000 Offset and length minimum unit operation is Byte

sf, write addr offset len

write 'len bytes from memor at' addr to flash at "offset"

0 x82000000 sf, write 0x0 0x200008200 0000 bytes, 0x0 bytes, 0x20000 bytes, 0x0 bytes, 0x0 bytes, 0x0 bytes, 0x0 bytes Offset and length minimum unit operation is Byte

sf, erase offset [+] len

erase 'len bytes from' offset '+' len 'round up' len 'to block size

sf, erase 0 x0 0x10000 ase block at offset 0x0 to 0x10000 Erase block at offset 0x0 Offset and len parameters must be erase block aligned

sf, update addr offset len

erase and write 'len bytes from the memory at "addr" to flash the at "Offset"


From the SF command, we can see several points:

Support Byte level read and write operation, support random access.
How to verify the effect of reading and writing
command can combine uboot md, sf, read, sf, write involves memory operations, can use the md for memory data
md x82000000 0 0 x100
0 x82000000 printing, 256 bytes of memory length range data

If the reference quotes your creation, and the reference, data does not sign your name, please do contact me to add, bring trouble to you!

Failed to initialize nvml driver / library version mismatch due to automatic update of NVIDIA driver

failed to initialize NVML driver/library version mismatchfailed to initiate NVML driver/library version mismatch. failed to initiate NVML driver/library version mismatch
This situation is generally Nvidia’s driver is automatically updated, enter the command to view the log, it is automatically updated

$ cat /var/log/apt/history.log
Start-Date: 2021-01-12  06:14:29
Commandline: /usr/bin/unattended-upgrade
Upgrade: libnvidia-compute-450:amd64 (450.80.02-0ubuntu0.18.04.2, 450.102.04-0ubuntu0.18.04.1), libnvidia-encode-450:amd64 (450.80.02-0ubuntu0.18.04.2, 450.102.04-0ubuntu0.18.04.1), nvidia-kernel-common-450:amd64 (450.80.02-0ubuntu0.18.04.2, 450.102.04-0ubuntu0.18.04.1), xserver-xorg-video-nvidia-450:amd64 (450.80.02-0ubuntu0.18.04.2, 450.102.04-0ubuntu0.18.04.1), libnvidia-gl-450:amd64 (450.80.02-0ubuntu0.18.04.2, 450.102.04-0ubuntu0.18.04.1), libnvidia-fbc1-450:amd64 (450.80.02-0ubuntu0.18.04.2, 450.102.04-0ubuntu0.18.04.1), libnvidia-decode-450:amd64 (450.80.02-0ubuntu0.18.04.2, 450.102.04-0ubuntu0.18.04.1), libnvidia-cfg1-450:amd64 (450.80.02-0ubuntu0.18.04.2, 450.102.04-0ubuntu0.18.04.1), nvidia-utils-450:amd64 (450.80.02-0ubuntu0.18.04.2, 450.102.04-0ubuntu0.18.04.1), nvidia-dkms-450:amd64 (450.80.02-0ubuntu0.18.04.2, 450.102.04-0ubuntu0.18.04.1), nvidia-compute-utils-450:amd64 (450.80.02-0ubuntu0.18.04.2, 450.102.04-0ubuntu0.18.04.1), libnvidia-ifr1-450:amd64 (450.80.02-0ubuntu0.18.04.2, 450.102.04-0ubuntu0.18.04.1), nvidia-driver-450:amd64 (450.80.02-0ubuntu0.18.04.2, 450.102.04-0ubuntu0.18.04.1), libnvidia-extra-450:amd64 (450.80.02-0ubuntu0.18.04.2, 450.102.04-0ubuntu0.18.04.1), nvidia-kernel-source-450:amd64 (450.80.02-0ubuntu0.18.04.2, 450.102.04-0ubuntu0.18.04.1)
End-Date: 2021-01-12  06:16:37

Referring to StackFlow, it was decided to restart the server, which was resolved after the restart.
I have to say that this driver update is really annoying. Anyone who reads this blog and knows how to disable this driver update on Ubuntu, please leave a comment in the comments section (for the time being, only on Windows)

Solution to flash back of MacBook Pro open software of M1 chip

Due to the ARM architecture, there are still a considerable number of Mac software not upgraded ARM architecture support can not run on the Mac computer with M1 chip. When opened on the computer with M1 chip, it may prompt [” XXX “cannot be opened because of a problem. Please contact the developer…]


However, most applications are compatible with the M1 chip, as follows:
1. Open Access, enter the application directory, find the software icon, right click on the icon and select “Show Profile”, or select the icon and press the shortcut key “Command + I” to open the profile;
2. Check “Open with Rosetta” and then open the software and run it.
About Rosetta
Rosetta 2 runs in the background every time you use an App built specifically for Macs equipped with Intel processors. Rosetta will automatically convert the App to work with the Apple chip.
In most cases, apps that require Rosetta will not show any difference in performance.
What software can be run through Rosetta?
To see if the application supports Rosetta, look at the type of “Type” on the profile:
The application (generic) means that the App supports both Apple chips and Intel processors and uses Apple chips by default.
The application (Intel) says that the App only supports Intel processors and requires Rosetta to run on any Mac with Apple’s chip.

Nmap enumerates remote machine open ports

Nmap lists open ports for remote machines
Nmap Scan Technology View Zenamp Scan Port NAMP Scan Port from the command line
Domain name resolution using the specified DNS server Target host alive or firewall enabled (-pn parameter) Scan specific port range (-p)

Nmap profile
Nmap (Network Mapper) is used to discover hosts and services on a computer network to create a “map” of the network. To achieve its goal, Nmap sends a specific packet to the target host and then analyzes the response. We can use Nmap to detect the server’s live and developed services, as well as to perform security audits on targets.
zenamp: Graphical interface version of Namp.
The principle of
Determine whether the command line entered by Nmap contains the domain name. If it contains the domain name, it needs to use the DNS server for domain name resolution, and then send ICMP Echo Request to detect the host’s existence. Nmap will retrieve the machine information including the port information based on the packet returned.
Port state

STATE (port)

explain

open

said port in the open STATE

closed

said port closed

filterd

said port in the filter can’t receive the returned the probe STATE

unfilterd

said port received back to the probe, but can’t confirm

opend/unfilterd

said port in the open or no filtering state

closed/unfilterd

said port in the closed or filtering state
NMAP scan technology to view
nmap-h / mark> >
SCAN TECHNIQUES are part of the SCAN TECHNIQUES. The following scanning techniques can be used to bypass certain filters in certain scenarios to achieve the purpose of detection. The parameters should be selected according to the actual situation.

Zenamp scans ports
Once Zenamp is open, enter the domain name or IP you want to probe into the target.

The namp scan port on the command line
Kali bring namp, nmap to use under Windows, the installation is successful in his folder exists after zenamp namp command line version exists, in the folder of CMD into namp enter namp. Exe followed by the domain name or IP address can scan, need to know the process of scanning can use the enter key when can get the current scanning progress.

Use the specified DNS server to resolve the domain name
The domain name is resolved to the IP address by the DNS server before the NMap probe. We can also use the specified DNS server for the resolution.

Nmap — DNS-Sever DNS server IP address to probe the domain name


8.8.8 is the Google domain name server.
when detecting some specific domain, because inside the company set up the DNS server, and resolve the IP address to the site, there might be Google’s DNS server does not contain the domain name and lead to can’t parse, where you need to change the DNS server to resolve the domain name
Target host alive or firewall enabled (-pn parameter)
When we already know that the host is alive or that the firewall is enabled, we can use the -pn parameter to stop probing previous ICMP requests. The purpose of not triggering firewall security mechanism has been reached.


Scan specific port range (-P)
-p m-n can be used to specify all ports in the port range between m and n.

Using Fiddler to capture mobile app

Use Fiddler to capture mobile APP package detailed tutorial
There were two very difficult problems in the process of grasping the package in the mobile APP with Fiddler. One was that the phone could not connect To the network after setting the proxy, and the download certificate on the phone always indicated that the download failed. The other was that the information of grasping the package on the Fiddler was all displayed as Tunnel To. It took a long time to solve, and now share it to let some novices walk less detours, maybe my method can solve your problem, may not solve it, but also provide a way to try.
To set the fiddler
1. Download Fiddler from the website and install it. https://www.telerik.com/download/fiddler
2. First configure Fiddler, open Fiddler, and then click Tools –>; The Options… – & gt; HTTPS, check and install the certificate as shown in the installation diagram.


3 4.

3 4.

3 4 Click the OK button to close Fiddler and reopen it again. At this point, the Fiddler part is set up in the normal way, followed by some Settings on the phone.
5. Here I use millet portable WiFi, mobile phone connected to millet portable WiFi, so that the phone and computer connected is the same network segment.
Set the cell phone
6. Go to the WiFi Settings page on the mobile phone, change the agent to “Manual”, and the hostname is the IP address

after the computer is connected to the WiFi network. Open the mobile browser, enter the address open http://ipv4.fiddler:8866, (because I set the port number is 8866), click in the page FiddlerRoot certificate, certificate of download. I have encountered a problem here, is the certificate can not download, keep telling download failed. Up to now, I have encountered two problems that are difficult to solve. One is that the download certificate in the webpage fails to download; the second is that after opening the APP on the mobile phone, all the packages caught in Fiddler are displayed as Tunnelto. Now, how do I solve these two problems
Solution to the problem:
1. Download Cermaker from the Fiddler website, download it and run the plug-in.
download address: https://www.telerik.com/fiddler/add-ons

2. After the installation, we found that the TunnelTo problem was still not solved, and there is a new problem. On the mobile phone, open http://ipv4.fiddler:8866, instead, it shows No Root Certificate was found.Have you enabled HTTPS traffic decryption in fiddler yet?
3. So I tried the following solutions.
makecert.exe-r-ss my-n “CN= do_not_trust_fiddlerRoot, O=DO_NOT_TRUST, OU=Created by http://www.fiddler2.com “-Sky Signature -EKU 1.3.6.1.5.5.7.3.1-h 1-cy Authority -a sha1-m 120-b 09/05/2012
If you want to run the fiddler, you can restart the fiddler
4. Then open http://ipv4.fiddler:8866 in the browser on the phone, download the certificate, download and install it successfully, open the test APP, and find that the packet was captured successfully. HTTPS can catch the packet normally, but HTTP still shows Tunnel to, but it does not affect the use.

Solution to garbled code problem after importing project in eclipse

Eclipse garbled words after importing the project solutions
after importing the project in Eclipse, if the project code in Chinese, may produce Chinese garbled question, take a look at how to solve below
1. Right-click on the project name and select Properties.

. In the right side of the Resource item, find Text File Encoding. By default, Inherited from Container (GBK) is selected, and select Other.