Category Archives: How to Fix

Vs2015 compiling ffmpeg source code

Refer to the article: https://blog.csdn.net/jcl1774356658/article/details/79983805

ShiftMediaProject: The purpose of ShiftMediaProject is to provide a native Window development library of FFmpeg and its dependent libraries in Visual Studio for easy media context creation and debugging in Visual Studio.
The process is as follows:
1 installation vs2015
The long wait…    
Download the FFMPEG source code
https://github.com/ShiftMediaProject
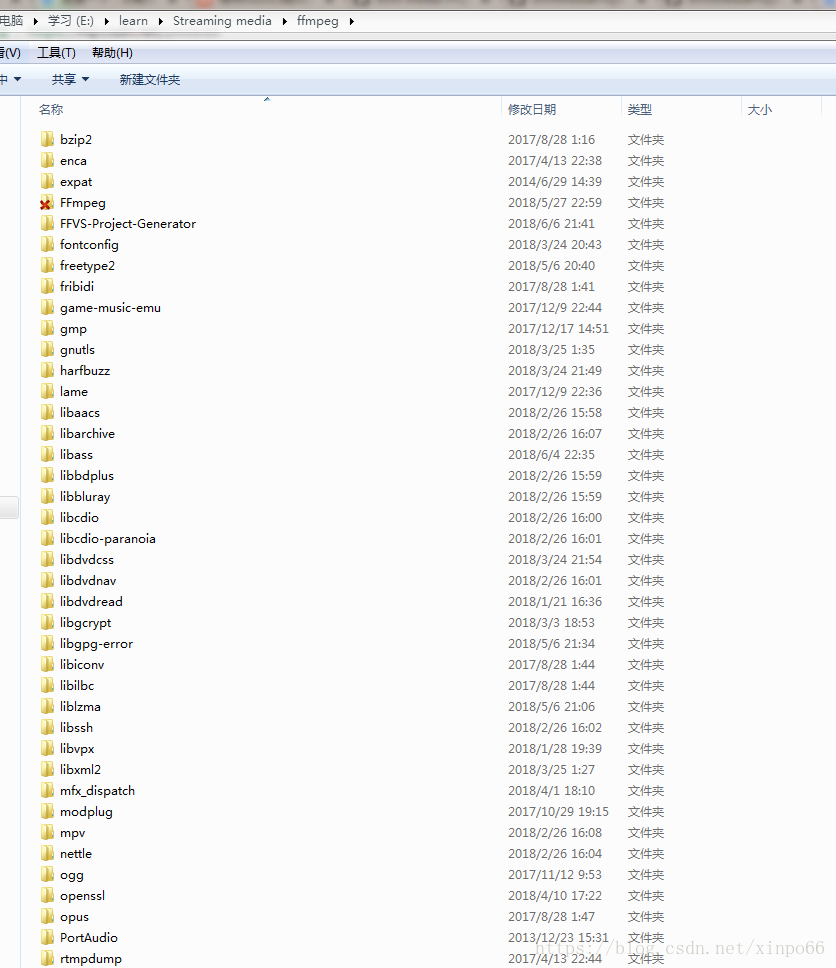
Up to 2018-6-7, a total of 53 projects, I downloaded all.
Note:
Use git clone to download the source code directory, so that you do not need to change the name of the source code directory, and later load in VS is easy. If you download zip, remove the “-master “suffix after unpacking.
My directory looks like this:

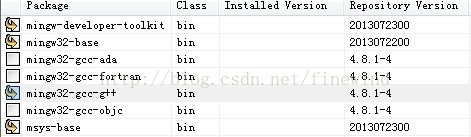
3. Install the VS extension tool
To be more efficient, FFMPEG authors use assembly instructions, which require the aid of tools. This is also mentioned in projects that require assembly tools. Two extensions to VS need to be installed:
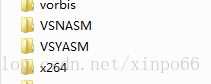
Of the projects downloaded in Step 2, there are two projects, VSNASM and VSYASM:

Open the folder separately, run the installation script separately, run the batch install_script.bat, wait a few minutes, and the installation will be prompted to complete.
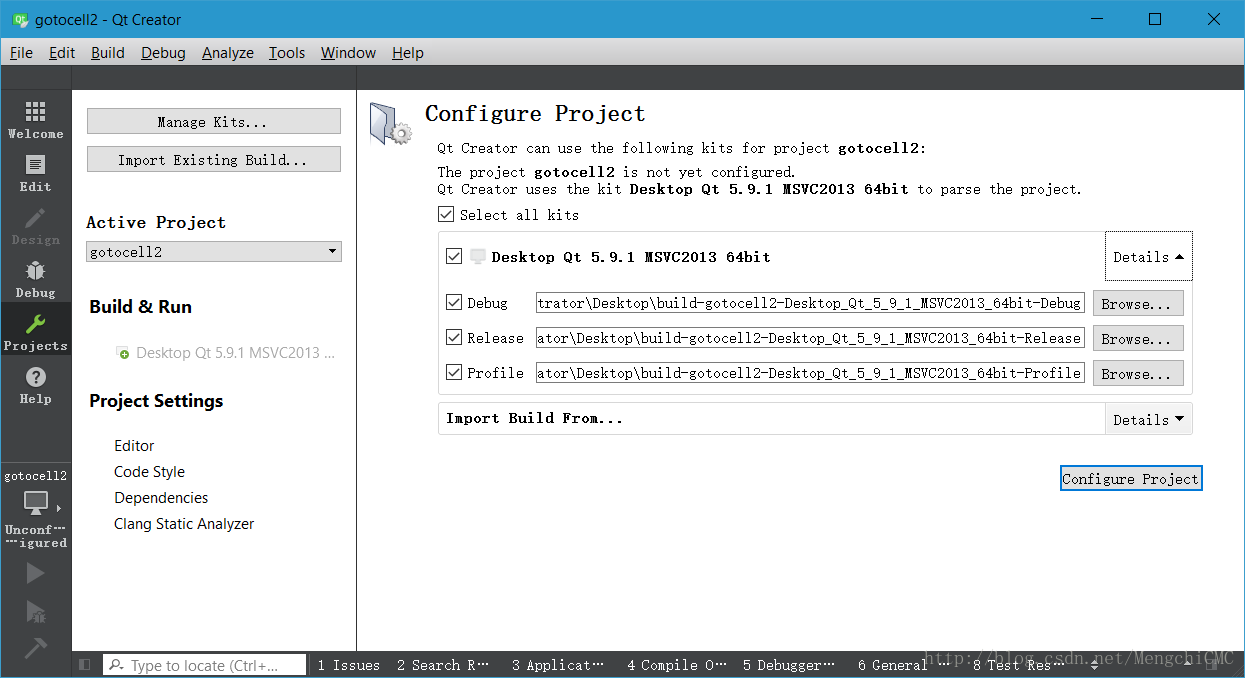
4 Open the project
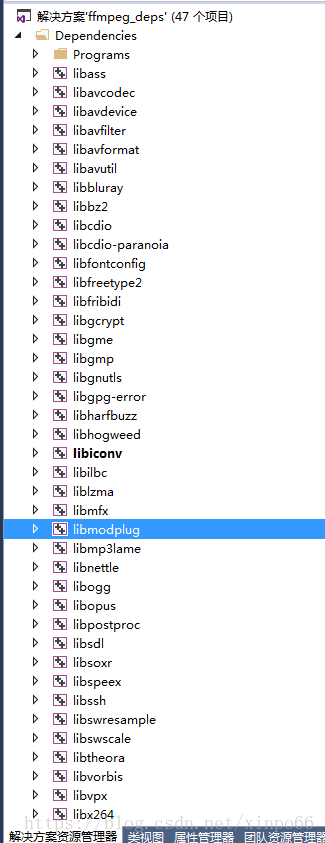
Open the “FFmpeg\SMP\ffmpeg_deps.sln” solution file and it loads successfully:

My machine is 64-bit Win7, equipped with VS2015 and VS2015 Update3. The problems encountered in compilation are as follows:
1. The compiler is saying that it cannot be found. stdio.h>
Probably because VS2013 was installed earlier. According to the methods to solve: http://blog.sina.com.cn/s/blog_8913a1d3010188wz.html
2 in the last step, after installation VSNAM and VSYASM script, according to https://github.com/ShiftMediaProject/VSNASM, you also need to download the nasm. Exe and yasm. Exe copy to the C: \ Program Files \ Microsoft Visual Studio (x86) \ VC 14.0
3 According to E:\ShiftMediaProject\ffmpeg\ ffmpeg\ SMP\readme.text, also need third party library support:

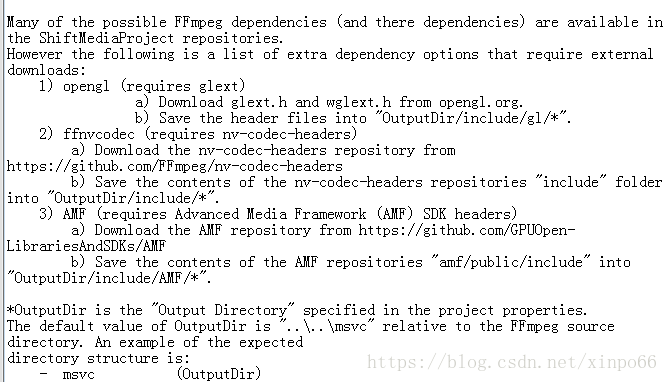
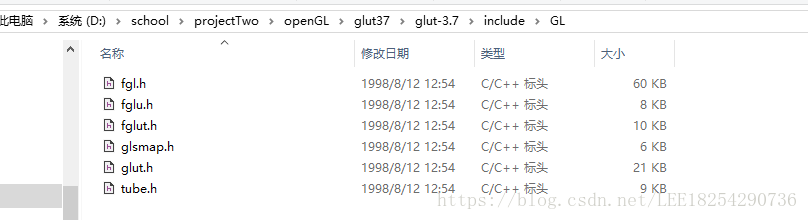
Glext download address: https://sourceforge.net/projects/glextwin32/
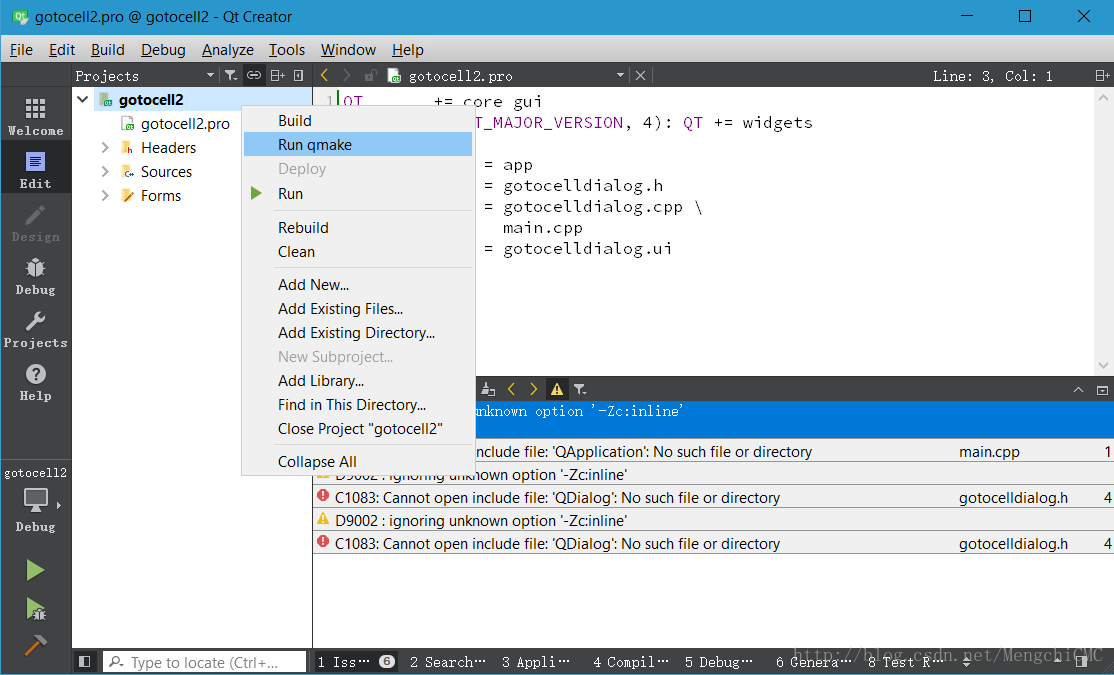
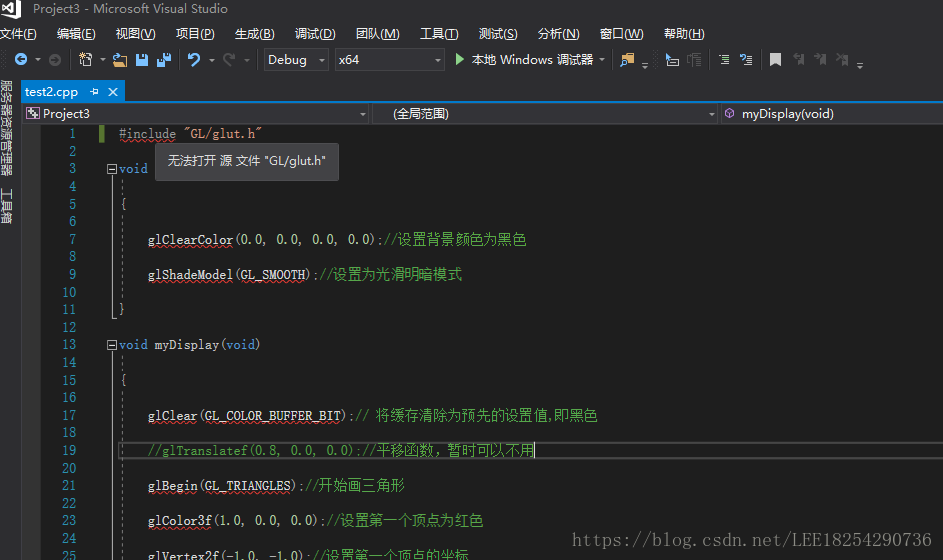
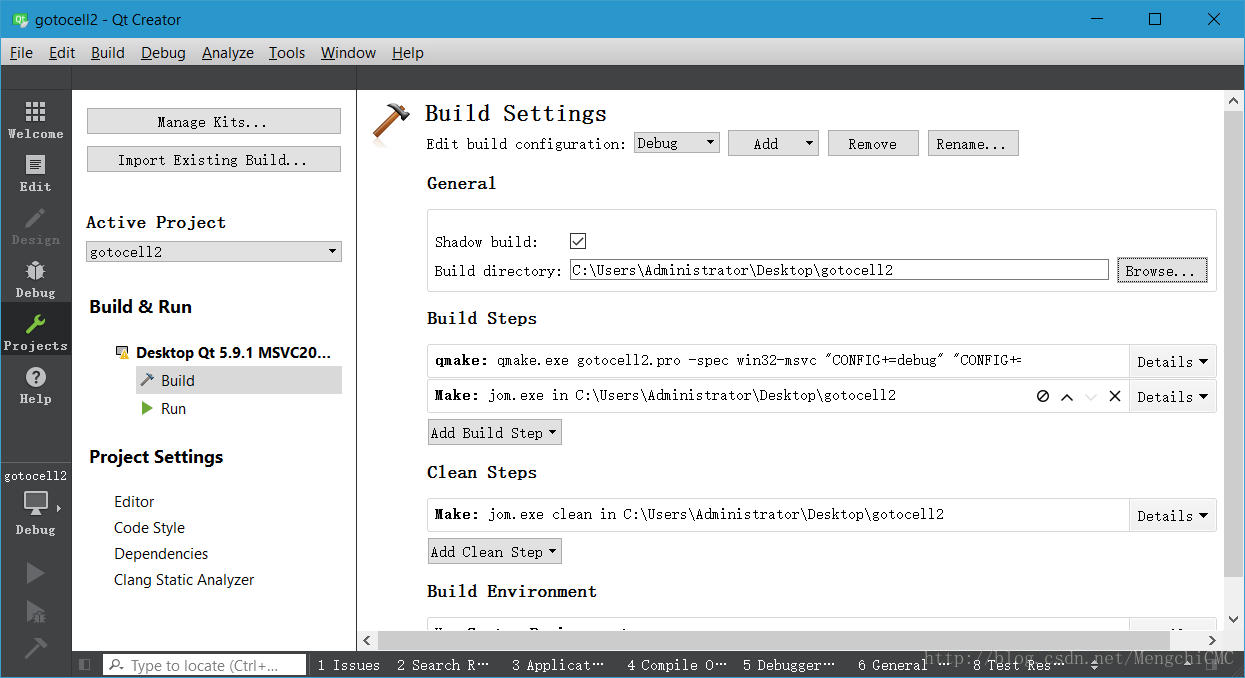
Compile…

Vs2013 compiling ffmpeg

Because VS2013 support C99, so, you can directly use VS2013 for FFMPEG compilation and debugging, and no longer use Eclipse toss. Referring to others, the record is as follows:

Specific steps:
1. Download FFMPEG source code, download address: http://ffmpeg.zeranoe.com/builds/ or http://ffmpeg.org/download.html

2. Download the MinGW installer, download address: http://www.mingw.org/ or http://sourceforge.net/projects/mingw/files/latest/download?Source =files install after download, click run after install, mark the following items:

Then, under the Installation menu, click Apply Changes (mingw32-gcc-g++ is not selected);

Download msys2 http://sourceforge.net/projects/msys2/ download after installation to the mingw/msys2/directory

Download YASM at http://yasm.tortall.net/; Please do not download the VS version, but download the 64-bit version. After downloading, rename it to yasm.exe and copy it to the usr/bin directory of msys2.

4. Configuration C:/MinGW msys/1.0/msys. Bat, in the front of this file (@ echo off after) add a line the following contents:
(The same is true for MSYS2)
Call “D:\Microsoft Visual Studio 12.0\VC\bin\vcvars32.bat”; call “D:\Microsoft Visual Studio 12.0\VC\bin\vcvars32.bat”

5. Rename the C:/MinGW msys/1.0/bin/link. Exe for link_renamed. Exe (in accordance with the actual installation path) choice, this step is to prevent the link. Exe and vc link. Exe conflict, after the completion of the compilation can modify the back; Vc /bin link. Exe lib. Exe.

6. Configure compilation, double click msys.bat, go to the FFMPEG source code root directory, can run./configure –help to view the compilation configuration options, I used the option:
Static library:./configure –enable-static –prefix=./vs2013_build –enable-debug –toolchain= MSVC
Dynamic library:./configure –enable-shared –prefix=./vs2013_build –enable-debug –toolchain= MSVC

— — — — — — — — — — — — — — — — — — note:
The default is enable-yasm, and you can –disable-asm disable all assembly optimizations if you don’t want them
For libraries that generate release mode, you can –disable-debug to remove the debug message
Static library:./configure –enable-static –prefix=./vs2013_build_release –disable-debug –toolchain= MSVC — enable-memalligate-hack
For libraries that generate Debug mode, it seems that the top approach is fine, but to be safe in order to step into any function, set it as follows:
./configure –enable-static –prefix=./vs2013_build_noyasm –enable-debug –toolchain= MSVC –disable-yasm — disable-memalloce-hack
—————–

Wait for the configuration to return;

7. Type make all to compile;
8. Type make install.

If you have any problems, make for msys2 can enter the msys environment, run the pacman -s make may refer to http://m.oschina.net/blog/363658

The generated header files and libraries are in the vs2013_build directory under the FFMPEG source code.

Create a project FFMEPG_TEST (static)
Find a file in share/example, such as avio_reading.c, and place it in your project
Add the include directory and lib directory: C++->; Conventional – & gt; ADD INCLUDE DIRECTORY ADD INCLUDE LINKER ADD LIB
Add to lib:
advapi32.lib; Secur32.lib; ws2_32.lib; libavcodec.a; libavdevice.a; libavfilter.a; libavformat.a; libavutil.a; libswresample.a; libswscale.a;

———————————————–
Inline error is encountered during compilation because VS2013 uses its own _inline
#define inline _inline in a file

Then, the default library “MSVCRTD” conflicts with other libraries
Solution:
Properties – C++->; Code Generation -> runtime changed to multithreading /MT
/NODEFAULTLIB:libcmt.lib: /NODEFAULTLIB:libcmt.lib: /NODEFAULTLIB:libcmt.lib: /NODEFAULTLIB:libcmt.lib

The avcodec_alloc_frame() function received an error

Replace avcodec_alloc_frame() with av_frame_alloc().

Compile successfully

The scheme used for compiling 64-bit is MSYS2 + MINGW64
After installing MSYS2, in the directory
Pacman-S make GCC diffutils mingw64-x86_64-toolchain
Rename /usr/bin/link.exe to /usr/bin/link.bak to avoid conflicts with MSVC’s link.exe.

04 configuration msys2
04.01 edit the C:/msys64/msys2_shell. CMD,
Rem set MSYS2_PATH_TYPE=inherit: set MSYS2_PATH_TYPE=inherit
Open the MSYS2 window associated with VS2015
In the Command Prompt window, type:
# Switch to C: /msys64 directory CD C: /msys64 # Switch to VS2016 64-bit environment C:\
PR
Ogram Files (x86)\Microsoft Visual Studio 14.0\VC\bin\amd64\vcvars64.bat # Open mingw64 window msys2_shel.cmd-mingw64 of msys2
04.03 Check tool components
/ C/ Program Files (x86)/Microsoft Visual Studio 14.0/VC/BIN/amd64/cl /c/Program Files (x86)/Microsoft Visual Studio 14.0/VC/BIN/amd64/link /usr/ BIN/ yasm /usr/ BIN/ CPP

Modify the MSYS2 window code page to GBK to avoid displaying garbled code at compile time.
Right-click on the window, select the [Options] menu, select [Text], locale select: zh_CN, Character set select GBK. –arch=x86_64 make

After configuring the config, it may still be x86, open the config file, and change the corresponding value to 0

QGIS uses qt4.6.3 to upgrade to the version compiled by qt4.8.3


To extend functionality, upgrade the Qt version of QGIS, which can be quickly upgraded using the CMake tool.

Step 1: Type the source data path from the CMake UI, such as: D:\Projects\numbers\source
Step 2: in the CMake UI interface to Build the project path, such as: D: \ Projects \ Numbers \ Build, CMake will automatically load at this time the Build qgis engineering under the


Step 3: Click Geneate Configure to generate a new project. Then you can develop with VS

QT learning 3: configuration and testing of QT creator 2.4.1 development environment

1. System environment
Host operating system: Ubuntu 10.04
Host compiler: gcc4.4.3,
Cross compiler: arm-linux-gcc-4.3.2
Prerequisites: build three compiled versions of Qt4.6.3: PC,X86, ARM
 
2. Install
Qt_SDK_Lin32_offline_v1_2_en.run
Download address: http://www.developer.nokia.com/dp?uri=http%3A%2F%2Fsw.nokia.com%2Fid%2F8ea74da4-fec1-4277-8b26-c58cc82e204b%2FQt_SDK_Lin32_offline
 
Run it directly and follow the default steps to install it. It’s included
Qt creator — against 2.4.1
 
3. Configuration of Qt-Creator development environment
1. Start Qt-Creator.
2. In the QT-Creator menu bar Tools–>; Options opens the Options window.
3. On the left side of the Options screen, click Build & Run—> The right side of QtVersions displays the QTVersions setting interface.

 
4. Click Add on the right side to Add the path of qmake:

At this point, Qt- Creator is configured.


5 sample
Here is divided into two parts, first compiled under x86, and run under QVFB, and then compiled under ARM, moved to the development board to run.
From/usr/local/Trolltech QtEmbedded 4.6.3/demos copy books routines to root under/TMP folder.
 
5.1×86 compilation and debugging
5.1.1 Start Qt-Creator, File–>; Open File or Project,
Open the root/TMP/books/books. Pro.
 
5.1.2 Select Compiler

Click Finish and the screen appears

The lower 
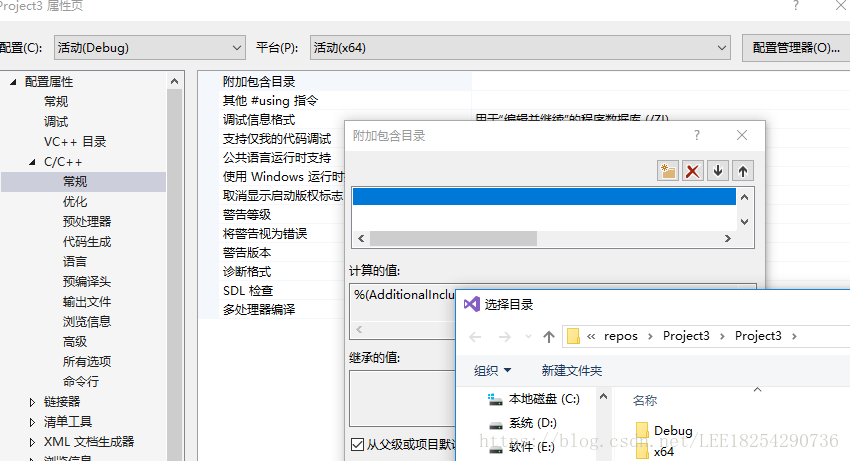
on the left allows you to modify compiler-specific configurations at any time
 
5.1.3 Modify the configuration
Click and add the -qws parameter, because you want to run under QVFB

 
5.1.3 compile

5.1.3 run
Start the QVFB
#qvfb -width800 -height 480 &
Run

So this is the result
 
5.2 Compiling and debugging under ARN
Leave it on hold


Reference:
1. Qt embedded environment construction and transplantation
http://blog.chinaunix.net/uid-26119896-id-3141782.html
= = = = = = = = = = = = = = = = = = = = = = = = = = = = = = = = = = = = = = = = = = = = = = = = = = = = = = = = = = =
Make :arm-linux-g++:Command Not Found Make :arm-linux-g++:Command Not Found Make :arm-linux-g++:Command Not Found: Make :arm-linux-g++:Command Not Found: Make :arm-linux-g++:Command Not Found

Upgrading QT4 project to Qt5 project

QT5 and QT4, there are a lot of changes and differences, you can refer to: changes from QT4 to QT5.
I am a computer installed Qt5.9.1, running in the c + + GUI Qt4 programming (second edition) with some problems happened when source program, this article will introduce how to upgrade to Qt5 Qt4 engineering, and run in the new version of the Qt Creator.
in the c + + GUI Qt4 programming (second edition) programs in the second chapter gotocell2 as an example, the original project directory contains the following five files:
.
and then open the gotocell2 pro file, Qt Creator will start to appear the interface for the following.

ick Configure Project to enter the Project configuration screen. In the General box, check Shadow Build, and then modify the Build Directory to suit your needs. Then click the Run button in the left toolbar.
Note: Neither the project file path nor the Build path can contain Chinese characters.

run as a result of an error, cannot find the relevant header files:
in.
solution is pro file begins with the following two lines of code:

QT += core gui
greaterThan(QT_MAJOR_VERSION, 4): QT += widgets

If you run it again, it will return an error. Because the change to the.pro file you just made requires a qmake to take effect.
In the project directory navigation window, select the project root folder ->; Right click – & gt; The Run qmake. Rerun it, and you get the desired result.

Because this project is relatively simple, the module used is few, so just modify the. Pro file can be. However, if the project is large and uses more functional modules, more modifications may be needed to run the program correctly.
#include <
#include <
#include <
#include < QtGui> change to include < QtWidgets> .

VS2010 compiler can’t open include file: “GL / glaux. H”: no such file or directory


#include <
#include < gl/gl.h>
#include < gl/glu.h>
#include < gl/glaux.h>
#include < gl/glut.h>

=
=
=
=
=
=
C :\ Users \ LJ \ Desktop \ Tracking Locate \ Camera \ Stdafx.h (43): fatal error C1083: Failed to open included file: “gl/glaux. H” : No such file or directory
C:\Program Files\Microsoft SDKS \Windows\ V7.0 A\Include\gl There are only two Files under C:\Program Files\Microsoft SDKS \Windows\v7.0A\Include\gl
So in VS2010, the corresponding header file cannot be found in the default lookup process
C:\Program Files\Microsoft SDKS \Windows\ V7.0 A\Lib
You’d better download these files from the Internet.
So the problem should be solved by copying the glaux-h and glaux-lib files (sometimes using glaux-dll), respectively, to the path referenced by default in VS2010 above.

Solution to the problem of unable to open glaux. H in vs2013

Gl /glaux. H cannot be opened. The solution is to download or copy it in the old version and put it in the directory of VS

VC6.0 C:\Program Files\Microsoft Visual Studio\VC98\Include\GL

VS2010 C:\Program Files\Microsoft SDKS \Windows\v7.0A\Include\gl

VS2013 C:\Program Files\Microsoft SDKS \Windows\v7.1A\Include\gl

1 put the lib files in the corresponding lib folder.

2 puts the.h file in the appropriate include\gl folder.

3 puts the DLL files in the system32 folder.

If it is already copied and still not available, put the corresponding header and library files in the current directory where you wrote them.
#include “GLAUX.h”

Error: unable to open include file: ‘GL / glut. H’

Today, someone else’s source program appeared such a problem, the first thought is the lack of files, really after viewing the lack of some toolkits, in this solution is offered, for your reference:
1. Download the GLUT Toolkit. https://download.csdn.net/download/xianhua7877/10473663
2, will download the package, Will get five documents, including GlU32. Lib glut32. DLL glut32. Lib glut. DLL glut. H glut. Lib
3, let the glut of decompression. H into the C:/Program Files/Microsoft Visual Studio 9.0/VC/include the folder.
4. Put the Glut. lib and Glut32.lib Files in the C:/Program Files/Microsoft Visual Studio 9.0/VC/lib folder where the static function libraries are located.
5. Put the extracted Glut. DLL and Glut32.dll in the system32 folder under the operating system directory.
6. This step is very important, this step is very important, this step is very important, run again, if the error is still, then change the header file’s original name #include <; GL/glut.h> For the # include & lt; glut.h> .

In VS2010, the compiler cannot open the file “GL / glaux. H”: no such file or directory

 
We recently tested an example OpenGL program:
#include < GL/gl.h>
#include < GL/glaux.h>
#include “glos.h”
 
void main(void)
{
auxInitDisplayMode(AUX_SINGLE|AUX_RGBA);
,0,500,500 auxInitPosition (0);
auxInitWindow(“simple”);
 
GlClearColor (0.0, 0.0, 0.0, 0.0);
glClear(GL_COLOR_BUFFER_BIT);
GlColor3f (1.0, 0.0, 0.0);
GlRectf (0.5, 0.5, 0.5, 0.5);
 
glFlush();
_sleep(1000);
}
 
It runs normally under VC6.0, but under VS2010 there is a compilation error as follows:
1> D :\elec\mymfctest\vs2010p\openglapps\opengltest\opengltest.cpp(4): fatal error C1083: Could not open included file: “GL/glaux.h” : No such file or directory
It seems that this error can be found in versions VS2008 and above.
Only two Files can be seen in the path C:\Program Files\Microsoft SDKS \Windows\ V7.0 A\Include\gl after VS2010 installation
Gl. h and glu. H instead of glaux. H,
C:\Program Files\Microsoft Visual Studio\VC98\Include\GL
The next one has three files
H, glu. H, and glaux. H, so the relevant header files are not found in VS2010.
The glaux.lib library file is not found in the VC6.0 installation path C:\Program Files\Microsoft SDKS \Windows\ V7.0 A\ lib, but in the VS2010 installation path C:\Program Files\Microsoft SDKS \Windows\ V7.0 A\ lib.
The solution is to copy the glaux. H and glaux. Lib files from their respective folders to the path referenced by default in VS2010 if you have VC6.0 installed. It is possible that the application will also need glaux. DLL support at runtime, which can also be downloaded.

Vs2019 OpenGL glut: error: unable to open include file: ‘GL / glut. H’: no such file or directory

The culprit
Updated vs2019
The solution
After the update, vs2019 installation directory (I) in disk C C: \ Program Files \ Microsoft Visual Studio (x86) \ 2019 \ Professional \ VC \ Tools \ MSVC will many a folder

to reconfigure the glut in the updated folder environment, as follows

    Put the file Glut. h in the path \Microsoft Visual Studio\2019\Professional\VC\Tools\MSVC\ New folder \ Include \ GL. Put Glut. lib and Glut32.lib under the \Microsoft Visual Studio\2019\Professional\VC\Tools\MSVC\ New folder \ Lib \x86 path.

Solution of VS2008 unable to open GL / glaux. H header file

2011-04-15 wcdj
 
I don’t know why there is no OpenGL header file in SDK after VS2008. Here is a summary for this problem.
 
In Lesson 6 of learning Nehe’s texture mapping, I initially needed to use the header file containing gl/glaux. H, but found that I didn’t have this header file on my system. There are two header paths in the compiler that reference OpenGL:
C:/Program Files/Microsoft SDKs/Windows/v6.0 A/include/gl/gl h (the default)
C:/Program Files/Microsoft Visual Studio 9.0/VC/include/gl/glut. H (the new gl manually folder)

Googled the solution.

thod 1: Find the most used solution, but I do not have VS2003 or VS2005 installed on my system, so I cannot copy it.
I have been porting old openGL program to VS2008. I have solved the problem by copying the “include/gl/glaux.h” and “lib/glaux.lib” from the VS2005 Platform SDK located on “C:/Program Files/Microsoft Visual Studio 8/VC/PlatformSDK” To the PlatformSDK of VS2008 located on “C:/Program Files/Microsoft SDKS /Windows/ V6.0a “


Based on the reply to https://forums.microsoft.com/MSDN/ShowPost.aspx?PostID=1065518& SiteID=1, it looks like glaux. Lib is deprecated. Instead link to kernel32.lib, user32.lib, gdi32.lib and advapi32.lib


The easiest way to sort this out is to:
) Install Glut3.6 or newer as directed.
2>pen Visual Studio 2008 and create a new project
3) Cho>C ++ -Empty solution
4) Import Al> the files from your previous OpenGL project
5) delete all headers i.e.
#include < gl/glu.h>
#include < gl/gluax.h>
and any other GL headers
6) then replace with #include < gl/glut.h>
7) recompile.

this worked for all of my 2003 & 2005 Solutions.

thod 4: Download Missing Files.
1: download the source CSDN download
OpenGL installation package download required documents:

http://d.download.csdn.net/down/2560229/ssagnn23 include:
GL. H GLAUX. H GLU. H glut.
H GLAUX. LIB GLU32. LIB glut32. LIB glut. LIB OPENGL32. LIB
GLAUX. DLL GLU32. DLL glut32. DLL glut. DLL OPENGL32. DLL

VS2008 without GL. H, H, glu.h, GLAUX. Lib, glu32.lib, opengl32.lib.

1) Copy GLUX. DLL, GLUT32.DLL, GLU32.DLL and GLU32.DLL to C:/WINDOWS/system32, which should already have OpenGL32.DLL and GLU32.DLL.
. (2) the GL H, GLAUX. J H, glu. H, glut. H a copy to the C:/Program Files/Microsoft Visual Studio 9.0/VC/include/GL
. (3) the GLAUX LIB and Glu32. LIB, glut32. LIB, Opengl32. LIB, C:/Program Files/Microsoft Visual Studio 9.0/VC/lib

br>>
nehe SRC – cn – nehe OpenGL tutorials Chinese version and the code download

http://code.google.com/p/nehe-src-cn/downloads/list nehe OpenGL tutorial Chinese version and the code download

http://www.yakergong.com/nehe/ provides each Lesson # sample code and the file you need.

4 according to the method, after downloading the file and configure, recompile, without the previous mistakes, documents found, but the following mistakes.
error C2664: “auxdibimageLoadw” : Cannot convert parameter 1 from “char *” to “LPCWSTR”
is is because I am building a Unicode character set based project, so I want to use wide characters. It is also possible not to use Unicode character sets in the property page ->; Configure properties ->; You can modify it in general. Select not to use the Unicode character set here; that is, select Unset. And then recompile it. OK!

br>>

reference:
missing glaux. H in v6.0 a SDK?

http://social.msdn.microsoft.com/Forums/en/windowssdk/thread/b66e5f7a-91f6-4dbe-b388-0c131008b08f project under VS2003 under VS2008 compilation, however, Can’t find the gl/glaux. H

http://topic.csdn.net/u/20070930/15/6a900f21-8e41-4325-862f-f6df3a425f36.html VS 2008 OpenGL configuration

http://lujun5918.blog.163.com/blog/static/287227712011013114410553/ Load images generated texture opengl program
http://topic.csdn.net/u/20070823/19/4497cb18-be2a-464f-ad20-b12191a61b26.html