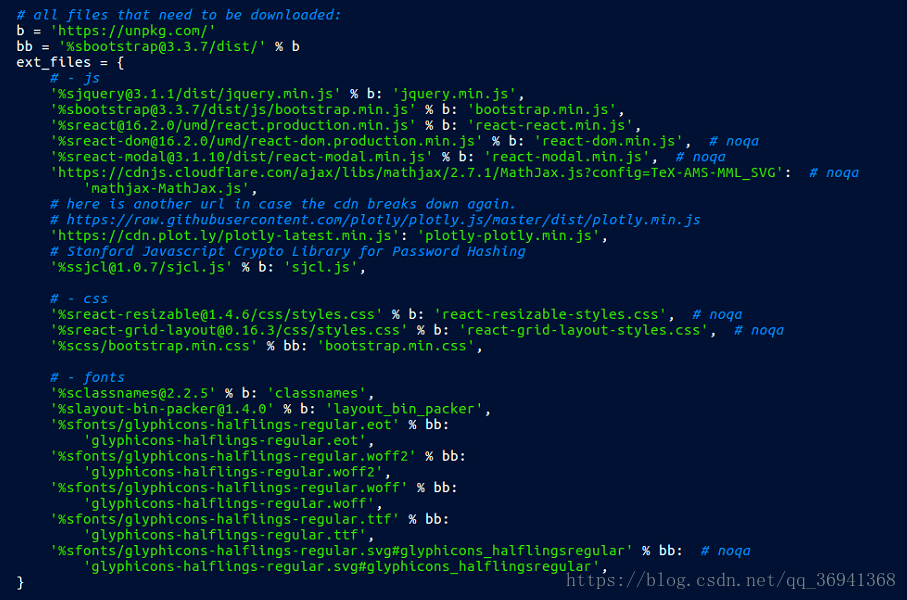
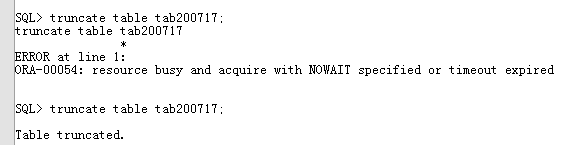
Category Archives: How to Fix

The solution to the error of [Oracle] ora-00054

Error message:
ORA-00054: resource busy and acquire with NOWAIT specified or timeout expired
 
Key words: ORA-00054 lock wait
 
The table cannot be truncated by another process if the table is not committed after the INSERT message is sent.
For example:
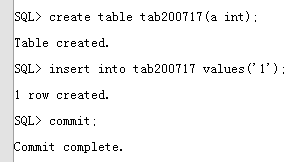
Process A creates A new table, inserts A row of data, but does not commit.

ORA-00054: ORA-00054 ORA-00054: ORA-00054: ORA-00054: ORA-00054: ORA-00054: ORA-00054: ORA-00054: ORA-00054: ORA-00054

The truncate of process B can only be executed after process A commits or after the resource is released.


Note that this situation is different from two processes operating on a resource at the same time (e.g., UPDATE on the same row). When two processes are operating on a resource at the same time, the second operation will get stuck (waiting).
You can find the process that holds the resource, commit the resource and release it. If you cannot commit, you can confirm and kill it.

SQL> select b.owner,b.object_name,a.session_id,a.locked_mode from v$locked_object a,dba_objects b where b.object_id = a.object_id;


Note that not all the information that appears after using the above statement is the problem process, because normal operation on the table as long as there is a hold resource in the query will be selected, so you can use this command several times to check whether the resource has been held, and you can look at the table name below to help confirm.
Query for sid and serial#.

SQL> select b.username,b.sid,b.serial#,logon_time from v$locked_object a,v$session b where a.session_id = b.sid order by b.logon_time;

KILL the session process.

Solution of visdom enabling problem

When enabling visdom.server, stop in the M.E. scripts.It might take a while before an error is reported after a long interval.
The reason for this is that during the process of downloading part of the script, some websites were not accessible (maybe because of overseas websites or firewall block). The reason is unclear.
Solution: Comment the download_scripts() function call in visdom/server.py. The exact location of the visdom/server.py file may vary. But you’re using the Python directory. For example, mine under this path:

/usr/local/anaconda3/lib/python3.6/site-packages/visdom

You can sudo gedit server.py or su root, enter the root password, and then gedit server.py. Once opened, you can go directly to the end of the file to find download_scripts_and_run() and comment out the download_scripts().
Enable visdom.server at this point and it will not get stuck in the previous problem. However, the download_scripts are commented out and some of the parts required for the front end are not working properly.
When you open localhost:8097, the page is blank (all blue) and there is no navigation bar as shown in the following image:

Cause: Viewing terminal will receive a 404 alert indicating that the page is not displaying properly due to some missing part.
Solution:

    tried online some change in the static index. The HTML file content method, solve the problem. Try manually downloading the missing file. Look for the URL in the download_scripts function of server.py from the previous operation. And compare the existing files of JS, CSS and Font files under visdom/static to download the missing files. The following is a list of the completed file directories. Click to download the missing files.


Website image:

Here are two examples of web sites for reference:
https://unpkg.com/[email protected]/dist/jquery.min.js with %b
With % bb url (must be in the middle add [email protected]/dist /) : https://unpkg.com/[email protected]/dist/[email protected]
Some can be downloaded directly and some URL is open source format, you can copy to a text document, and then change the rename change format.
Note: Fonts/Glyphicons – Halflings-Regular. SVG did not download successfully, but it does not seem to affect the use of Visdom.

Solution of visdom startup failure in Windows 10

Task description
Recently collected a batch of data, want to call Cyclegan to complete the domain migration to see the effect. So I found the open source Cyclegan code on the Internet, the code can run normally, but the call to Visidom will always show an Error: HTTP Error. So record the process of my solution
 
Start the visdom

python -m visdom.server

Calling CMD to start visdom.server but the code will get stuck, stuck in downloading the script
 
To solve the caton
The reason is that the file is difficult to download. Here’s how to solve it
Find the location of the Visidom package in the current environment, roughly: ~\Lib\site-packages\visdom Open server.py and look for download_scripts and comment this line so that download_scripts() is not executed
After this operation, and then start Visidom, the model will run smoothly, and no exception thrown. But there is a problem, open the page blue screen.
 
To solve the blue screen
The reason for the blue screen is that it does not download properly. The solution here refers to two articles, both of which are cited in the following references
Into local visdom in static files, there is a index. The HTML files, the backup download reference (2) in the index. The HTML files, to replace the current folder has the backup index. The restart visdom HTML files, open the page, the question remains, to be the next step will be the backup of the original index. The HTML to replace the current index. The HTML restart visdom, problem solving
 
reference
https://blog.csdn.net/AnthongDai/article/details/79117472https://github.com/chenyuntc/pytorch-book/blob/2c8366137b691aaa8fbeeea478cc1611c09e15f5/README.md#visdom%E6%89%93%E4%B8%8D%E5%BC%80%E5%8F%8A%E5 %85%B6%E8%A7%A3%E5%86%B3%E6%96%B9%E6%A1%88
 
This article is the author’s original, reproduced need to indicate the source!

Windows solution enabled visdom.server Slow and blank blue screen (no navigation bar)

Windows resolves enabling visdom.server slow and blank blue screen (no navigation bar)

ke a little while <>ode>take a little while take a little while The solution is as follows:
visdomrectory (.> \ [local] Anaconda3 \ Lib \ site - packages \ visdom ), open the inside of the server. Py file, directly turn to find the file last download_scripts_and_run () , will be one of the download_scripts () commented out, as follows:

then you can start quickly but also have the port, but after the browser is "blue screen", there is no navigation, the diagram below:

to see the process in the CMD, said error Could not open the static file , illustrate the static missing some necessary documents can't find it in the

then only need to put the missing file up the line. Here for everybody, you just need to put the visdom in the static replace the static .
Link: https://pan.baidu.com/s/1fDKi2rAtot-PcHGTXH8fbA
extraction code: li1w
python-m visdom.server/ code>>

The C compiler identification is unknown solution

LINK: fatal error LNK1158: cannot run ‘rc.exe’
Solution:
C:\Program Files (x86)\ Windowkits \8.1\bin\x86 C:\Program Files (x86)\ WindowKits \8.1\ Bin \x64, ARM :\Program Files (x86)\ WindowKits \8.1\ Bin \ ARM :\Program Files (x86)\ WindowKits \8.1\ Bin \ ARM
C:\Program Files (x86)\Windows Kits\8.1\ Bin \x86 (x64 or ARM) C:\Program Files (x86)\Microsoft Visual Studio 14.0\VC\ Bin (this compiler is corresponding to VS2015) folder.
Problem solved!

The C compiler identification is unknown

The environment
CLion+Cmake+Mingw
An error log

-- The C compiler identification is unknown
-- Check for working C compiler: D:/MinGW/bin/gcc.exe
-- Check for working C compiler: D:/MinGW/bin/gcc.exe -- broken
CMake Error at D:/Program Files/JetBrains/CLion 2019.2.3/bin/cmake/win/share/cmake-3.15/Modules/CMakeTestCCompiler.cmake:60 (message):
  The C compiler

    "D:/MinGW/bin/gcc.exe"

  is not able to compile a simple test program.

If it is a CPP program, it may be reported again

-- The CXX compiler identification is unknown

why
CMAKE could not check the C Compiler ID for unknown reasons, causing compilation to fail
The solution
Add the following configuration to the cMakelists.txt file to force the Compiler ID to be specified

INCLUDE(CMakeForceCompiler)
CMAKE_FORCE_C_COMPILER(gcc GNU)
CMAKE_FORCE_CXX_COMPILER(g++ GNU)

Rerun the cmake directive after adding it

Solve the problem of the C compiler identification is unknown or the cxx compiler identification is unknown in the process of using cmake

The compiler is not installed. You can run the following commands from the command line depending on your system choice.
RedHat-based

yum install gcc gcc-c++

Debian/Ubuntu-based

apt-get install cmake gcc g++

If you don’t have enough permissions, preface the command with sudo, execute
and recompile your project

The cxx compiler identification is unknown

//Configure VS2015/VS2015/VS2015/VS2015/VS2015/VS2015/VS2015

The CXX compiler identification is unknown

Cmake can’t find the C++ compiler. Check the VS installation directory for cl.exe, rc.exe and rcdll. DLL.
If you do not have cl.exe, you may have only installed VS and no VC compiler. Open VS and select VC to install.
If you do not have rc.exe and rcdll. DLL, which are used for compiling resources, you may install them in the Windows SDK. You can directly copy these two files to the VC/bin directory.

Centos-7 set boot to enter the text interface (not enter the graphical interface)

Centos-7 Settings Boot to the text interface (not to the graphical interface)
: /etc/inittab = /etc/inittab = /etc/inittab = /etc/inittab = /etc/inittab = /etc/inittab = /etc/inittab = /etc/inittab

# Default runlevel. The runlevels used are:
#   0 - halt (Do NOT set initdefault to this)
#   1 - Single user mode
#   2 - Multiuser, without NFS (The same as 3, if you do not have networking)
#   3 - Full multiuser mode
#   4 - unused
#   5 - X11
#   6 - reboot (Do NOT set initdefault to this)
#
id:3:initdefault:

This file does not look the same in centos-6 as it does in centos-7:

[root@localhost ~]# uname -a
Linux localhost.localdomain 3.10.0-327.el7.x86_64 #1 SMP Thu Nov 19 22:10:57 UTC 2015 x86_64 x86_64 x86_64 GNU/Linux
[root@localhost ~]# ll /etc/inittab
-rw-r--r--. 1 root root 511 Nov 19  2015 /etc/inittab
[root@localhost ~]# cat /etc/inittab 
# inittab is no longer used when using systemd.
#
# ADDING CONFIGURATION HERE WILL HAVE NO EFFECT ON YOUR SYSTEM.
#
# Ctrl-Alt-Delete is handled by /usr/lib/systemd/system/ctrl-alt-del.target
#
# systemd uses 'targets' instead of runlevels. By default, there are two main targets:
#
# multi-user.target: analogous to runlevel 3
# graphical.target: analogous to runlevel 5
#
# To view current default target, run:
# systemctl get-default
#
# To set a default target, run:
# systemctl set-default TARGET.target
#

There is no place to set the level.
In fact, in Centos-7, you can directly enter the text interface without entering the graphical interface by using the command setup:

[root@localhost ~]# which systemctl
/usr/bin/systemctl

You can use your own man systemctl, but don’t go too far
Here is how to set it:

[root@localhost ~]# systemctl get-default
graphical.target
[root@localhost ~]# systemctl set-default multi-user.target
Removed symlink /etc/systemd/system/default.target.
Created symlink from /etc/systemd/system/default.target to /usr/lib/systemd/system/multi-user.target.
[root@localhost ~]# systemctl get-default
multi-user.target

Systemctl get-default is used to get the current default target.
use systemctl set – the default can be set the default target, the target can be graphical, target, multi – user. Target.
Well, that’s basically it, reboot and you’ll go straight to the text interface.
Reference source

Centos7 installation interface without interface


Centos7 unbounded installation interface
Centos7 unbounded below installation interface

https://blog.csdn.net/qq_39112646/article/details/109444462
1 install a graphical interface. Boot root login
2. Install X (X Window System) as follows:
Yum groupinstall “X Window System”
Complete
3. Then install the GNOME Desktop command as follows
Yum groupinstall “GNOME Desktop”
the software group is bigger, the installation process is slower, also can appear the words complete after the installation is complete.
4. After the installation is complete, enter startx to enter the graphical interface

1.Ctrl+ Alt + F2 toggle to command line mode
2. Enter the following command to view the current boot mode
Systemctl get-default
graphical. Target represents the graphical interface to boot
Multi-User. target means to start the DOS interface at boot time
3. Enter the following commands to set up the startup graphical interface
Systemctl set – the default graphical. Target
in the same way if you want to start the DOS boot interface should enter the following command
Systemctl set-default multi-user. Target
DOS interface with graphical toggle shortcut
aphics to DOS: Ctrl+ Alt + F2
DOS to graphics: type startx
or
Switch to the DOS interface by typing init 3 on the command
Type init 5 to switch to the graphical interface

Git authentication failure solution, due to the problem of password modification

fatal: Authentication failed for ‘http:xxxxxxxxxx.git/’

The solution

1. git config –global user.name “username”

Git config –global user.email “email” git config –global user.email


2. Git config –system –unset credential


3. Control Panel – User Account – Voucher Manager – Ordinary Voucher, modify and delete the git password in it

Reproduced in: https://www.cnblogs.com/ChineseLiao/p/9400191.html

Git authentication failed

Enter the command to clear the login and password

git config --system --unset credential.helper

And then when you push
it’s going to pop up the login window again
Use the following command to configure login free

 git config  credential.helper store