Tag Archives: Configuration

The cxx compiler identification is unknown

//Configure VS2015/VS2015/VS2015/VS2015/VS2015/VS2015/VS2015

The CXX compiler identification is unknown

Cmake can’t find the C++ compiler. Check the VS installation directory for cl.exe, rc.exe and rcdll. DLL.
If you do not have cl.exe, you may have only installed VS and no VC compiler. Open VS and select VC to install.
If you do not have rc.exe and rcdll. DLL, which are used for compiling resources, you may install them in the Windows SDK. You can directly copy these two files to the VC/bin directory.

|-OpenGL – | some small problems about the glut Library

When you’re using OpenGL, if you can’t find the header file Glut. h, you probably don’t have a GLUT library installed on your computer
Install the glut library
1. Download the GLUT library toolkit
The glut library download address: http://www.opengl.org/resources/libraries/glut/glutdlls37beta.zip
2. The location of the GLUT library file


br>

Glut. H file
Placement is: C: \ Program Files \ Windows (x86) Kits \ \ Include \ 8.1 um \ gl

if you don't know oneself should put in that position, you can directly search gl. H to find this file in folder, or in the compiler directly see the gl. H file placement position, then put the glut. H on with gl. H with folder

Glut. Lib and glut32. Lib
Know the glut. H after placed the folder, it is convenient for many
is placed as follows: C: \ Program Files \ Windows (x86) Kits \ \ Lib \ winv6.3\8.1 um \ x64 and C: \ Program Files \ Windows (x86) Kits \ \ Lib \ winv6.3\8.1 um \ x86


Glut. DLL and glut32. DLL

C:\ windows\ System32
br> a>
>
: \ windows\ System32


>
C:\ windows\ System32

Configure OpenGL in CodeBlocks

There are many online tutorials, but some are easy to use and some are not.
There are two broad categories. One is that you don’t have to manually add libraries after you’ve configured them, but a New GLUT Project is needed to create a New Project instead of the usual Console Application. This category can refer to this document: https://wenku.baidu.com/view/7396dc8783d049649b66588c.html
Another type of configuration method, when configured, will be a New normal Console Application, but you will need to manually add the OpenGL library.
I chose the second category because I found that the console could not be tuned out of the configuration method of the first category, so I could not see the output of the console. Debug is very inconvenient, so I haven’t found a solution yet.
General reference is http://www.yalewoo.com/opengl_notes_2_use_opengl_in_codeblocks.html, but is not identical also, built after the project need to add one more libraries.

Steps:
Glut. h goes into the MinGW\include\GL directory of the compiler. .
glut32 lib in MinGW \ lib directory
glut32. The DLL into the C: \ Windows \ System in

Open the codeblocks create the console program, and then in the project to build the options – would add three static link library glut32 Settings. The lib, libopengl32. A, as well as libglu32. A, their paths in the lib folder of the compiler.

Fatal Python error: initfsencoding: unable to load the file system codec

When both Python 2 and Python 3 exist and one of them fails to start, an error is reported in one of two cases
 
1. File error in python2 path failed to start python3

Fatal Python error: initfsencoding: Unable to load the file system codec
file “C:\Python27\Lib\encodings\__init__. Py “, line 123
ise CodecRegistryError,\
^>r> syntaxe> : invalid syntax
Current thread 0x000004dc (most recent call first):
2, file error in python3 path failed to start

File “E:\Python37\Lib\site.py”, line 177
File =sys.stderr)

s>xerror: invalid syntax
 
The above two cases in returning the same, the reason is to set the environment variable PYTHONPATH, PYTHONPATH is Python search path, we import the default module will search from the PYTHONPATH, environment variable is set to one version of the module path, lead to another version of the module loading path error when starting, leading to launch failure, this is according to the online tutorial to install Python when leaving a hole, the variable can not actually, The environment variable needs to be configured when the custom module is no longer in the Python installation path, so you can remove this environment variable, or just remove C:\Pythonxx\Lib

Perfect solution after deletion

Start tomcat server error Context initialization failed

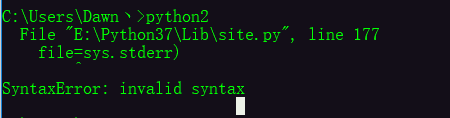
Severe: Context initialization failed
org. Springframework. Beans. Factory. BeanCreationException: Error creating bean with name ‘org.springframework.context.annotation.internalAsyncAnnotationProcessor’ defined in org.springframework.scheduling.annotation.ProxyAsyncConfiguration: Bean instantiation via factory method failed; nested exception is org.springframework.beans.BeanInstantiationException: Failed to instantiate [org.springframework.scheduling.annotation.AsyncAnnotationBeanPostProcessor]: Factory method ‘asyncAdvisor’ threw exception; nested exception is java.lang.IllegalArgumentException: @EnableAsync annotation metadata was not injected
at org.springframework.beans.factory.support.ConstructorResolver.instantiateUsingFactoryMethod(ConstructorResolver.java:599)
at org.springframework.beans.factory.support.AbstractAutowireCapableBeanFactory.instantiateUsingFactoryMethod(AbstractAutowireCapableBeanFactory.java:1123)
At…
Solution: In springMVC.xml configuration file will < context:component-scan base-package=”*”/>
Change the path of your own project class files to: < context:component-scan base-package=”com.srpingmvc.*”>
— — — — — — — — — — — — — — — — — — — — to interpret the following — — — — — — — — — — — — — — — — — — — — — — — — — — — — — — — — — — — — — — —
Now let’s take a look at the SpringMVC.xml file to see why this is happening
< ?The XML version = “1.0” encoding = “utf-8”?>
< beans xmlns=”http://www.springframework.org/schema/beans”
xmlns:xsi=”http://www.w3.org/2001/XMLSchema-instance”
xmlns:context=”http://www.springframework.org/schema/context”
xsi:schemaLocation=”http://www.springframework.org/schema/beans
http://www.springframework.org/schema/beans/spring-beans.xsd
http://www.springframework.org/schema/context
http://www.springframework.org/schema/context/spring-context-4.3.xsd “& gt;
 
< ! — Configure @Controller @service –>
< context:component-scan base-package=”com.springmvc.*”> < /context:component-scan>
< ! — View parser logical View, physical view –& GT;
< bean class= “org.springframework.web.servlet.view.InternalResourceViewResolver”>
< property name=”prefix” value=”/”> < /property>
< property name=”suffix” value= “.jsp”> < /property>
< /bean>
 
< /beans>
In the configuration file, base-package=”com.srpingmvc.*” means that all files under the com.springMVC folder will be scanned for the purpose of scanning
Register classes with specific annotations such as @Controller @Component # Repository and so on as beans in the Spring container.
The following is reproduced from: http://blog.csdn.net/zzjjiandan/article/details/22922847
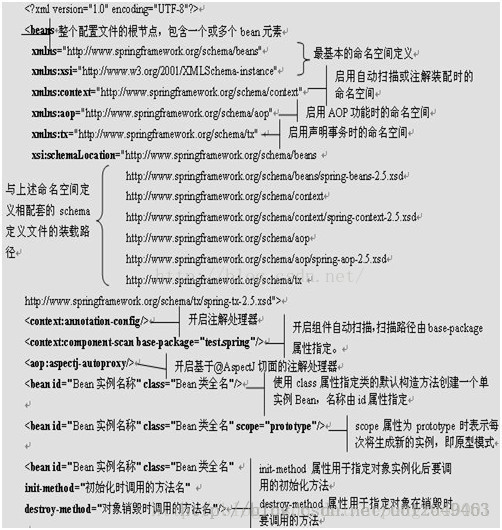
The Spring configuration file is the “drawing” for directing the Spring factory to Bean production, dependency injection (assembly), and Bean instance distribution.
Java EE programmers must learn and flexibly apply this “drawing” to accurately express their “production intentions”.
The Spring configuration file is one or more standard XML documents. Applicationcontext.xml is the default configuration file for Spring.
When the container starts and cannot find the specified configuration document, an attempt is made to load the default configuration file.
The following is a relatively complete configuration file template. The basic purpose of each XML tag node in the document is also explained in detail.
These XML tag nodes will be used in the following knowledge points. After mastering the purpose of these XML nodes and attributes,
It provides a solid foundation for us to start writing configuration files.


Install PyTorch in Anaconda environment

download address: https://download.pytorch.org/whl/torch_stable.html

my CPU is python 3, 7 win10 system corresponding to the following

2 switch directory

copies the downloaded WHL file to the site-packages directory in the lib of anaconda.
directory such as: E:\Anaconda3\Lib\site-packages.

3 installation
After

open the anaconda prompt and switch to the site-packages directory:
(base) C:\Users\Lenovo> E:
(base) E:> cd Anaconda3\Lib\site-packages
(base) E:\Anaconda3\Lib\site-packages> For example, my WHL file name is:
torch 1.3.0+cpu-cp37-cp37m-win_amd64. WHL

test: import torch
no error should be no problem