Category Archives: How to Fix

Vue Error: initialize failed: invalid dom [How to Solve]

An error occurred when ecarts component was introduced into Vue project: “error: initialize failed:invalid dom. ”

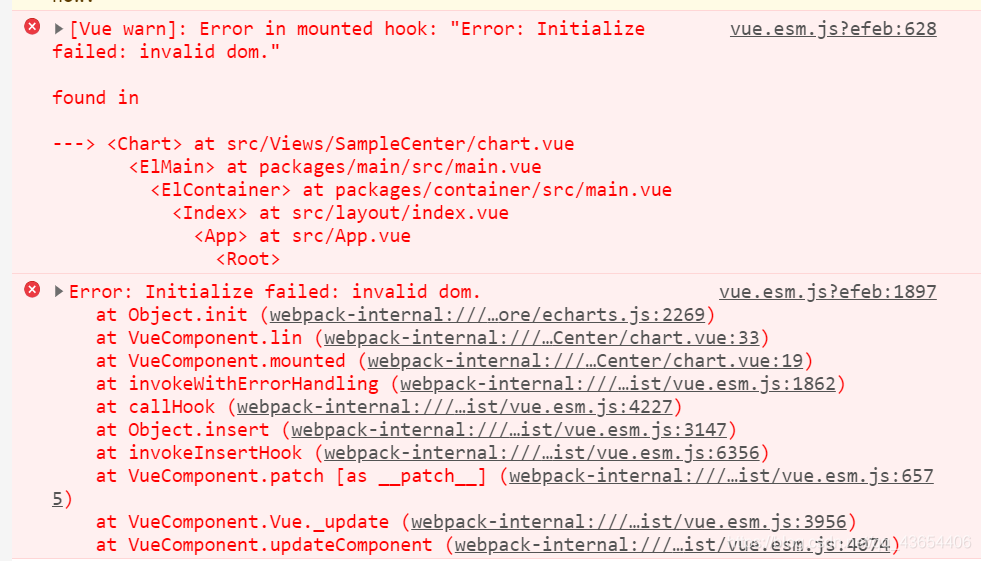
I found that I didn’t reach that level at all. The problem I encountered was that I didn’t quote correctly. I split up. Xiaobai grew up in tears and blood. He didn’t talk much nonsense. Write an article and record it.

The main reason is that I didn’t understand the reference method of ecarts component. Here is my solution

<div id="a" style="height:80vh;width:100%" ref="b"></div>

There are two ways, one is Ref

let mychart = this.$echarts.init(this.$refs.b)

A way of using ID

this.$echarts.init(document.getElementById("a"))

The following is the complete code of the ecart component that I quoted. I have highlighted the mistakes I made. I hope it can help you.

<template>
  <div id="a" style="height:80vh;width:100%" ref="b"></div>
</template>
<script>
mounted() {
      this.init()

  },
 
  methods: {
      init(){
          let mychart = this.$echarts.init(this.$refs.b)
          // let mychart = this.$charts.init(document.getElementById("a"))
          //Here, I am the problem here, did not understand the whole id and ref relationship
          let optionline = {
              backgroundColor: '#f0f0f0',
    title: {
        text: 'Folding Line Chart',
        textStyle: {
            align: 'center',
            color: '#99CCFF',
            fontSize: 20,
        },
        top: '5%',
        left: 'center',
    },
    tooltip: {
        trigger: 'axis',
        axisPointer: {
            lineStyle: {
                color: {
                    type: 'linear',
                    x: 0,
                    y: 0,
                    x2: 0,
                    y2: 1,
                    colorStops: [{
                        offset: 0,
                        color: 'rgba(0, 255, 233,0)'
                    }, {
                        offset: 0.5,
                        color: 'rgba(255, 255, 255,1)',
                    }, {
                        offset: 1,
                        color: 'rgba(0, 255, 233,0)'
                    }],
                    global: false
                }
            },
        },
    },
    grid: {
        top: '15%',
        left: '5%',
        right: '5%',
        bottom: '15%',
        // containLabel: true
    },
    xAxis: [{
        type: 'category',
        axisLine: {
            show: true
        },
        splitArea: {
            // show: true,
            color: '#f00',
            lineStyle: {
                color: '#f00'
            },
        },
        axisLabel: {
            color: '#fff'
        },
        splitLine: {
            show: false
        },
        boundaryGap: false,
        data: ['A', 'B', 'C', 'D', 'E', 'F'],

    }],

    yAxis: [{
        type: 'value',
        min: 0,
        // max: 140,
        splitNumber: 4,
        splitLine: {
            show: true,
            lineStyle: {
                color: 'rgba(255,255,255,0.1)'
            }
        },
        axisLine: {
            show: false,
        },
        axisLabel: {
            show: false,
            margin: 20,
            textStyle: {
                color: '#d1e6eb',

            },
        },
        axisTick: {
            show: false,
        },
    }],
    series: [{
            name: 'Total registration',
            type: 'line',
            // smooth: true, // whether smooth
            showAllSymbol: true,
            // symbol: 'image://./static/images/guang-circle.png',
            symbol: 'circle',
            symbolSize: 25,
            lineStyle: {
                normal: {
                    color: "#6c50f3",
                    shadowColor: 'rgba(0, 0, 0, .3)',
                    shadowBlur: 0,
                    shadowOffsetY: 5,
                    shadowOffsetX: 5,
                },
            },
            label: {
                show: true,
                position: 'top',
                textStyle: {
                    color: '#6c50f3',
                }
            },
            itemStyle: {
                color: "#6c50f3",
                borderColor: "#fff",
                borderWidth: 3,
                shadowColor: 'rgba(0, 0, 0, .3)',
                shadowBlur: 0,
                shadowOffsetY: 2,
                shadowOffsetX: 2,
            },
            tooltip: {
                show: false
            },
            areaStyle: {
                normal: {
                    color: this.$echarts.graphic.LinearGradient(0, 0, 0, 1, [{
                            offset: 0,
                            color: 'rgba(108,80,243,0.3)'
                        },
                        {
                            offset: 1,
                            color: 'rgba(108,80,243,0)'
                        }
                    ], false),
                    shadowColor: 'rgba(108,80,243, 0.9)',
                    shadowBlur: 20
                }
            },
            data: [502.84, 205.97, 332.79, 281.55, 398.35, 214.02, ]
        },
        {
            name: 'Total registration',
            type: 'line',
            // smooth: true, // whether smooth
            showAllSymbol: true,
            // symbol: 'image://./static/images/guang-circle.png',
            symbol: 'circle',
            symbolSize: 25,
            lineStyle: {
                normal: {
                    color: "#00ca95",
                    shadowColor: 'rgba(0, 0, 0, .3)',
                    shadowBlur: 0,
                    shadowOffsetY: 5,
                    shadowOffsetX: 5,
                },
            },
            label: {
                show: true,
                position: 'top',
                textStyle: {
                    color: '#00ca95',
                }
            },

            itemStyle: {
                color: "#00ca95",
                borderColor: "#fff",
                borderWidth: 3,
                shadowColor: 'rgba(0, 0, 0, .3)',
                shadowBlur: 0,
                shadowOffsetY: 2,
                shadowOffsetX: 2,
            },
            tooltip: {
                show: false
            },
            areaStyle: {
                normal: {
                    color: this.$echarts.graphic.LinearGradient(0, 0, 0, 1, [{
                            offset: 0,
                            color: 'rgba(0,202,149,0.3)'
                        },
                        {
                            offset: 1,
                            color: 'rgba(0,202,149,0)'
                        }
                    ], false),
                    shadowColor: 'rgba(0,202,149, 0.9)',
                    shadowBlur: 20
                }
            },
            data: [281.55, 398.35, 214.02, 179.55, 289.57, 356.14, ],
        },
    ]
          }
          mychart.setOption(optionline)
      }
  }
</script>

[Solved] Import org.apache.hadoop.hbase.hbaseconfiguration package cannot be imported

    <dependency>
      <groupId>org.apache.hbase</groupId>
      <artifactId>hbase-client</artifactId>
      <version>2.1.0-cdh6.2.1</version>
    </dependency>
    <dependency>
      <groupId>org.apache.hadoop</groupId>
      <artifactId>hadoop-client</artifactId>
      <version>2.7.1</version>
    </dependency>
    <dependency>
      <groupId>org.apache.hadoop</groupId>
      <artifactId>hadoop-hdfs</artifactId>
      <version>2.7.1</version>
      <exclusions>
        <exclusion>
          <groupId>io.netty</groupId>
          <artifactId>netty</artifactId>
        </exclusion>
      </exclusions>
    </dependency>

After importing hbaseconfiguration, we found that we need to configure the remote warehouse. Add the

  <repositories>
    <repository>
      <id>cloudera</id>
      <url>https://repository.cloudera.com/artifactory/cloudera-repos/</url>
    </repository>
  </repositories>

After the problem is solved

How to Solve Error: Failed to execute goal org.codehaus.mojo:……..

How to Solve:Failed to execute goal org.codehaus.mojo:exec-maven-plugin:3.0.0:exec (default-cli) on project spring_aop: Command execution failed.error


error:

Failed to execute goal org.codehaus.mojo:exec-maven-plugin:3.0.0:exec (default-cli) on project 
spring_aop: Command execution failed.

Solution 1: in this case, I will use the main method to execute the program and use the unit test @ test instead

~It used to be like this: running with main

public class MyTest {
    public static void main(String[] args) {
    
        ClassPathXmlApplicationContext context = new ClassPathXmlApplicationContext("applicationContext.xml");

        //Dynamic proxies represent interfaces
        UserService userservice = (UserService) context.getBean("userservice");

        userservice.add();
    }
}

~Changed to: use @ test

import com.niuyun.service.UserService;
import com.niuyun.service.UserServiceImpl;
import org.junit.Test;
import org.springframework.context.support.ClassPathXmlApplicationContext;

public class MyTest {

    @Test
    public void test(){
        ClassPathXmlApplicationContext context = new ClassPathXmlApplicationContext("applicationContext.xml");

        //Dynamic proxies represent interfaces
        UserService userservice = (UserService) context.getBean("userservice");

        userservice.add();
    }
}

~Finish the work and run successfully

! Expansion

@Test is the basis of JUnit testing, and its functions are as follows:
1. Specify the type of exception to be thrown
2. Test the running time of the code.


Solution 2: if you have to use the main function, you can introduce two plug-ins in Maven (compiler can not be introduced), but it may lead to Chinese garbled.

Maven compiler plugin: used to compile java files, specify JDK version, etc.
exec Maven plugin: used to execute class files, in which the path of executing class should be indicated in plug-in configuration.

<build>
     <plugins>
         <plugin>
             <groupId>org.codehaus.mojo</groupId>
             <artifactId>exec-maven-plugin</artifactId>
             <version>1.6.0</version>
             <executions>
                 <execution>
                     <goals>
                         <goal>java</goal>
                     </goals>
                 </execution>
             </executions>
             <configuration>
                 <classpathScope>test</classpathScope>
             </configuration>
         </plugin>
     </plugins>
</build>

~Run successfully


Solve the problem of garbled code

Method 1:
in setting – & gt; maven-> Runner-> Fill in the column VM options
with – dfile. Encoding = GB2312

Method 2: add in pom.xml (I tried this method, but I didn’t solve the garbled code, which may be useful to you)

<properties>
	<!-- Encoding when copying files -->
	<project.build.sourceEncoding>UTF-8</project.build.sourceEncoding>
	<project.reporting.outputEncoding>UTF-8</project.reporting.outputEncoding>
	<!-- Compile-time coding -->
    <maven.compiler.encoding>UTF-8</maven.compiler.encoding>
</properties> 

TypeError: An asyncio.Future, a coroutine or an awaitable is

Typeerror: an asyncio. Future, a coroutine or an awaitable is required
when it’s asynchronous, it’s found that one is reporting this error. Some methods are found on the Internet, but it doesn’t work, so it’s found that it doesn’t work

Async is missing from the front of the method

Full asynchronous:

async def ExportData(v,f_row,a):
			........


loop = asyncio.new_event_loop()
asyncio.set_event_loop(loop)
 t1 = time.time()
 # for v in a[1:]:
 tasks = [ExportData(v,f_row,a) for v in a[1:]]
 loop.run_until_complete(asyncio.gather(*tasks))

The use of makefile in GoLand under Windows

Install chocolate

The official website is very clear. Just refer to the official website for download

Install make

To execute the makefile file, you need to use make, and install make by using chocolate (note that you also need to use the administrator identity)

 choco install make

Change GoLand settings

At this point, you can use the make instruction to execute the makefile file

Hive execution task report cannot find main class error

Reason: because my cluster is centos7 system, according to the data on the Internet, the buffer/cache caching mechanism of centos7 will continue to increase the number of buffers, which will occupy the memory and reduce the available memory of the program. As a result, the Java garbage collection mechanism recycles the yarnchild process, resulting in the failure to find the main class
solution: store the cache data in memory to disk, and then release the memory manually

It is found on the Internet that:
execute the sync command several times, and then execute it in turn:
echo 1 & gt/ proc/sys/vm/drop_ caches
echo 2 >/proc/sys/vm/drop_ caches
echo 3 >/proc/sys/vm/drop_ caches

However, when running the following statement to clear the cache, an error of permission denied is reported: – bash/proc/sys/VM/drop_ caches: Permission denied

sudo echo 1 >/proc/sys/vm/drop_ caches

sudo echo 2 >/proc/sys/vm/drop_ caches

sudo echo 3 >/proc/sys/vm/drop_ caches

sync

Bash refused to do so because of the redirection symbol “& gt;” It’s also bash’s order. Sudo only allows echo command to have root authority,
but not “& gt;” The command also has root permission, so bash will think that the command has no permission to write information.

resolvent:

“SH – C” command, which allows bash to execute a string as a complete command

sudo sh -c “echo 1 >/proc/sys/vm/drop_ caches”

sudo sh -c “echo 2 >/proc/sys/vm/drop_ caches”

sudo sh -c “echo 3 >/proc/sys/vm/drop_ caches”

Or
echo 1 | sudo TEE/proc/sys/VM/drop_ caches

Centos7 solves the problem of unable to use tab to complete automatically

Centos7 solves the problem of unable to use tab to complete automatically

Ifconfig cannot be completed with tab key

Ifconfig doesn’t work

Just install net tools

[root@localhost ~]# yum -y install net-tools
[root@localhost ~]# ifconfig
ens33: flags=4163<UP,BROADCAST,RUNNING,MULTICAST>  mtu 1500
        inet 192.168.220.132  netmask 255.255.255.0  broadcast 192.168.220.255
        inet6 fe80::4310:d566:7af5:f620  prefixlen 64  scopeid 0x20<link>
        ether 00:0c:29:49:44:8a  txqueuelen 1000  (Ethernet)
        RX packets 11769  bytes 16082745 (15.3 MiB)
        RX errors 0  dropped 0  overruns 0  frame 0
        TX packets 5209  bytes 340821 (332.8 KiB)
        TX errors 0  dropped 0 overruns 0  carrier 0  collisions 0

lo: flags=73<UP,LOOPBACK,RUNNING>  mtu 65536
        inet 127.0.0.1  netmask 255.0.0.0
        inet6 ::1  prefixlen 128  scopeid 0x10<host>
        loop  txqueuelen 1000  (Local Loopback)
        RX packets 8  bytes 704 (704.0 B)
        RX errors 0  dropped 0  overruns 0  frame 0
        TX packets 8  bytes 704 (704.0 B)
        TX errors 0  dropped 0 overruns 0  carrier 0  collisions 0

The tab key cannot be completed

CentOS needs to be installed manually because it does not install the automatic completion package when the installation is minimized[root@localhost ~]# yum -y install bash-completion [root@localhost ~]# bash

Make the root user login through SSH and report the error of “permission denied, please try again”

When using SSH to log in to the ECS instance of the Linux system, if the root user enters the correct password, the following error message will appear.

Note: the non root user can log in normally, and the root user can log in normally through the management terminal.

Permission denied, please try again.

Please check the security log. If it contains the following error message, the problem is usually caused by the SELinux service enabled. Please refer to the solution to the problem caused by SELinux service. In other cases, please refer to the solution to the problem caused by forbidding the root user to log in.

error: Could not get shadow infromation for root.

 
Solutions to problems caused by forbidding root user to log in

Tips:

The related Linux configuration and instructions in this paper have been tested in CentOS 6.5 64 bit operating system. The operating system configuration of other types and versions may be different. Please refer to the official documents of the corresponding release for details. Related policies can improve the security of the server. Users are requested to decide whether to modify the relevant configuration based on the trade-off between security and ease of use.

Please refer to the following steps to check the configuration and modify it.

    log in to the ECS instance of Linux system through the management terminal

      View /etc/SSH/sshd through cat and other commands_ Whether the config configuration file contains a configuration similar to the following.

      PermitRootLogin no

      Note: the description of this parameter is as follows.

      If the parameter is not configured (by default), or the parameter value is configured to “yes”, the root user is allowed to log in. Only when the parameter value is set to “no”, will the root user be forbidden to log in.

      This parameter only affects the root user’s SSH login, and does not affect the root user’s login to the system through the management terminal and other ways.

      use VI and other editors to set the parameter value to “yes”, or delete the parameter, or comment (add “#” at the beginning) the whole line configuration. For example: ?Permitrootlogin yes .

      Note: it is recommended to back up the configuration file before modification.

      execute the following command to restart the SSH service.

      service sshd restart

      Try logging in to the server again using root. If the problem still exists, you can refer to the troubleshooting guide for remote login failure of ECS Linux SSH for further troubleshooting and analysis

       
      Solutions to problems caused by SELinux service

      You can choose to temporarily or permanently shut down SELinux service to solve the problem of SSH connection exception according to the needs of the on-site environment.

       
      Check SELinux service status

        log in to the Linux instance through the management terminal and execute the following command to view the current SELinux service status.

        /usr/sbin/sestatus -v 

        The system display is similar to the following.

        SELinux status:       enabled

        Tip: if

        The SELinux status parameter is

        enabled means that it is in the on state

        disabled is off.

       
      Temporarily shut down SELinux service

      Log in to the Linux instance and execute the following command to temporarily close SELinux.

      Tip: temporary modification of SELinux service status is real-time and effective, and there is no need to restart the system or instance.

      setenforce 0

       
      Permanently shut down SELinux service

      Log in to the Linux instance and execute the following command to shut down the SELinux service permanently.

      Tip: to permanently modify SELinux service status, you need to restart the system or instance before it can take effect.

      sed -i 's/SELINUX=enforcing/SELINUX=disabled/' /etc/selinux/config

      Tip: this command is only applicable when the SELinux service is in enforcing state.

Request processing failed;nested exception is java.lang.*

catalogue

Questions

analysis

solve

Appendix

be careful

reference resources


Questions

Error 1:

Httpclient sends a request to the server, and the server sometimes returns 500 errors to the client,

Open the server error log and report the following error:

2021-05-28   21:05:06.548 default [http-nio-0.0.0.0-xxxx-exec-6] ERROR o.a.c.c.C.[.[localhost].[/].[dispatcherServlet] – L ine:175 – Servlet.service() for servlet [dispatcherServlet] in context with path [] threw exception [Request processing failed; nested exception is java.lang.NullPointerException] with root cause
java.lang.NullPointerException: null

(the problem is that there is no specific empty pointer in which line, which is not easy to locate. Moreover, it does not report an error every time, but occasionally.)

Error 2:

java.net.SocketTimeoutException

analysis

Error 1 Analysis

After further analysis, it is found that the problem lies in InputStream,

InputStream inputstream =request.getInputStream()

inputstream.read()

After obtaining the InputStream in the request, the above error 2: java.net.sockettimeoutexception appears in the process of reading the InputStream. However, the program only catches this exception and does not handle it, resulting in a null pointer.

So the question is, why do you report error 2, and sometimes.

Error 2 Analysis

Error 2 is caused by the timeout of httpclient getting response, that is, before the server has finished reading the InputStream, httpclient has already responded to the timeout, and broken the link after the timeout, resulting in the exception of reading InputStream.

There are many reasons why response timeout is triggered,

It may be due to the network, which leads to the slow network transmission;

It may also be that httpclient carries a large amount of data in this request and the server reads it slowly;

It is also possible that the load of the server is high, the data processing is slow, and so on.

solve

After analyzing the reasons, we can solve the problem from two aspects,

For the server, it is necessary to handle the exception capture and respond to the corresponding prompt information to the client. For the client, the response time (HTTP. Socket. Timeout) can be increased appropriately.

Appendix

About the setting of two timeouts of httpclient,

Request timeout (HTTP. Connection. Timeout): that is, connection timeout, refers to the time from the establishment of HTTP link initiated by the client to the completion of the establishment of HTTP link. Response timeout (HTTP. Socket. Timeout): that is, reading data timeout, refers to the time from the client sending the HTTP request to the server receiving the response.

be careful

To write Java, we must catch all kinds of exceptions and handle them; Otherwise, it is difficult to locate the problem. For all kinds of file streams, network streams, etc., we must close the stream in finally {} to ensure that the stream is closed under both normal conditions and abnormal conditions. Otherwise, it may lead to the occupation of resources under abnormal conditions, resulting in the server can not normally provide external services. The problem that is relatively difficult to locate is that sometimes an error is reported, sometimes it is normal, and sometimes it is normal for the same request. Sometimes this problem has to be considered from the network, hardware, CPU, memory, or operating system level.

reference resources

https://blog.csdn.net/goodlixueyong/article/details/50676821

https://blog.csdn.net/weixin_ 38629529/article/details/89788963

https://blog.csdn.net/senblingbling/article/details/43916851

https://blog.csdn.net/u010142437/article/details/18091545

https://tech.kujiale.com/ying-yong-pin-fan-bao-chu-cause-java-net-sockettimeoutexception-read-timed-outzen-yao-ban/

cannot assign module before Module.__init__() call


Property error, module cannot assign value before initialization. The error may be caused by:

The initialization of the parent class is not added to the initialization of the class, for example:

class Conv2dBatchLeaky(nn.Module):
    def __init__(self, in_channels, out_channels, kernel_size, stride, leaky_slope=0.1):

        self.in_channels = in_channels
        self.out_channels = out_channels
        self.kernel_size = kernel_size

 
resolvent:

add:

super(Conv2dBatchLeaky, self).__ init__()

The code is as follows:

class Conv2dBatchLeaky(nn.Module):
    def __init__(self, in_channels, out_channels, kernel_size, stride, leaky_slope=0.1):
        super(Conv2dBatchLeaky, self).__init__()

        self.in_channels = in_channels
        self.out_channels = out_channels
        self.kernel_size = kernel_size


SSL_ERROR_SYSCALL in connection to github.com:443

Project scenario:

Mac uses git push or hexo deploy to push GitHub

Problem Description:

Bug contains

LibreSSL SSL_connect: SSL_ERROR_SYSCALL in connection to github.com:443

Cause analysis:

Because the agent is attached locally, you can clone
but when pushing, you need to attach the agent to the terminal


Solution:

vim ~/.gitconfig

View the port of the native agent and replace the following XXXX

[http]
	proxy = socks5://127.0.0.1:xxxx
[https]
	proxy = socks5://127.0.0.1:xxxx

You can also push by turning off the agent and accessing it normally