Tag Archives: tensorflow

After the new video card rtx3060 arrives, configure tensorflow and run “TF. Test. Is”_ gpu_ The solution of “available ()” output false

First of all, install according to the normal installation method:
the necessary conditions for success are:
1. The version number should be correct, that is, CUDA should be installed above 11.1 (because CUDA version supported by 30 AMP architecture graphics card starts from 11.1)
link: https://developer.nvidia.com/zh-cn/cuda-downloads
2. Cudnn needs to install the, Link (to register and log in to NVIDIA account) https://developer.nvidia.com/zh-cn/cudnn
If you haven’t installed it, you can see other posts https://so.csdn.net/so/search/all?q=3060%20tensorflow& t=all& p=1& s=0& tm=0& lv=-1& ft=0& l=& U =
after installation, enter the created environment and run tf.test.is_ gpu_ available()。
if the computer can detect the graphics card, it can display the number of cores, computing power and other parameters of each graphics card, but the final answer is false
if the command line shows that cusolver64 cannot be found_ 10 documents

, at the following address C:// program files/NVIDIA GPU computing toolkit/CUDA/V11.1/bin

Will cusolver64_ 11. DLL renamed to cusolver64_ 10. Dll
and then run tf.test.is again_ gpu_ available()

Your uncle made it!

After installing the dual system , Code error

1. After installing the Linux system, the executable code in win10 will report an error. It will display importerror: DLL load failed: this volume does not contain a recognized file system. Make sure that all requested file system drivers are loaded and that the volume is not corrupted

2. Run pychar, do not call the package, for example

print(2+3)

If it runs successfully, pychar is OK , Modify other environments to see if they can run successfully . That’s how I solved it .
 

Several solutions to HDF5 error reporting in Python environment

Several solutions to the problem of HDF5 error reporting in Python environment (personal test)
the content of error reporting is as follows:
warning! HDF5 library version mismatched error
the HDF5 header files used to compile this application do not match
the version used by the HDF5 library to which this application is linked.
data corruption or segmentation faults may occur if the application continues.
This can happen when an application was compiled by one version of HDF5 but
linked with a different version of static or shared HDF5 library.
You should recompile the application or check your shared library related
settings such as ‘LD_ LIBRARY_ PATH’.
You can, at your own risk, disable this warning by setting the environment
variable ‘HDF5_ DISABLE_ VERSION_ CHECK’ to a value of ‘1’.
Setting it to 2 or higher will suppress the warning messages totally.
Headers are 1.10.4, library is 1.10.5

There are two ways to solve this problem.
first of all, this problem may be the mismatch of HDF5 library, or it may be something similar to warning. I will talk about it in detail below.
The first solution: uninstall HDF5 and then install it again.
The code executed by the terminal is as follows:
CONDA install HDF5
there are many friends on the Internet who use this method to be useful. I personally test that this method is useless to me.
The second solution: check the set path: LD_ LIBRARY_ Path
I personally test: because the system I use is win10, but LD_ LIBRARY_ I couldn’t find the path for a long time. Later, I searched for the path of Linux, so I didn’t use this method.
The third solution: the HDF5_ DISABLE_ VERSION_ Check is set to a higher level, ignoring warnings.
Before import tensorflow, add the following code to the code:
Import OS;
Import OS;
Import OS os.environ [‘HDF5_ DISABLE_ VERSION_ Check ‘] =’2’
my personal test: this method is really useful!

Tensorflow C++:You must define TF_LIB_GTL_ALIGNED_CHAR_ARRAY for your compiler

When using the tensorflow C++ API, the error You must define TF_LIB_GTL_ALIGNED_CHAR_ARRAY for your compiler.
The reason is as follows (see reference).


If you omit the COMPILER_MSVC definition, you will run into an error saying “You must define TF_LIB_GTL_ALIGNED_CHAR_ARRAY for your compiler.” If you omit the NOMINMAX definition, you will run into a number of errors saying “’(‘: illegal token on right side of ‘::’”. (The reason for this is that <Windows.h> gets included somewhere, and Windows has macros that redefine min and max. These macros are disabled with NOMINMAX.)

Solution 1:
Add at the beginning of the code

#pragma once

#define COMPILER_MSVC
#define NOMINMAX

Solution 2:

Take vs2017 as an example: attribute Manager — > C/C + + –> preprocessor definition

Paste in the following

COMPILER_ MSVC
NOMINMAX

put things right once and for all!

ValueError: Input 0 of node import/save/Assign was passed float from import/beta1_power:0 incompatib

Exception encountered while importing optimized frozen graph.

# read pb into graph_def
with tf.gfile.GFile(pb_file, "rb") as f:
    graph_def = tf.GraphDef()
    graph_def.ParseFromString(f.read())

# import graph_def
with tf.Graph().as_default() as graph:
    tf.import_graph_def(graph_def)

Get exception in this line:

tf.import_ graph_ def(graph_ def)

ValueError: Input 0 of node import/save/Assign was passed float from import/beta1_ power:0 incompatible with expected float_ ref.

The solution: make sure your_ The file format is correct (similar to this), and try to_ graph_ Set some values in the ‘name’ parameter of def() to try to override the default value of ‘import’, as follows:

import tensorflow as tf

from tensorflow.python.platform import gfile
model_path="/tmp/frozen/dcgan.pb"

# read graph definition
f = gfile.FastGFile(model_path, "rb")
gd = graph_def = tf.GraphDef()
graph_def.ParseFromString(f.read())

# fix nodes
for node in graph_def.node:
    if node.op == 'RefSwitch':
        node.op = 'Switch'
        for index in xrange(len(node.input)):
            if 'moving_' in node.input[index]:
                node.input[index] = node.input[index] + '/read'
    elif node.op == 'AssignSub':
        node.op = 'Sub'
        if 'use_locking' in node.attr: del node.attr['use_locking']

# import graph into session
tf.import_graph_def(graph_def, name='')
tf.train.write_graph(graph_def, './', 'good_frozen.pb', as_text=False)
tf.train.write_graph(graph_def, './', 'good_frozen.pbtxt', as_text=True)

How to Solve Python AttributeError: ‘module’ object has no attribute ‘xxx’

Python script error attributeerror: ‘module’ object has no attribute ‘xxx’ solution

when you encounter a few problems, you should pay attention to the same problem when you don’t ask for a solution

1. When naming py script, it should not be the same as the reserved word and module name of Python
(it is not easy to notice when naming files)
2 Delete the. PyC file of the library (because the. PyC file will be generated every time the PY script runs; if the. PyC file has been generated, if the code is not updated, the runtime will still go PyC, so you need to delete the. PyC file), rerun the code, or find an environment where you can run the code and copy and replace the. PyC file of the current machine Import questions </ font> </ font>

Tensorflow error: attributeerror: module ‘tensorflow’ has no attribute ‘unpack’ (‘pack ‘)

Tensorflow: attributeerror: module ‘tensorflow’ has no attribute ‘unpack’ (‘pack ‘)

As shown in the figure:

AttributeError: module ‘tensorflow’ has no attribute ‘unpack’

Analysis: after tensorflow version 1.0 + is updated, the method name changes

Solution:

error report

before update

after update

attributeerror: module ‘tensorflow’ has no attribute ‘unpack’

after update tf.unpack () tf.unstack ()
AttributeError: module ‘tensorflow’ has no attribute ‘pack’ tf.pack () tf.stack ()

ImportError: libcudnn.so.7: cannot open shared object file: No such file or directory

When installing cudnn, after the installation, import tensorflow will have the error in the question,

This error is either caused by the configuration of environment variables or the establishment of cudnn connection.

1. Environmental variables

Add at the end of ~ /. Bashrc

export PATH=/usr/local/cuda/bin${PATH:+:${PATH}}

export LD_ LIBRARY_ PATH=/usr/local/cuda/lib64${LD_ LIBRARY_ PATH:+:${LD_ LIBRARY_ PATH}}

export CUDA_ HOME=/usr/local/cuda

2. Cudnn connection establishment

 cd /usr/local/cuda/lib64

sudo rm -rf libcudnn.so libcudnn.so . 7 # delete the original version number, which is queried in cudnn / lib64

sudo ln -s libcudnn.so .7.0.5 libcudnn.so . 7 # generate a soft connection and pay attention to the version number you download

sudo ln -s libcudnn.so .7 libcudnn.so  

Sudo ldconfig # effective immediately


Concat error caused by tensorflow version

Error prompt:

TypeError: Expected int32, got list containing Tensors of type ‘_ Message’ instead.

Error Description:

Follow the prompts to know a line of concat related code in the code.
This is due to an error in the tensorflow version.

In the API of tensorflow Version (0. X) before 1.0, the parameters of concat are numbers first and tensors second

tf.concat(3, net, name=name)

In the API after tensorflow 1.0, the parameters of concat are tensors first and numbers second

tf.concat(net, 3, name=name)

Because the reference code may be running different tensorflow version from the native version, there is a problem.

Solution:

Find the corresponding code line according to the error prompt, and change the order of concat parameters to run successfully.


copyright: http://blog.csdn.net/cloudox_
Reference: http://blog.csdn.net/zcf1784266476/article/details/71248799

Tensorflow tf.train.exponential_ Decay function (exponential decay method)

one

In tensorflow, exponential decay method is provided to solve the problem of setting learning rate.

adopt tf.train.exponential_ The decay function realizes the exponential decay learning rate.

Steps: 1. First, use a larger learning rate (purpose: to get a better solution quickly);

Secondly, the learning rate is gradually reduced by iteration;

Code implementation:

[html]

view plain

copy

    decayed_ learning_ rate=learining_ rate*decay_ rate^(global_ step/decay_ steps)  

Among them, decayed_ learning_ Rate is the learning rate used in each round of optimization;

           learning_ Rate is the preset initial learning rate;

           decay_ Rate is the attenuation coefficient;

           decay_ Steps is the decay rate.

and tf.train.exponential_ For the decay function, you can use the stair case (the default value is false; when it is true, the global_ step/decay_ Steps) are converted to integers, and different attenuation methods are selected.

Code example:

[html]

view plain

copy

    global_ step =  tf.Variable (0)    learning_ rate =  tf.train.exponential_ decay(0.1, global_ Step, 100, 0.96, stair case = true) # generating learning rate # learning_ step =  tf.train.GradientDescentOptimizer (learning_ rate).minimize(….., global_ step=global_ Step) # use exponential decay learning rate

learning_ Rate: 0.1; stair case = true; then multiply by 0.96 after every 100 rounds of training

Generally, the setting of initial learning rate, attenuation coefficient and attenuation speed is subjective (i.e. empirical setting), while the decreasing speed of loss function is not necessarily related to the loss after iteration,

So the effect of neural network can’t be compared by the falling speed of loss function in previous rounds.

two

tf.train.exponential_ decay(learning_ rate, global_ , decay_ steps, decay_ rate, staircase=True/False)

For example:

[python]

view plain

copy

    import tensorflow as tf;  import numpy as np;  import  matplotlib.pyplot  as plt;    learning_ rate = 0.1  decay_ rate = 0.96  global_ steps = 1000  decay_ steps = 100    global_  =  tf.Variable ( tf.constant (0))  c =  tf.train.exponential_ decay(learning_ rate, global_ , decay_ steps, decay_ rate, staircase=True)  d =  tf.train.exponential_ decay(learning_ rate, global_ , decay_ steps, decay_ rate, staircase=False)    T_ C = []  F_ D = []    with  tf.Session () as sess:      for i in range(global_ steps):          T_ c =  sess.run (c,feed_ dict={global_ : i})          T_ C.append(T_ c)          F_ d =  sess.run (d,feed_ dict={global_ : i})          F_ D.append(F_ d)       plt.figure (1)   plt.plot (range(global_ steps), F_ D, ‘r-‘)   plt.plot (range(global_ steps), T_ C, ‘b-‘)         plt.show ()  

Analysis:

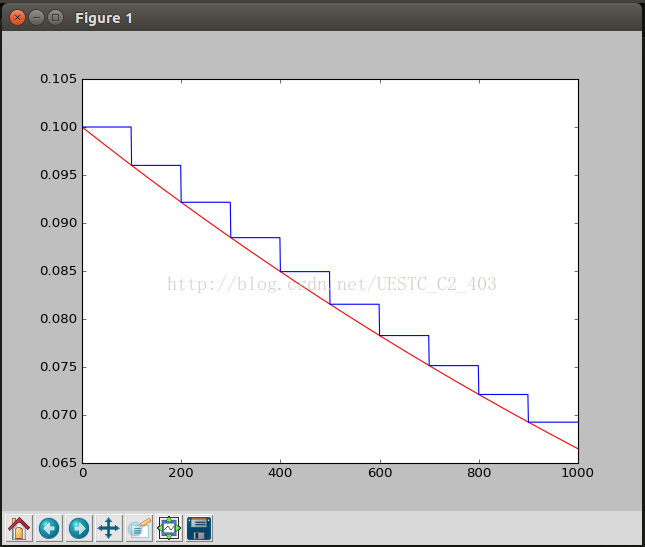
The initial learning rate is 0.1, and the total number of iterations is 1000. If stair case = true, it means every decade_ Steps calculates the change of learning rate and updates the original learning rate. If it is false, it means that each step updates the learning rate. Red means false and green means true.

results:
matplotlib 1.3.1 requires nose, which is not installed. matplotlib 1.3.1 requires tornado, which is

When installing tensorflow, execute the command

$ pip install https://storage.googleapis.com/tensorflow/mac/tensorflow-0.5.0-py2-none-any.whl

Reference:
1 http://www.tensorfly.cn/tfdoc/get_ started/os_ setup.html

The error is as follows:

Matplotlib 1.3.1 requirements nose, which is not installed.
Matplotlib 1.3.1 requirements tornado, which is not installed.
installing collected packages: numpy, six, tensorflow
found existing installation: numpy 1.8.0rc1
to solve the problem, the implementation is as follows:

  sudo easy_install nose
  sudo easy_install tornado