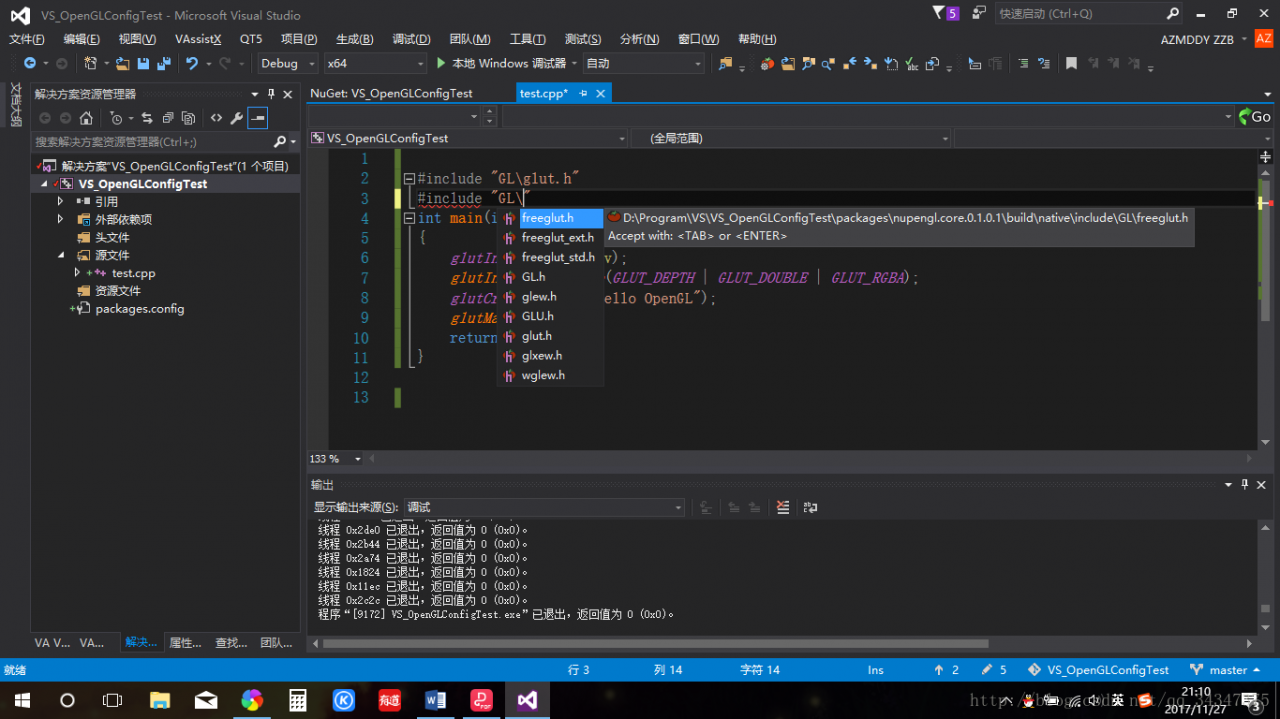
This method I think is the simplest!
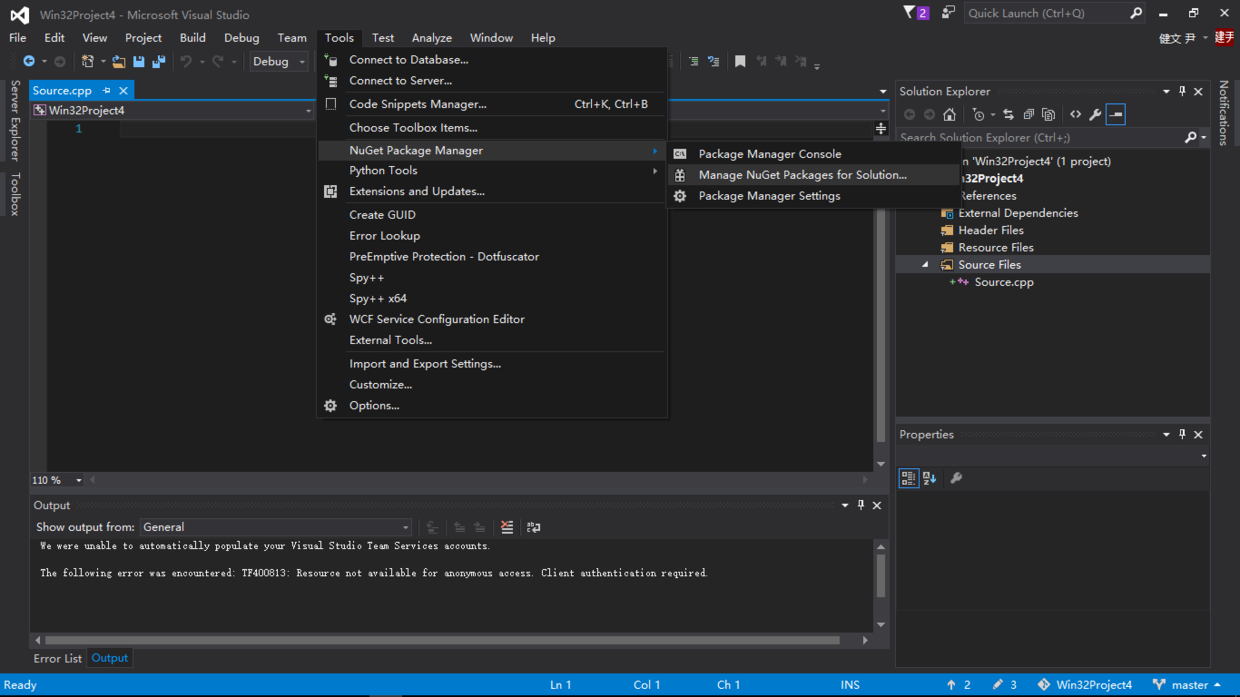
Before I wrote this, I did a lot of research online on what to do with GLUT, GLEW, FreeGLUT, and what files to add to the site. Now I can tell you that VS2015 is so powerful that none of these operations are needed! VS has a tool called NuGet, which is a package manager for.NET. NuGet allows developers to create, share, and use libraries. We use OpenGL, which should be called libraries using OpenGL.
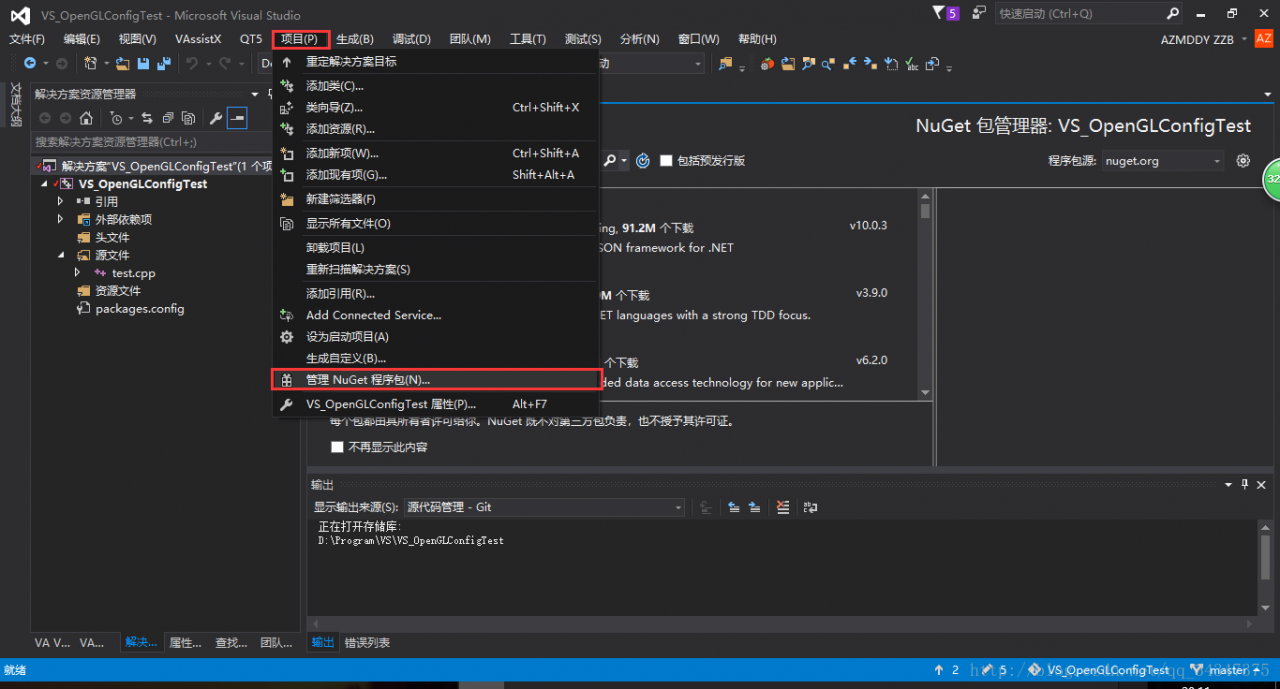
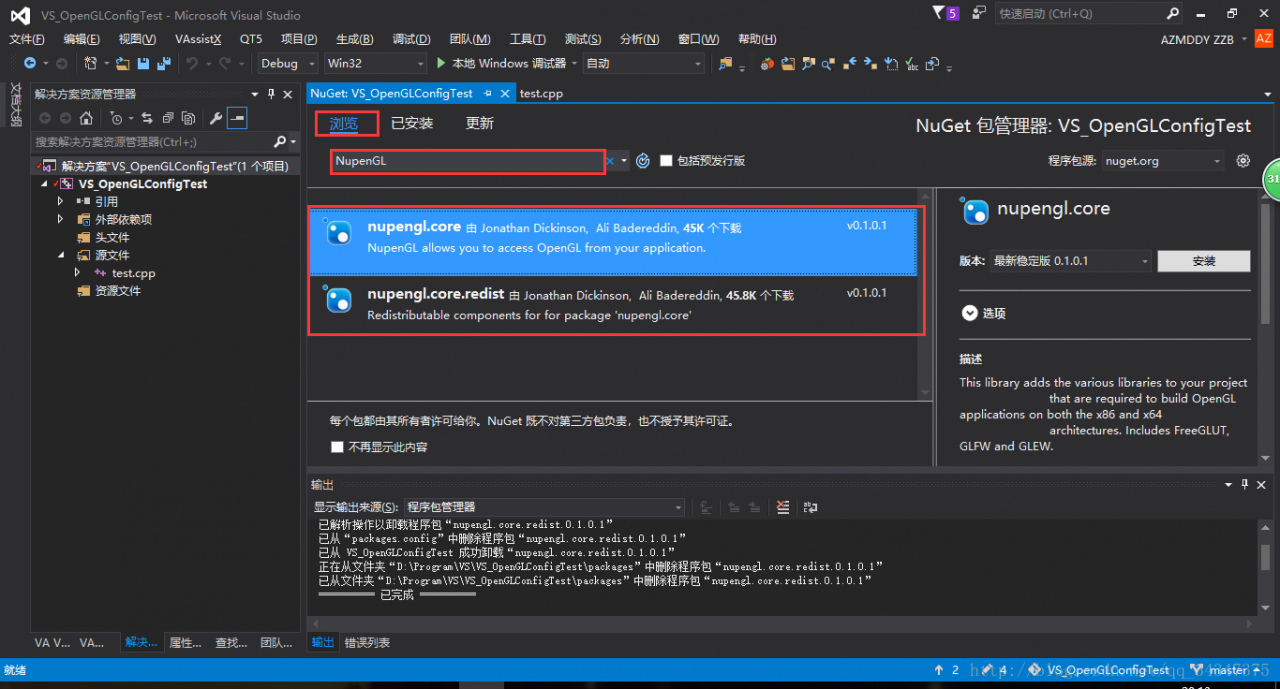
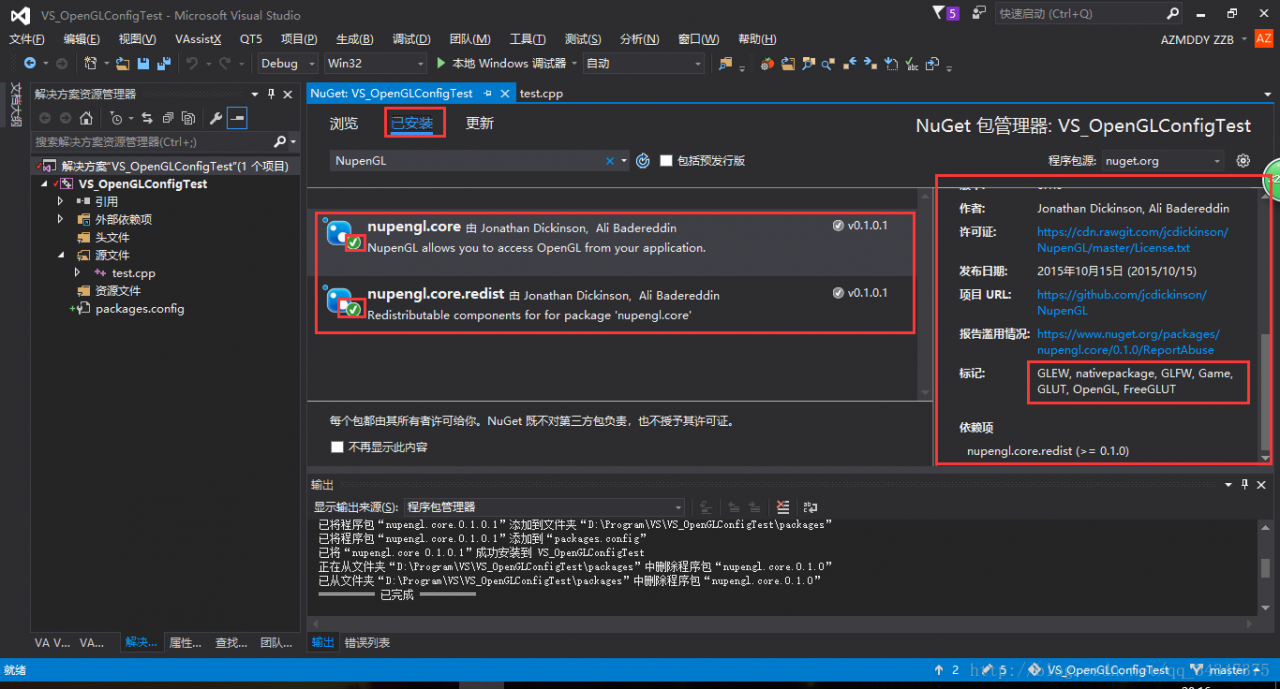
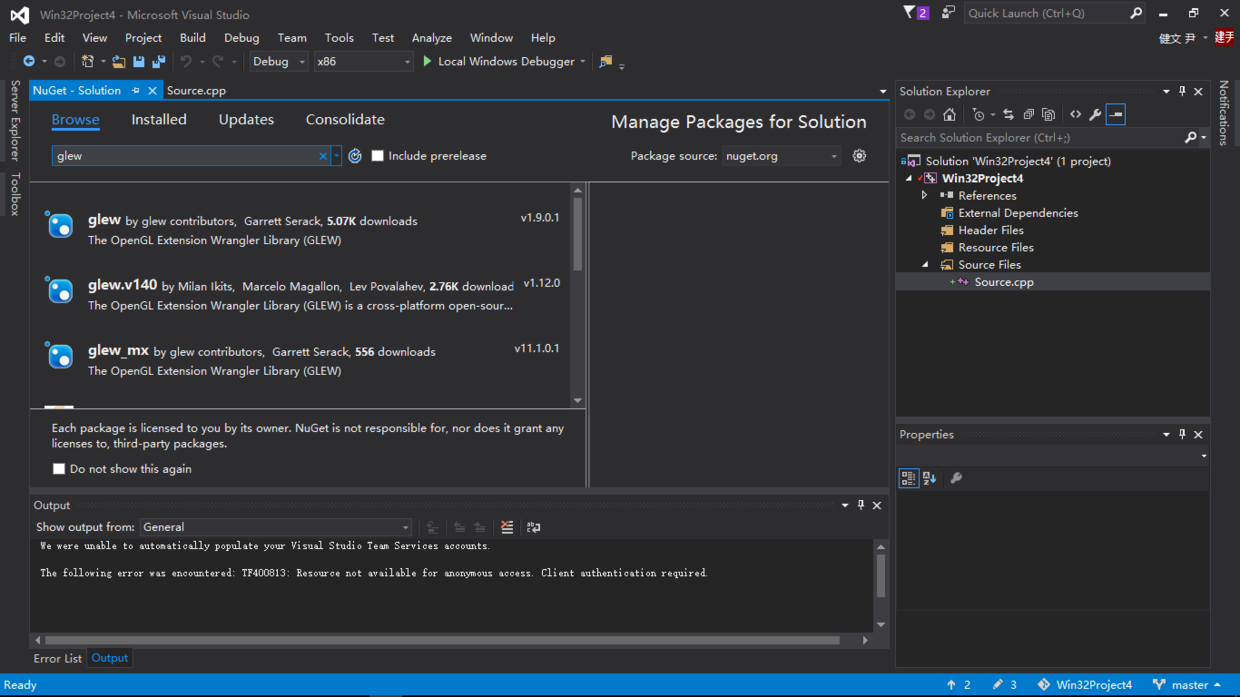
VS2015 steps to configure OpenGL. First, you need to have a project, and then add the OpenGL library to your project by clicking Project ->; Manage NuGet package, and then in a TAB, click on the “browse” input “NupenGL” into the search box, search will appear two libraries, we should both to our engineering to installation, after the success of the installation, you can find them in the installed base, in the right of the child window, you can learn about the installation of the library information.
It is not particularly easy to install GLUT, FreeGLUT, and GLEW libraries in just a few simple steps.
>
>
>
>
>
>
> I won’t post the source code.
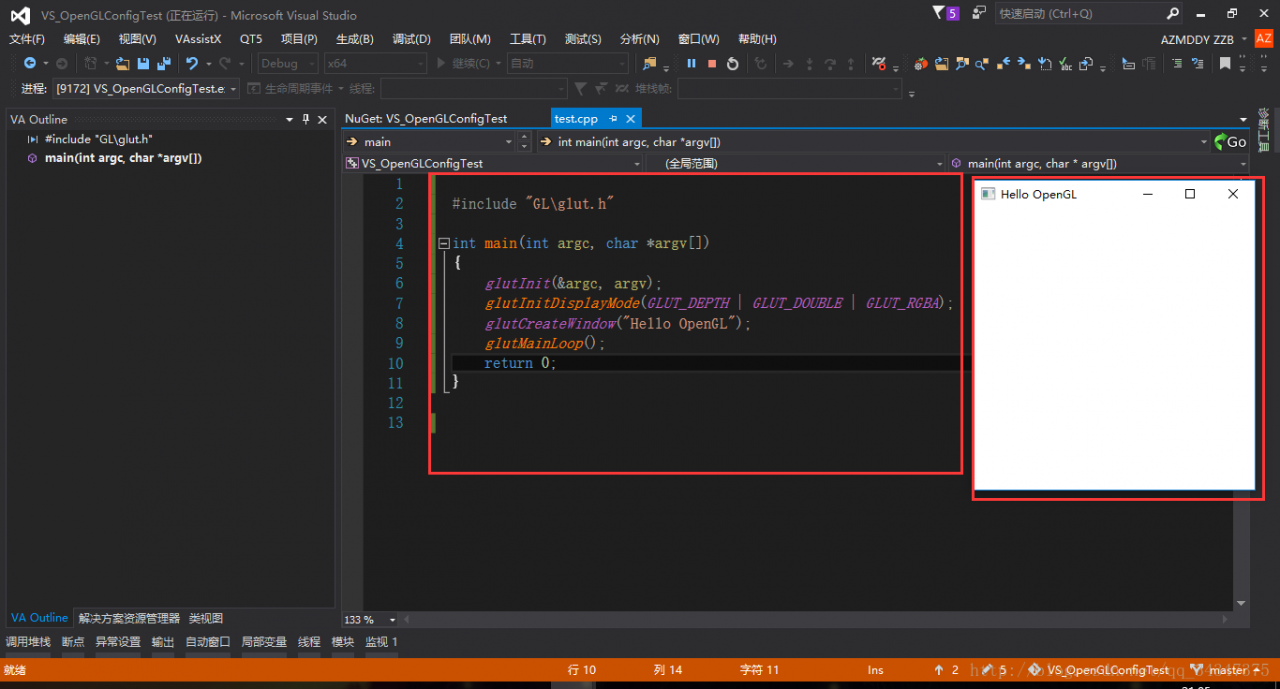
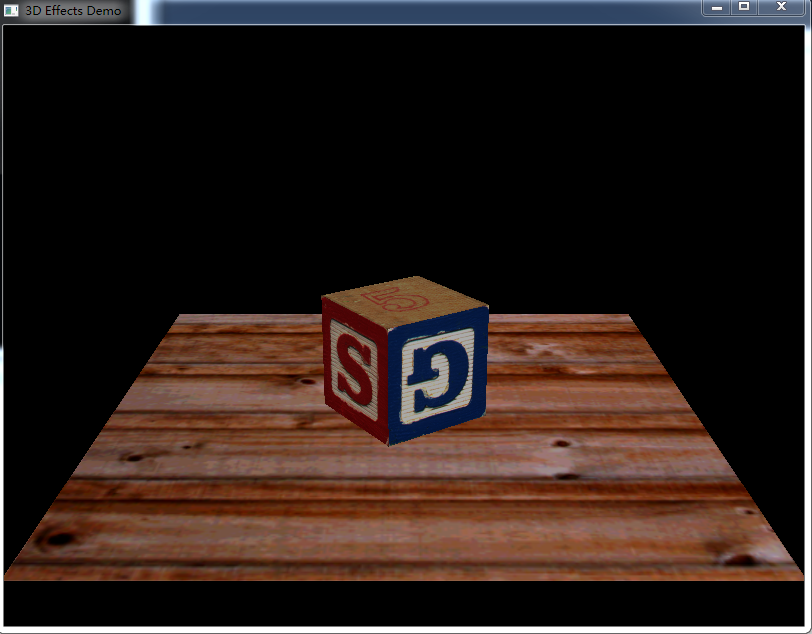
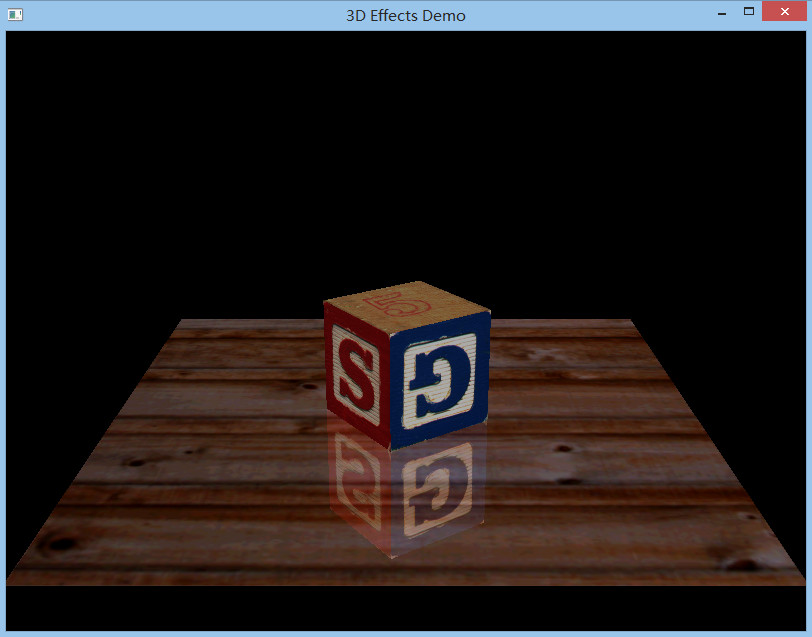
You look at the picture below, is it time to put your heart at ease?
But again simple things, some people will still appear all kinds of problems. First of all, every time you create a new OpenGL project, you have to install a library. Some people hate this tedious, but I can’t help it. It won’t take you half a minute to install these two libraries, and you don’t have to do that on other computers. Also, turn off the 360, it’s so annoying!
Tag Archives: OpenGL
On the configuration of OpenGL Red Book eighth edition environment in vs2013
I just started learning OpenGL, bought a copy of OpenGL Red Book 8,
The first example has been studied for a while and is finally ready to run. I wonder if there are any children’s shoes that have the same problem as me.
Here’s how I configured it:
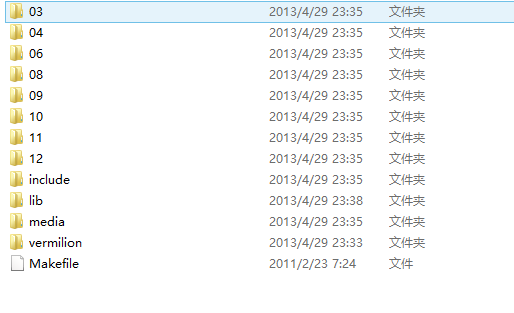
First go to http://www.opengl-redbook.com/ and download the source code of the Little Red Book. Unzip it to get this
Then open VS2013 and create an empty Win32 console project.
Then right-click on the project properties and click on the VC ++ directory
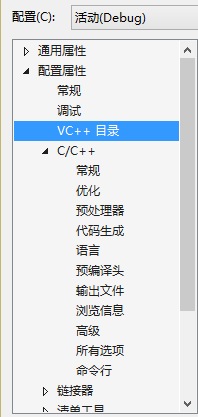
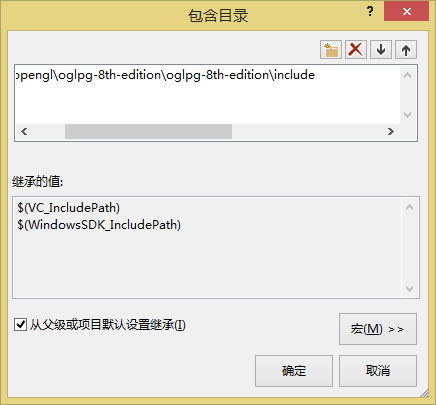
Include directory – Edit and add the include folder in the Red Book source directory
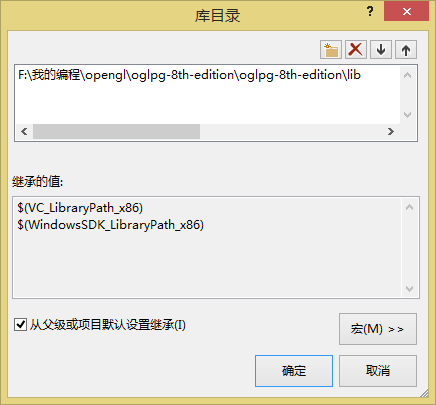
Library directory – Edit and add the lib folder
in the Red Book source directory
Add and source files to the project, and paste the code from the first example of the Little Red Book
The first example has been studied for a while and is finally ready to run. I wonder if there are any children’s shoes that have the same problem as me.
Here’s how I configured it:
First go to http://www.opengl-redbook.com/ and download the source code of the Little Red Book. Unzip it to get this
Then open VS2013 and create an empty Win32 console project.
Then right-click on the project properties and click on the VC ++ directory
Include directory – Edit and add the include folder in the Red Book source directory
Library directory – Edit and add the lib folder
in the Red Book source directory
Add and source files to the project, and paste the code from the first example of the Little Red Book
///
//
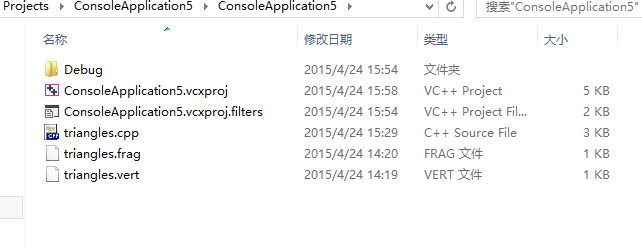
// triangles.cpp
//
///
#include <iostream>
using namespace std;
#include "vgl.h"
#include "LoadShaders.h"
enum VAO_IDs { Triangles, NumVAOs };
enum Buffer_IDs { ArrayBuffer, NumBuffers };
enum Attrib_IDs { vPosition = 0 };
GLuint VAOs[NumVAOs];
GLuint Buffers[NumBuffers];
const GLuint NumVertices = 6;
//---------------------------------------------------------------------
//
// init
//
void init(void)
{
glGenVertexArrays(NumVAOs, VAOs);
glBindVertexArray(VAOs[Triangles]);
GLfloat vertices[NumVertices][2] = {
{ -0.90, -0.90 }, // Triangle 1
{ 0.85, -0.90 },
{ -0.90, 0.85 },
{ 0.90, -0.85 }, // Triangle 2
{ 0.90, 0.90 },
{ -0.85, 0.90 }
};
glGenBuffers(NumBuffers, Buffers);
glBindBuffer(GL_ARRAY_BUFFER, Buffers[ArrayBuffer]);
glBufferData(GL_ARRAY_BUFFER, sizeof(vertices),
vertices, GL_STATIC_DRAW);
ShaderInfo shaders[] = {
{ GL_VERTEX_SHADER, "triangles.vert" },
{ GL_FRAGMENT_SHADER, "triangles.frag" },
{ GL_NONE, NULL }
};
GLuint program = LoadShaders(shaders);
glUseProgram(program);
glVertexAttribPointer(vPosition, 2, GL_FLOAT,
GL_FALSE, 0, BUFFER_OFFSET(0));
glEnableVertexAttribArray(vPosition);
}
//---------------------------------------------------------------------
//
// display
//
void display(void)
{
glClear(GL_COLOR_BUFFER_BIT);
glBindVertexArray(VAOs[Triangles]);
glDrawArrays(GL_TRIANGLES, 0, NumVertices);
glFlush();
}
//---------------------------------------------------------------------
//
// main
//
int main(int argc, char** argv)
{
glutInit(&argc, argv);
glutInitDisplayMode(GLUT_RGBA);
glutInitWindowSize(512, 512);
glutInitContextVersion(4, 3);
glutInitContextProfile(GLUT_CORE_PROFILE);
glutCreateWindow(argv[0]);
if (glewInit()) {
cerr << "Unable to initialize GLEW ... exiting" << endl;
exit(EXIT_FAILURE);
}
init();
glutDisplayFunc(display);
glutMainLoop();
}compile once found not through, will quote cannot resolve external command error,
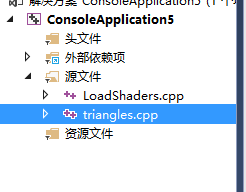
This is because loadShaders.cpp could not be found
In the Little Red Book source directory there is a lib folder with LoadShaders
Right-click on the project’s source file to add an existing item
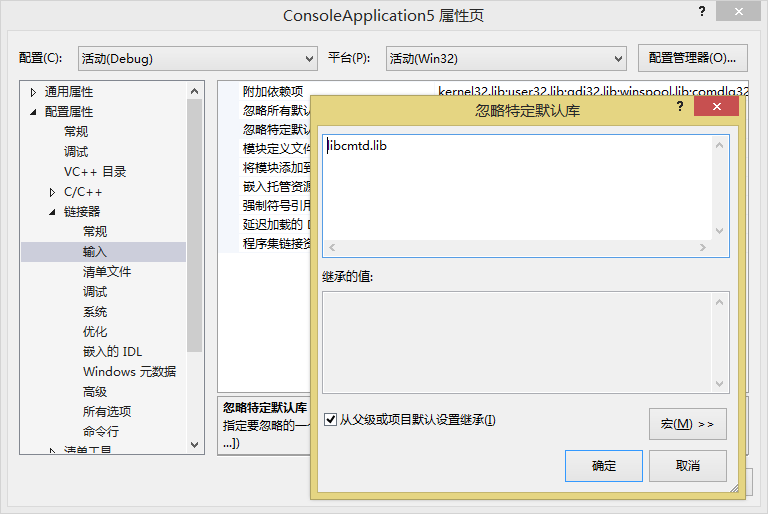
The libcmtd.lib library is in conflict with other libraries, so we can ignore it
Right-click on the project — Properties — Linker — Enter and add it in Ignore the specific default library
Now in the compilation once found can pass out
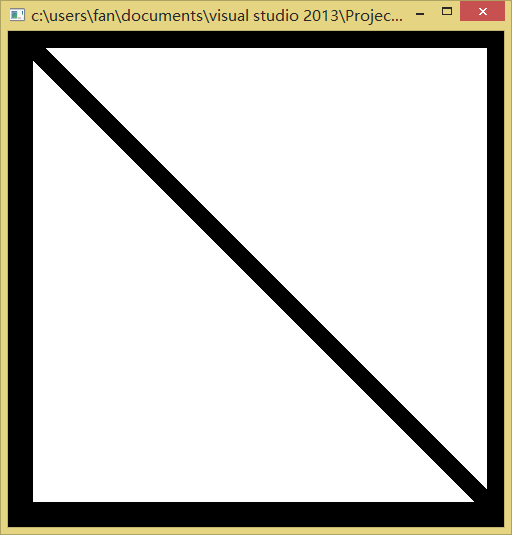
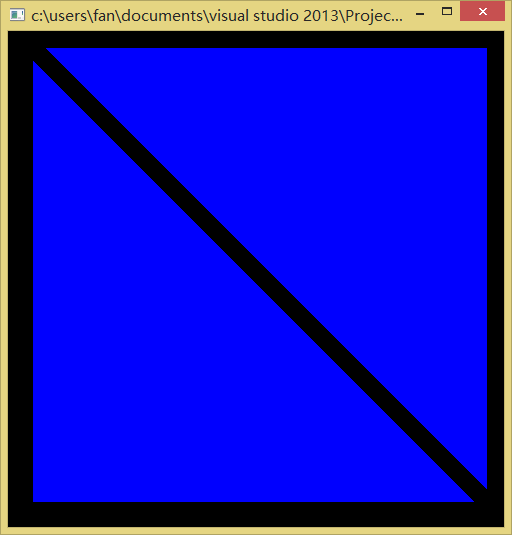
But it’s a white triangle, not a blue triangle, and you need to create two new texts in the project directory
Renamed Triangles. Vert and Triangles. Frag
The code is as follows:
triangles.vert
#version 430 core
layout(location = 0) in vec4 vPosition;
void
main()
{
	gl_Position = vPosition;
}
triangles.frag
#version 430 core
out vec4 fColor;
void
main()
{
	fColor = vec4(0.0, 0.0, 1.0, 1.0);
}
>
>
OpenGL class library and environment configuration under win10 and vs2015
Quote:
The OpenGL Super Bibliography (Fifth Edition) and the OpenGL Programming Guide (Eighth Edition) are two practical OpenGL learning books. The difference is that the former has more examples and is easier to follow step by step, while the latter focuses on the API, so it’s best to read the former first.
OpenGL class library configuration has been troubled by many beginners, I browse the configuration methods of various reference articles, found that in VS2015 configuration encountered many problems, after a few days of groping finally solved.
This article mainly refer to https://www.cnblogs.com/zpcdbky/p/6724772.html
http://blog.csdn.net/brillianteagle/article/details/51623208
http://www.it165.net/pro/html/201504/38164.html
Thanks to the contributions of the authors.
In this paper, all the resources have been packaged well, download address: http://download.csdn.net/download/shs1992shs/10142198
I. GLEW configuration
Glew’s official website: http://glew.sourceforge.net/
glew making official homepage: https://github.com/nigels-com/glew
glew is a cross-platform OpenGL extensions library, supporting multiple operating system, the url has to provide the latest version of glew.

1. Download Source and Binaries respectively, where the Binaries version is the compiled glew file and the Source is the Source.
2. Find the VS2015 installation directory, if it is installed in C disk, most is similar to C: Program Files(x86)\Microsoft Visual Studio 15.0 such path (the next is Microsoft Visual Studio 14.0), can also be in other disk directory; For the convenience of expression, the following will be explained according to the directory “D:\ Software Installation \VS2015”.
3. Locate the C++ header directory, such as “D:\ software installation \VS2015\VC\include”, and create a new GL folder under the include directory (if there is none).
4. Page 1 Binaries glew – 2.1.0/include/GL folder 4 header files are copied to 3 GL in the folder.
5. Copy glew32.dll from Binaries version to D:\ software installation \VS2015\VC\bin.
6. Copy the Binaries version of glew-2.1.0\lib\Release\Win32 to the directory D:\ software installation \VS2015\VC\lib.
Note that it is not necessary to copy the DLL file to C:\Windows\System32 or C:\Windows\SysWOW64.
At this point, glew is configured.
The OpenGL Super Bibliography (Fifth Edition) and the OpenGL Programming Guide (Eighth Edition) are two practical OpenGL learning books. The difference is that the former has more examples and is easier to follow step by step, while the latter focuses on the API, so it’s best to read the former first.
OpenGL class library configuration has been troubled by many beginners, I browse the configuration methods of various reference articles, found that in VS2015 configuration encountered many problems, after a few days of groping finally solved.
This article mainly refer to https://www.cnblogs.com/zpcdbky/p/6724772.html
http://blog.csdn.net/brillianteagle/article/details/51623208
http://www.it165.net/pro/html/201504/38164.html
Thanks to the contributions of the authors.
In this paper, all the resources have been packaged well, download address: http://download.csdn.net/download/shs1992shs/10142198
I. GLEW configuration
Glew’s official website: http://glew.sourceforge.net/
glew making official homepage: https://github.com/nigels-com/glew
glew is a cross-platform OpenGL extensions library, supporting multiple operating system, the url has to provide the latest version of glew.
1. Download Source and Binaries respectively, where the Binaries version is the compiled glew file and the Source is the Source.
2. Find the VS2015 installation directory, if it is installed in C disk, most is similar to C: Program Files(x86)\Microsoft Visual Studio 15.0 such path (the next is Microsoft Visual Studio 14.0), can also be in other disk directory; For the convenience of expression, the following will be explained according to the directory “D:\ Software Installation \VS2015”.
3. Locate the C++ header directory, such as “D:\ software installation \VS2015\VC\include”, and create a new GL folder under the include directory (if there is none).
4. Page 1 Binaries glew – 2.1.0/include/GL folder 4 header files are copied to 3 GL in the folder.
5. Copy glew32.dll from Binaries version to D:\ software installation \VS2015\VC\bin.
6. Copy the Binaries version of glew-2.1.0\lib\Release\Win32 to the directory D:\ software installation \VS2015\VC\lib.
Note that it is not necessary to copy the DLL file to C:\Windows\System32 or C:\Windows\SysWOW64.
At this point, glew is configured.
FreeGLUT configuration
1. GLEW obtains the latest version of OpenGL API. The FreeGLUT is used to replace the GLUT library. So, the glew and freeGLUT libraries are configured to completely replace the glu and GLUT libraries, and the latest version of the API is available for Shader programming.
f
The latest stable version of ReeGLUT is 3.0, which can be downloaded at:
http://freeglut.sourceforge.net/
Open the page and see the following section:
Download the Prepackaged version of MSVC and click the red button to get to the next page
Click on the red box to download the file named FreeGlut-MSVC-3.0.0-2.MP.zip
2.
“FreeGlut-MSVC-3.0.0-2.MP.zip” to extract the FreeGlut-MSVC-3.0.0-2.MP.zip folder.
There are four header files in the FreeGLUT /include/GL directory. Copy the three header files except GLUT. H to the D:\ software installation \VS2015\VC\include\GL directory.
Copy the FreeGlut. DLL file from FreeGlut. bin to D:\ software installation \VS2015\VC\bin.
4. Copy the FreeGlut. lib file to D:\ software installation \VS2015\VC\lib.
At this point, the FreeGLUT is configured.
Third, GLUT configuration
The GLUT library is old and hasn’t been updated since 2000, and many of them can be downloaded online or packaged with the resource bundles I uploaded.
Glut.h, Glut.dll, Glut32.dll, Glut.lib, Glut32.lib. Glut.h, Glut.dll, Glut32.dll, Glut.lib, Glut32.lib
2. Copy Glut. h to D:\ software installation \VS2015\VC\include\GL.
3. Copy ULT. DLL, GLUT32.DLL to D:\ software installation \VS2015\VC\bin.
4. Copy Glut. lib and Glut32. lib to D:\ VS2015\VC\lib.
At this point, GLUT is configured.
Note: When using the OpenGL Super Bibliotheca example, you need to add #pragma comment(lib,”gltools.lib”) to the beginning of the program. Used to connect to gltools.lib.
Four, GLTools configuration
The GLTools library is provided by the author of the OpenGL Super Bibliome. It is cumbersome to configure. I can use the files packaged in my resource pack, or I can compile them myself.
1. Copy all 11 header files from the gltools\include directory to the D:\ software installation \VS2015\VC\include directory (note the include directory, not the GL subdirectory).
2. Copy gltools.lib to D:\ software installation \VS2015\VC\lib.
> At this point, GLTools is configured.
> At this point, OpenGL is configured.
Self-compilation method:
Unzip the resource bundle and get the gltools folder. This folder has two folders, include and SRC, in its directory. Since GLTools compilations depend on glew, you can see that GLTools \include\GL is a version of the glew header, and GLTools \ SRC has the glew.c source.
Since you have already used the latest version of glew-2.1.0, you need to replace all the header files in the gltools\include\GL directory and select
with
Glew-2.1.0 version glew.c source file replaces glew.c in gltools\ SRC. (The Source version of glew-2.1.0\ SRC \glew.c as mentioned earlier).
Note 1: GLTools in the resource pack is all packaged and does not need to be changed. Readers who need to update the resource pack should follow the above method.
Note 2: when using the OpenGL super treasure dian example, found that transformation pipeline header file GLGeometryTransform. H compile error, a large number of can’t find the identifier, so the revised, if readers encounter such problems, in the resource bundle of gltools within a folder GLGeometryTransform – fix GLGeometryTransform. H header file to replace to D: \ software \ VS2015 VC \ \ the include directory, can be normal use.
Generate gltools. Lib
1. Copy all 11 header files from the gltools\include directory to the D:\ software installation \VS2015\VC\include directory (note the include directory, not the GL subdirectory).
2.
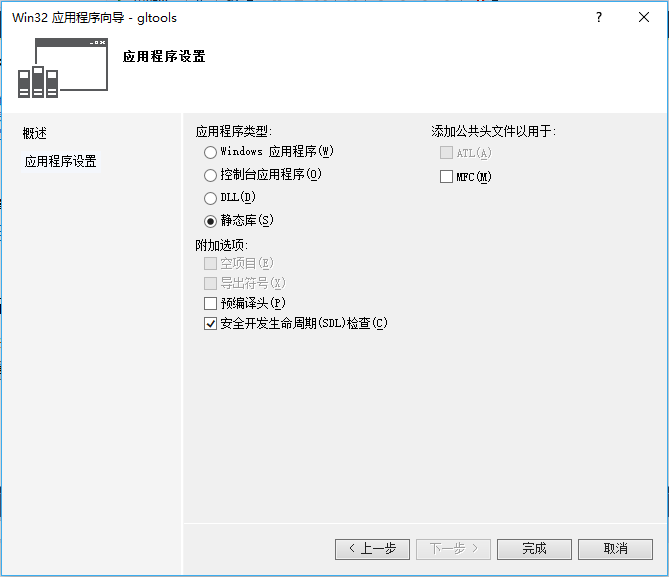
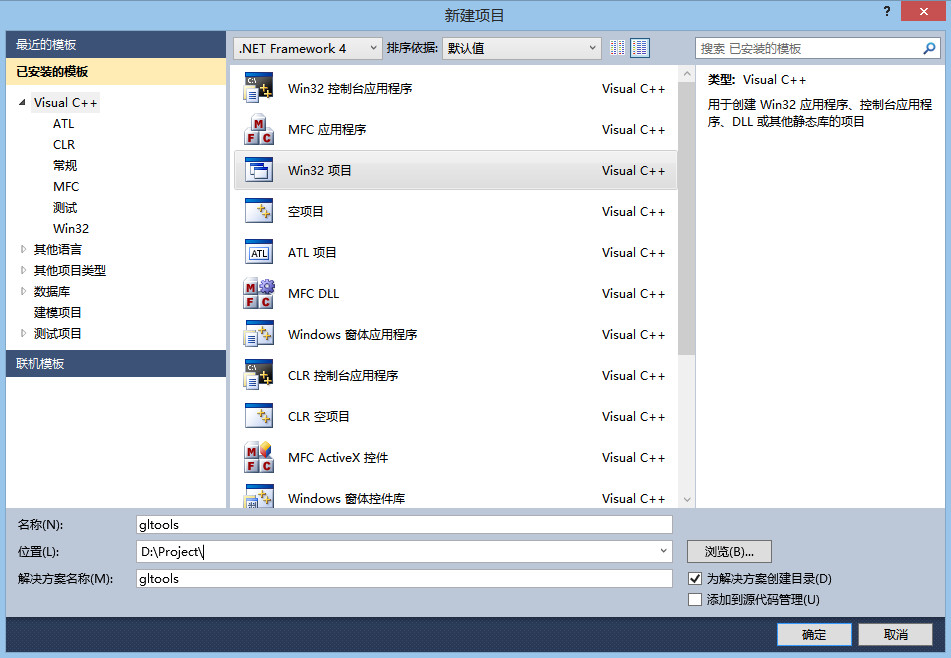
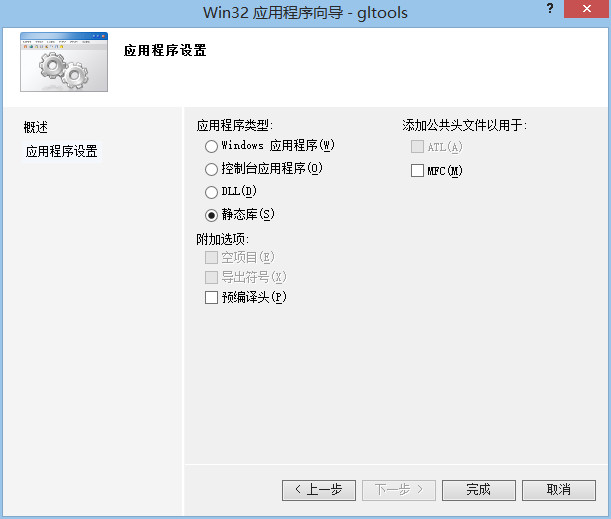
Start VS2015 and create a Win32 application called GLTools.

3. Select “Static Library” and uncheck the “Precompiled Header” box.
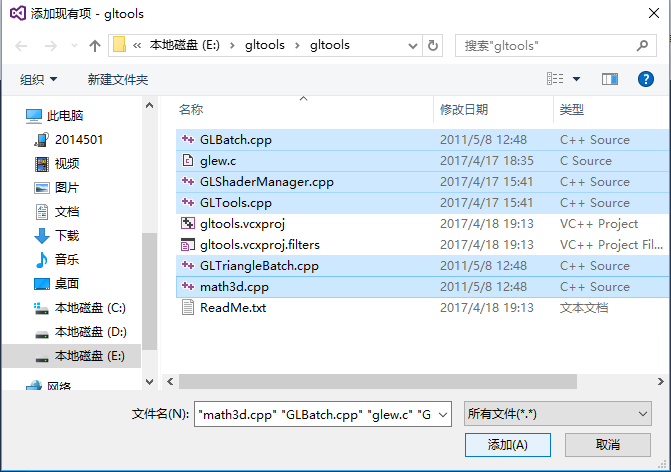
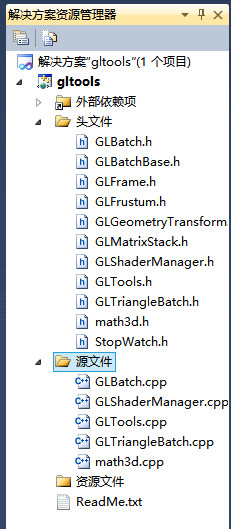
4. Copy the six files in the gltools\ SRC directory to the project directory you just created (for example, E: gltools\gltools).
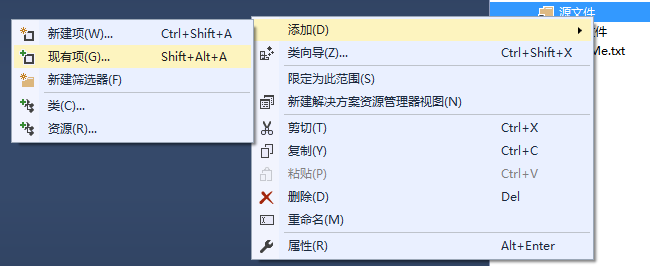
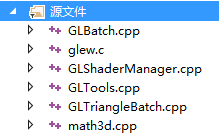
5. Right-click ‘Source File’ –>; “Add”, & gt; “Existing Items”, add 6 of the 4 files to the project.
C/C++ > C/C++ > C/C++ > Add _CRT_SECURE_NO_WARNINGS to the preprocessor definition to the right of the preprocessor,
Otherwise, the function will be warned that it is not safe to use and will not compile successfully.

7. To generate – & gt; Generate gltools
I have seen a compilation in Release mode and a compilation in Debug mode in different articles, so far I can’t see the specific difference, just to be safe, I can compile in both modes.
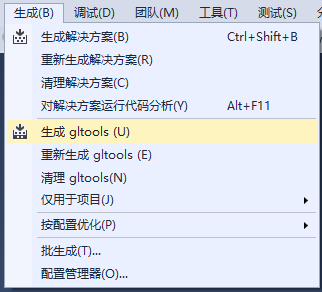
There were a bunch of “DLL link inconsistencies” warnings on the compile, but the compilation was successful.
8. The generated gltools.lib files can be found in the E: gltools\Debug directory and the E: gltools\Release directory respectively. To copy the gltools.lib file from the Release file, refer to the lib file placement format of FreeGLUT. You can copy the gltools.lib file from the Release file to the D:\ software installation \VS2015\VC\lib directory.
At this point, you are done.
Vs2015 configuring OpenGL (glfw Library)
Recently to use OpenGL, in VS2015 configuration cost a lot of effort, now will be my results directly contribute to everyone, hope to need to configure OpenGL under VS2015 readers save some trouble.
Documents to prepare
Baidu cloud link: https://pan.baidu.com/s/1qZbcLtU password: f58o
PS: The tutorial gives you a 32-bit library. Baidu Cloud Resource is the 64-bit runtime I compiled later. The configuration process is similar to
Download the relevant header files
Download or compile the relevant library files
Here I used the library files compiled by Win32, that is, the Release of x86 platform, including the lib static library and the dynamic DLL library;
File storage
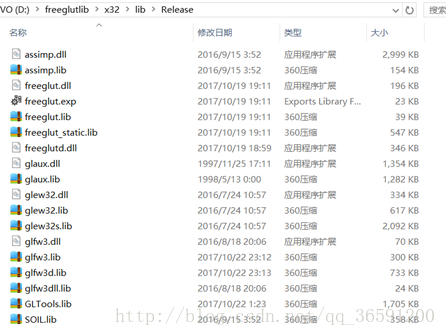
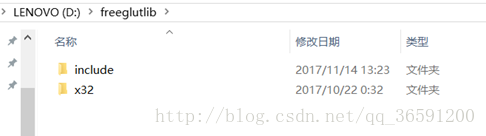
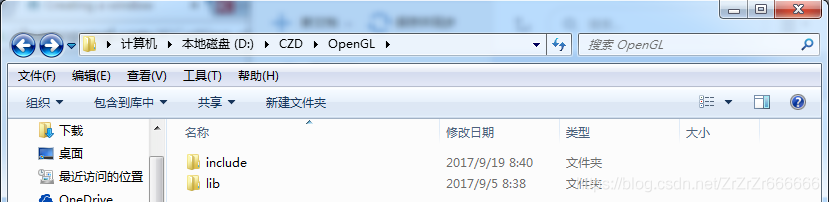
Put all the header and library files in one folder (I put them in the D:/freeglutlib folder);
Part program
1. Open VS2015, create a new Win32 console program, set the compilation environment as x86 or Win32, Release version;

2. Find the property manager and create a new property sheet under the corresponding compilation environment;

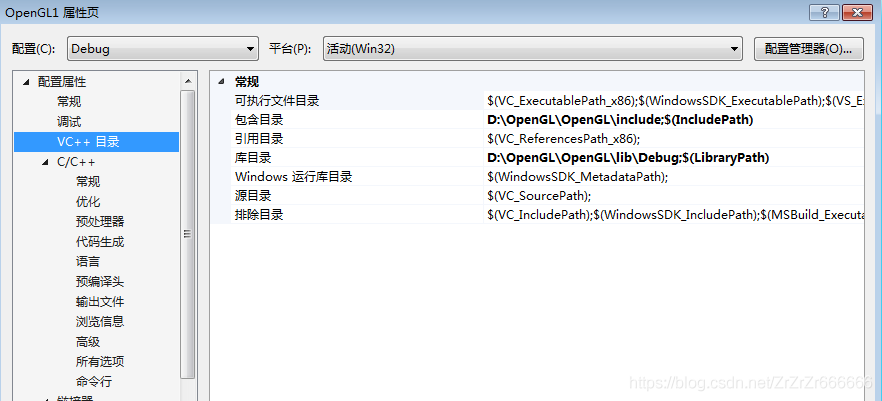
3. Select the VC++ directory ->; Include directory, library directory, just saved the header file and library file corresponding folder to add in


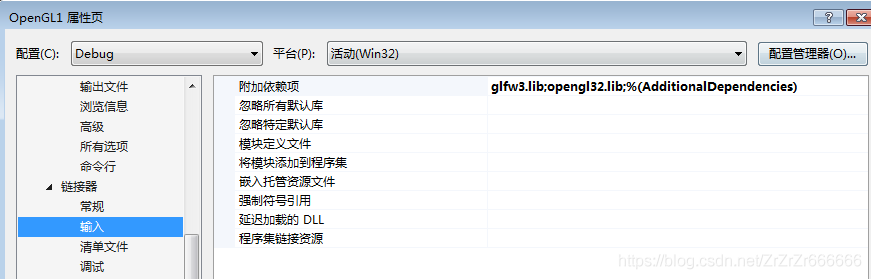
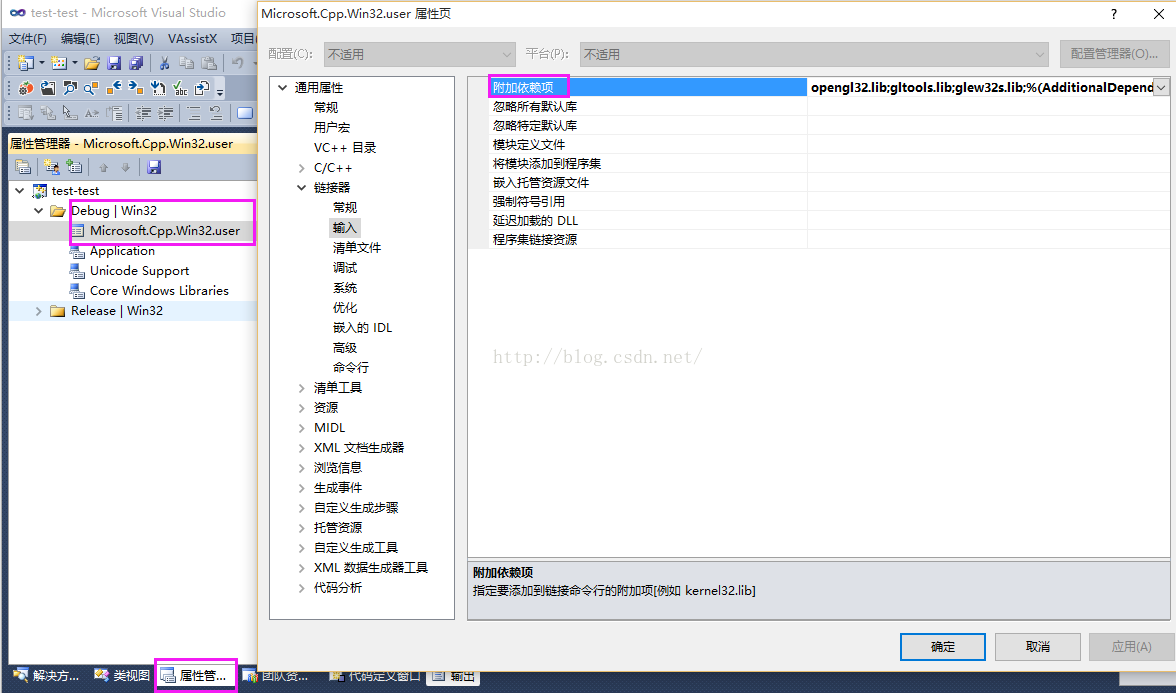
4, Compiler ->; Input – & gt; Attach a dependency, and type the DLL names of all the external libraries used
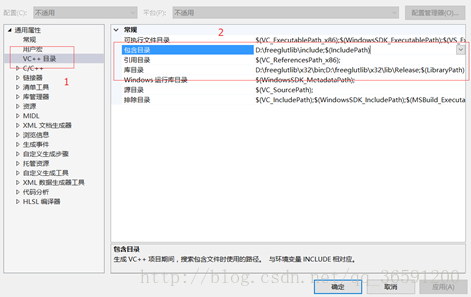
5. Add code in main file to test
Documents to prepare
Baidu cloud link: https://pan.baidu.com/s/1qZbcLtU password: f58o
PS: The tutorial gives you a 32-bit library. Baidu Cloud Resource is the 64-bit runtime I compiled later. The configuration process is similar to
Download the relevant header files
Download or compile the relevant library files
Here I used the library files compiled by Win32, that is, the Release of x86 platform, including the lib static library and the dynamic DLL library;
File storage
Put all the header and library files in one folder (I put them in the D:/freeglutlib folder);
Part program
1. Open VS2015, create a new Win32 console program, set the compilation environment as x86 or Win32, Release version;
2. Find the property manager and create a new property sheet under the corresponding compilation environment;
3. Select the VC++ directory ->; Include directory, library directory, just saved the header file and library file corresponding folder to add in
4, Compiler ->; Input – & gt; Attach a dependency, and type the DLL names of all the external libraries used
5. Add code in main file to test
Configure OpenGL development environment (glfw3 + glad) once and for all with visual studio
primers
There are many versions of OpenGL, we need to introduce additional third-party libraries to meet our usual rendering needs, which is more troublesome for students who just started learning.
I also met many many times behind the configuration of the tutorial, wasted time, also their technology and modern technology of OpenGL.
(2018), at the current time from learning OpenGL if glBegin () and a glEnd () that a is behind The Times, this tutorial is to demonstrate how to configure OpenGL3.3 over the environment.
> Learn the OpenGL tutorial: Learnopengl, you may need over the wall, there is a Chinese translation.
If you want to learn OpenGL quickly, here is the configured environment: (open it directly in VS2015 or above, Win7/10 test)
perlink: Resources
(> header files, lib files, DLLs used in the directory structure are also in this link)
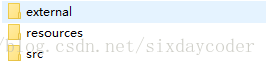
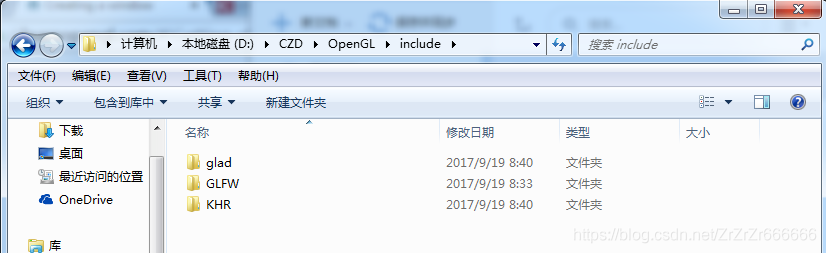
The directory structure
The environment we configured is not only responsible for storing code and third party lib, but also some shader files and resource files, so we need to build a good directory structure.
The full configuration directory structure is as follows:
| name | note |
|---|---|
| SRC | store code |
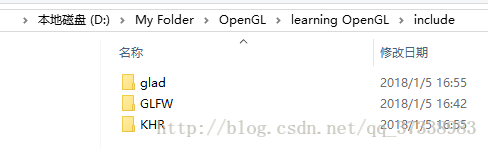
| external \ include | third-party library header files, Contains stb_image. J h, glad. J h, GLFW. J h, assimp. H such as |
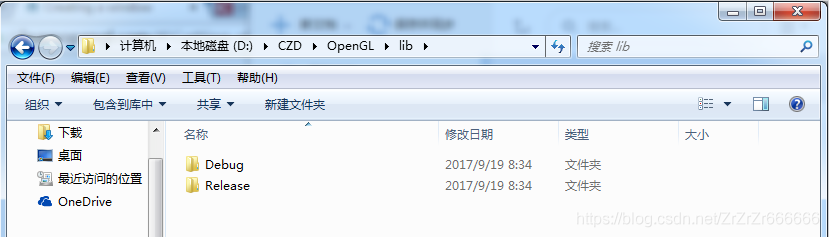
| external \ lib | third-party libraries of lib |
| external \ DLL | third-party library DLL |
| resources | resource folder, | > | / table> <>d>
GLM OpenGL mathematical library, defined a lot of vector, matrix operations, concise and fast. GLFW is a cross-platform abstract library of window resources. Glad has different OpenGL implementations for different graphics card drivers, Glad helps us hide these differences and happily use OpenGL. STB_IMAGE lightweight library for reading images ASSIMP lightweight library for reading models
We have, so to speak, all the common components except the physics engine and sound control.
Now let’s construct the directory structure from scratch.
> First find an empty folder and create the following directory structure in it:
Instead of creating a vsbuild, VS will do it for us.
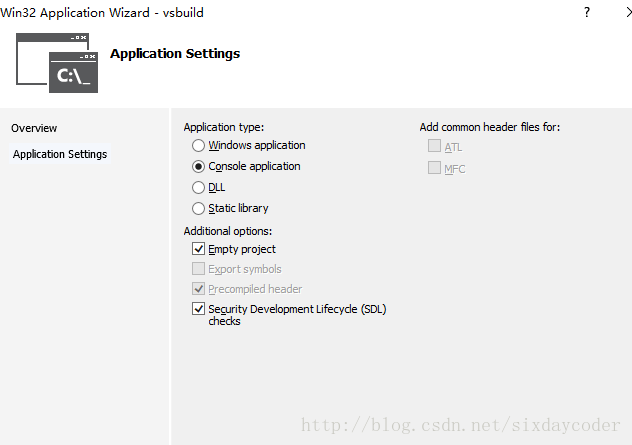
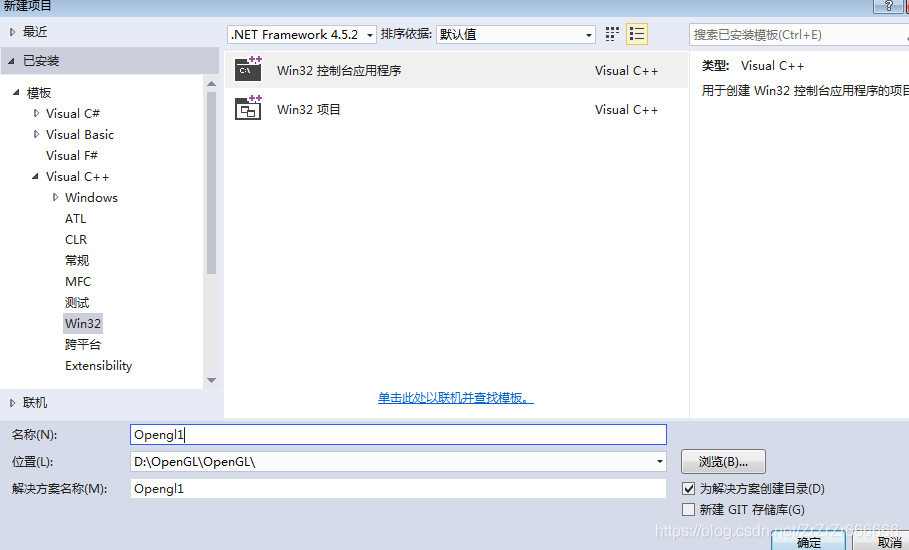
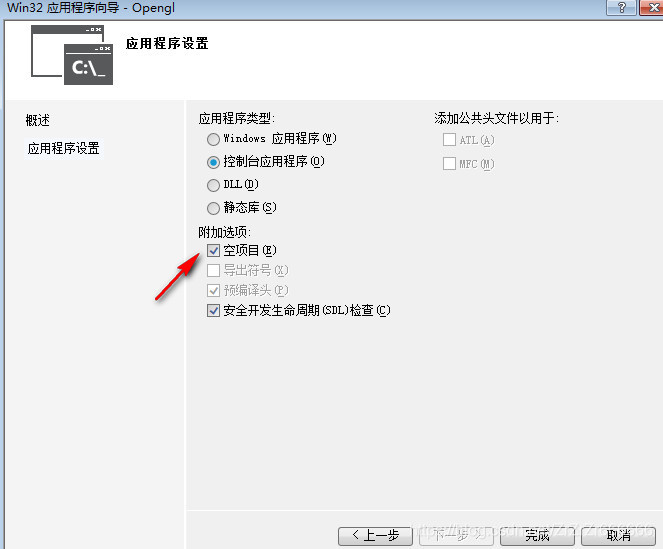
> Open Visual Studio and create an empty project. The project name is vsbuild.
After creation:
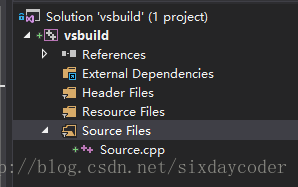
Next we need to configure lib, include to be introduced into our project.
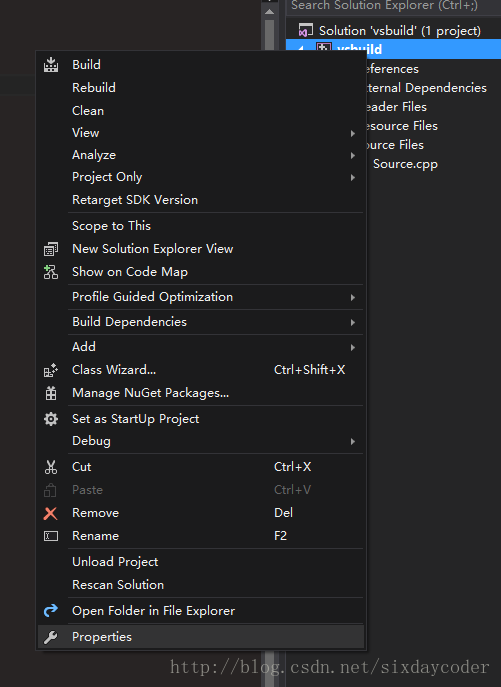
Right-click on the vsbuild project and open the properties page:
Find the C/C++ Genral
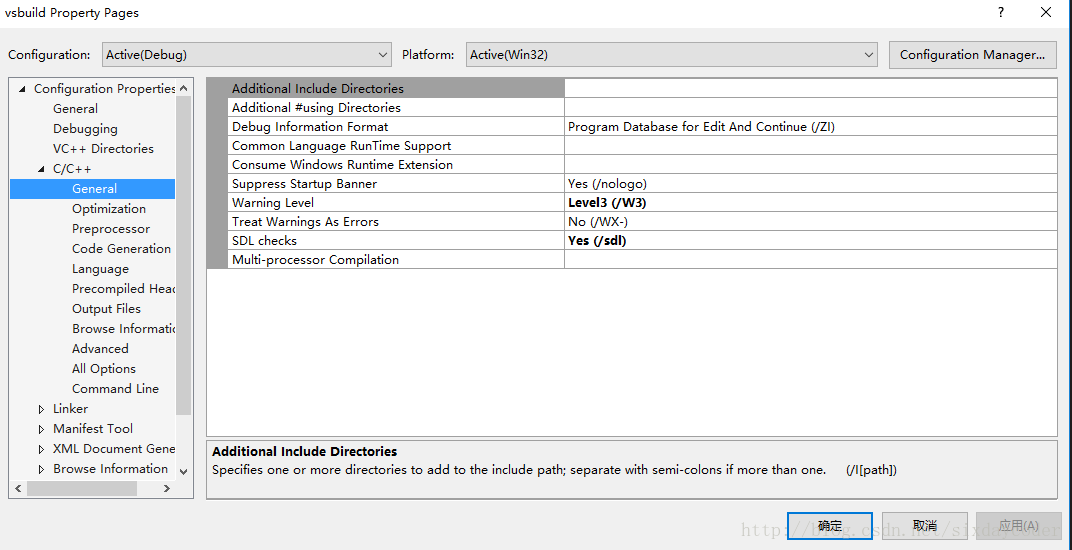
note that the C/C++ option only appears when you create a new.cpp file)
E>the additional directory on the right:
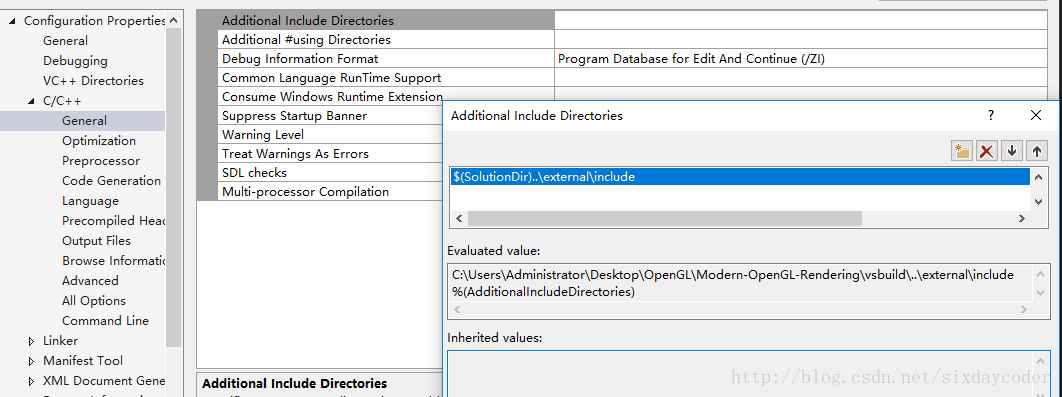
Note that SolutionDir is a macro that represents the directory where VSBuild is located, so we can find External/Include relative to it.
(Type the information $(SolutionDir)… , external, include).
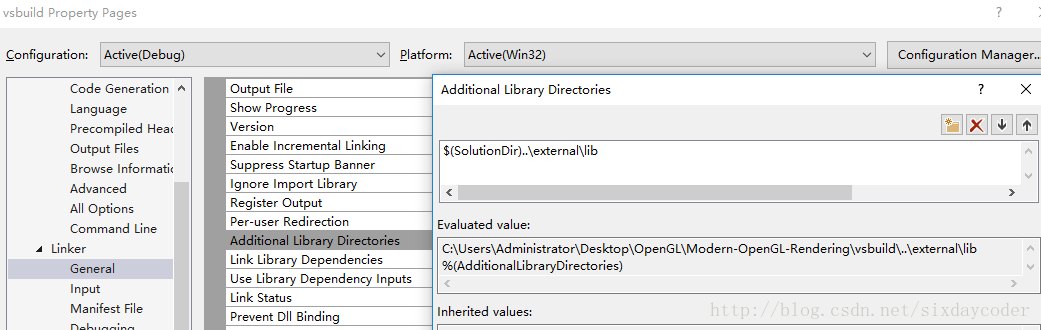
Similarly, select the additional library directory for Linker’s General
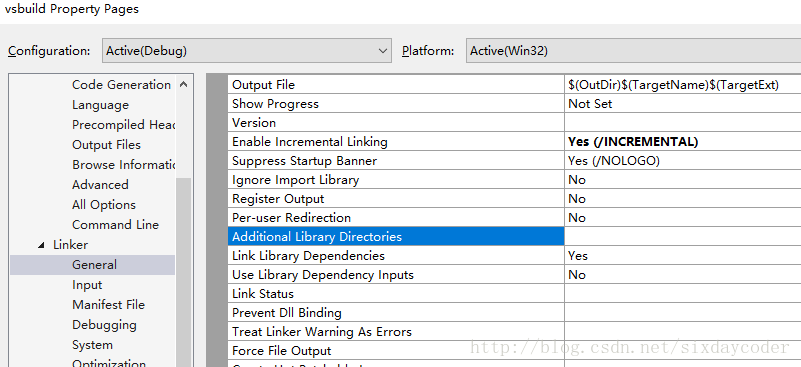
Open Edit:
In addition, open the Linker Input directory and enter the following values:
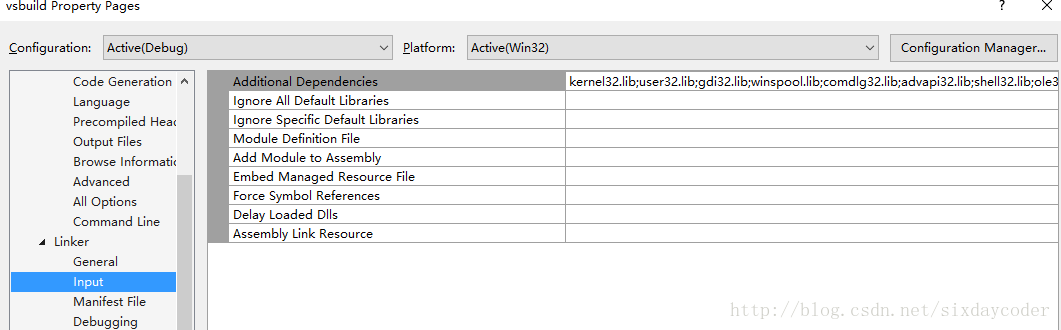
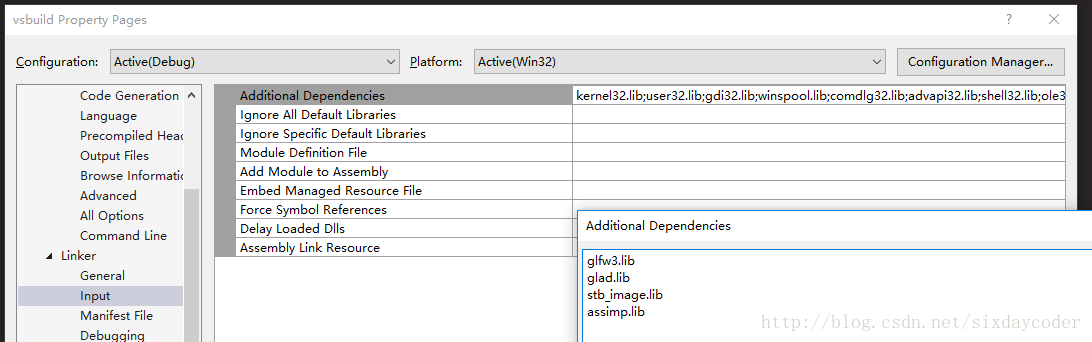
glfw3.lib
ad.lib
s>mage.lib
assimp.>
SolutionDir \external\lib
(here I compiled glad and stb_image into static libraries)
nally, because ASSIMP requires dynamic linking, we need to import the corresponding DLL into our project.
The easiest way to do this is as follows:
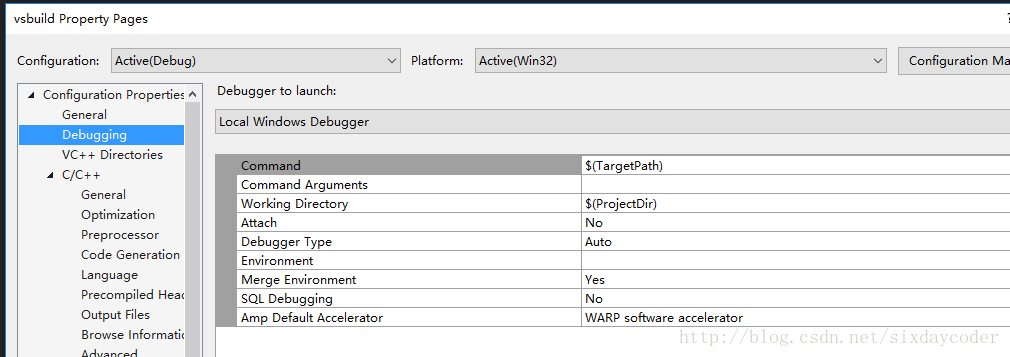
Select Debug and edit the environment entry:
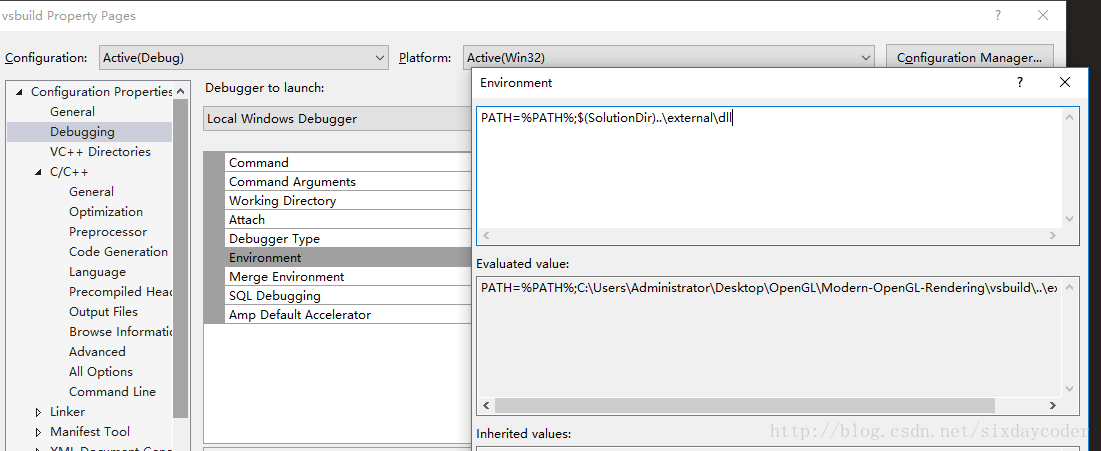
The meaning of this line is to temporarily add the EXTERNAL \ DLL directory to the environment variable in debug mode so that we can successfully dynamically link.
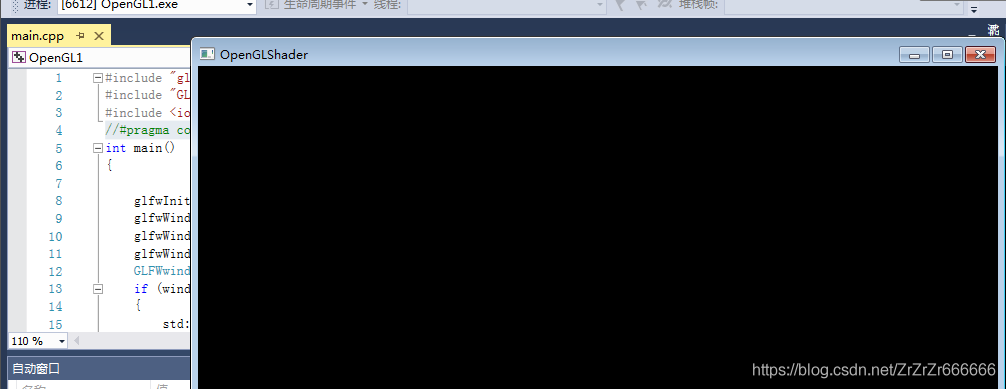
After the configuration is complete, paste the following code into source.cpp and run.
#include <glad\glad.h>
#include <glfw\glfw3.h>
#include <iostream>
void framebuffer_size_callback(GLFWwindow* window, int width, int height);
void processInput(GLFWwindow *window);
// settings
const unsigned int SCR_WIDTH = 800;
const unsigned int SCR_HEIGHT = 600;
int main()
{
// glfw: initialize and configure
// ------------------------------
glfwInit();
glfwWindowHint(GLFW_CONTEXT_VERSION_MAJOR, 3);
glfwWindowHint(GLFW_CONTEXT_VERSION_MINOR, 3);
glfwWindowHint(GLFW_OPENGL_PROFILE, GLFW_OPENGL_CORE_PROFILE);
#ifdef __APPLE__
glfwWindowHint(GLFW_OPENGL_FORWARD_COMPAT, GL_TRUE); // uncomment this statement to fix compilation on OS X
#endif
// glfw window creation
// --------------------
GLFWwindow* window = glfwCreateWindow(SCR_WIDTH, SCR_HEIGHT, "LearnOpenGL", NULL, NULL);
if (window == NULL)
{
std::cout << "Failed to create GLFW window" << std::endl;
glfwTerminate();
return -1;
}
glfwMakeContextCurrent(window);
glfwSetFramebufferSizeCallback(window, framebuffer_size_callback);
// glad: load all OpenGL function pointers
// ---------------------------------------
if (!gladLoadGLLoader((GLADloadproc)glfwGetProcAddress))
{
std::cout << "Failed to initialize GLAD" << std::endl;
return -1;
}
// render loop
// -----------
while (!glfwWindowShouldClose(window))
{
// input
// -----
processInput(window);
// render
// ------
glClearColor(0.2f, 0.3f, 0.3f, 1.0f);
glClear(GL_COLOR_BUFFER_BIT);
// glfw: swap buffers and poll IO events (keys pressed/released, mouse moved etc.)
// -------------------------------------------------------------------------------
glfwSwapBuffers(window);
glfwPollEvents();
}
// glfw: terminate, clearing all previously allocated GLFW resources.
// ------------------------------------------------------------------
glfwTerminate();
return 0;
}
// process all input: query GLFW whether relevant keys are pressed/released this frame and react accordingly
// ---------------------------------------------------------------------------------------------------------
void processInput(GLFWwindow *window)
{
if (glfwGetKey(window, GLFW_KEY_ESCAPE) == GLFW_PRESS)
glfwSetWindowShouldClose(window, true);
}
// glfw: whenever the window size changed (by OS or user resize) this callback function executes
// ---------------------------------------------------------------------------------------------
void framebuffer_size_callback(GLFWwindow* window, int width, int height)
{
// make sure the viewport matches the new window dimensions; note that width and
// height will be significantly larger than specified on retina displays.
glViewport(0, 0, width, height);
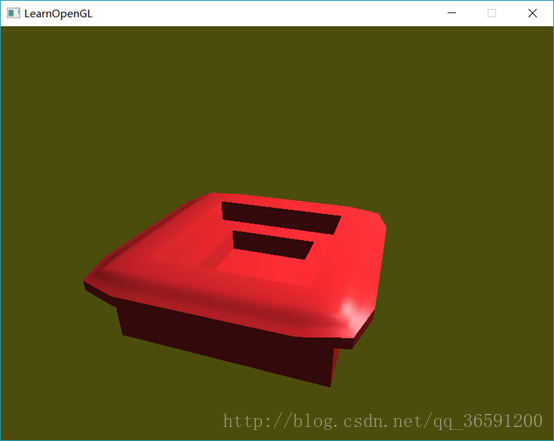
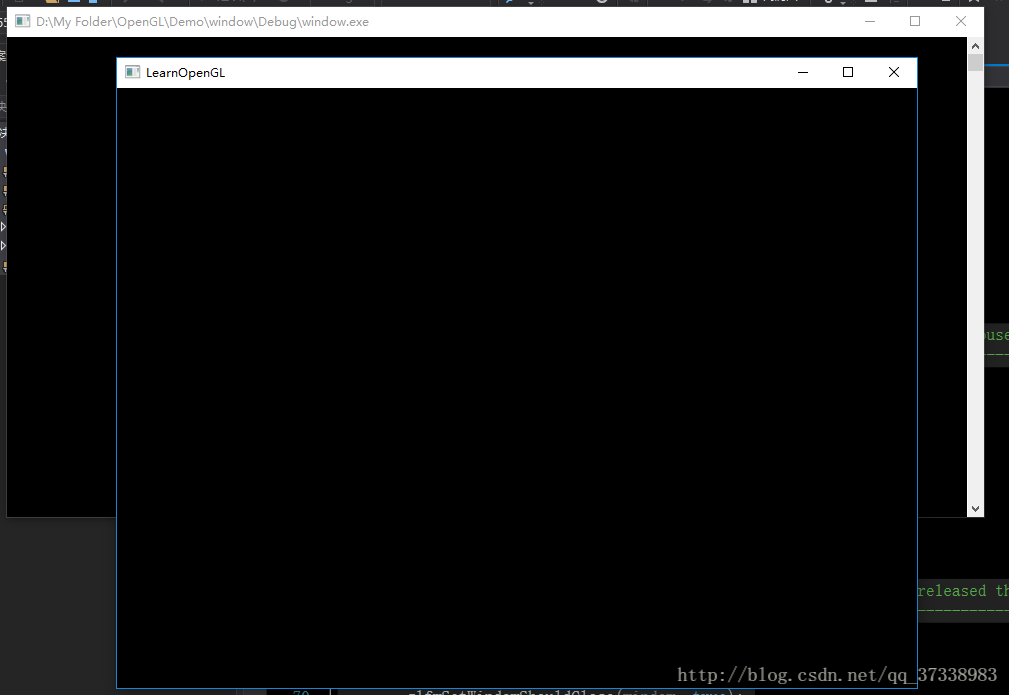
}The following window shows that the configuration is successful.
Vs configuration of OpenGL development environment: configuration of glfw library and glad Library
1. Go to GLFW official website to download the corresponding version of the configuration file: click the open link, no matter your system is 32-bit or 64-bit, it is recommended to download the 32-bit configuration file, as shown below:
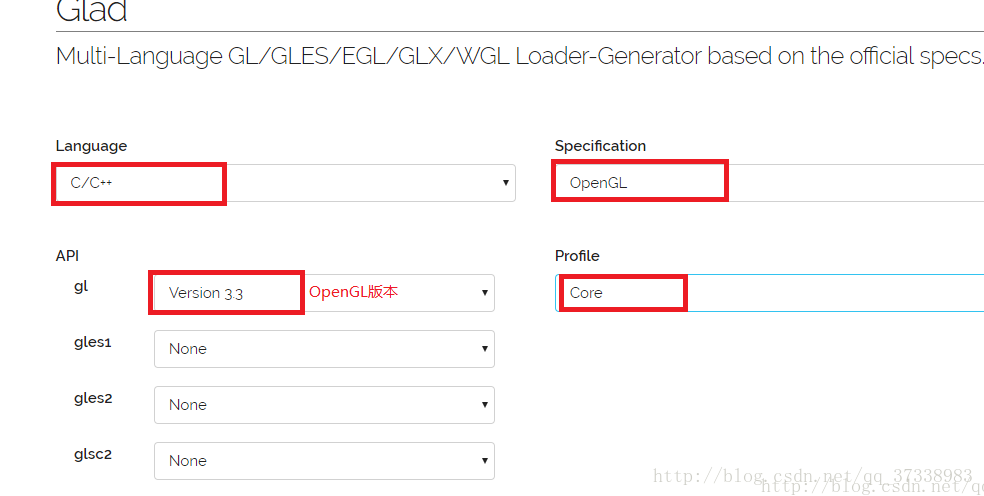
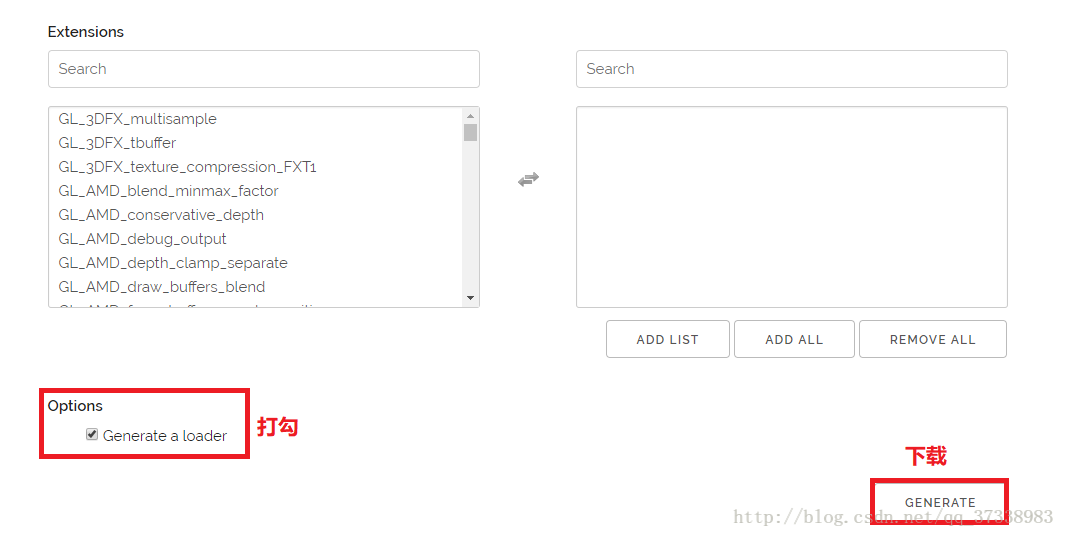
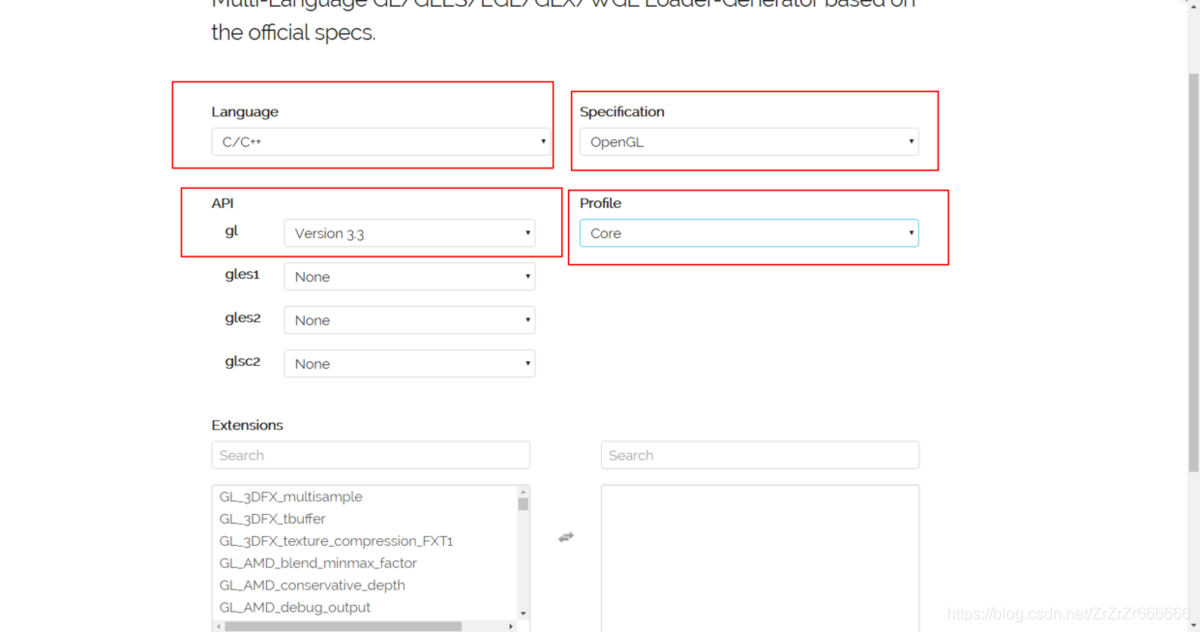
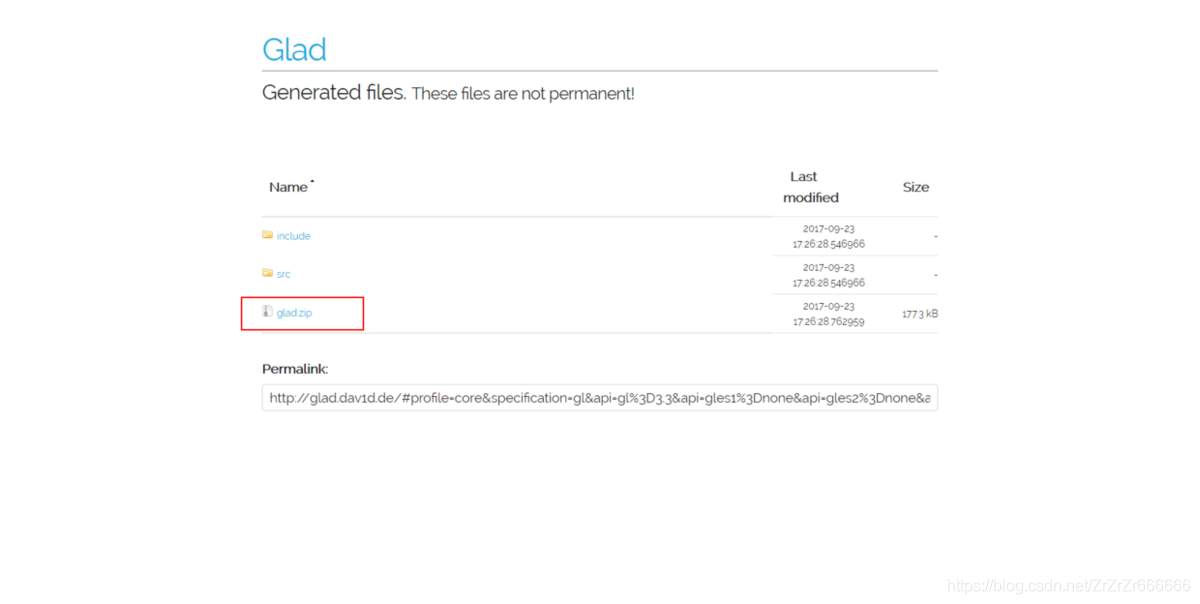
Go to the Glad Online service to get the Glad. H configuration file and click the link to open it. Fill in the information as shown below to get the Glad. Zip file:
2. Unzip the downloaded file to get the configuration library of each version of VS. You can choose according to the version of VS you have installed. After decompression glad.zip can see two folders: include and SRC, we will include KHR and glad in folder folder to include new folder, as shown in the figure below:
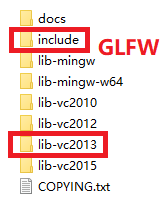
Then place the lib-vc2013 folder and include folder in the same folder, as shown in the figure below:

Good to here folder finishing work, then see how to configure!!
3. Copy the glfw3.dll files from the lib-vc2013 folder to the system folders: C:\ windows\ System32 and C:\ windows\ SysWOW64.
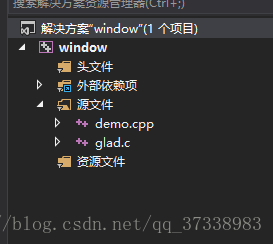
4. Open VS2013, create a new console application, create a new demo.cpp, and add the glad.c in the SRC folder from which the glad.zip is unzips to the project, as shown in the figure below:
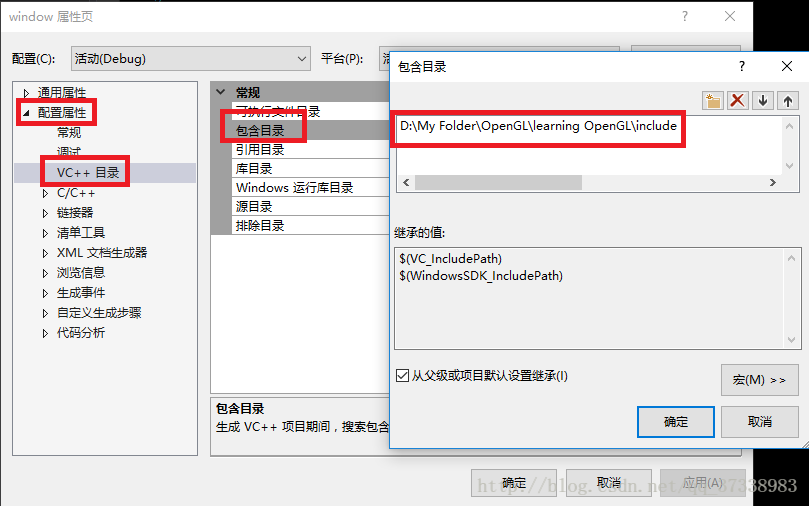
5. Link to contain directory and library directory, right-click Solution: Properties ->; Configure properties ->; VC++ Directory: Include the paths to the two folders from Step 2, as shown in the figure below:

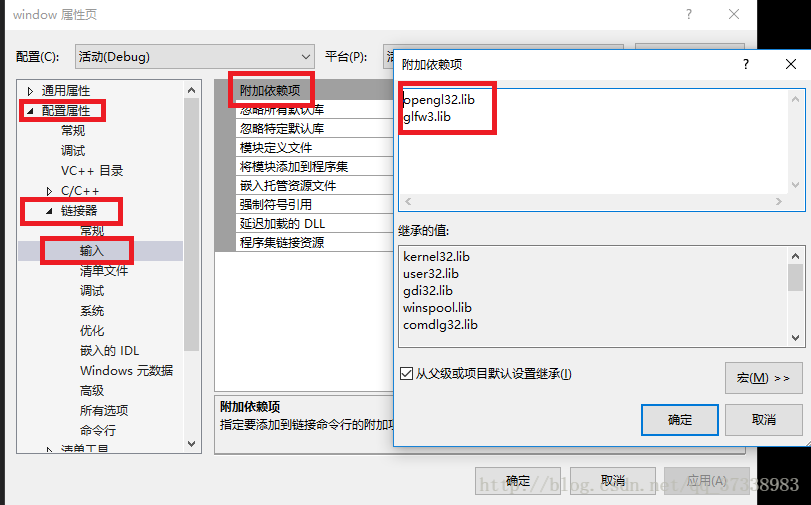
6. Link libraries: opengl32.lib and glfw3.lib. Right-click Solution: Properties ->; Configure properties ->; The linker – & gt; Add a dependency, as shown in the figure below:
Here, the configuration is complete, let’s run the first example!!
7. Implement an OpenGL window: Hello Window.
The demo. CPP code:
Go to the Glad Online service to get the Glad. H configuration file and click the link to open it. Fill in the information as shown below to get the Glad. Zip file:
2. Unzip the downloaded file to get the configuration library of each version of VS. You can choose according to the version of VS you have installed. After decompression glad.zip can see two folders: include and SRC, we will include KHR and glad in folder folder to include new folder, as shown in the figure below:
Then place the lib-vc2013 folder and include folder in the same folder, as shown in the figure below:
Good to here folder finishing work, then see how to configure!!
3. Copy the glfw3.dll files from the lib-vc2013 folder to the system folders: C:\ windows\ System32 and C:\ windows\ SysWOW64.
4. Open VS2013, create a new console application, create a new demo.cpp, and add the glad.c in the SRC folder from which the glad.zip is unzips to the project, as shown in the figure below:
5. Link to contain directory and library directory, right-click Solution: Properties ->; Configure properties ->; VC++ Directory: Include the paths to the two folders from Step 2, as shown in the figure below:
6. Link libraries: opengl32.lib and glfw3.lib. Right-click Solution: Properties ->; Configure properties ->; The linker – & gt; Add a dependency, as shown in the figure below:
Here, the configuration is complete, let’s run the first example!!
7. Implement an OpenGL window: Hello Window.
The demo. CPP code:
#include <glad\glad.h>
#include <GLFW\glfw3.h>

#include <iostream>
void framebuffer_size_callback(GLFWwindow* window, int width, int height);
void processInput(GLFWwindow *window);

// settings
const unsigned int SCR_WIDTH = 800;
const unsigned int SCR_HEIGHT = 600;

int main()
{
	// glfw: initialize and configure
	// ------------------------------
	glfwInit();
	glfwWindowHint(GLFW_CONTEXT_VERSION_MAJOR, 3);
	glfwWindowHint(GLFW_CONTEXT_VERSION_MINOR, 3);
	glfwWindowHint(GLFW_OPENGL_PROFILE, GLFW_OPENGL_CORE_PROFILE);

#ifdef __APPLE__
	glfwWindowHint(GLFW_OPENGL_FORWARD_COMPAT, GL_TRUE); // uncomment this statement to fix compilation on OS X
#endif

	// glfw window creation
	// --------------------
	GLFWwindow* window = glfwCreateWindow(SCR_WIDTH, SCR_HEIGHT, "LearnOpenGL", NULL, NULL);
	if (window == NULL)
	{
		std::cout << "Failed to create GLFW window" << std::endl;
		glfwTerminate();
		return -1;
	}
	glfwMakeContextCurrent(window);
	glfwSetFramebufferSizeCallback(window, framebuffer_size_callback);

	// glad: load all OpenGL function pointers
	// ---------------------------------------
	if (!gladLoadGLLoader((GLADloadproc)glfwGetProcAddress))
	{
		std::cout << "Failed to initialize GLAD" << std::endl;
		return -1;
	}

	// render loop
	// -----------
	while (!glfwWindowShouldClose(window))
	{
		// input
		// -----
		processInput(window);

		// glfw: swap buffers and poll IO events (keys pressed/released, mouse moved etc.)
		// -------------------------------------------------------------------------------
		glfwSwapBuffers(window);
		glfwPollEvents();
	}

	// glfw: terminate, clearing all previously allocated GLFW resources.
	// ------------------------------------------------------------------
	glfwTerminate();
	return 0;
}

// process all input: query GLFW whether relevant keys are pressed/released this frame and react accordingly
// ---------------------------------------------------------------------------------------------------------
void processInput(GLFWwindow *window)
{
	if (glfwGetKey(window, GLFW_KEY_ESCAPE) == GLFW_PRESS)
		glfwSetWindowShouldClose(window, true);
}

// glfw: whenever the window size changed (by OS or user resize) this callback function executes
// ---------------------------------------------------------------------------------------------
void framebuffer_size_callback(GLFWwindow* window, int width, int height)
{
	// make sure the viewport matches the new window dimensions; note that width and
	// height will be significantly larger than specified on retina displays.
	glViewport(0, 0, width, height);
}
Running results:
[OpenGL · error] visual studio 2019 reports an error. It is an external symbol gladloadglloader that cannot be parsed. This symbol is referenced in the function main
Errors encountered
Today before open write OpenGL rendering triangular program, found that have been submitted to the following error
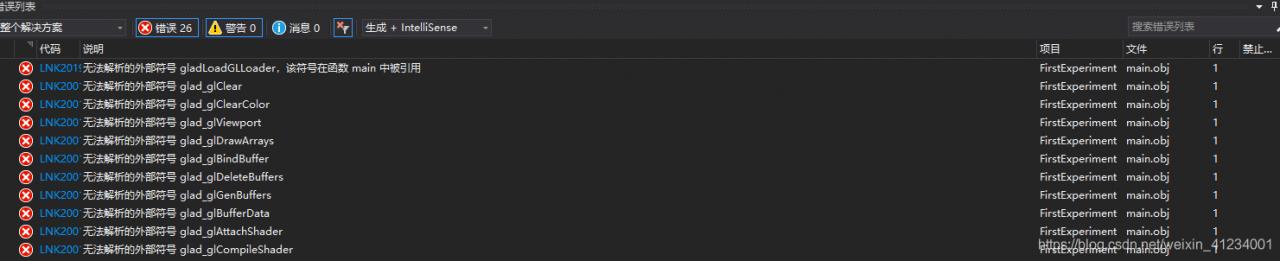
when thought is a good start you don’t have links to files and library files, search on the Internet, and finally found the problem, is you don’t have the glad. C files added to the project.
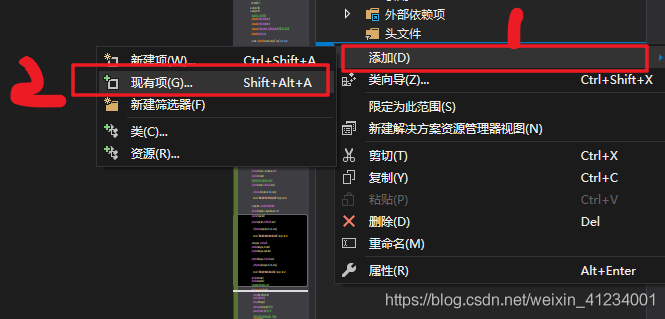
The solution
Before remembering yourself to add glad.c file is passed in the source file ->; Create a new item, create a new glad.c file, and then copy the contents of the glad.c file from the other directory.
> By right-clicking the source file ->; Add an existing item ->;
OpenGL Programming Guide 8th Edition 9th Edition vs2015 vs2017 configuration method
“OpenGL Programming Guide” 8th Edition 9th Edition VS2015 VS2017 configuration method
“OpenGL programming guide” source download and source code in VS2015 VS2017 configuration method
directory
“OpenGL programming guide” version 8 version 9 environment configuration VS2015
1. Source download:
2. Cmake build configuration
3. VS2015 configuration
4. Run the example
5. Special Settings
“OpenGL programming guide” source download and source code in VS2015 VS2017 configuration method
directory
“OpenGL programming guide” version 8 version 9 environment configuration VS2015
1. Source download:
2. Cmake build configuration
3. VS2015 configuration
4. Run the example
5. Special Settings
1. Source download:
Version 9 can be downloaded from the official website: http://www.opengl-redbook.com/
Making the source address: https://github.com/openglredbook/examples
Note, direct source code downloaded from making, using CMake build VS2015 always appear a lot of mistakes, later on the issue of https://github.com/openglredbook/examples/issues/2, found that has successfully solved the great god, therefore, recommended directly download the source code of the lot:
https://github.com/elmindreda/examples
For the convenience of everyone to use, here I have configured the VS2015 to provide everyone to download, save you to build:
https://download.csdn.net/download/guyuealian/10878513 (direct download decompression, opened by VS2015/VS2017 my_build/vermilion9 SLNS, detected and then you can happy to run the example la la la la la)
2. Cmake build configuration
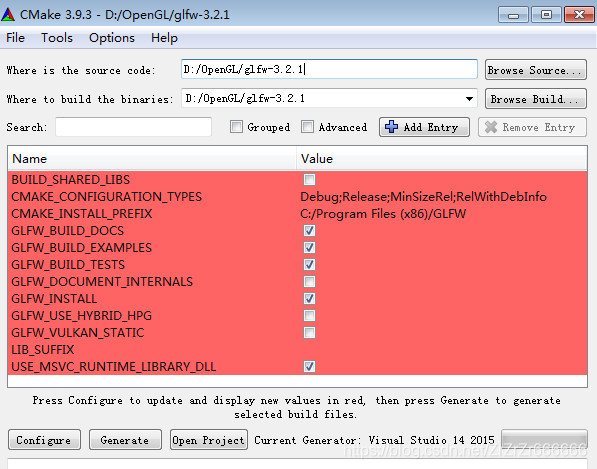
Install Cmake in Windows and set the following Settings:

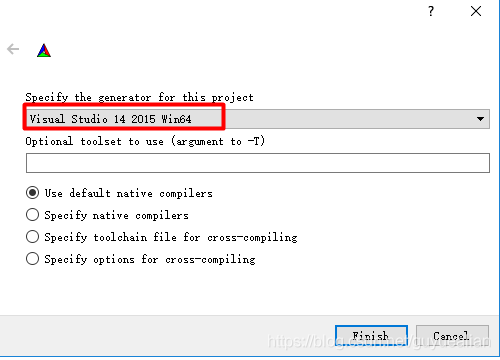
If you click “Configure” :, the compiler will be selected, and you can select Visual Studio 14 2015 for VS2015
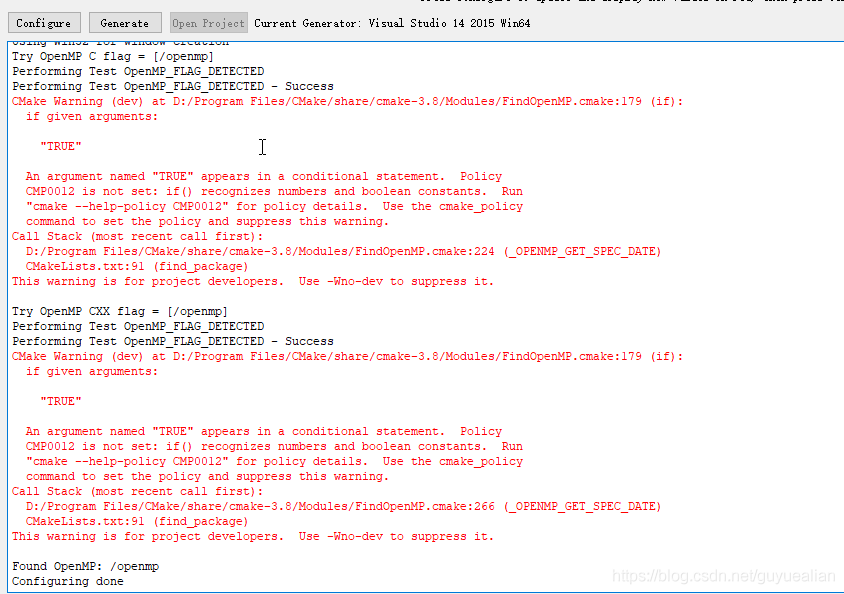
“Configuring Done” indicates that the configuration is OK. Forget the warnings that appear in red
Click “Generate” : “Generate done” will be displayed.
Finally, “Open Project” will be opened by default with VS2015
3. VS2015 configuration
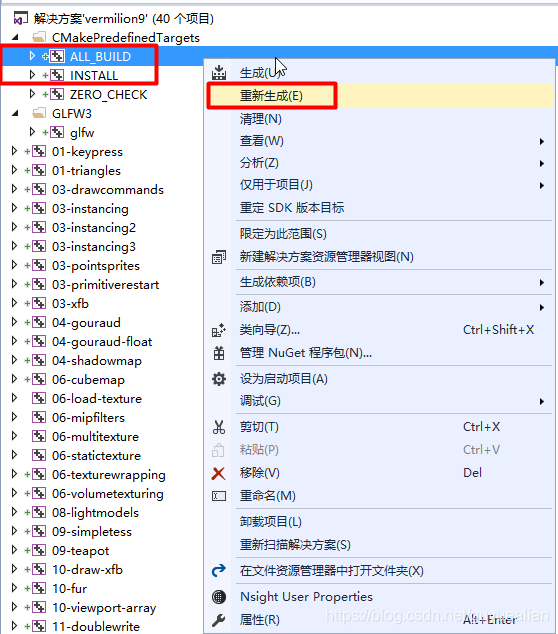
Mouse select “ALL_BUILD” → Recompile
Select “Install” → Recompile with the mouse
4. Run the example
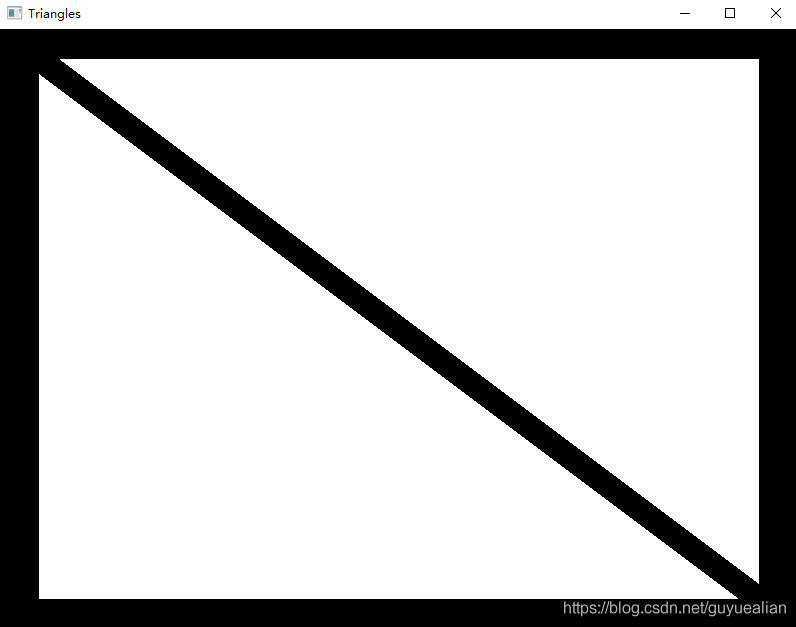
If you want to test running an example from a book, just select the example, like “01-triangles,” set it to “Set as Start Project,” and you’ll be ready to go

A triangular window will appear after successful operation:
5. Special Settings
Some examples, such as “12-imageprocessing,” will show a black window with nothing at all. This is because some of the shaders are not set to the correct file paths. Many of the resource files in the book are in: examples, bin, media.
A simple way to do this is to set up the working directory so that the relevant resource files can be found at runtime:
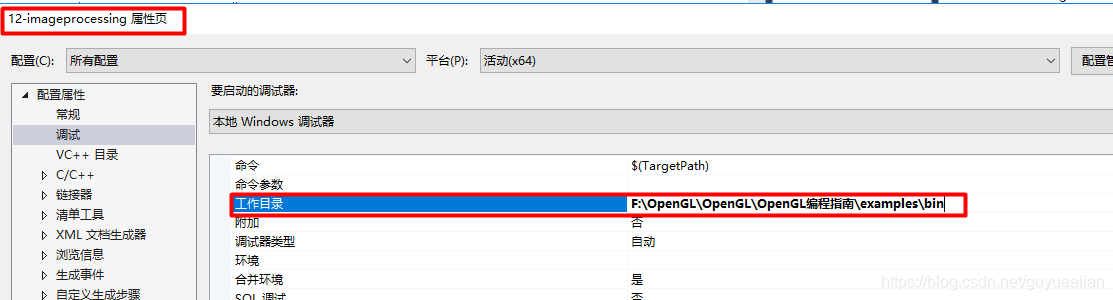
The working directory is: $(projectDir).. \bin

Vs2015 + OpenGL environment configuration
The article from http://jingyan.baidu.com/article/d5c4b52bca5005da560dc5d6.html
http://www.linuxidc.com/Linux/2013-02/78959p2.htm
Look at both of them if I don’t make sense
Download the GLUT library http://www.opengl.org/resources/libraries/glut/glutdlls37beta.zip
(If you can’t get out, remember over the wall. I gotover the wallfrom BBB1 and downloaded it directly in the browser.)
Copy the static function libraries Glut. lib and Glut32.lib into the lib folder of the file directory after extracting them
X:\Program Files (x86)\Microsoft Visual Studio 12.0\VC\lib
Will glut. DLL, glut32 DLL this two dynamic library file into the operating system directory under the C: \ Windows \ system32 folder (32-bit system) or C: \ Windows \ SysWOW64 (64 – bit systems).
For compatibility, it is best to copy the corresponding files in both directories.
Copy the extracted header file Glut. h into the following directory:
X:\Program Files (x86)\Microsoft Visual Studio 12.0\VC\ Include \GL
Tip: If there is no GL folder in the incluce directory, you will need to create it manually
Verification method:
Create a blank Win32 console application
2,
Add the include directory at the beginning of the code
#include < GL/glut.h>
3. Then you can edit your own OpenGL program
4,
For example: Copy the following code into the newly configured VS
#include < GL/glut.h>
#include < stdlib.h>
#include < math.h>
#include < stdio.h>
static int year = 0,spin=0, day = 0;
static GLint fogMode;
const int n = 100;
Const GLFloat R = 1.0F;
Const GLFloat Pi = 3.1415926536 F;
void DrawCircle()
{
Int I;
glClear(GL_COLOR_BUFFER_BIT);
glBegin(GL_LINE_LOOP);
for (i = 0; i < n; ++i)
{
GlColor3f (1.0, 0.0, 0.0);
glVertex2f(R*cos(2 * Pi/n*i), R*sin(2 * Pi/n*i));
}
glEnd();
glFlush();
}
void init(void)
{
GlFloat Position [] = {0.5, 0.5, 3.0, 0.0};
glEnable(GL_DEPTH_TEST); // prevent occlusion
glLightfv(GL_LIGHT0, GL_POSITION, position);
GlEnable (GL_LIGHTING);
glEnable(GL_LIGHT0);
{
GLFloat Mat [3] = {0.1745, 0.01175, 0.01175};
glMaterialfv(GL_FRONT, GL_AMBIENT, mat);
Mat [0] = 0.61424; Mat [1] = 0.04136; Mat [2] = 0.04136;
glMaterialfv(GL_FRONT, GL_DIFFUSE, mat);
Mat [0] = 0.727811; Mat [1] = 0.626959; Mat [2] = 0.626959;
glMaterialfv(GL_FRONT, GL_SPECULAR, mat);
GlMaterialf (GL_FRONT GL_SHININESS, 0.6 * 128.0);
}
glEnable(GL_FOG);
{
GlFloat fogColor[4] = {0.5, 0.5, 0.5, 1.0};
fogMode = GL_EXP;
glFogi(GL_FOG_MODE, fogMode);
glFogfv(GL_FOG_COLOR, fogColor);
GlFogf (GL_FOG_DENSITY, 0.35);
glHint(GL_FOG_HINT, GL_DONT_CARE);
GlFogf (GL_FOG_START, 1.0);
GlFogf (GL_FOG_END, 5.0);
}
GlClearColor (0.5, 0.9, 0.9, 1.0); Fog color/* * /
}
void display(void)
{
glClear(GL_COLOR_BUFFER_BIT | GL_DEPTH_BUFFER_BIT);
GlColor3f (0.0, 1.0, 1.0);
GlPushMatrix (); // Remember your position
GlutSolidSphere (1.0, 20, 16); /* Draw solar radius, 20 longitude, 16 latitude */
GlRotatef (spin, 0.0, 1.0, 0.0); // Rotate around a vector at a given Angle (positive is counterclockwise)
GlTranslatef (2.0, 1.0, 0.0);
GlRotatef (spin, 1.0, 0.0, 0.0);// revolution
GlRectf (0.1, 0.1, 0.5, 0.5);
GlColor3f (0.0, 0.0, 1.0);
GlutWireSphere (0.2, 8, 8); /* Draw the first asteroid */
GlColor3f (1.0, 0.0, 0.0);
GlTranslatef (2.0, 1.0, 0.0);
Glrotatef (2 * spin, 0.0, 1.0, 0.0);
GlutSolidSphere (0.5, 16, 8);
glPopMatrix(); // Return to the original position
glutSwapBuffers();
}
void spinDisplay(void)
{
spin = spin + 2;
if (spin > 360).
spin = spin – 360;
glutPostRedisplay();
}
void mouse(int button,int state,int x,int y )
{
switch (button)
{
case GLUT_LEFT_BUTTON:
if (state == GLUT_DOWN)
glutIdleFunc(spinDisplay);
break;
case GLUT_MIDDLE_BUTTON:
if (state == GLUT_DOWN)
glutIdleFunc(NULL);
break;
default:
break;
}
}
void reshape(int w, int h)
{
glViewport(0, 0, (GLsizei)w, (GLsizei)h);
glMatrixMode(GL_PROJECTION);
glLoadIdentity();
GluPerspective (60.0, (GLFloat)w/(GLFloat)h, 0.5, 20.0);
glMatrixMode(GL_MODELVIEW);
glLoadIdentity();
GluLookAt (0.0, 10.0, 10.0, 0.0, 0.0, 0.0, 0.0, 1.0, 0.0);
}
void keyboard(unsigned char key, int x, int y)
{
switch (key) {
case ‘d’:
day = (day + 10) % 360;
glutPostRedisplay();
break;
case ‘D’:
day = (day – 10) % 360;
glutPostRedisplay();
break;
case ‘y’:
year = (year + 5) % 360;
glutPostRedisplay();
break;
case ‘Y’:
year = (year – 5) % 360;
glutPostRedisplay();
break;
case 27:
exit(0);
break;
default:
break;
}
}
int main(int argc, char** argv)
{
glutInit(& argc, argv);
glutInitDisplayMode(GLUT_DOUBLE | GLUT_RGB);
glutInitWindowSize(400, 400);
glutInitWindowPosition(100, 100);
GlutCreateWindow (” OpenGL Programming — Yang Chao “);
init();
//glutDisplayFunc(DrawCircle);
glutDisplayFunc(display);
glutReshapeFunc(reshape);
//glutKeyboardFunc(keyboard);
glutMouseFunc(mouse);
glutMainLoop();
return 0;
}
5,
http://jingyan.baidu.com/album/d5c4b52bca5005da560dc5d6.html?picindex=5
So we have the picture
Construction of vs2015 OpenGL configuration environment
OpenGL configuration
Main solutions:
What is OpenGL?How to configure successfully to create a window?
1. OpenGL is what?
A set of specifications that defines a set of functions, what arguments are passed in, and what results are sent out. Since it is only such a set of specifications, anyone can implement functions in different ways as long as they conform to the specifications. VS with OpenGL library (should be able to directly use VS own, but here is the configuration of their own this way, after your add)
OpenGL itself is a big state machine: there are many variables can be set up so that we can control its operations. The state of OpenGL is often referred to as a context. So what we do with OpenGL is we change the context in which it runs by changing its state, so that OpenGL gives us the results that we want
2. The configuration
2.1 What tools need to be prepared for configuration?
2.VS2015
. Glad source is used to encapsulate the function called in OpenGL library
4>make is used to compile source code (GLFW library).
2.1.1 download GLFW
Website address is: http://www.glfw.org/download.html (you need over the wall to access)
in baidu network location to download, links:
https://pan.baidu.com/s/1ceyucgFRYImnjmG-LmkuwA password: 9 SMQ
2.1.2 download Cmake
Through CMake GLFW source is needed to compile the
website address is: https://cmake.org/download/ (also need over the wall to access)
baidu network location to download
link: http://pan.baidu.com/s/1clPRIm password: ct24
install CMake, the following configuration, click the configure, choose vs2015 (vs) according to oneself, click the generate, later. At this point, look at the cmake file under the generated GLFW project.
 ## 2.1.3
Click the Generate button at the bottom right corner of the page, and on the following page, click Glad. Zip to press
2.1.4 The download is done, the next to assemble the library used
1
1
1
1
1
1 New folder Opengl
2. Will GLFW directory of the include directory is copied to the Opengl directory to
3. Opengl folder under a new folder, named lib
4. Will be compiled GLFW library is copied to the lib folder
GLFW library position is: GLFW – 3.2.1 \ SRC, the inside of the Debug and Release two directory replication, copied to the lib folder
note: Debug and Release do not exist at the beginning of this time, you need to open the GLFW solution in VS2015, run the two modes (Debug/Release), to produce, run after the Win32 folder will have these two folders, do not bother, just copy the two SRC. A lot of readers didn’t know what I was looking at on the blog, so let me make a statement here.
5. Copy glad decompression folder, the include directory two folders glad and KHR copy, copy to the OpenGL directory, include folder
Include
 lib
lib
ah
2.1.5 OK, finally can use VS2015 to create projects, add libraries
1.VS2015, create an empty project, 
 copy from glad folder to project source file.
 click on the project, set the properties, VC ++ directory, set respectively
br> *>lick on the connector, enter, and add additional dependencies
** Note: !!!!!!!!!!!
OpenGL environment configuration under VS2010 / vs2012 / vs2015
Please read every word carefully.
In order to learn “OpenGL Super Bibliography (Fifth Edition)” must configure OpenGL environment, is the so-called work to do its thing must first benefit its device. Through a lot of online configuration tutorial, have a lot of problems, but also has the essence of the detailed tutorial, such as a blog: http://www.zyh1690.org/build-opengl-super-bible-fifth-edition-development-environment/. While the tutorial is detailed, there are a few details that the blog doesn’t go into. Configuring the OpenGL environment must be careful and patient. Because a little oversight can cause the final configuration environment to fail. Although this is for the “Win7 X64 +VS2010” environment configuration process, but I in VS2012/VS2015 also built successfully, VS2012/VS2015 configuration OpenGL principle is also very simple, is one of the Microsoft Visual Studio 10.0 to add files into Microsoft Visual Studio 12.0 or Microsoft Visual Studio 15.0 to add related files.
Configure environment:
win7 X64 + Visua Studio 2010
win7 X64 + Visua Studio 2012
win7 X64 + Visua Studio 2015
Required configuration files and tools:
Baidu cloud disk Download Address:
Link: http://pan.baidu.com/s/1kVsKUGJ password: XXQQ
Link: http://pan.baidu.com/s/1slu9RK5 password: asj8
Here is the official setup:>; > > > > > > > > > > > > > > > > > > > > > > > Line & gt; > > > > > > > > > > > > > > > > > > > > > > > > Line & gt; > > > > > > > > > > > > > > > > > > > > > > > >
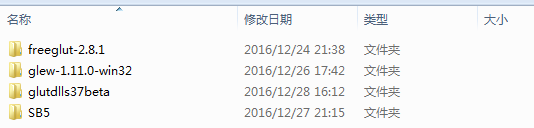
The FreeGLUT configuration
Open the x:\x\ FreeGlut-2.8.1 \VisualStudio\2010\ FreeGlut.SLN project project, (if you are configuring VS2015, you can select x:\x\…. \2015\ FreeGlut.SLN Project Project)
The solution is generated in Debug mode and Release mode, respectively. (You can generate only one. It is recommended to compile in debug mode without execution. If you run the pop-up black box, ignore it. 32-bit operating systems note that eventually, when running the code in Bluebook chapter01\ Block, if you encounter a problem with freeglut_static. Lib not being opened, you should choose Debug_Static mode to recompile and generate the required freeglut_static. Lib and add it to the specified folder.)
You will see the generated.dll and.lib files in the x:\x\ FreeGlut-2.8.1 \lib\x86 directory. Please add _d to the.dll and.lib files in the Debug directory to distinguish them later. As shown in figure:

X :\x\ FreeGlut-2.8.1 \ Include \GL: :\Program Files (x86)\Microsoft Visual Studio 10.0\VC\ Include \GL: : : : : : : : : : : : : : : : : : : : : : : : : : : : : : : : : : : : : : : : : : : : : : : : : :
Copy the.dll file in the x:\x\ FreeGlut-2.8.1 \ Lib \x86 folder (and the Debug folder) to the C:\ Windows&syswow64 directory (x86 to the System32 directory).
Copy the.lib file in the x:\x\ FreeGlut-2.8.1 \lib\x86 folder (and the Debug folder) to x:\x\Microsoft Visual Studio 10.0\VC\lib.
So now the FreeGlut is done!
(Once you’ve done this, you can code check.
Test 1: build Win32 console project, add test code, compile and run.
Test two: build Win32 console project, add test code, compile and run.
II. GLEW configuration
Copy the.h file in the folder x:\x\glew-1.11.0\include\GL to the directory x:\Program Files (x86)\Microsoft Visual Studio 10.0\VC\include\GL.
Copy the.lib file in the folder x:\x\glew-1.11.0\lib\Release\Win32 to the directory x:\x\Microsoft Visual Studio 10.0\VC\lib.
Copy the.dll file from the x:\x\glew-1.11.0\bin\Release\Win32 folder to the C:\ WindowsSYSWOW64 directory. (If not, skip it.)
(Note that if VS2015 is supplied, you need to put the configuration file in x:\x\Microsoft Visual Studio 15.0…. C)
Third, GLUT configuration
Copy the.h file in the folder x:\x\ Glutdlls37Beta to the directory x:\Program Files (x86)\Microsoft Visual Studio 10.0\VC\include\GL.
Copy the.lib file under the x:\x\ Glutdlls37Beta folder to the x:\x\Microsoft Visual Studio 10.0\VC\lib directory.
Copy the.dll file under the x:\x\ Glutdlls37Beta folder to the C:\ WindowsSYSWOW64 directory.
(Note that if VS2015 is supplied, you need to put the configuration file in x:\x\Microsoft Visual Studio 15.0…. )
4. Build GLTools library
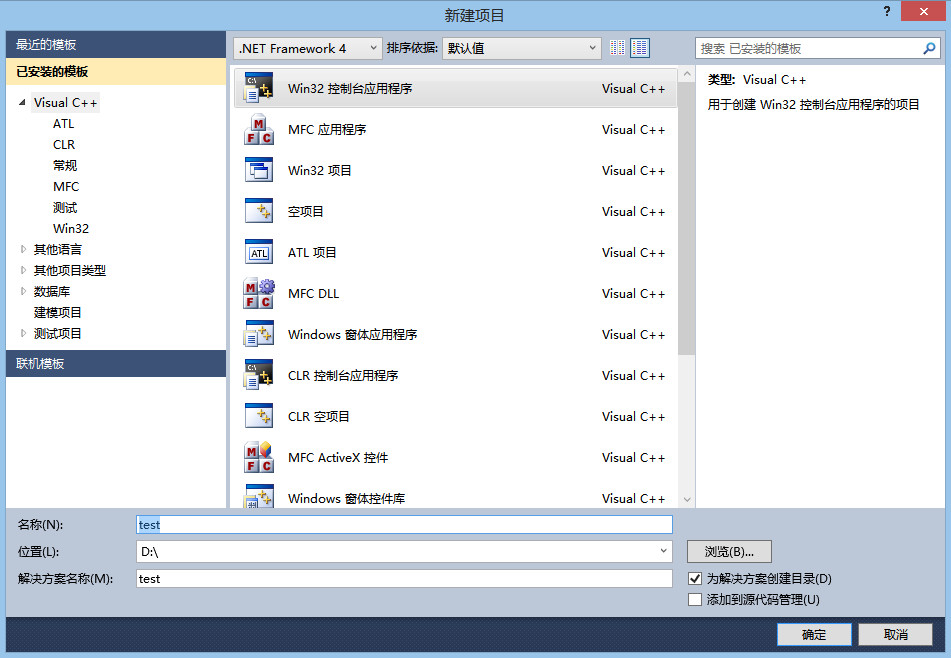
Create a new GLTools Win32 project, as shown in the figure below:
First compile, (original here has error, below is I modify)
Copy the.cpp file (excluding glew.c file) in the x:\x\SB5\Src\GLTools\ Src directory to x:\x\ GLTools\ GLTools.
Copy the.h file (excluding the GL folder) in the x:\x\SB5\Src\GLTools\include directory to x:\x\ GLTools\ GLTools.
Right-click on the header file and the source file respectively and add ->; The existing item adds.h and.cpp files to the project. As shown in figure:
The compiler prompts are as follows:
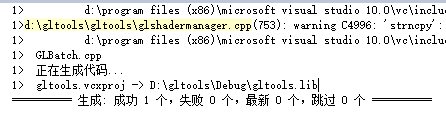
The gltools.lib file was generated successfully. It can be viewed under the x:\x\gltools\Debug directory.
Copy the.lib file to the x:\Program Files (x86)\Microsoft Visual Studio 10.0\VC\lib folder.
Copy the.h file to the x:\Program Files (x86)\Microsoft Visual Studio 10.0\VC\include folder (note that this is not the GL folder).
So gltools is OK.
Five, the test
Let’s test the environment using the examples given in the book. If the test is successful, then the OpenGL environment is ready.
The project of establishing TEST:
We use the example from Chapter 1 to test by copying all the files in the x:\x\SB5\Src\Chapter01\Block into the x:\x\test\test folder. Also right-click on the source file and add ->; The existing entries include the block.cpp file.
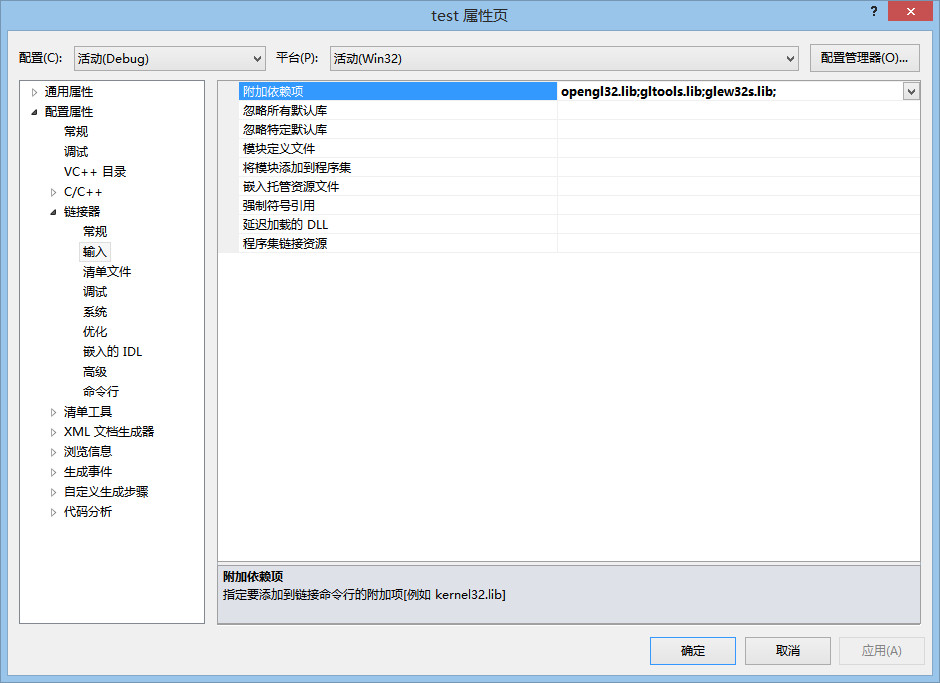
Adding Additional Dependencies (first figure) :(This way of adding dependencies only works for the current Test project. To make these.lib files available to other projects, you should add dependencies to the properties manager, as shown in the second figure below.
Compile and run the project, and the effect is as follows :(If there is an error in compilation, search the error information with Baidu Browser to find the corresponding solution. Or check out “Some special cases handling” at the end of this blog post for help.)
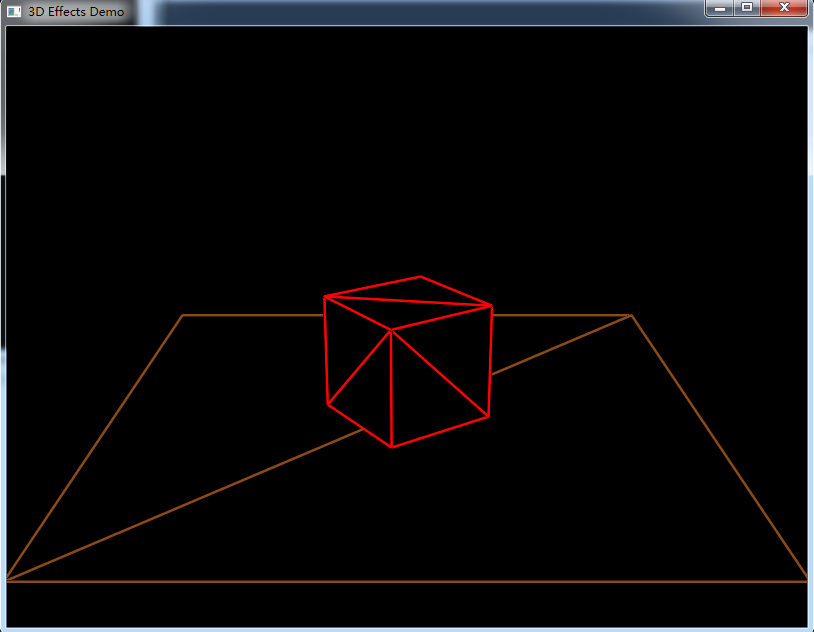
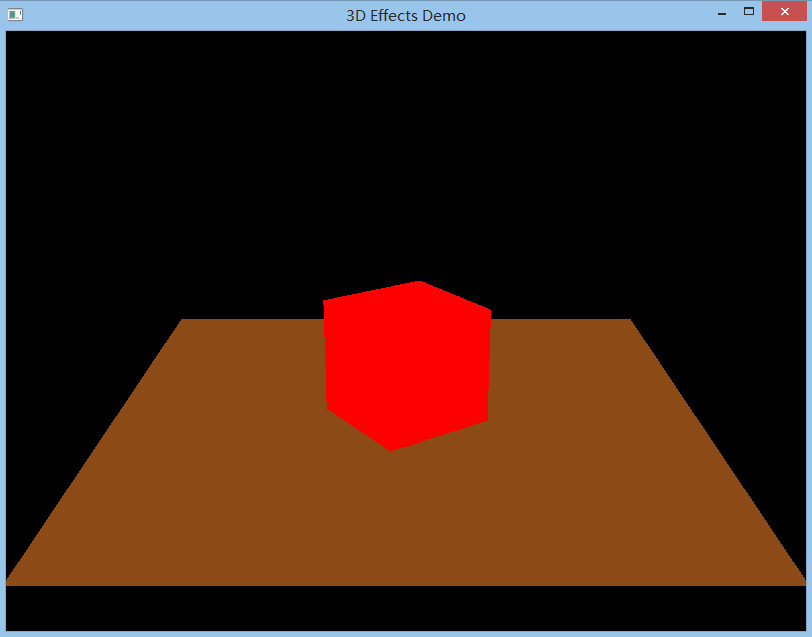
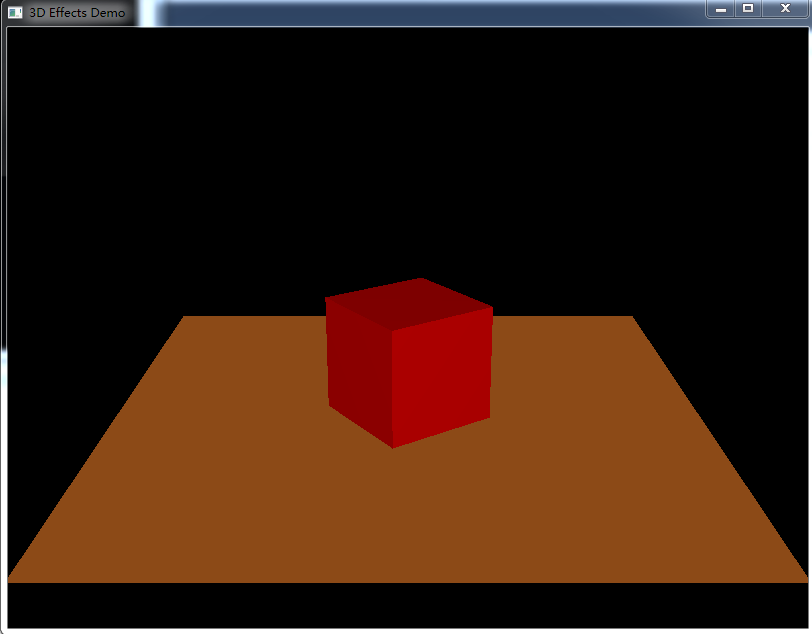
Press the space bar to transform the display effect, a total of six effects:

VI. Handling of some special cases:
Configuring the OpenGL environment exactly as described above will work on most computers. However, there are always exceptions. If the configuration fails, the following configuration details may help you solve the problem.
Case1: freeglut_static.lib could not open the problem
OpenGL SuperBibliography \SB5\SB5\ FreeGlut-2.6.0 \VisualStudio2008Static\Release FreeGlut_Static. Lib to X :\Program Files (x86)\Microsoft VisualStudio 10.0\VC\ Lib If you fail, try Plan 2.
Solution 2: Take a closer look at the FreeGLUT configuration section of this blog post, which is highlighted in bold red. Pay attention to configuration details.
case2: “math3d.h” : No such file or directory
C :\project\gltools\gltools\math3d.cpp(45): fatal error C1083: failed to open the “math3d.h” : No such file or directory header file.
Case3: UCrtBased. DLL missing
in Visual Studio 2015
Can follow this link: http://blog.csdn.net/so_geili/article/details/53009680, choose the “solution” to solve the problem.
The simplest course of configuring OpenGL in vs2015
This may be the simplest configuration of OpenGL related library method, this semester needs to learn graphics, so the Internet to find a variety of configuration OpenGL method, found that many people are copied to copy, many methods are wrong. Otherwise, the PC environment is different and various.lib file lookup errors appear in the configuration. Also many methods need to configure the external environment, is also troublesome. Today I will introduce my own method, do not need to consider the computer environment, convenient and simple.
1. Upgrade to VS2015
I am using VS2015. I do not know about the previous version, nor do I know whether it can be used, so I suggest you to upgrade to 2015. After all, do you use the new version or not?
2. Open VS2015 and create a new Win32 project (won’t create the wall to go).
Name it whatever you want, place it whatever you want.
3. Use NUTGET
This step is the most important and the only step in the configuration process.
vs2015 toolbars -> NuGet Package Manager-> Manage Nuget Packages for solution
The diagram below
And then you see something like this
Search the Browse window for any library you want. For example, here I want to configure glew and freeGLUT, I’ll search glew and then click Install at the top.
When configuring FreeGLUT, remember to select the second one. In fact, you can look at the installation amount, and select the one with the highest installation amount as the safest install.
4. Test
#include <stdio.h>
#include <GL/glew.h>
#include <GL/glut.h>
void init()
{
    glClearColor(0.0f, 0.0f, 0.0f, 0.0f);
}

void display()
{
    glClear(GL_COLOR_BUFFER_BIT);
}

int main(int argc, char* argv[])
{
    glutInit(&argc, argv);
    glutInitWindowPosition(100, 100);
    glutInitWindowSize(800, 480);
    glutInitDisplayMode(GLUT_RGBA);

    glutCreateWindow("opengl");

    glewInit();

    init();

    glutDisplayFunc(display);

    glutMainLoop();
    return 0;
}
Run this code, if run successfully indicates that the configuration is successful, do not need any reference code what, super convenient!!
if you’re running failure is your problem, it’s ok with me (low ˇ ∀ ˇ “)