OpenGL environment configuration


1. Download 3 libraries:
GLEW, GLM, SDL2
2. Configure the Visual Studio environment variables include directory (include header), library path (lib), executable directory (DLL) in the project configuration.
Specific addition can refer to
Linker –> input –> additional dependencies, add lib file name:
glew32.lib
glew32s.lib
SDL2.lib
SDL2main.lib
SDL2test.lib
OpenGL32.lib

The solution of configuring OpenGL in vs2017

I’ve just tried to mesh the sphere using OpenGL in the last two days. The solution to configure OpenGL in VS2017 is as follows:
Running is the link of https://blog.csdn.net/xdg_blog/article/details/52864872 code, the following need library file is also for this code, need to add other library method.
 
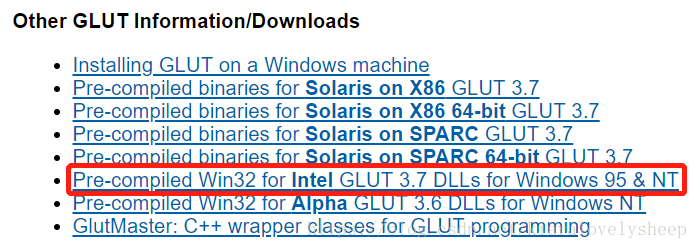
1. Download glut in the website, website link: https://www.opengl.org/resources/libraries/glut/.

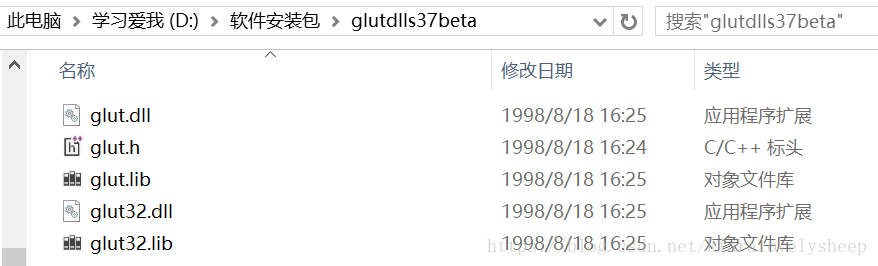
2. The downloaded file is as follows:

A. Put the two lib files Glut.lib and Glut32.lib into the directory:
D:\Program Files (x86)\Microsoft Visual Studio\2017\Community\VC\Tools\MSVC\14.15.26726\ Lib \x86
B. Put Glut. DLL and Glut32.dll into a directory: C:\Windows\syswow64
Under 64-bit Windows: 64-bit EXE and DLL are in the directory C :\ Windows \ System32, and 32-bit EXE and DLL are in the directory C :\ Windows \ SYSWOW64. So note that registering a 32-bit OCX or DLL on a Win64-bit system requires copying the 32-bit OCX or DLL to the C :\ Windows \syswow64\ directory. C :\ Windows \ SYSWOW64 \ REGSVR32 XXXXXXXX. OCX or DLL.)
C. In the directory: D:\Program Files (x86)\Microsoft Visual Studio\2017\Community\VC\Tools\MSVC\14.15.26726\ Include, create a new folder GL and put the header file in GL folder.
3. In VS2017, the configuration is as follows. First create a new C ++ project, then open the toolbar: Project ->; Properties:
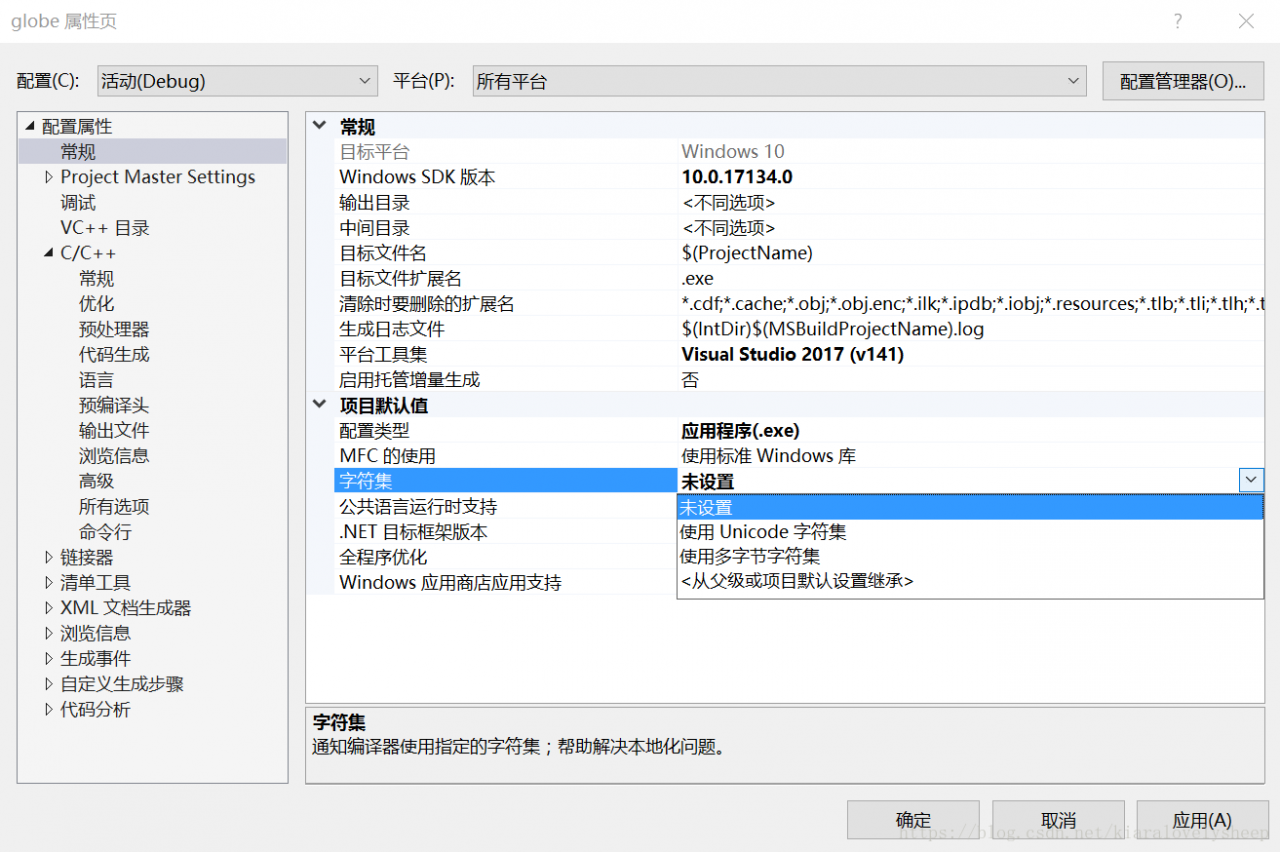
A. general – & gt; Character set – & gt; Is not set

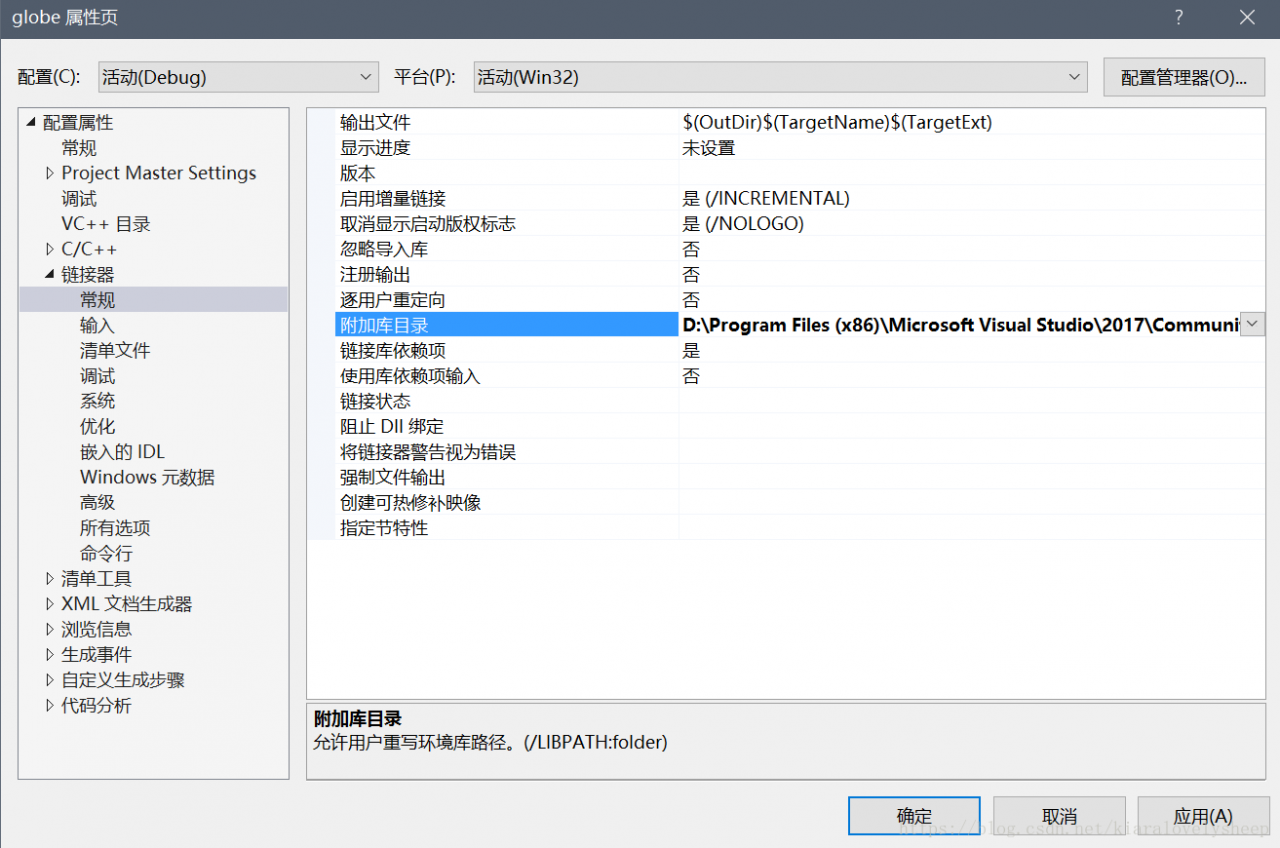
B. Linker ->; Conventional – & gt; Add the library directory, add OpenGL library file directory and its own library file directory. Write the path where the two lib files are placed.
D:\Program Files (x86)\Microsoft Visual Studio\2017\Community\VC\Tools\MSVC\14.15.26726\ Lib
D:\Program Files (x86)\Microsoft Visual Studio\2017\Community\VC\Tools\MSVC\14.15.26726\ Lib \x86

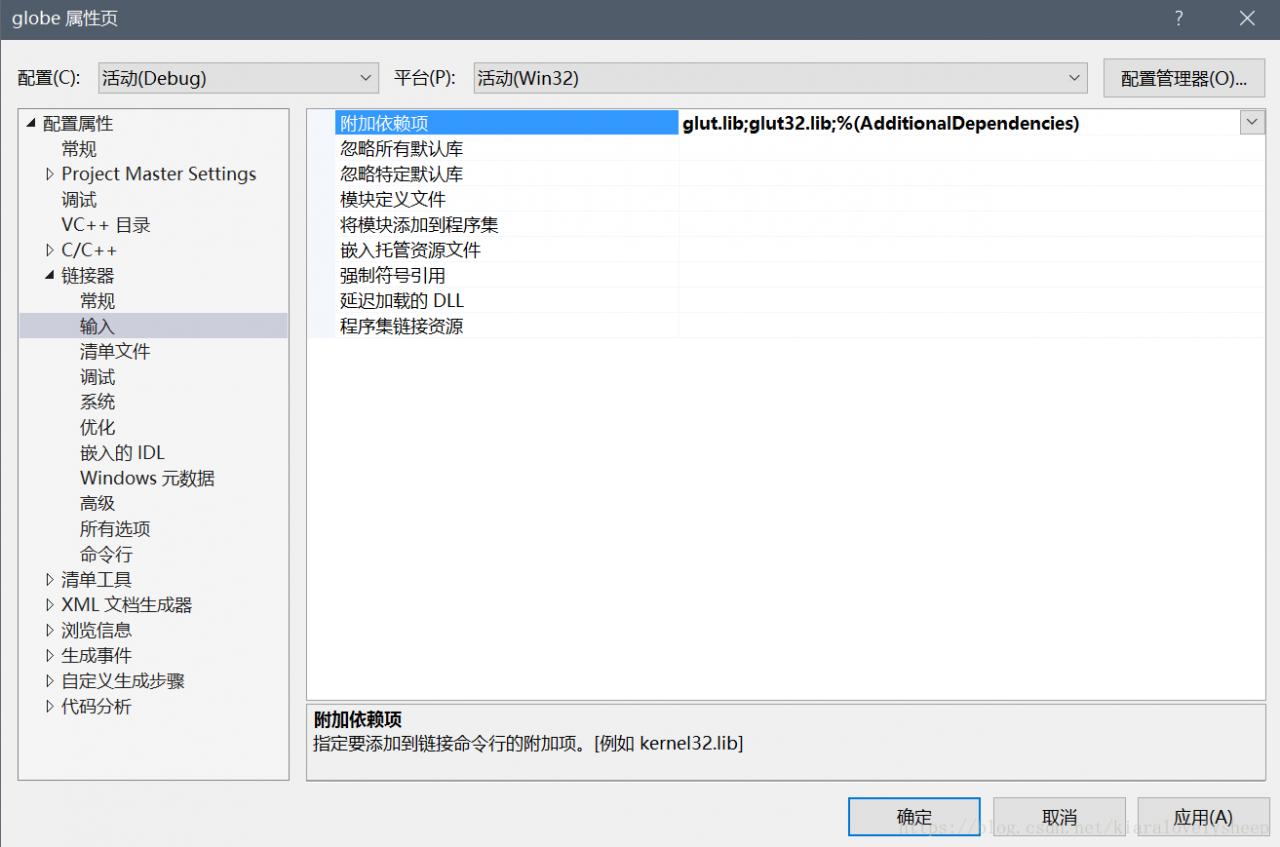
C. Linker ->; Input – & gt; Attach dependencies. Add the individual lib files from OpenGL (Glut.lib and Glut32.lib are the only ones added here), separated by English keyboard semicolons.

Note: There are other ways on the web to set: linker ->; System – & gt; Subsystem – & gt; SUBSYSYTEM: WINDOWS. But I’ve tried setting this to not work, so just leave it unset by default. (Although I don’t know why ~
Finally all the way down to determine the configuration of good ~

OpenGL development environment configuration [vs2017] + common problems

The article detailed configuration:
the reference 1: OpenGL development environment configuration (Windows) – Visual Studio 2017 + GLFW + GLAD detailed graphic tutorials
reference 2: OpenGL + VS2017 environment configuration reference 3:
[OpenGL] configuration GLFW
configuration process are detailed in this article, I mainly to mention a few configuration in the pit

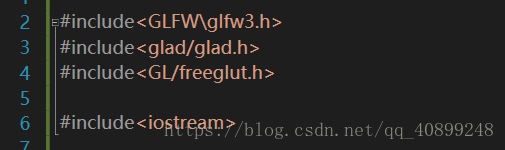
    create an empty project. If you create a new Windows console application, the program will automatically include the pch.h header. You must consult include "pch.h" o>me other precompiled header at the beginning of the source file. E0035 # error instructions: OpenGL header already included, remove this include, glad already provides it there are two solutions:
    2.1 leave out the third line glad. H header file, the header file
    define conflict
    2.2 this method is more brutal, I saw from the Internet: In the glad. H file commented error: OpenGL header already included, remove this include, glad already provides it GL_COLOR_BUFFER_BIT defined variables is not found, such as:
    the solution: The iostream. H file in header file at the end of the

[graphics] exceptions in downloading and installing OpenGL in vs2017

1, Put DLL file: C:\Windows\ SYSWOW64
Or C: \ Windows \ windows32
2, lib and h: C:\Program Files (x86)\Microsoft Visual Studio\2017\Enterprise\VC\Tools\MSVC\
The lib is placed in the lib folder.
H is placed in the GL folder in Include, which needs to be created.
Download address: https://files-cdn.cnblogs.com/files/inku/opengl%E6%96%87%E4%BB%B6.zip
= = = = = = = = = = = =
Find VC\Tools\MSVC\. Where it’s not bold, it’s different for everyone. Enterprise is the VS version.
Lib: C:\Program Files (x86)\Microsoft Visual Studio\2017\Enterprise\VC\Tools\MSVC\14.16.27023\ Lib \x86
H: C:\Program Files (x86)\Microsoft Visual Studio\2017\Enterprise\VC\Tools\MSVC\14.16.27023\ Include \ GL
= = = = = = = = = = = =
Possible exceptions:
1. Unable to find glut32.dll. Use another path for step 1.
2. Unable to find GL \ Glut. h, create new GL file.
3. Notice the selection of Debug in VS.


Reproduced in: https://www.cnblogs.com/inku/p/10159867.html

The solution of OpenGL not displaying normally in win7 system

These days I want to have a look at OpenGL, according to the online introduction to use the GLUT plug-in on Windows 7 VS2008. After the GLUT plug-in is installed, the program will compile, but at run time, the GLUT window will either be white or stuck, not properly.
I thought Windows 7 was incompatible with the GLUT plugin. Inadvertently see in online (http://bbs.tgbus.com/thread-1707009-1-1.html) said today may be the graphics driver (I is amd hd 8570 m). So, with 360 hardware master detection, the original their graphics card driver is too old. After updating the video card driver, it still can’t display normally. In right click on the desktop, select “configuration can exchange CARDS”, appear amd graphics Settings, left corner of the window we recommend: swappable display card global Settings, a battery case and insert the power supply two Settings, choose to “maximize performance” (or choose according to need) can normal use openGL glut plugin.
If you have any questions, you can ask me in the thread

Some small problems in using vs2017

Remove the precompiled header
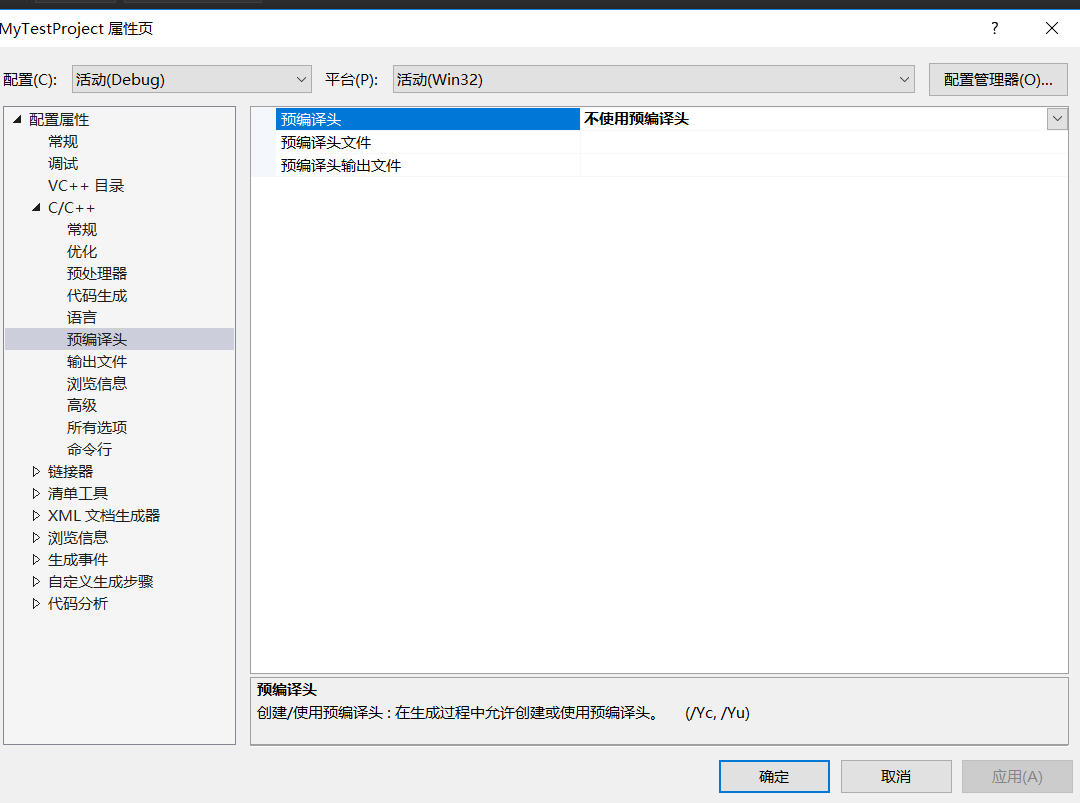
H, stdafx.h, stdafx.h, stdafx.h, stdafx.h, stdafx.h, stdafx.h, stdafx.h, stdafx.h, stdafx.h As a newbie, I didn’t need these precompiled headers for a while, so I wanted to get rid of them.
Right-click item ->; Property – & gt; C/C++-> Precompiled headers, as shown below, and then select not to use precompiled headers.

Set the C++ standard
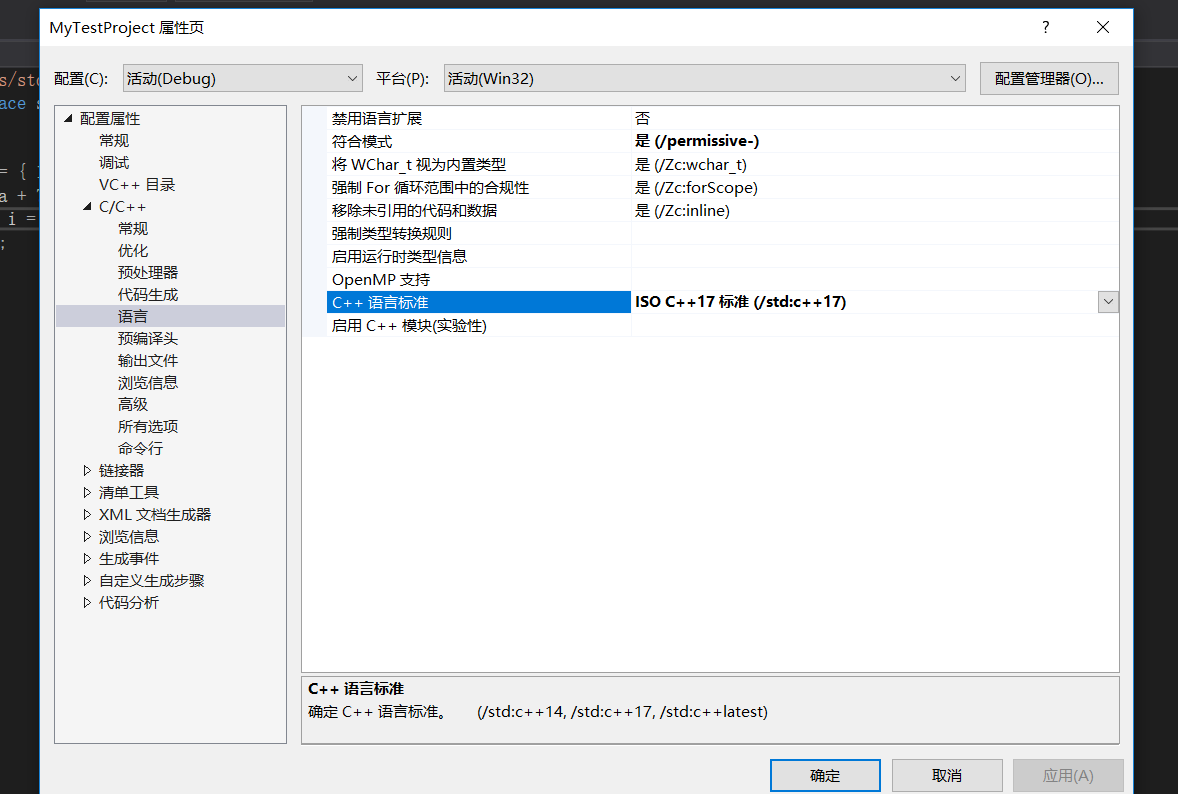
When writing C++ in VS2017, you want to set the C++ standard. Set it to C++14 or C++17.
Right-click item ->; Property – & gt; C/C++-> Language, as shown in the figure below, in the C++ language standard to select the desired C++ version.

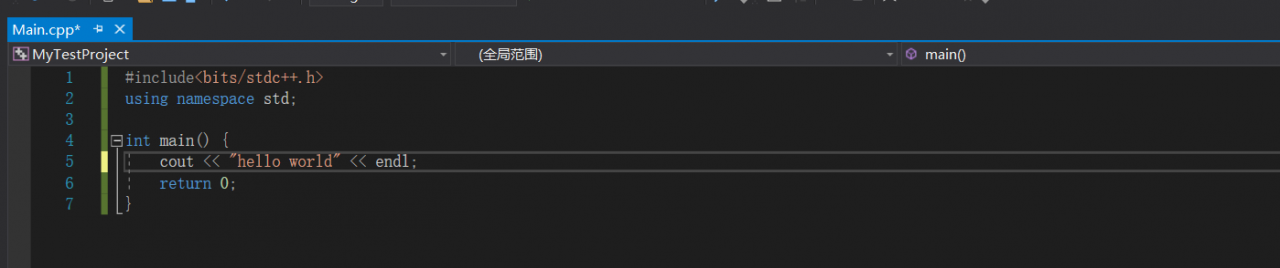
3. Use lt; bits/stdc++.h> The header file
#include< #include< bits/stdc++.h> I’m too lazy to start a file. Then, found that VS2017 using this header file will report error prompts can not be found, so the Internet to find a way.
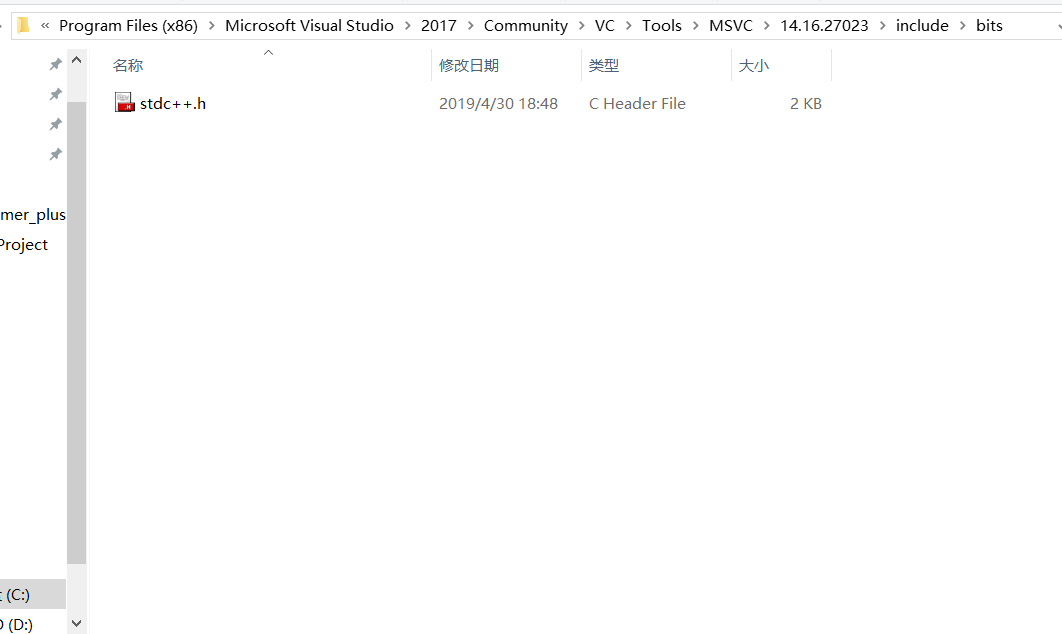
Since VS2017 is not available, we will add it ourselves, find the VS2017 installation directory, and then find the include file, my file path is this:
C:\Program Files (x86)\Microsoft Visual Studio\2017\Community\VC\Tools\MSVC\14.16.27023\ Include
Then create your own bits folder, then go to the bits folder, create the file stdc++. H, and add the following:

// 17.4.1.2 Headers

// C
#ifndef _GLIBCXX_NO_ASSERT
#include <cassert>
#endif
#include <cctype>
#include <cerrno>
#include <cfloat>
#include <ciso646>
#include <climits>
#include <clocale>
#include <cmath>
#include <csetjmp>
#include <csignal>
#include <cstdarg>
#include <cstddef>
#include <cstdio>
#include <cstdlib>
#include <cstring>
#include <ctime>

#if __cplusplus >= 201103L
#include <ccomplex>
#include <cfenv>
#include <cinttypes>
#include <cstdalign>
#include <cstdbool>
#include <cstdint>
#include <ctgmath>
#include <cwchar>
#include <cwctype>
#endif

// C++
#include <algorithm>
#include <bitset>
#include <complex>
#include <deque>
#include <exception>
#include <fstream>
#include <functional>
#include <iomanip>
#include <ios>
#include <iosfwd>
#include <iostream>
#include <istream>
#include <iterator>
#include <limits>
#include <list>
#include <locale>
#include <map>
#include <memory>
#include <new>
#include <numeric>
#include <ostream>
#include <queue>
#include <set>
#include <sstream>
#include <stack>
#include <stdexcept>
#include <streambuf>
#include <string>
#include <typeinfo>
#include <utility>
#include <valarray>
#include <vector>

#if __cplusplus >= 201103L
#include <array>
#include <atomic>
#include <chrono>
#include <condition_variable>
#include <forward_list>
#include <future>
#include <initializer_list>
#include <mutex>
#include <random>
#include <ratio>
#include <regex>
#include <scoped_allocator>
#include <system_error>
#include <thread>
#include <tuple>
#include <typeindex>
#include <type_traits>
#include <unordered_map>
#include <unordered_set>
#endif


Once the addition is complete, we will be able to use the #include< as normal. bits/stdc++.h> .

Reproduced in: https://www.cnblogs.com/fu3638/p/10801251.html

The reason of OpenGL configuration error in VS

When working with OpenGL, I encountered a number of errors:
The glut32.lib library cannot be opened.
2. Openg. DLL file missing
And so on.
After my debugging, I found two possible reasons. Please pay attention when debugging, it may be caused by these two reasons.
1.VS has two development platforms, X64 and Win32, I found that there are problems on X64 platform, first, there is no such error on Win32 platform, I guess it is because OpenGL is 32-bit.
I don’t know if OpenGL 64 is going to work, but I didn’t verify it, but you can verify it.
2. If there is an error in question 2, it may be that the lib library file in connector input is incorrect. I have tested it, and if it is changed to glu32.lib and glut32.lib, the error can be eliminated!
This is the problem I encountered in writing OpenGL, to give you a debugging idea.

Problems in configuring OpenGL

glut32.lib does not reference
vironment :vs2013
c> & VC++ directory ->; C/C++> C/C++> C/C++> Additional include directories to add it again inside VS complains.
Conclusion :VS is really bad for property configuration... emmmmm

Vc2010 configuring OpenGL environment

Glut32.Lib Glut32.dll and Glut.h Glut.h Glut.h Glut.h Glut.h Glut.h Glut.h Glut.h Glut.h Glut.h Glut.h Glut.h Glut.h Glut.h Glut.h
2, the glut. H in the C:/Program Files/Microsoft SDKs/Windows/AA/Include/gl v7.0 directory; GLUT32. lib: C:/Program Files /Microsoft SDKS /Windows/ V7.0a/lib Glut32.dll is placed in the C:/WINDOWS/system32 directory
3. Create a new empty project in VS2010 and select Win32 Console Project
 
4. Add a.cpp file to the project with the following contents:
# include “stdafx. H”
#include< gl/glut.h>
 
Void myDisplay (void)
{
GlClear (GL_COLOR_BUFFER_BIT);
GlRectf (0.5-0.5 f to 0.5 f, f, 0.5 f);
GlFlush ();
}
Int _tmain(int argc, _TCHAR* argv[])
{
GlutInitDisplayMode (GLUT_RGB | GLUT_SINGLE);
GlutInitWindowPosition (100, 100);
GlutInitWindowSize (400, 400);
GlutCreateWindow (” the first OpenGL program “);
GlutDisplayFunc (& amp; myDisplay);
GlutMainLoop ();
Return 0;
}
5. Set the IDE environment: project->; new Property-> Configuration propertites-> linker-> Input-> Additional dependencies
OpenGL32. lib GLUT32. lib, apply, confirm.
 
 
6. F5, Start Debugging, you should see a window with a white square in the middle.

QT encountered in CentOS installation( qt.qpa.plugin : Could not load the Qt platform plugin “xcb” )

I don’t believe it. How hard is it to install Qt on Linux?I reinstalled the system several times and got drunk. Here are the problems I encountered:
Round1:
After installation, execute the QTCreator prompt:
Linux qt “qt.qpa.plugin: Could not load the Qt platform plugin “xcb” ”

sudo gedit ~/.bashrc

export QT_DEBUG_PLUGINS=1
export LD_LIBRARY_PATH=/opt/Qt5.13.1/5.13.1/gcc_64/lib:$LD_LIBRARY_PATH
export LD_LIBRARY_PATH=/opt/Qt5.13.1/Tools/QtCreator/lib:$LD_LIBRARY_PATH

The last two sentences are from the link library path added to the search path, do not know whether to work.
Emphasized in fact the first sentence here, and after the configuration items, QtCreator will output a lot of information, so we can be targeted, step by step to solve the problem/
the changes to take effect

sudo source  ~/.bashrc

round2:
Execute the QtCreator program again from the command line, and output a bunch of log information. Skip to the end to find a prompt:
always load the library/opt/Qt5.13.1/Tools/QtCreator/lib/Qt/plugins/platforms/libqxcb. So: (libxkbcommon – x11. So. 0: unable to open the Shared object file: Don’t have that file or directory)
QLibraryPrivate: : loadPlugin failed on “/ opt/Qt5.13.1/Tools/QtCreator/lib/Qt/plugins/platforms/libqxcb. So” : “Always load the library/opt/Qt5.13.1/Tools/QtCreator/lib/Qt/plugins/platforms/libqxcb. So: (libxkbcommon – x11. So. 0: unable to open the Shared object file: no files or directories)”

obviously failure load of dynamic link library, first check whether there is the file exists, then look at whether the dependent libraries are able to find success:

ldd  /opt/Qt5.13.1/Tools/QtCreator/lib/Qt/plugins/platforms/libqxcb.so

Libxkbcommon is not available, you need to install the library, use yum to install:

yum -y install libxkbcommon-x11-devel

Round 3 lacks DBUS
If you continue, there is still an error. If you skip to the last line, there is still an error
/ opt/Qt5.13.1/Tools/QtCreator/bin/QtCreator: relocation error:/opt/Qt5.13.1/Tools/QtCreator/lib/Qt/plugins/platforms /.. /.. /lib/ libqt5dbus.so.5: Symbol dbus_message_set_allow_interactive_authorization, version LIBDBUS_1_3 not defined in file libbus-1.so.3 with link time reference

yum -y install dbus-devel

round4
Continue with the following error
Opt/Qt5.13.1/Tools/QtCreator/bin/QtCreator: symbol lookup error:/opt/Qt5.13.1/Tools/QtCreator/lib/Qt/plugins/platforms /.. /.. /lib/ libqt5xcbqpa.so.5: undefined Symbol: FT_GET_FONT_FORMAT

yum -y install freetype-devel

Export QT_DEBUG_PLUGINS=1. You may not have the same problem as me, but with the output, you can solve it step by step.
Pangolin installation record

1. git clone
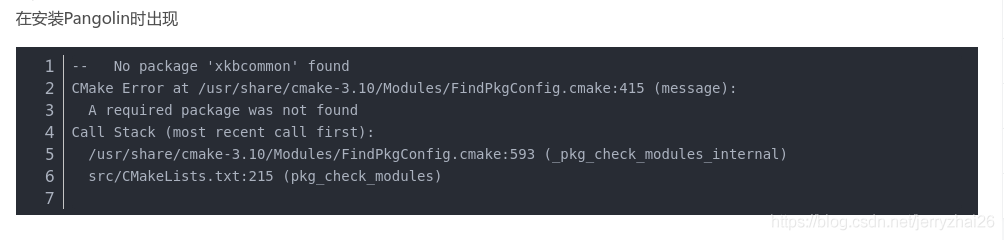
2. Install dependencies

The solution is
sudo apt-get install libxkbcommon-x11-dev
3. The compilation
   

cd Pangolin
mkdir build
cd build
cmake ..
cmake --build .

Pangolin: I tried to reinstall Pangolin because the pictures I drew with Pangolin kept flashing, so I used Locate to find the SO shared library. After deleting Pangolin, I reinstalled Pangolin. After compiling, I had to make install Pangolin to successfully generate SO files. However, after reloading the drawing is still flashing, I don’t know why. If anyone knows, I’d appreciate it if you could leave me a message
 

Remember once to solve the problem that Ubuntu 18.04 can’t enter GUI

Recently, I tried to use a relatively easy Markdown software vnote. As its release version seems to be hosted on AWS, it is very inconvenient to download in China. Although the download address of Baidu network disk is provided, Baidu network disk client cannot be used on Linux system, so we try to build AppImage with code. Found a code directory. Travis_linux. Sh scripts that looked like a used to generate the appimage, then try to run the script, then the nightmare begins.
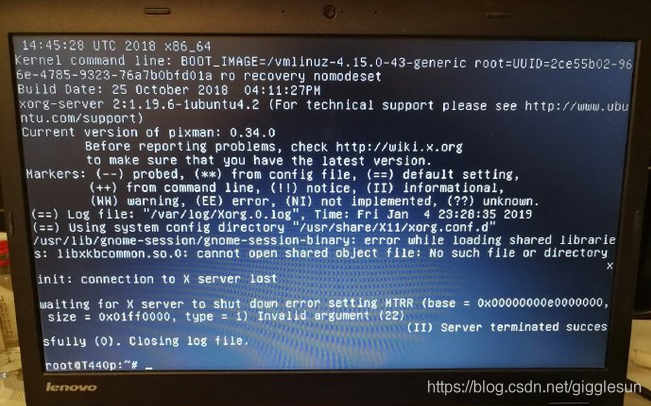
Linux after restart the system has been unable to enter the graphical user interface, has been stuck in “started the GNOME Display manager”, but there is no other specific useful information, and only under the recovery mode through Google search solution,
The usual way to do this is to reinstall gdm3 or lightdm and select gdm3 or lightdm as the desktop. Normally this would work, but mine never did.
Try looking at the.travis_linux.sh files, make uninstall them one by one, reboot them, and still not get to the graphical interface. Here is the installation package for one of the worst offenders, but unfortunately it was not found at first.

Wget http://xkbcommon.org/download/libxkbcommon-0.5.0.tar.xz
the tar xf libxkbcommon – 0.5.0. Tar. Xz
CD libxkbcommon – 0.5.0
./configure — prefix =/usr – libdir =/usr/lib/x86_64 – Linux – gnu -disable-x11
make -j$(nproc) & & sudo make install

start c1 session of gnome =false
/usr/bin/gnome-session: Unable to find libxkbcommon.so.0

d /usr/bin/gnome-session/libxkbcommon.so.