reason may be the reason that the sass-loader version is too high:
installation version 7.3.1, can solve the problem
cnpm install [email protected] --save-dev
JSP page cannot get value using El expression
solution
1. Add the following code to the header tag of the JSP page<%@ page isELIgnored="false" %>
perfectly solves
Servicetask synchronization failed to set automatic retrying
when you write a ServiceTask listener class, you need to call several services to synchronize at the same time, so you need to consider how to handle the synchronization failure.
my current idea is that one is to automatically retry after failure, and then run batch synchronization by timed task after retry failure.
Settings fail to automatically retry (to be verified) :
adds the following configuration to the tag of the XML file in the BPMN flowchart:
<serviceTask activiti:async="true" activiti:exclusive="false" activiti:expression="${demoService.getSentence(execution)}" id="demoServiceTask" name="demoServiceTask">
   	 <extensionElements>
		<activiti:failedJobRetryTimeCycle>R5/PT1M</activiti:failedJobRetryTimeCycle>
      </extensionElements>
</serviceTask>
(1) the configuration async is true, the default is false
(2) the R5/PT1M: said configuration retry count for each 1 minute try again once, retry a total of five reference:
https://my.oschina.net/go4it/blog/756149
sys.path.append(), os.path.exists(), os.path.join() and os.makedirs() meaning
When we import a module: import XXX, by default the python parser will search the current directory, installed built-in modules and third-party modules. The search path is stored in the path of the sys module:
import sys
sys.path
output:
['d:\\program\\anaconda3\\envs\\learn_py36\\python36.zip',
 'd:\\program\\anaconda3\\envs\\learn_py36\\DLLs',
 'd:\\program\\anaconda3\\envs\\learn_py36\\lib',
 'd:\\program\\anaconda3\\envs\\learn_py36',
 '',
 'd:\\program\\anaconda3\\envs\\learn_py36\\lib\\site-packages',
 'd:\\program\\anaconda3\\envs\\learn_py36\\lib\\site-packages\\win32',
 'd:\\program\\anaconda3\\envs\\learn_py36\\lib\\site-packages\\win32\\lib',
 'd:\\program\\anaconda3\\envs\\learn_py36\\lib\\site-packages\\Pythonwin',
 'd:\\program\\anaconda3\\envs\\learn_py36\\lib\\site-packages\\IPython\\extensions',
 'C:\\Users\\DELL\\.ipython']
can see that the result is a list, that is, we use import to import the module, in the list of these contents to search. So sys.path.append() brackets fill in the path to import the module, and then you can import the module using the import module.
os.path. Exists () :
OS operating system (operating system), Python OS module encapsulates the system files and file paths. The
os.path module is mainly used for obtaining file properties. Exists means “exists”, so os.path. Exists () is used to determine the existence of a file in parentheses. For all files in the system and their paths, you can determine.
returns: True or False
OS. Path. The join () : </ strong>
OS. The path. The join (” father “, “subset”)
the returned result is:
father set subset \ ‘
meaning to add “subset” to “father” after the path.
os.makedirs() :
create folders under the current path: subset
can also write absolute paths:
os.makedirs(‘C:\Users\DELL\Desktop\ subset)
create folders named as subsets on the Desktop.
After changing tomcat, the previous images cannot be displayed. All 404,
after changing tomcat, the previous images cannot be displayed, all 404, but js is normally loaded, can also get data from the library,**
since the images in the library are stored in relative paths, it may be a path problem. Remove all tomcat projects
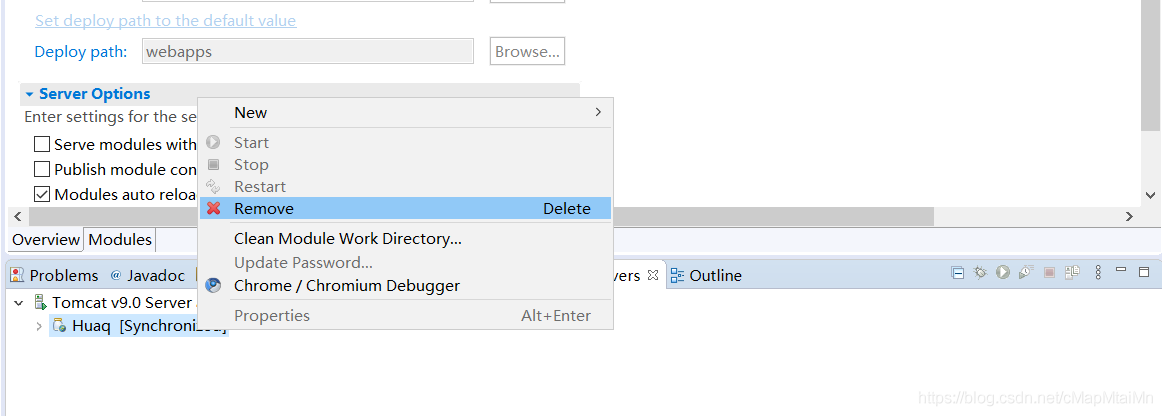
and then find the Deploy path and ServerLocation you set before
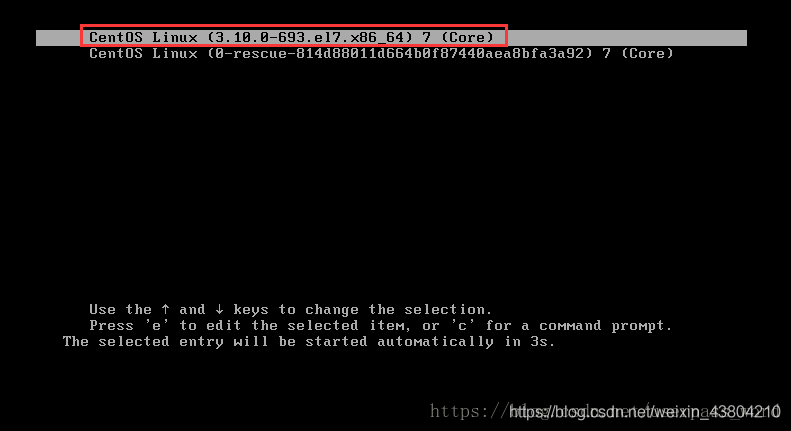
Centos7 forgot the root password and could not log in to the system
1. First, start the system, enter the power-on interface, and press “e” in the interface to enter the editing interface. As shown in figure:
2. Next, go to the edit screen and use the up and down keys on the keyboard to move the cursor down to the number of lines starting with “Linux16”. At the end of the line, type init=/bin/sh. As shown in figure:
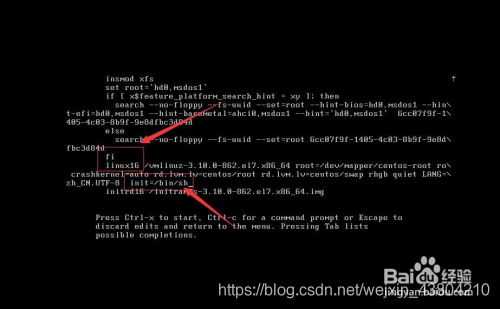
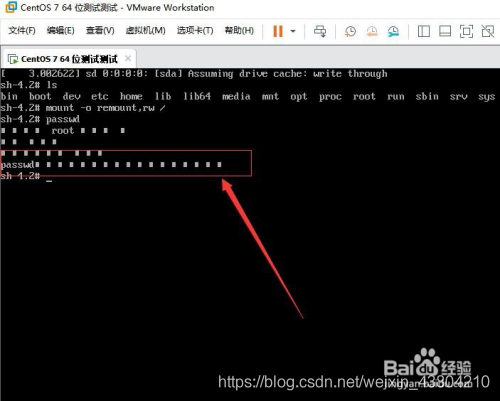
3. Then, after typing, press the shortcut key: Ctrl+x to enter the single-user mode.
4. Next, in the position where the cursor is flashing (the position of the last line), type: mount -o remount,rw/(note: there is a space between mount and -o and a space between rw and /, cannot be omitted), and press Enter on the keyboard when finished. As shown in figure:

5. Then, in the pop-up is to change the password in the content of operation, in the position of the cursor blink Enter a new password (password when the input is not show, just like have no reaction, only need to remember your input password is correct, the password must be no less than 8 bits, otherwise it will fail to modify), after the completion of the press of the keyboard Enter key (Enter). As shown in figure: 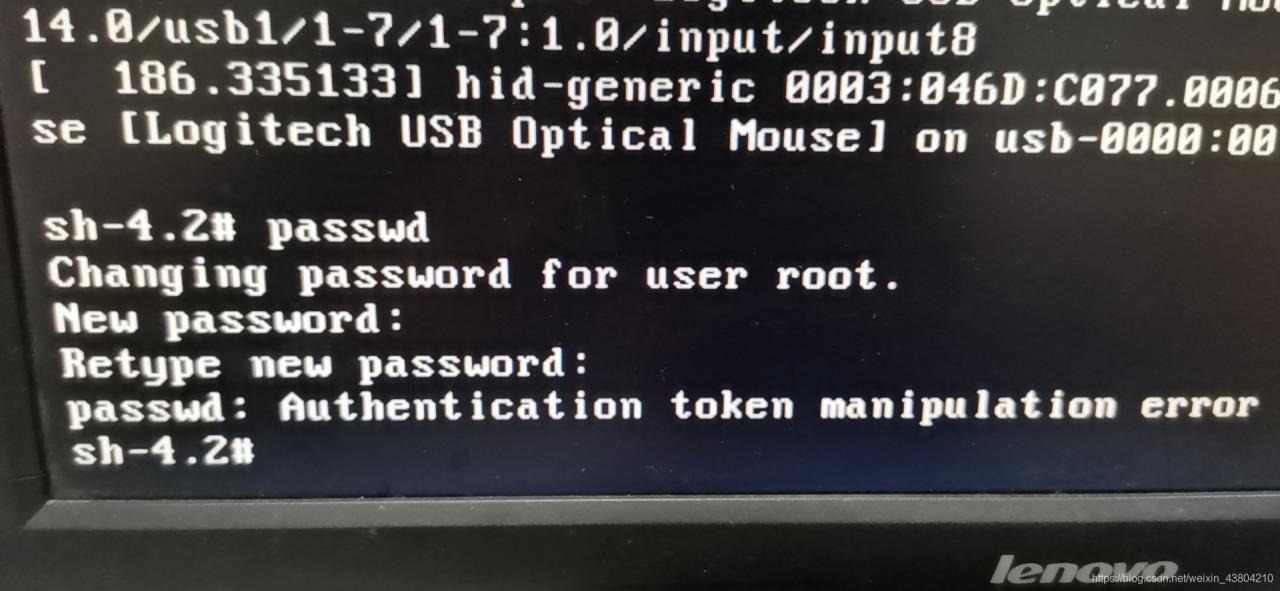
solves this problem by linking
6. Then, after the password change is successful, passwd… , indicating that the password was changed successfully.
Next, in the position where the mouse is blinking (in the last line) type: touch /. Autorelabel (note: touch and/followed by a space). When finished, press the Enter key on the keyboard
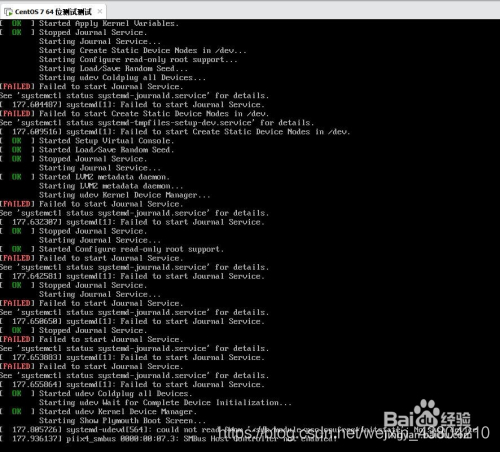
8. Password changed successfully, you can log in
successfully
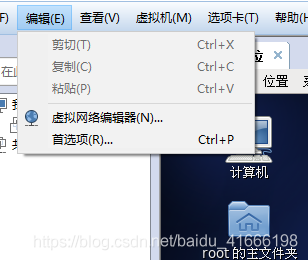
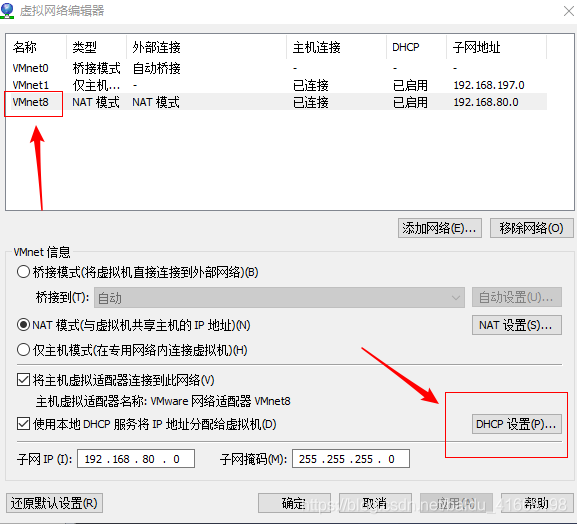
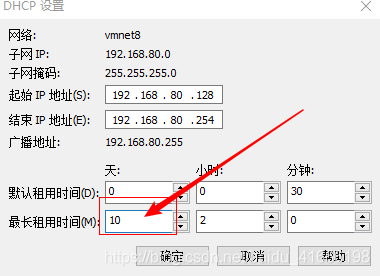
Solution to restart without showing eth0 connection after installing virtual machine
[environment configuration]
native: Windows10 virtual machine: Centos6 using VM12 software NAT mode network
[problem description]
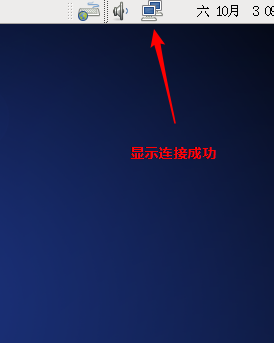
after installing centos for the first time, you can find System eth0 in the following indication icon and click on network connection
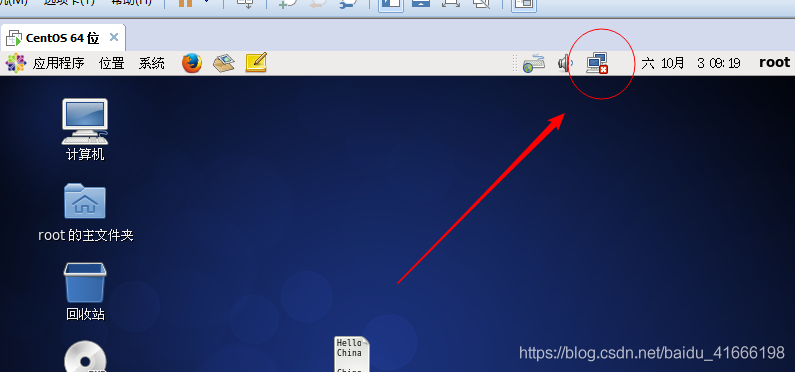
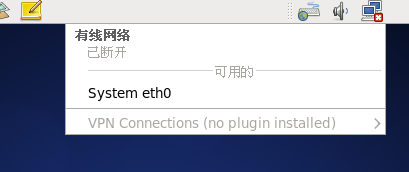 , but after the restart, mark not shown in the picture have eth0
[problem solved]
change the DHCP setting of VMnet8 network card in the virtual network editor, set the maximum rental time, and change the number of days 0 to greater than 0.
[self-summary]
we have a deeper understanding of the network setup in DHCP mode of Linux network NAT mode, but we still have a vague idea of the reason why eth0 fails to connect after restarting. We are waiting for further study.
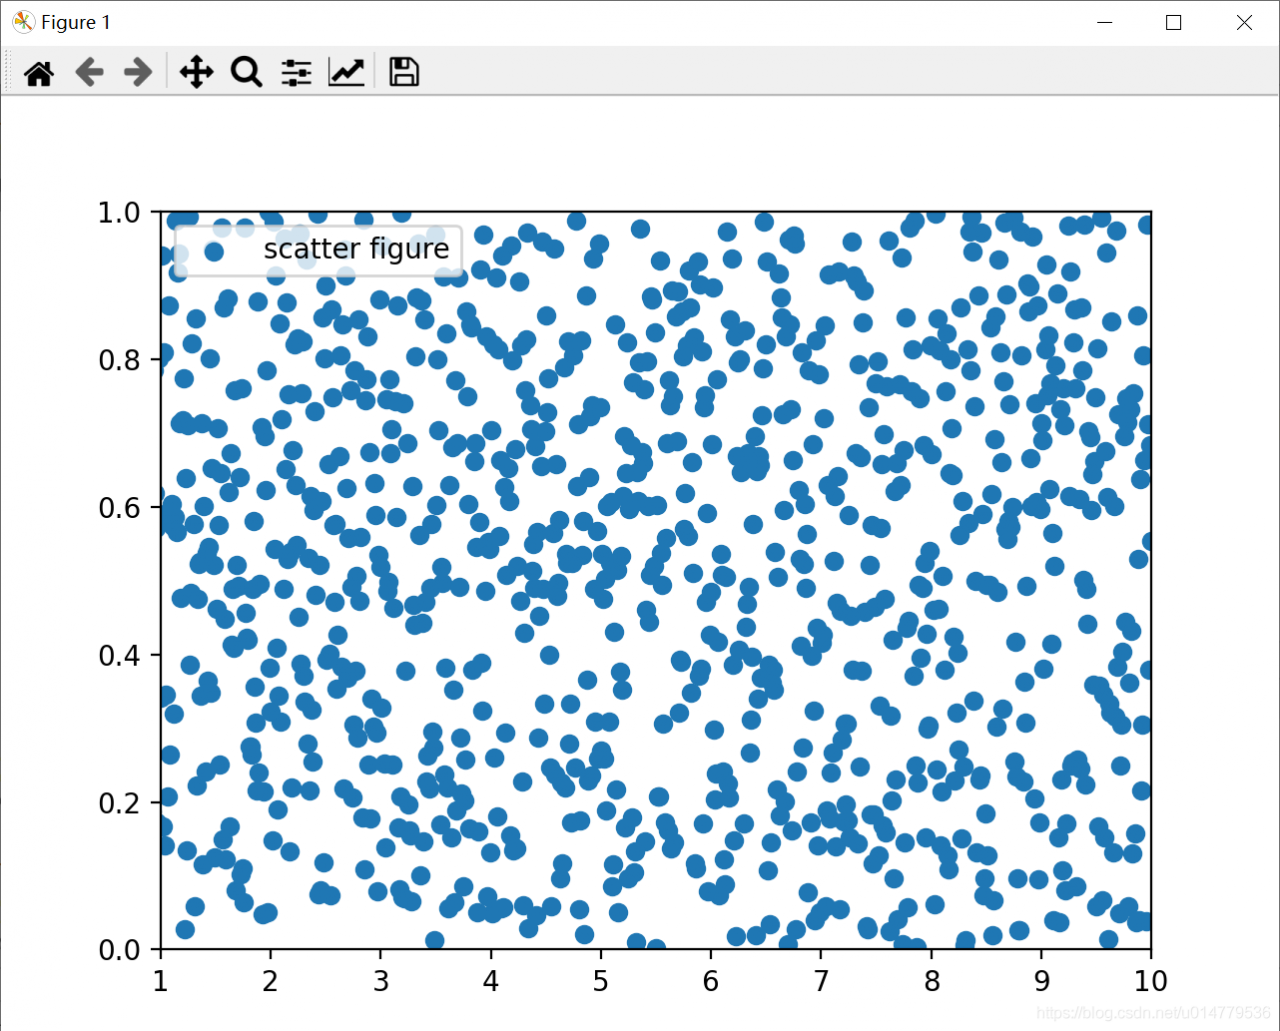
Matplotlib of data visualization plt.xlim The () ylim() function sets the x-axis and y-axis range coordinates
import matplotlib.pyplot as plt
import numpy as np

x = np.linspace(0.05,10,1000)
y = np.random.rand(1000)

plt.scatter(x,y,label="scatter figure")

plt.legend()

plt.xlim(1,10)
plt.ylim(0,1)

plt.show()
Flume monitors a single append file in real time
1) case requirements: real-time monitoring Hive logs, and uploaded to the HDFS
2) requirement analysis:

3) implementation steps:
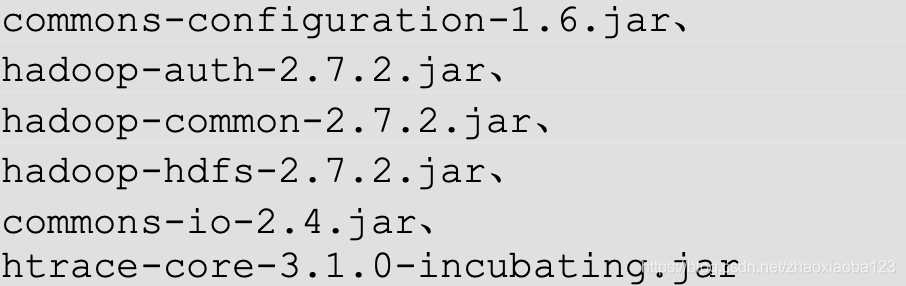
1. The Flume to the data output to the HDFS, Hadoop-related JAR packages must be copied to /opt/module/ Flume /lib folder.
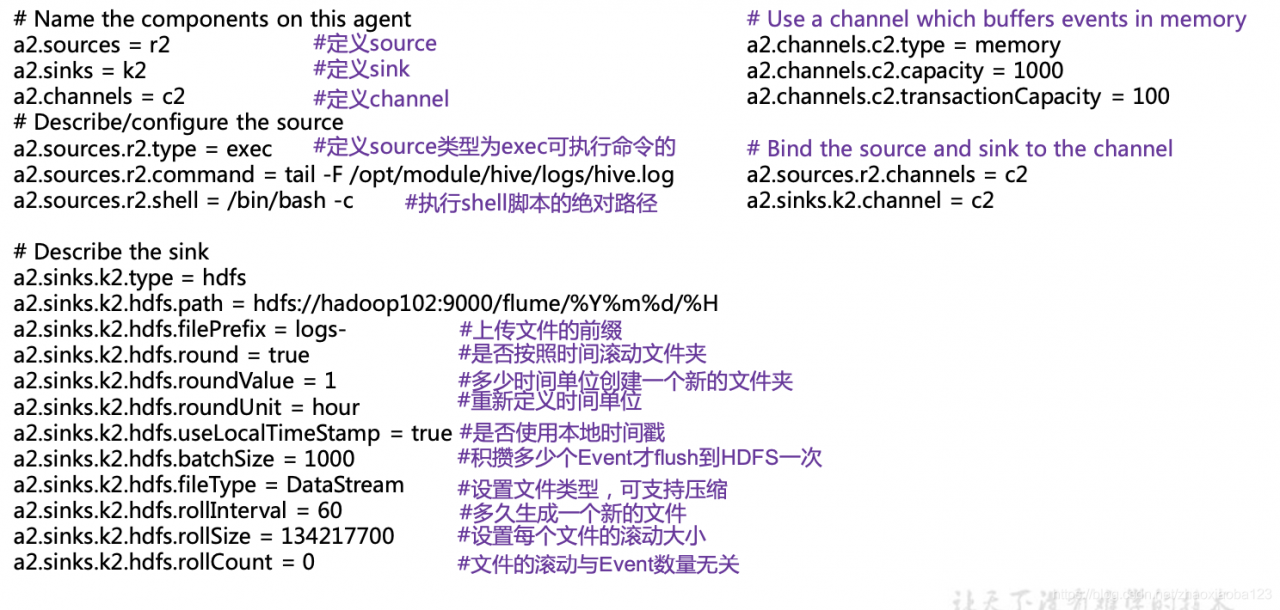
2. Create the flume – file – HDFS. Conf file
create file 
note: if you want to read the files in the Linux system, have to be in accordance with the rules of the Linux command execute the command. Since Hive logs are in Linux, the type of file to be read is selected :exec means execute. Means to execute a Linux command to read a file.
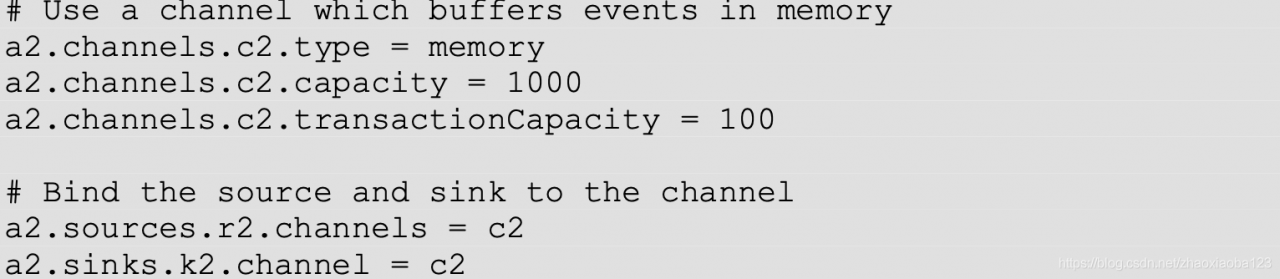
add the following content

3. Run the Flume

4. To open the Hadoop and the Hive and Hive produces log

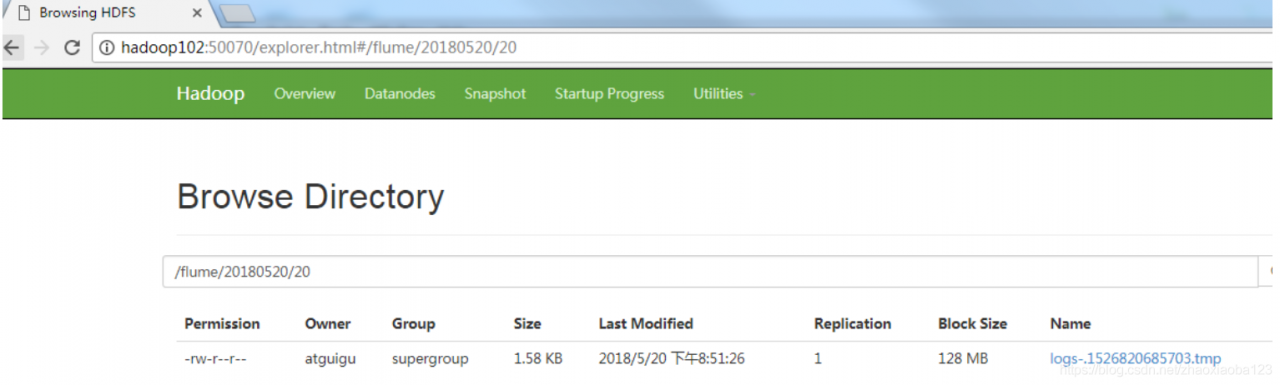
5. View files on HDFS.
Related configuration of mybatis project
Note: the development environment used is IDEA
- import dependency
enter relevant dependency information in pom.xml
<!--导入依赖-->
    <dependencies>
        <!--mysql驱动-->
        <dependency>
            <groupId>mysql</groupId>
            <artifactId>mysql-connector-java</artifactId>
            <version>5.1.47</version>
        </dependency>
        <!--mybatis-->
        <!-- https://mvnrepository.com/artifact/org.mybatis/mybatis -->
        <dependency>
            <groupId>org.mybatis</groupId>
            <artifactId>mybatis</artifactId>
            <version>3.5.2</version>
        </dependency>

        <!--junit-->
        <dependency>
            <groupId>junit</groupId>
            <artifactId>junit</artifactId>
            <version>4.12</version>
        </dependency>
    </dependencies>
MyBatis config. XML
<!--核心配置文件-->
<configuration>
<environments default="development">
<environment id="development">
<transactionManager type="JDBC"/>
<dataSource type="POOLED">
<property name="driver" value="com.mysql.jdbc.Driver"/>
<property name="url" value="jdbc:mysql://localhost:3306/mybatis?useSSL=true&useUnicode=true&characterEncoding=UTF-8"/>
<property name="username" value="root"/>
<property name="password" value="123456"/>
</dataSource>
</environment>
</environments>
<!--每一个Mapper.xml都需要在Mybatis核心配置文件中注册!-->
<mappers>
<mapper resource="com/liu/mapper/UserMapper.xml"/>
</mappers>
</configuration>
MyBatis tool class
MybatisUtils
package com.liu.utils;

import org.apache.ibatis.io.Resources;
import org.apache.ibatis.session.SqlSession;
import org.apache.ibatis.session.SqlSessionFactory;
import org.apache.ibatis.session.SqlSessionFactoryBuilder;

import java.io.IOException;
import java.io.InputStream;

/**
 * @author liucong
 * @date 2020/9/8 - 15:08
 */
//sqlSessionFactory --> sqlSession
public class MybatisUtils {

    private static SqlSessionFactory sqlSessionFactory;

    static{
        try {
            //使用Mybatis 第一步:获取sqlSessionFactory
            String resource = "mybatis-config.xml";
            InputStream inputStream = Resources.getResourceAsStream(resource);
            sqlSessionFactory = new SqlSessionFactoryBuilder().build(inputStream);
        } catch (IOException e) {
            e.printStackTrace();
        }
    }

    //既然有了 SqlSessionFactory,顾名思义,我们可以从中获得 SqlSession 的实例。
    // SqlSession 提供了在数据库执行 SQL 命令所需的所有方法。
    public static SqlSession getSqlSession(){
        SqlSession sqlSession = sqlSessionFactory.openSession();
        return sqlSession;
    }
}
- create entity class
package com.liu.pojo;

/**
 * @author liucong
 * @date 2020/9/8 - 15:24
 */
//实体类
public class User {
    private int id;
    private String name;
    private String pwd;

    public User() {
    }

    public User(int id, String name, String pwd) {
        this.id = id;
        this.name = name;
        this.pwd = pwd;
    }

    public int getId() {
        return id;
    }

    public void setId(int id) {
        this.id = id;
    }

    public String getName() {
        return name;
    }

    public void setName(String name) {
        this.name = name;
    }

    public String getPwd() {
        return pwd;
    }

    public void setPwd(String pwd) {
        this.pwd = pwd;
    }

    @Override
    public String toString() {
        return "User{" +
                "id=" + id +
                ", name='" + name + '\'' +
                ", pwd='" + pwd + '\'' +
                '}';
    }
}
- write Mapper interface class
package com.liu.mapper;

import com.liu.pojo.User;

import java.util.List;

/**
 * @author liucong
 * @date 2020/9/8 - 15:31
 */
public interface UserMapper {
    //查询全部用户
    List<User> getUserList();

    //根据ID查询用户
    User getUserById(int id);

    //增加一个用户
    int addUser(User user);

    //修改用户
    int updateUser(User user);

    //删除一个用户
    int deleteUser(int id);
}
- write mapper. XML configuration file
<?xml version="1.0" encoding="UTF-8" ?>
<!DOCTYPE mapper
        PUBLIC "-//mybatis.org//DTD Mapper 3.0//EN"
        "http://mybatis.org/dtd/mybatis-3-mapper.dtd">
<!--namespace:绑定一个对应的Dao/Mapper接口-->
<mapper namespace="com.liu.mapper.UserMapper">
    <select id="getUserList" resultType="com.liu.pojo.User">
        select * from user
    </select>

    <select id="getUserById" parameterType="int" resultType="com.liu.pojo.User">
        select * from mybatis.user where id=#{id}
    </select>

    <insert id="addUser" parameterType="com.liu.pojo.User">
        insert into mybatis.user (id, name, pwd) VALUES (#{id},#{name},#{pwd})
    </insert>

    <update id="updateUser" parameterType="com.liu.pojo.User">
        update mybatis.user set name = #{name},pwd=#{pwd} where id=#{id};
    </update>

    <delete id="deleteUser" parameterType="int">
        delete from mybatis.user where id=#{id}
    </delete>

</mapper>
- write test class
package com.liu.mapper;

import com.liu.pojo.User;
import com.liu.utils.MybatisUtils;
import org.apache.ibatis.session.SqlSession;
import org.junit.Test;

import java.util.List;

/**
 * @author liucong
 * @date 2020/9/8 - 15:54
 */
//org.apache.ibatis.binding.BindingException: Type interface com.liu.mapper.UserMapper is not known to the MapperRegistry.
//java.lang.ExceptionInInitializerError
public class UserMapperTest {
    @Test
    public void test(){
        //第一步:获得SqlSession对象
        SqlSession sqlSession = MybatisUtils.getSqlSession();
        //执行SQL
        //方式一:getMapper
        UserMapper mapper = sqlSession.getMapper(UserMapper.class);
        List<User> userList = mapper.getUserList();

        //方式二:
//        List<User> userList = sqlSession.selectList("com.liu.mapper.UserMapper.getUserList");

        for(User user:userList){
            System.out.println(user);
        }

        //关闭SqlSession
        sqlSession.close();
    }

    @Test
    public void test2(){
        SqlSession sqlSession = MybatisUtils.getSqlSession();

        UserMapper mapper = sqlSession.getMapper(UserMapper.class);
        User user = mapper.getUserById(1);
        System.out.println(user);

        sqlSession.close();
    }

    //增删改需要提交事务
    @Test
    public void test3(){
        SqlSession sqlSession = MybatisUtils.getSqlSession();
        UserMapper mapper = sqlSession.getMapper(UserMapper.class);
        int res=mapper.addUser(new User(4,"王五","123456"));
        if(res>0){
            System.out.println("插入成功");
        }
        //提交事务
        sqlSession.commit();
        sqlSession.close();
    }

    @Test
    public void test4(){
        SqlSession sqlSession = MybatisUtils.getSqlSession();
        UserMapper mapper = sqlSession.getMapper(UserMapper.class);
        mapper.updateUser(new User(4,"wangwu","1234"));
        sqlSession.commit();

        sqlSession.close();
    }

    public void test5(){
        SqlSession sqlSession = MybatisUtils.getSqlSession();
        UserMapper mapper = sqlSession.getMapper(UserMapper.class);
        mapper.deleteUser(4);
        sqlSession.commit();
        sqlSession.close();
    }
}
possible problem note: Maven static resource filtering problem
adds
to the pom. XML file
<!--在build中配置resources,来防止我们资源导出失败的问题-->
    <build>
        <resources>
            <resource>
                <directory>src/main/java</directory>
                <includes>
                    <include>**/*.properties</include>
                    <include>**/*.xml</include>
                </includes>
                <filtering>false</filtering>
            </resource>
            <resource>
                <directory>src/main/resources</directory>
                <includes>
                    <include>**/*.properties</include>
                    <include>**/*.xml</include>
                </includes>
                <filtering>false</filtering>
            </resource>
        </resources>
    </build>
Edge detection: two methods
- Laplace algorithm gives edge
import cv2
import numpy
from scipy import ndimage
def strokeEdges(src,dst,blurksize,edgeKsize):
    src=numpy.array(src)
    yuansrc=src
    dst=numpy.array(dst)
    if blurksize>=3:
        blurredSrc=cv2.medianBlur(src,blurksize)
        graySrc=cv2.cvtColor(blurredSrc,cv2.COLOR_BGR2GRAY)
    else:
        graySrc=cv2.cvtColor(blurksize,cv2.COLOR_BGR2GRAY)
    ##以上操作是对图片模糊化然后边缘灰化 是否模糊化的标准就是blurksize是否小于3
    ##
    cv2.Laplacian(graySrc,cv2.CV_8U,graySrc,edgeKsize)
    ##拉普拉斯算法 第一个参数是原图 第二个参数是深度 也就是和图片形式有关例如 RGB分别由8位
    ##那么深度就是2的24次方 这里的cv2.CV_8U具体看下面
    ##第三个参数dest是结果的图片 Ksize是核的大小 为奇数 (并不是数字越大或者越小就越好 这个好不好原因还未知)
    #此时这里的边缘检测已经是完成了
    normalizedInverseAlpah=(1.0/255)*(255-graySrc)
    channels=cv2.split(src)
    #通道拆分
    for channel in channels:
        channel[:]=channel*normalizedInverseAlpah
    cv2.merge(channels,dst)
    cv2.imshow('dst',dst)
    cv2.imshow('graySrc',graySrc)
    cv2.imshow('shouw',yuansrc)
    cv2.waitKey()
    cv2.destroyAllWindows()
src=cv2.imread('D:\\pycharm\\text.jpg')
dst=src
strokeEdges(src,dst,7,5)
as for the above code there are two points which you won’t find if you don’t look at it the first question is why do we use numpy.array to 2d the second question is why do we change the channels when there is no change in the for loop but then the channels change at the end
Question the answer is in the loop and strokeEdges normalizedInverseAlpah = (1.0/255) of the * (255 – graySrc) this operation numpy array for the concrete operation of operation rules will give the answer in the code snippet below
problem two answers will give the answer in the code snippet below if I go back to review or future readers see the trouble knock code of your answer to see what problem we have appeared in
import numpy
gray=[2]
channels=[[1,2,3],[1,2,3],[1,2,3]]
for channel in channels:
    channel[:]=channel*2
print(channels)
print('____________________________')
channels=[[1,2,3],[1,2,3],[1,2,3]]
channels=numpy.array(channels)
for channel in channels:
    channel[:]=channel*[1,2,3]
print(channels)
print('____________________________')
channels=[[1,2,3],[1,2,3],[1,2,3]]
channels=numpy.array(channels)
for channel in channels:
    channel[:]=channel*2
print(channels)
- Canny algorithm obtained the edge
import cv2
img=cv2.imread('D:\\pycharm\\text.jpg')
cv2.imshow('canny',cv2.Canny(img,0,100))
cv2.waitKey()
cv2.destroyAllWindows()
canny function itself and not for image noise reduction operation so if you want to use canny must advance using low channel filtering denoising
cv2, canny is the first parameter to the natural images in the second and the third parameter is respectively on the threshold and the threshold is simple to understand is the edge of the small number will appear more but the same risk is likely to take noise as edges or appeared on the edge of the following is not big number will edge if too less will appear the edges as not
Solve the problem of unable to locate package python3.6 when upgrading from python3.5 to python3.6 in ubantu16.04
error as follows:
Reading package lists... Done
Building dependency tree
Reading state information... Done
E: Unable to locate package python3.6
E: Couldn't find any package by glob 'python3.6'
E: Couldn't find any package by regex 'python3.6'
The ppa used by
is the old version:
sudo add-apt-repository ppa:jonathonf/python-3.6
needs to update ppa:
sudo add-apt-repository ppa:deadsnakes/ppa
and then system update:
sudo apt-get update
Finally, python3.6
is installedsudo apt-get install python3.6