for example:
<!DOCTYPE html>
<html lang="en">
<head>
    <meta charset="UTF-8">
    <meta name="viewport" content="width=device-width, initial-scale=1.0">
    <title>Document</title>
    <style>
        *{
            padding: 0;
        }
        ul{
            width: 400px;
            height: 300px;
            background-color: #ccc;
        }
        ul>li{
            width: 100px;
            height: 100px;
            background-color: red;
            list-style: none;
        }
    </style>
</head>
<body>
    <ul>
        <li></li>
    </ul>
</body>
</html>
results as shown in the figure below,

method:
makes ul relatively positioned and li absolutely positioned, in two ways
        ul{
            position: relative;
        }
        ul>li{
            position: absolute;
            /*1*/
            margin: auto;
            top: 0;
            right: 0;
            bottom: 0;
            left: 0;
            /*2、 或者直接使用如下top和left */
            top:100px;/*父元素高度减子元素的高度的一半*/
            left: 150px;/*父元素宽度减子元素的宽度的一半*/
        }
results as shown below

Set ul display:flex
        ul{
            display: flex;
            justify-content: center;
            align-items: center;
        }
Configuring pyflink in pychar (failed)
reference [1], but the official document is a little brief, or need to digest the line
(1) CD/home/appleyuchi/bigdat
(2) the git clone https://gitee.com/mirrors/apache-flink.git
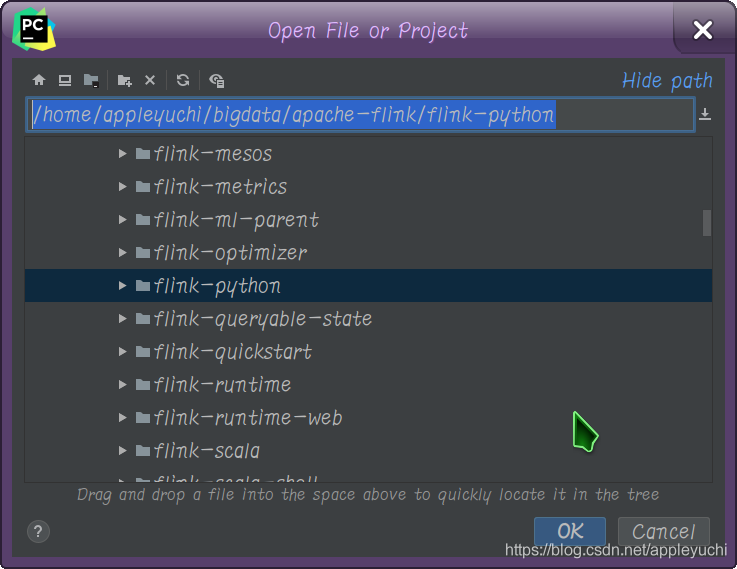
opens the following path :
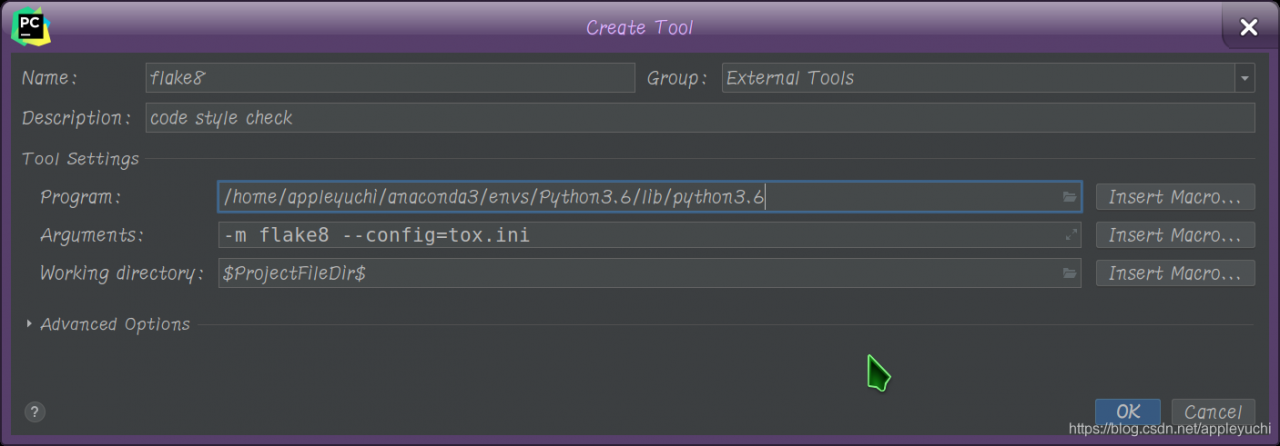
4. PIP install flake8
(5) Settings – & gt; External Tools
—————————————————————————————————————-
what is this?

—————————————————————————————————————-
, right click Mark Directory as-> Sources Root
—————————————————————————————————————-
python-m PIP install apache-flink(also search for this in pycharm)
—————————————————————————————————————-
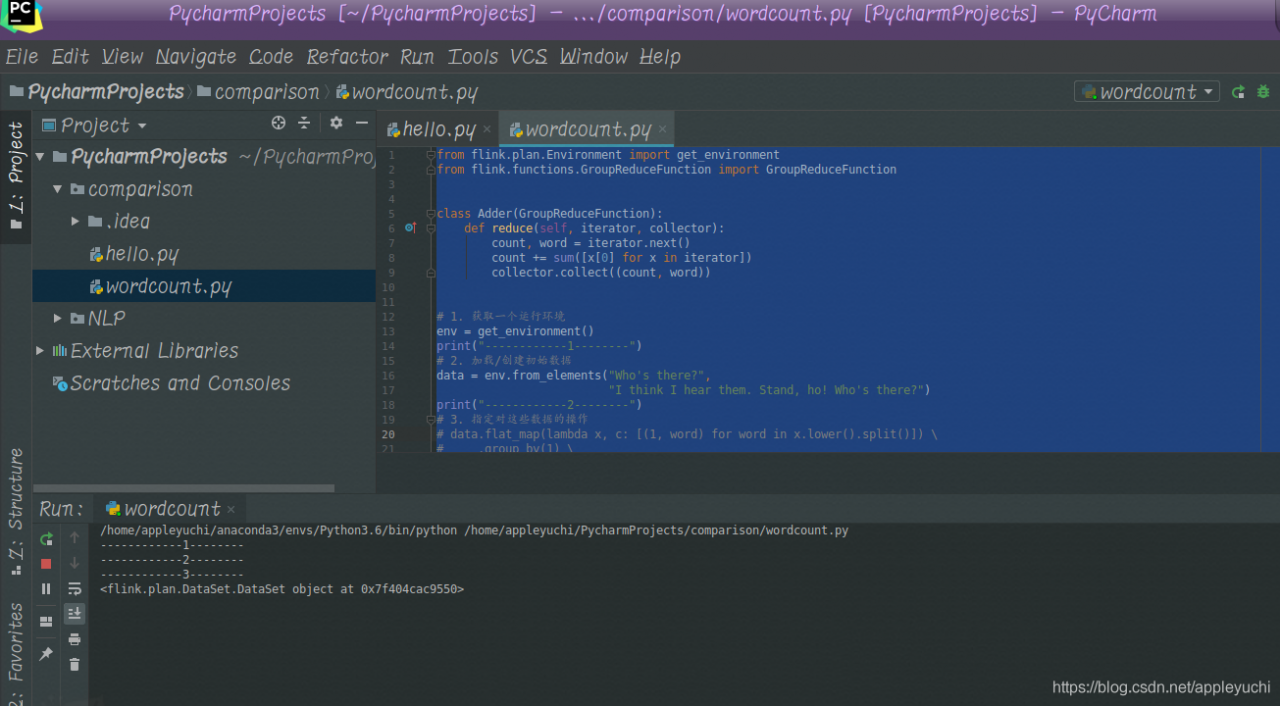
run code :
from flink.plan.Environment import get_environment
from flink.functions.GroupReduceFunction import GroupReduceFunction


class Adder(GroupReduceFunction):
    def reduce(self, iterator, collector):
        count, word = iterator.next()
        count += sum([x[0] for x in iterator])
        collector.collect((count, word))


# 1. 获取一个运行环境
env = get_environment()
print("------------1--------")
# 2. 加载/创建初始数据
data = env.from_elements("Who's there?",
                         "I think I hear them. Stand, ho! Who's there?")
print("------------2--------")
# 3. 指定对这些数据的操作
# data.flat_map(lambda x, c: [(1, word) for word in x.lower().split()]) \
#     .group_by(1) \
#     .reduce_group(Adder(), combinable=True) \
#     .output()
data.output()
print("------------3--------")
print(data)

# 4. 运行程序
env.execute()  # 设置execute(local=True)强制程序在本机运行
—————————————————————————————————————-
finally fails because data.output() cannot output any result
—————————————————————————————————————-
The
command line runs pyflink as
$FLINK_HOME/bin/flink run-py /home/appleyuchi/ desktop/experiment/wordport.py
Reference:
[1]Importing Flink into an IDE
[2]PyCharm builds Spark development environment + the first pyspark program
[3]pycharm not updating with environment variables
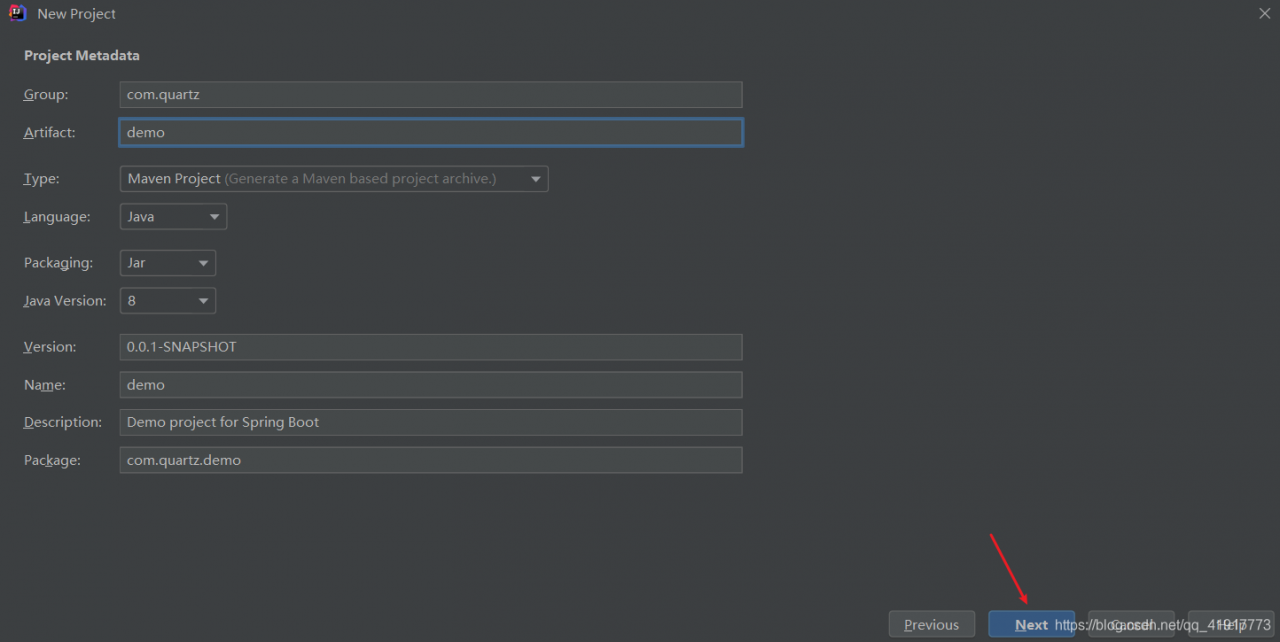
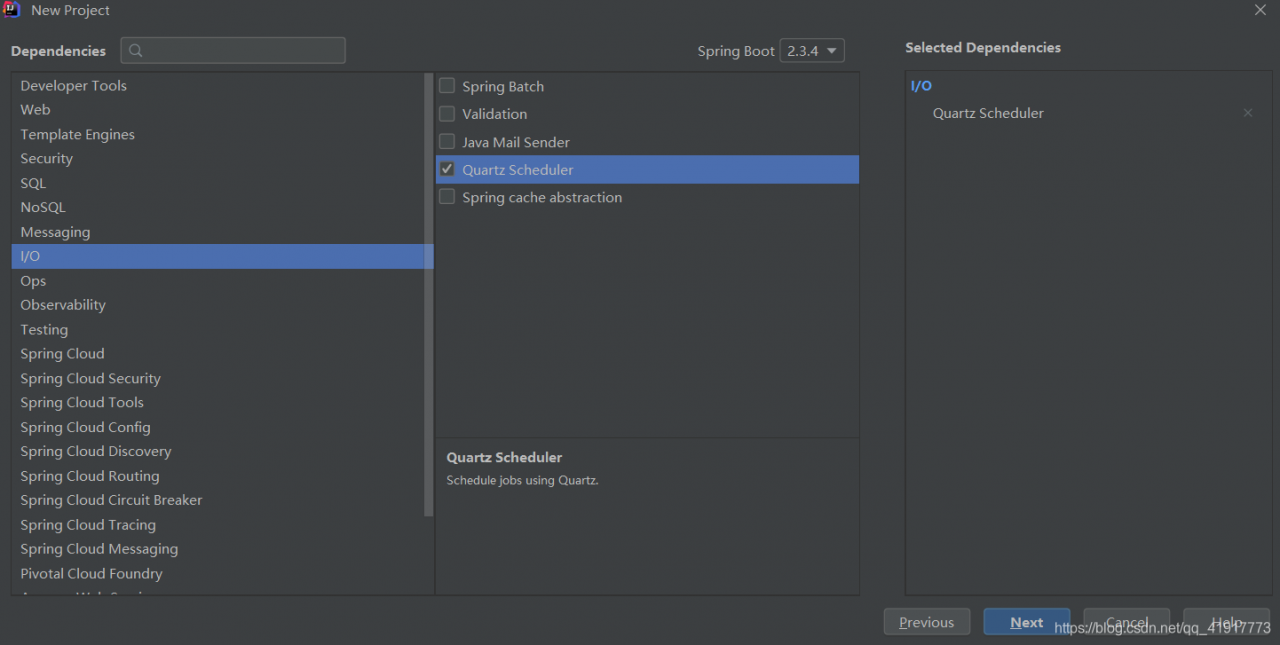
Springboot integrates quartz timing tasks
SpringBoot integrated Quartz timing task
1, create project
2. Create task class
package com.quartzjob.job.sysJob;

import org.quartz.Job;
import org.quartz.JobExecutionContext;
import org.quartz.JobExecutionException;

import java.text.SimpleDateFormat;
import java.util.Date;

/**
 * 具体任务
 */
public class HelloJob implements Job {
    @Override
    public void execute(JobExecutionContext jobExecutionContext) throws JobExecutionException {
        Date date = new Date();
        SimpleDateFormat simpleDateFormat = new SimpleDateFormat("yyyy-MM-dd:HH:mm:ss");
        String dateString = simpleDateFormat.format(date);
        System.out.println(dateString);
    }
}
3, configure trigger and task scheduler
package com.quartzjob.job.config;

import com.quartzjob.job.sysJob.HelloJob;
import org.springframework.context.annotation.Bean;
import org.springframework.context.annotation.Configuration;
import org.springframework.scheduling.quartz.JobDetailFactoryBean;
import org.springframework.scheduling.quartz.SchedulerFactoryBean;
import org.springframework.scheduling.quartz.SimpleTriggerFactoryBean;

/**
 * 配置触发器和任务调度器
 */
@Configuration
public class QuartzConfig {
    /**
     * 创建job对象
     * @return
     */
    @Bean
    public JobDetailFactoryBean jobDetailFactoryBean(){
        JobDetailFactoryBean factoryBean =  new JobDetailFactoryBean();
        //具体任务类
        factoryBean.setJobClass(HelloJob.class);
        return factoryBean;
    }

    /**
     * 创建tigger对象
     * @param jobDetailFactoryBean
     * @return
     */
    @Bean
    public SimpleTriggerFactoryBean simpleTriggerFactoryBean(JobDetailFactoryBean jobDetailFactoryBean){
        SimpleTriggerFactoryBean factoryBean = new SimpleTriggerFactoryBean();
        //关联jobDetailFactoryBean
        factoryBean.setJobDetail(jobDetailFactoryBean.getObject());
        //执行周期
        factoryBean.setRepeatInterval(2000);
        //重复次数
        factoryBean.setRepeatCount(5);
        return factoryBean;
    }

    /**
     * 创建Scheduler
     * @param simpleTriggerFactoryBean
     * @return
     */
    @Bean
    public SchedulerFactoryBean schedulerFactoryBean(SimpleTriggerFactoryBean simpleTriggerFactoryBean){
        SchedulerFactoryBean factoryBean = new SchedulerFactoryBean();
        //关联tigger
        factoryBean.setTriggers(simpleTriggerFactoryBean.getObject());
        return factoryBean;
    }
}
4. Turn on the timed task
package com.quartzjob.job;

import org.springframework.boot.SpringApplication;
import org.springframework.boot.autoconfigure.SpringBootApplication;
import org.springframework.scheduling.annotation.EnableScheduling;

@SpringBootApplication
@EnableScheduling
public class JobApplication {

    public static void main(String[] args) {
        SpringApplication.run(JobApplication.class, args);
    }

}
Android solves the gliding problem of EditText
problem description
when presenting (and editing) multiple lines of text using EditText, slide up and down without feeling fluid or inertia.
solution
wraps EditText with ScrollView.
<ScrollView
    android:layout_width="match_parent"
    android:layout_height="match_parent"
    android:layout_weight="1"
    android:fillViewport="true">

    <EditText
        android:layout_width="match_parent"
        android:layout_height="wrap_content"
        android:background="@null"
        android:gravity="top"
        android:inputType="textMultiLine" />

</ScrollView>
App: Cleartext traffic not permitted
when debugging ExoPlayer in media. Exolist. The json file to add video source URL of the Http: http://vfx.mtime.cn/Video/2019/02/04/mp4/190204084208765161.mp4
result not allowed to play video, Cleartext traffic not permitted.
Android8 cannot open Http pages in plain text; Https must be used.
or add the usesCleartextTraffic attribute,
, to the App Manifest file
<application
    android:label="@string/application_name"
    .....
    android:usesCleartextTraffic="true"
Accelerating spark iterative computation with coalesce
problem: join causes partition number inflation
Spark divides each RDD into several partitions, and the calculation on each partition is an independent task. Each task has its own schedule when it executes, so it needs to complete the sorting, serialization, calculation and deserialization work once.
the overhead of a large part of the work is basically constant and does not vary with the amount of data in partition. So when there are too many partitions in an RDD, there will be a large overhead to compute.
in the process of calculation, we often need to put two or more variables together to do some calculation, we usually use join, cogroup operations. Take a.join(b) for example. In the process of execution, the mapb3 operations would be done to partitions (a and b) for the two RDDS respectively. This is because sharding is not guaranteed by default and b's method is not the same, so it is impossible to complete the join operation with only local data. After re-sharding, you can ensure that the keys of a and B on the same partition are the same. The join operation can then be performed locally.
Due to the existence of mapPartitions, operations such as joins would add partition Numbers. In an iterative computing task, the number of partitions would be added to an unimaginably large number, and the computation time for each round would continue to swell.
below is an example of iteratively calculating the shortest path, where we use the BFS algorithm. Among them, we use graph. Join (SSSP) to combine the graph and the current known shortest distance, and then calculate the distance from each node to other nodes through flatMap and compute calculation approach, and finally calculate the known shortest distance in the new round with reduceByKey(min).
# 随机生成一个有权图
# 格式:(src, [(dst, weight)*n])
n=10000
graph=[(k, [(i, random.random()) for i in random.sample(range(n),random.randint(1,n-1))]) for k in range(n)]
print(graph[0])
# 初始化从source到各个节点的已知最短距离
source=0
sssp=graph.map(lambda r:(r[0],0 if r[0]==source else math.inf)
# 定义计算函数
def compute(links, v):
	for d,w in links:
		yield (d,v+w)
# 迭代计算
for i in range(20):
	t=time.time()
	c=graph.join(sssp).flatMap(lambda kls: compute(kls[1][0],kls[1][1]))
	sssp=c.reduceByKey(min)
	#sssp=sssp.coalesce(4)
	p=sssp.aggregate((0,0), (lambda lr,v:(lr[0],lr[1]+1) if math.isinf(v[1]) else(lr[0]+v[1],lr[1])), (lambda a,b:(a[0]+b[0],a[1]+b[1])))
	print(i,time.time()-t,p,c.getNumPartitions(),sssp.getNumPartitions())
The getnumb2 function here called can see how many partitions are currently in an RDD.
the following data is the calculation result when I ran graph with 3 core, and cut graph into 3 pieces at the same time, and cut the initial SSSP into 6 pieces. It can be seen that, except for the first round, which was slower due to some initialization work, the calculation time of each round increased with the increase of partition number.
if WebUI is used, the corresponding stage information can be pointed out, and it can be seen clearly that the number of tasks is increasing gradually and overhead is also increasing. The resulting operation reduceByKey also took longer and longer to operate.
0 2.0179808139801025 (8745.09903, 1) 9 9
1 1.5022525787353516 (8745.099020000001, 0) 12 12
2 2.0394625663757324 (8745.09902, 0) 15 15
3 2.5546443462371826 (8745.099020000001, 0) 18 18
4 3.239337921142578 (8745.09902, 0) 21 21
Solution: merge partition
repartition function
The most direct merger of parition of
is the repartition function. It can convert an RDD into any number of Partitions.
a=sc.parallelize(range(100),5) # 初始为5个partition
print(a.getNumPartitions())
b=a.repartition(10) # 转为10个partition
print(b.getNumPartitions())
c=a.repartition(2) # 转为2个partition
print(c.getNumPartitions())
, but repartition will recalculate all the elements' partitions that they should be part of each execution, which may be very expensive.
coalesce function
The
function is different from the repartition function, and the coalesce function is used only to reduce the number of partitions. And it does not recompute partition ownership, it simply merges some data. Therefore, its parameters are only meaningful if they are less than the current number of partitions of the RDD.
its execution principle is not to carry out cross-communication, but simply to combine data blocks on the same core, so that the final partition quantity meets the given parameters.
a=sc.parallelize(range(100),5
b=a.coalesce(5)
Below is the result after I removed the comment in the above code for coalesce. The first run took a little longer because I did some other things with each other. But then the running time is very stable and no longer increases with the number of rounds.
0 2.5019025802612305 (8745.099020000001, 0) 7 4
1 0.9806034564971924 (8745.099020000001, 0) 7 4
2 0.8405632972717285 (8745.099020000001, 0) 7 4
3 0.795809268951416 (8745.099020000001, 0) 7 4
4 0.7986171245574951 (8745.099020000001, 0) 7 4
MySQL Access denied
reset password for Linux ERROR 1045 (28000): Access denied for user ‘root’ @’ localhost ‘(using password: YES)
usually this ERROR is caused by a password ERROR, so the solution is naturally to reset the password.
suppose we are using a root account.
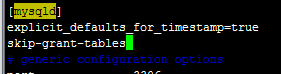
1. The first step to reset your password is to skip the MySQL password authentication process as follows:
#vim /etc/my.cnf(note: my.ini is modified under Windows)
search mysqld within the document to locate the [mysqld] text segment:
/mysqld(directly enter this command to search text content in vim edit state)
add “skip-gran-tables” on any line after [mysqld] to skip the password verification process, as shown in the figure below:
save the document and exit:
#:wq
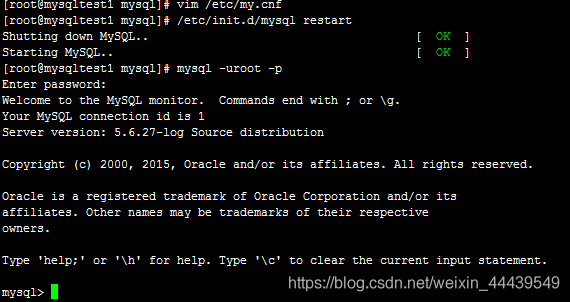
2. Next we need to restart MySQL:
/etc/init.d/mysql restart(some users may need to use /etc/init.d/mysqld restart)

3. After a reboot enter #mysql to enter mysql. 
4. The next step is to use SQL to change root’s password
mysql> use mysql;
mysql> Update user set password=password(” your new password “) where user= “root”;
mysql> flush privileges;
mysql> quit
is where the root account has been reset to the new password.
5. Edit my.cnf to remove the content you just added, and then restart MySQL. There we go!
![]()
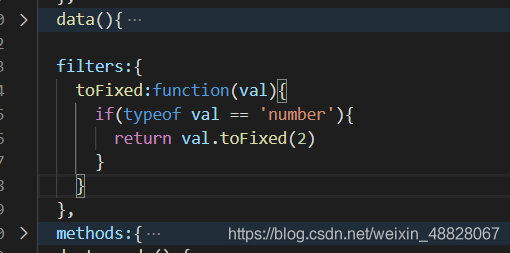
Failed to resolve filter: ToFixed
syntax error, solution: add the following code
  filters:{
    toFixed:function(val){
      if(typeof val == 'number'){
        return val.toFixed(2)
      }
    }
  },
note: the position cannot be wrong. The following is the screenshot of the position of my project
Handling of expression not in group by key [value] reported by hive on October 12, 2020
hive Expression Not In Group By Key>我在hive中创建了一个表。它有以下列:
id bigint, rank bigint, date string
我想要得到每月的平均排名。我可以使用这个命令。它的工作原理。
select a.lens_id, avg(a.rank)
from tableA a
group by a.lens_id, year(a.date_saved), month(a.date_saved);
但是,我还想要得到日期信息。我使用这个命令:
select a.lens_id, avg(a.rank), a.date_saved
from lensrank_archive a
group by a.lens_id, year(a.date_saved), month(a.date_saved);
它报错:Expression Not In Group By Key
回答:
完整错误消息的格式应为Expression Not in Group By Key [value]。
[value]会告诉你需要在的组中是什么表达式。仅看这两个查询,我认为您需要显式地将a.date_saved添加到Group By中。
问题:是的。添加了a.date_saved之后,它就工作了。然而,它并没有做到我想要的。我想要一个月的平均薪资。现在它不做平均。它只显示了通过a.date_saved添加组之后的所有记录。
回答:
您不能选择一个列,并且不按照该列进行分组。如果您想要显示a.date_saved,您需要根据它进行分组。你可以显示year(a.date_saved)和month(a.date_saved),因为它们在组中,但不是100%
解决方案二:
走动是将额外的字段在collect_set并返回集合的第一个元素。例如
select a.lens_id, avg(a.rank), collect_set(a.date_saved)[0]
from lensrank_archive a
group by a.lens_id, year(a.date_saved), month(a.date_saved);
– customer unit price (including reject), in HQL, in select… Group by… To display a field in>, you must group by that field, otherwise do not select that field
select user_id,sum(order_money)/count(order_money) from us_order;
error:
 modified answer:
select user_id,sum(order_money)/count(order_money) from us_order group by user_id;

select collect_set(user_id)[0],sum(order_money)/count(order_money) from us_order;


Installing open CV under Linux system
1. Install the apt – get
step1:
curl https://raw.githubusercontent.com/dvershinin/apt-get-centos/master/apt-get.sh -o /usr/local/bin/apt-get


step2:
chmod 0755 /usr/local/bin/apt-get
2. Install the PKG – config
download the version you want
https://pkg-config.freedesktop.org/releases/
2. installation
tar xf tar xf pkg-config-0.29.2.tar.gz
cd pkg-config-0.29.2
./configure --with-internal-glib
make
make check
make install
(3) verify
which pkg-config

An error occurred when opensips started the service“ ERROR:core :db_ check_ table_ Version: invalid version 7 for Table dialog found “
recently engaged in SIP phone related projects, encountered a lot of trouble when building opensips server, most of which could be solved by looking up information, but today I encountered a problem that I could not find the solution on the Internet, so I decided to share it with you.
virtual system is Ubuntu14.04
opensips version is 2.1.2
when opensips service is started, the following error occurs:
root@sjt-VirtualBox:/usr/local/opensips_proxy/sbin# ./opensipsctl start

INFO: Starting OpenSIPS :

ERROR: PID file /var/run/opensips.pid does not exist -- OpenSIPS start failed
view the ERROR log and prompt “ERROR:core:db_check_table_version: invalid version 7 for table dialog found”, assuming there was a problem with the database creation
root@sjt-VirtualBox:/usr/local/opensips_proxy/sbin# tail -f /var/log/syslog
Oct 13 08:40:29 sjt-VirtualBox ./opensips[2851]: INFO:alias_db:mod_init: initializing...
Oct 13 08:40:29 sjt-VirtualBox ./opensips[2851]: INFO:dialog:mod_init: Dialog module - initializing
Oct 13 08:40:29 sjt-VirtualBox ./opensips[2851]: INFO:core:evi_publish_event: Registered event <E_DLG_STATE_CHANGED(12)>
Oct 13 08:40:29 sjt-VirtualBox ./opensips[2851]: ERROR:core:db_check_table_version: invalid version 7 for table dialog found, expected 10
Oct 13 08:40:29 sjt-VirtualBox ./opensips[2851]: ERROR:dialog:init_dlg_db: error during table version check.
Oct 13 08:40:29 sjt-VirtualBox ./opensips[2851]: ERROR:dialog:mod_init: failed to initialize the DB support
Oct 13 08:40:29 sjt-VirtualBox ./opensips[2851]: ERROR:core:init_mod: failed to initialize module dialog
Oct 13 08:40:29 sjt-VirtualBox ./opensips[2851]: ERROR:core:main: error while initializing modules
creates opensips database
again
root@sjt-VirtualBox:/usr/local/opensips_proxy/sbin# ./opensipsdbctl create
MySQL password for root:
INFO: test server charset
INFO: creating database opensips ...
ERROR 1007 (HY000) at line 1: Can't create database 'opensips'; database exists
ERROR: Creating database opensips failed!
indicates that the database already exists and the creation failed. The reason was finally found, because I had built a database before, and this installation configuration of OpenSiPs did not match the previous database, so the OpenSips service could not be started.
therefore, delete the previous database, recreate, execute./opensipsdbctl reinit.
root@sjt-VirtualBox:/usr/local/opensips_proxy/sbin# ./opensipsdbctl reinit
MySQL password for root:
INFO: Database opensips deleted
INFO: test server charset
INFO: creating database opensips ...
INFO: Using table engine MyISAM.
INFO: Core OpenSIPS tables successfully created.
Install presence related tables? (y/n): y
INFO: creating presence tables into opensips ...
INFO: Presence tables successfully created.
Install tables for imc cpl siptrace domainpolicy carrierroute userblacklist b2b cachedb_sql registrant call_center fraud_detection? (y/n): y
INFO: creating extra tables into opensips ...
INFO: Extra tables successfully created.
open opensips service again, success!
root@sjt-VirtualBox:/usr/local/opensips_proxy/sbin# ./opensipsctl start

INFO: Starting OpenSIPS :
INFO: started (pid: 3128)
JavaScript realizes the longest substring of non repeated characters
simple rough direct code
is easy to understand with console, the code is as follows:
    var lengthOfLongestSubstring = function (s) {
      var arr = [];
      var max = 0;
      for (let index = 0; index < s.length; index++) {
        var a = arr.indexOf(s[index]);
        console.log(a, s[index], 222)
        if (a != -1) {
          arr.splice(0, a + 1)
          console.log(111, arr, max)
        }
        arr.push(s.charAt(index))
        console.log(arr, 222)
        max = Math.max(arr.length, max)
      }
      return console.log(max, arr)

    };
    lengthOfLongestSubstring('abcdeasasas')