You may want to configure Maven to skip unit tests entirely. Maybe you have a large system, unit tests take many minutes to complete, and you don’t want to wait for unit tests to complete before generating the final output. You may be working on a legacy system with a series of failed unit tests, and you may simply want to generate a JAR instead of fixing all the unit tests. Maven provides the ability to skip unit tests by using the Surefire plug-in’s skip parameter. On the command line, simply add the maven.test.skip attribute to any target:
$ mvn install -Dmaven.test.skip=true
…
[INFO] [compiler:testCompile]
[INFO] Not compiling test sources
[INFO] [surefire:test]
[INFO] Tests are skipped.
…
If maven.test.skip is set to true when the Surefire plug-in reaches the test target, it skips the unit tests. Another way to configure Maven to skip unit tests is to add this configuration to your project’s pom.xml. You need to add the plugin element to your build.
< project>
[…].
& lt; build>
& lt; plugins>
& lt; plugin>
& lt; groupId> org.apache.maven.plugins< /groupId>
& lt; artifactId> maven-surefire-plugin< /artifactId>
& lt; configuration>
& lt; skip> true< /skip>
& lt; /configuration>
& lt; /plugin>
& lt; /plugins>
& lt; /build>
[…].
< /project>
From http://blog.csdn.net/symgdwyh/article/details/4289080
Category Archives: How to Fix
How to disable Network Manager on Linux
origin: http://xmodulo.com/disable-network-manager-linux.html
Network Manager is a feature-rich network configuration service which is used by default in most Linux desktop environments nowadays. It provides automatic configuration of (wired/wireless) network interfaces, as well as VPN, mobile broadband and even Bluetooth connections. Network Manager is smart enough to automatically switch to the best (or the most recent) connection network, and can inform other applications of up-to-date network events via D-Bus API.
While Network Manager comes with various sophisticated features, you might just prefer the old plain network service. There could be several reasons to do so. For one, you may wish to have more control over network management, instead of relying on purely automatic configuration and switch-over, which may or may not suit your needs. Besides, Network Manager is not suitable for advanced networking setup, such as multi-homing to more than one wired connections, forwarding network traffic, configuring Linux bridge or aliases, etc.
In general, Network Manager is designed to keep a typical end-user Linux box connected at all times with the best possible connection with minimum intervention by users. If such automation is not needed in your Linux environment, you can turn off Network Manager.
This tutorial describes how to disable Network Manager in various Linux desktop environments. Be careful if you are trying to disable Network Manager on a remote host, as you will lose connectivity if you fail to set up its networking correctly in some other means.
Check Which Network Interfaces are Managed by Network Manager
To check if Network Manager is managing any network interface, you can use nmcli, which is a command line utility that comes with Network Manager.
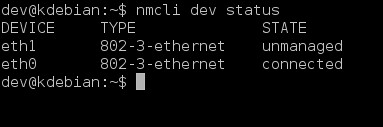
$ nmcli dev status
DEVICE     TYPE              STATE
eth1      802-3-ethernet   connected
eth0      802-3-ethernet   connected
The above command will list all existing network interfaces along with their STATE. If STATE is shown as “unmanaged”, this means Network Manager is NOT controlling a corresponding interface. If STATE displays any other values (e.g., “connected”), it implies that a given interface is managed by Network Manager.
Disable Network Manager Completely
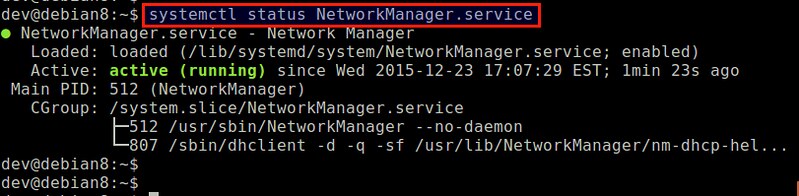
Here is how to disable Network Manager completely, so that Network Manager stops running on your Linux system.
To disable Network Manager on Debian 8 or later:
$ sudo systemctl stop NetworkManager.service
$ sudo systemctl disable NetworkManager.service
To disable Network Manager on Debian 7 or earlier:
$ sudo /etc/init. d/network-manager stop
$ sudo update-rc. d network-manager remove
To disable Network Manager on Ubuntu or Linux Mint:
$ sudo stop network-manager
$ echo “manual” | sudo tee /etc/init/network-manager.override
After disabling Network Manager on Debian or Ubuntu, use /etc/network/interfaces to configure network interfaces.
To disable Network Manager on Fedora or CentOS/RHEL 7 or later:
$ sudo systemctl stop NetworkManager.service
$ sudo systemctl disable NetworkManager.service
To disable Network Manager on CentOS/RHEL 6 or earlier:
$ sudo service NetworkManager stop
$ sudo chkconfig NetworkManager off
After disabling Network Manager on Fedora or CentOS, use /etc/sysconfig/network-scripts/ifcfg-ethX files to configure network interfaces.
Disable Network Manager for a Particular Network Interface on Debian, Ubuntu or Linux Mint
To disable Network Manager only for eth1 on Debian, Ubuntu or Linux Mint, you can do the following.
First, open the Network Manager configuration file in /etc/NetworkManager with a text editor, and set “managed=false”, typically shown under [ifupdown].
$ sudo vi /etc/NetworkManager/NetworkManager.conf
[ifupdown]
managed=false
Then in /etc/network/interfaces, add information about the interface you want to disable Network Manager for. In this example, the interface is eth1, and we are using static IP configuration.
$ sudo vi /etc/network/interfaces
# The loopback network interface
auto lo
iface lo inet loopback

# network interface not managed by Network Manager
allow-hotplug eth1
iface eth1 inet static
address 10.0.0.10
netmask 255.255.255.0
gateway 10.0.0.1
dns-nameservers 8.8.8.8
Then Network Manager automatically ignore any interfaces specified in /etc/network/interfaces, and stop managing them.
After rebooting, verify that Network Manager is successfully disabled for eth1.
$ nmcli dev status
Disable Network Manager for a Particular Network Interface on Fedora or CentOS/RHEL
The following steps will disable Network Manager for eth1 on Fedora, CentOS or RHEL.
Create an interface configuration file for eth1 (if not exist), and add “NM_CONTROLLED=no”.
TYPE="Ethernet"
NAME="eth1"
BOOTPROTO="static"
IPADDR=10.0.0.10
NETMASK=255.255.255.0
GATEWAY=10.0.0.1
HWADDR="00:90:29:95:EA:57"
ONBOOT="yes"
DEFROUTE="yes"
NM_CONTROLLED=no
Now enable network service so that eth1 is activated by network service automatically upon boot.
On Fedora or CentOS/RHEL 7 or later:
$ sudo systemctl enable network.service
On CentOS/RHEL 6 or earlier:
$ sudo chkconfig network on
Upon rebooting, verify that Network Manager is successfully disabled for eth1 with nmcli command.
$ nmcli dev status
Modify the name after @ in Linux
Change the name of Linux
When we use Linux with long names, it’s hard for our ocd patients to change
to the name they want.
vi /etc/hostname
Delete the contents and replace them with the name you want. If (Alice)
, save and exit.
, restart and you will find that the modification is complete
Unicode encodeerror: ‘GBK’ codec can’t encode character solution
UnicodeEncodeError: ‘GBK’ codec can’t encode character ‘\ue615’ in position 488084: Illegal Multibyte Sequence
with open('baidu.html', 'w', encoding='utf-8') as f:
    f.write(data)
Ubuntu starts or restarts SSH service
To open SSH service, you first need to install the library to open SSH service:
sudo apt-get install openssh-server
Check the current SSH opening status:
ps -e |grep ssh
If SSHD is present, sSH-Server is already started. If there is only agent, it has not been started;
open SSH service:
/etc/init.d/ssh start
To start or want to restart SSH, modify the configuration and restart the SSH service:
vi /etc/ssh/sshd_config
Then you can see the configuration file and modify it according to the requirements.
restart SSH:
sudo /etc/init.d/ssh restart
Detailed steps for installing Visual Studio 2010 + Intel parallel studio Xe 2013 and configuring mpich2
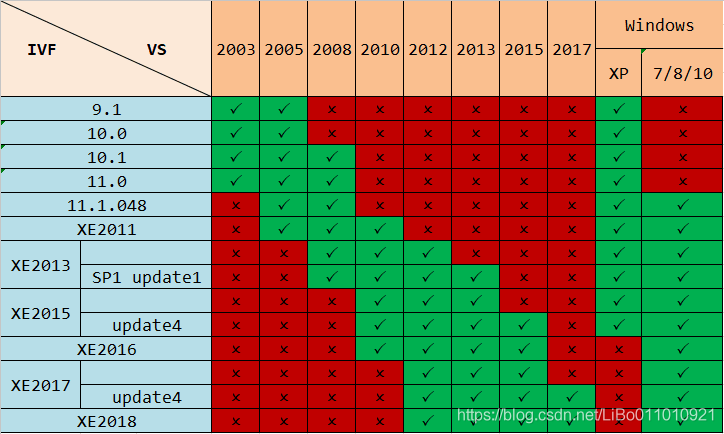
Pre-installation Instructions
Before installation, it is necessary to determine whether your VS and IVF version matches, as shown in the figure below. Also, the MPICH version is very important, this article USES the 32-bit, if the installation of 64-bit cannot be configured, it will be mentioned later.
Install Visual Studio 2010
- download Visual studio 2010 unzip and double-click setup.exe “Next” until finished, select exit;
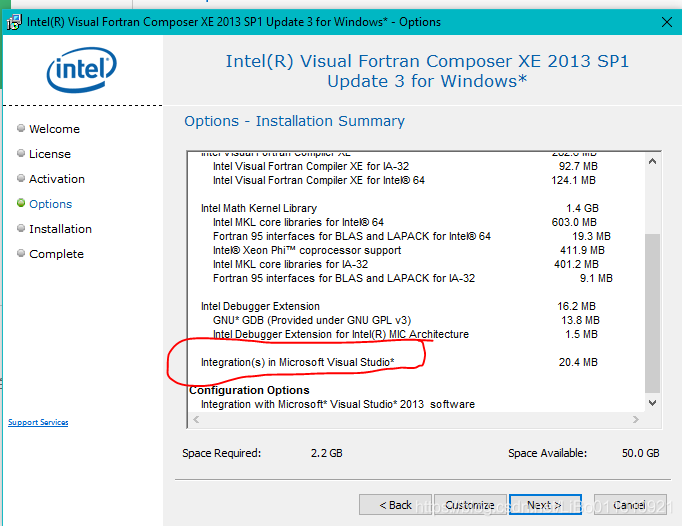
Install Intel Parallel Studio XE 2013
- close VS(otherwise cannot load ivf template) unzip w_fcompxe_novsshell_2013.2.149.zip double-click the installation file, open it, select license configuration, and select lic under the installation file; When it comes to Options, look at the Installation Summary list for instructions added to VS, which is the part with the red coil. If so, it means that after IVF you will be able to use Fortran in VS.
 starts the installation to check whether the FORTRAN module has been successfully added, as shown in the figure below
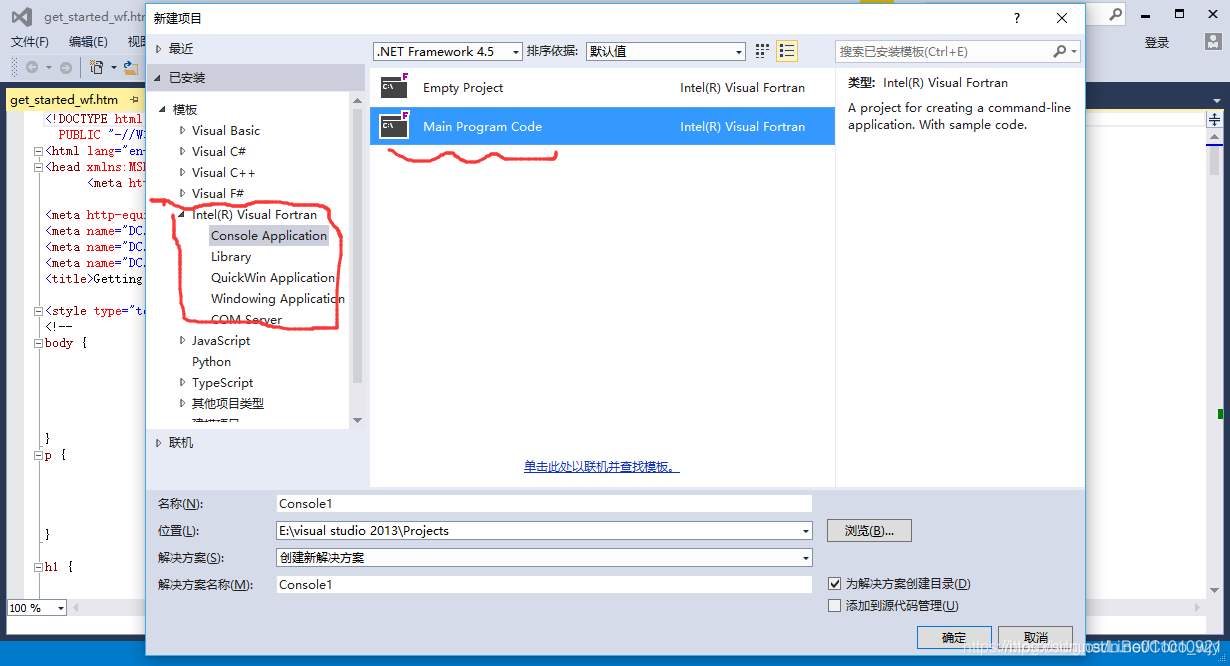
Install and configure MPICH2
- double-click and install mpich2-1.4.1p1-win-ia32.msi(the installation file provided in the network disk linked in this paper requires mpich of version 32, and the hosts of “Get setting” of the 64-bit version cannot be changed to green when wmpiconfig. Exe is used); After installation, strictly follow the configuration file (win7_vS2010_mpich2.pdf) given;
User CF itemcf collaborative filtering algorithm based on user and item
UserCF:
weight coefficient: the similarity between all non-target users and Target users, normalized (that is, the sum is 1).
calculates the score of the ith item by multiplying the score of the Target item by the weight factor of the non-target user.
considering that some users like high score and some like low score, decentralization + centralization strategy is often adopted.
| 1 | 2 | 3 | 4 | 5 | |
|---|---|---|---|---|---|
| A | 10 | 9 | 9 | 8 | 10 |
| B | 7 | 4 | 6 | 6 | 5 |
| C | 10 | 7 | 10 | 10 | 10 |
| D | 10 | 9 | 7 | 7 | 9 |
| E | 6<10/td> | 7 | 8 | ? |
For here
S
E
.
5
S_{E,5}
SE, the value of 5:
1. Calculate the similarity of user 1-4 and 5 (use the value of goods A-> D);
2. Normalization of similarity, that is, the sum of 4 similarities is 1; 3. The ith similarity times (the ith user’s rating of item E – the ith user’s average rating of all items) (decentralize), sum the four results, and add the average rating of Target user (centralize). I = 1, 2, 3, 4.
ItemCF:
weight coefficient: similarity of non-target goods, and normalized (making the sum 1);
then multiply each non-target user’s rating of the Target product by the weight coefficient to get the Target user’s rating.
Ditto for
S
E
.
5
S_{E,5}
The value of SE,5:
1. Calculate the similarity of goods a-d and E (using 1-4 users with ratings);
2. Normalization of similarity coefficient; 3. The ith similarity multiplied by (user 5’s score for item j – user 5’s average score for all items) (decentralize), sum the four results, plus the average score for item E from user 1-4 (centralize). Ibid., j=A,B,C,D.
Free dynamic screen capture drawing tool under MAC: KAP
preface
If you want to take live screenshots on your MAC, here’s a free tool: KAP.
The address of the project: https://github.com/wulkano/Kap
download
1) homebrewCask installation (not recommended)
https://github.com/wulkano/kap/releases
3) My network disk sharing (fast and permanent)
Link: https://pan.baidu.com/s/1YGZ8p5HHN3Xsnp4dY-0a9A password: ficg
The installation
Double-click DMG to install directly
use
1. Click Kap in the docking station

2. Click the KAP icon in the top taskbar

3. After the mouse becomes a cross, hold down and drag to select the range

5. After selecting the range, click the red circle button above to start recording the screen.
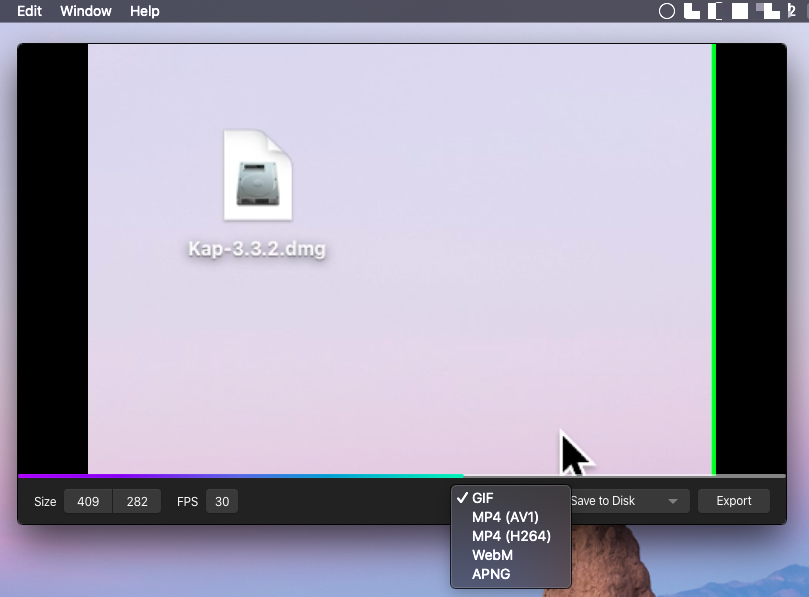
6. After recording, click the KAP icon (circle) in the top menu bar.
7. As shown in the figure below, you can choose to Export to GIF format. Click Export and select save path
If you want to take live screenshots on your MAC, here’s a free tool: KAP.
The address of the project: https://github.com/wulkano/Kap
download
1) homebrewCask installation (not recommended)
brew cask install kap2) official website release https://github.com/wulkano/kap/releases
3) My network disk sharing (fast and permanent)
Link: https://pan.baidu.com/s/1YGZ8p5HHN3Xsnp4dY-0a9A password: ficg
The installation
Double-click DMG to install directly
use
1. Click Kap in the docking station
2. Click the KAP icon in the top taskbar
3. After the mouse becomes a cross, hold down and drag to select the range
5. After selecting the range, click the red circle button above to start recording the screen.
6. After recording, click the KAP icon (circle) in the top menu bar.
7. As shown in the figure below, you can choose to Export to GIF format. Click Export and select save path
Blogger: Test to make money
Motto: Focus on testing and automation, to improve the efficiency of RESEARCH and development; Through the test to complete the original accumulation, through reading financial management toward financial freedom.
csdn:https://blog.csdn.net/ccgshigao
Garden: blog https://www.cnblogs.com/qa-freeroad/
51 cto:https://blog.51cto.com/14900374
Installing rabbitmq on alicloud server
1. Install Erlang
Because RabbitMQ is developed in the Erlang language, you install Erlang first
Because RabbitMQ is developed in the Erlang language, you install Erlang first
yum install erlang
Download the RPM package
wget http://www.rabbitmq.com/releases/rabbitmq-server/v3.6.15/rabbitmq-server-3.6.15-1.el7.noarch.rpm
3. Install after downloading
yum install rabbitmq-server-3.6.15-1.el7.noarch.rpm
4. Restart the service after installation
service rabbitmq-server start
5. Check service status
service rabbitmq-server status
6. Install the plug-in
/sbin/rabbitmq-plugins enable rabbitmq_management
Restart the service
service rabbitmq-server restart
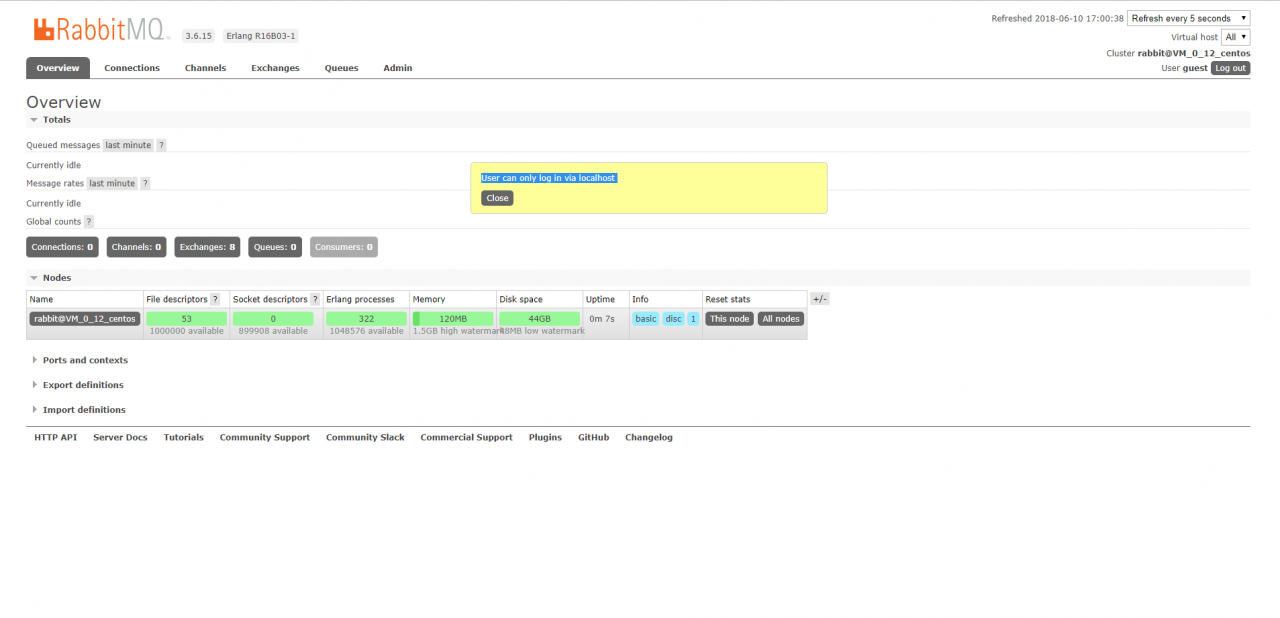
At this point, you can go to http://ip:15672 to access the page. The default password is “guest/guest”.
However, starting with version 3.3.0, access other than using guest/guest to log in to localhost is prohibited. The solution is to find
Rabbitmq_server-3.6.15 /ebin/ Rabbitmq_server-3.6.15 /ebin/ Rabbit.app
{loopback_users, [<<"guest">>]},
Is amended as:
{loopback_users, []},
Then restart it.
7. Access
Error: required request body is missing, @ requestbody annotation usage
RequestBody is a json formatted parameter converted to Java Type,
for receiving content-type application/json requests, data Type is json: {” aaa “:” 111 “, “BBB” : “222”}
When not using the @RequestBody annotation, one may receive data submitted in a Content-type application/ X-www-Form-urlencoded Type request, in a format of AAA =111& BBB =222,form form submission and jQuery’s.post() method send requests of this type.
JQuery’s $. Ajax (url, [Settings])
1. The default ContentType value is: Application/x-www-Form-urlencoded; Charset = utf-8
this format is the form submission format, the data is key1=value1& Key2 = value2 format
2. Although the ajax data attribute value format is :{key1:value1,key2:value2}, it will be changed to key1=value1& The key2=value2 format is submitted to the background
3. If Ajax wants to interact with SpringMVC, key1=value1& Key2 =value2 format, springMVC in the background only need to define the object or parameter, will be automatically mapped.
4. If springMVC parameters have @RequestBody annotation (receive JSON string format data), Ajax must convert the date property value to JSON string, not to JSON object (js object, automatically converted to key=value). Also, change the value of the contentType to: Application/JSON; Charset =UTF-8, so attributes annotated with @RequestBody are self-mapped to values
note that the requested parameters are not in json format, not in json format, and do not annotate with @requestbody
UnicodeEncodeError: ‘ascii’ codec can’t encode characters in position 0-2: ordinal not in range(128)
UnicodeEncodeError: ‘ASCII’ Codec can’t encode characters in position 0-2: ordinal not in range(128
Solution:
(1) set the environment variable LANG
, modify ~/.profile file, and execute:
export LANG=“en_US.UTF-8” >> ~/.profile
source ~/.bash_profile
(2) Add UTF-8 to the Python execution command, execute:
export PYTHONIOENCODING=utf-8 >> ~/.bashrc
source ~/.bashrc
Transfer: https://www.cnblogs.com/beile/p/12980149.html
How to Cancel pending transactions on Ethereum
Transactions model
Ethereum transactions model is vastly different from Bitcoin. Instead of using UTXO (unspent transaction outputs) transaction uniqueness and order are achieved using transaction nonce. It is an integer (uint256) counter which is incremented for each transaction of an account. Its value is effectively the number of transactions sent from a given address and its value must be included in every transaction.
There are two rules:
transactions must be processed in order (transaction with a nonce of 1 must be processed before the transaction with a nonce of 2)no skipping (transaction with a nonce of 4 cannot be included in a block until transactions with nonces of 1, 2, 3 are processed)
This way the network is able to identify duplicates of transactions and enforce their order (which is essential for smart contracts).
Gas price and transaction fees
Each transaction must set gas price which directly affects transaction fees. Miners optimize their profits by including transactions with a high gas price first.
If gas price is low the transaction will wait for a long time until it is mined. Eventually, it will be mined (sometimes many hours later) or dropped (miners have limited resources to queue pending transactions). However, even if the transaction is dropped by miners it may still await in pendingTransaction list of your client and artificially increase your nonce.
You can explore the list of pending transactions on Etherscan.
Blocked account
When a transaction is waiting for being mined all subsequent transactions are blocked. They cannot be included in a block until the previous one is included (it is determined by mentioned nonce value). Even if subsequent transactions have a very high gas price they cannot be processed as it would break the order of transactions and produce different state than expected. This makes the account effectively blocked.
How to cancel pending transaction
A single transaction with a low gas price renders the whole account unusable for many hours. The easiest and often most viable solution is to cancel the transaction. But wait, there is no such method in wallets or even API for that!
Fortunately, it is possible. The solution is not obvious but quite logical. A transaction can be overridden with a different transaction that is more attractive to miners.
The solution is to send another transaction with the same nonce and higher gas price. But what kind of transaction can act as a NOP (no operation)?
It turns out that transaction of sending 0 ether to itself (from == to) is a perfect candidate without any side effects. Obviously, the transaction must be signed by the same account as the one that sent the pending transaction.
Let’s start geth console
geth attach
The first step is to identify pending transaction hash. You can list pending transactions using geth specific call:
eth.pendingTransactions
Also, you can locate it in the list of transactions from your account on Etherscan.
Next, we need to unlock the account to sign the transaction.
personal.unlockAccount('<YOUR_ACCOUNT>')
Unlock account <YOUR_ACCOUNT>
Passphrase:
true
When we unlocked the account and identified the pending transaction nonce and previous gasPrice, we can send zero value transaction fromand to your account using more reasonable gas price and the same nonce as the pending transaction.
The gas price should be at least 10% higher than previously but I suggest checking ETH Gas Stations for the recommended gas price which varies depending on the network congestion.
gasPrice should be expressed in wei units (smallest Ethereum unit 10e-18).
You can use web3 helpers to convert Ethereum units, for example, web3. toWei(21, 'gwei').
eth.sendTransaction({
    from: '<YOUR_ACCOUNT>',
    to: '<YOUR_ACCOUNT>',
    value: 0,
    gasPrice: <NEW_HIGHER_GAS_PRICE>,
    gasLimit: 24000,
    nonce: '<NONCE_OF_YOUR_PENDING_TRANSACTION>'
});
A long way ahead of GUI wallets
One can very easily block the account by sending a transaction with a low gas price. It may happen even if the price is reasonable but the network is experiencing congestion. Unfortunately, at the time of writing, Ethereum clients (official Wallet, Mist, MetaMask etc.) do not support canceling transactions nor increasing the gas price after transaction broadcast. I hope that such low-level solution will not be needed in the future as it may cause a lot of issues for the beginners.