Author Archives: Robins

Xshell 6 opens with an error prompt FlexNet_ Licensing

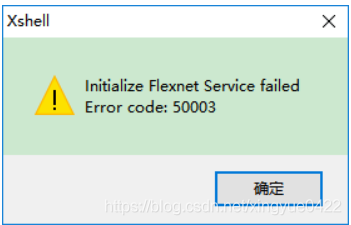
Before the computer from a third party website under the Xshell version 6, may not be the formal official version caused. FlexNet_Licensing Initialize Flexnet Service failed Error code 50003. Normal family/school use does not require licensing. Found a lot of answers, although this tip does not affect the use, but look awkward not. Find a solution and share it for your reference.
Error screenshot:
         
The attachment already exists on CSDN: File name: FlexNet_Licensing_xshell Service error Reporting solution.7z
Operation method:
If you really mind the Error popover of Error 50003, please download and unzip to a directory and run! -install.bat script to Install the service, or run! -Uninstall.bat script uninstalls this service. This script also works for Xshell 6 + Xftp 6 integrated and Xshell 5 + Xftp 5 integrated

[depth concept] · introduction of EER (equal error rate)

· Introduction of the evaluation index EER(Equal Error Rate)
In-depth learning articles generally use Error probabilities such as EER(Equal Error Rate) as an objective criterion for measuring classifiers, and the RECEIVER Operating Characteristic (ROC) curve explains how to calculate EER.
Here is a brief introduction to the EER calculation
EER (Average error probability) is a biometric security system algorithm used to pre-determine its error acceptance rate and its error rejection rate threshold. When the rates are equal, the common value is called the equal error rate. This value indicates that the proportion of false acceptances is equal to the proportion of false rejections. The lower the iso-error rate, the higher the accuracy of biometric identification system.


Use other ROC evaluation criteria
AUC (area under thecurve), also is the area under the ROC curve, the greater the classifier, the better, the maximum value is 1, the blue stripes in the graph area is the blue curve corresponding AUCEER (equal error rate), that is, the value of the FPR = FNR, due to the FNR = 1 – TPR, can draw A from (0, 1) to (1, 0) in A straight line, finding the intersection point, in the figure A and B two points.

Solution to PCL XL error of HP p2055d laser printer

Recently, HP P2055d laser printer (produced in November 2009) has been installed at the customer’s office. The hardware environment is as follows: PC: Dell OptiPlex 360, and another Fujitsu DPK 8600E ticket printer. P2055d is connected to PC via USB data cable. Software environment: The operating system, Windows XP SP2, USES the driver disk attached. After the installation of the operating system and the driver, the HP P2055d printer will be installed. After the installation of the driver, the test page will be printed, OK; Then, the Fujitsu DPK8600E was installed. After the installation was completed, everything worked fine. As a result, the P2055d hung up.
— — — — — — — — — — — — — — — — — — — — — — — — — — — error message started the author add (visit) — — — — — — — — — — — — — — — — — — — — — — — — — — — —
PCL XL error
Subsystem: KERNEL
Error: IllegalOperatorSequence
Operator: EndSession
Position: 7
— — — — — — — — — — — — — — — — — — — — — — — — — — — — — — — — — — — — — — — — — — — — — — — — — — — — — — –// error message end I (visit)
Using the built-in test function of the machine, the printer can work normally, but it cannot communicate with the PC normally. Uninstall and reinstall the driver and all associated software, and the problem remains. Helpless, call HP customer service, customer service staff told the problem cannot be determined, can only use the following methods to try. Because the telephone is far from the machine, it is not convenient to operate. After two calls to customer service, the P2055d can finally be printed. The operation method is listed here for later use.
1. Change the advanced options for the first time
1) Right-click the printer and select “Print Preference…” in the window that pops up. , as shown in Figure 1.
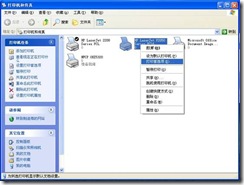
Figure 1
2) Open the print preferences window as shown in Figure 2
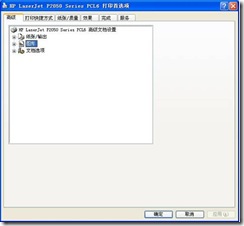
Figure 2
3) Expand “Graph” and select “Download as Soft Font” from the drop-down list of “True Type Font” below (Figure 3)
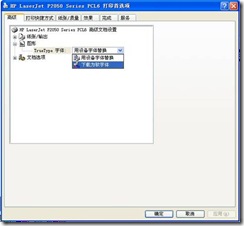
Figure 3
4) Expand Document Options a Printer Functions and change the drop-down list of Send True Type as bitmap to Enabled (Figure 4).
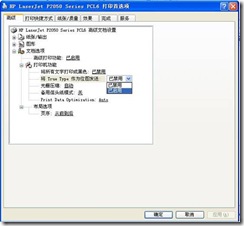
Figure 4.
5) Then, change the “Print Data Optimization” drop-down list to “Optimize for Text and Vector,” apply “–” Optimize “(Figure 5).
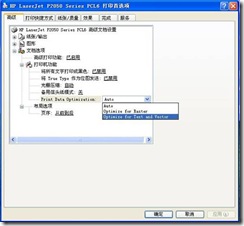
Figure 5
To be on the safe side, I restarted the machine and printer (actually shutting down the computer and then shutting down the printer).
2. Try again and change the driver
As the problem was not solved, the author turned to HP customer service again (every time I played HP customer service, I had to wait, I didn’t know whether HP service was too good or HP product quality was wrong). The author was told to replace it with a 2200 driver, so I tried again.
1) Open the “Printer and Fax” window (start A to set A printer and fax), and click “File” A to “Add Printer” in turn, as shown in Figure 6.
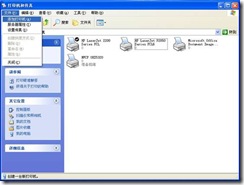
Figure 6.
2) Open the “Add Printer Wizard” window as shown in Figure 7, and click “Next”.
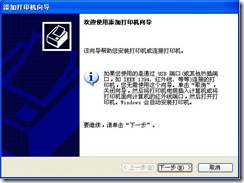
Figure 7.
3) Remove the selection of “Automatic Detection and Installation of plug and play Printer” in the window shown in Figure 8, and click “Next”.
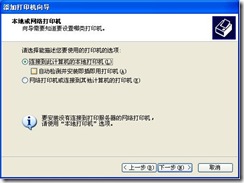
Figure 8.
4) In the “Select Printer Ports” window, select “USB001” (Figure 9) from the following port drop-down list and click “Next”.
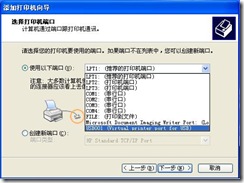
Figure 9.
5) In the “Install Printer Software” window, select “HP” from the list of manufacturers, and the printer select “HP LaserJet 2200 Series PCL”, and click “Next” to add the printer.
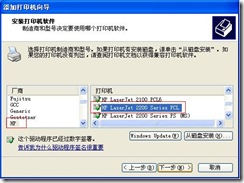
Figure 10.
After adding this printer, print the document and test page OK. The original 2055D printer system will be installed automatically. It is recommended to set this 2200 printer as the default printer. At this point, the “PCL XL error” problem is resolved.
When the operating system was reinstalled, the printer was installed directly in accordance with Plan 2, and everything was fine.

Solve the startup error “something Wen wrong” of NVIDIA geforce experience

Something went wrong. There are two cases, which are respectively introduced below

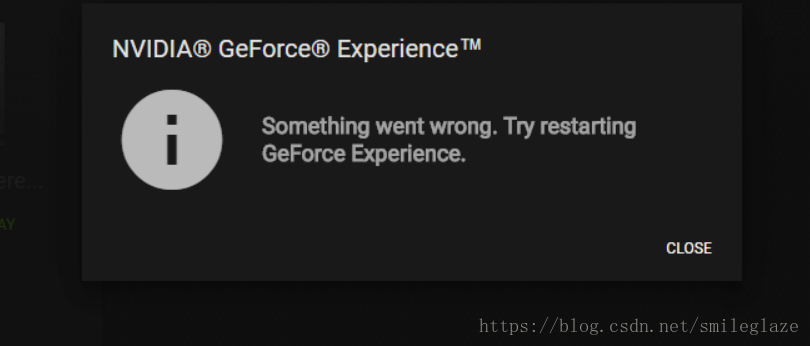
Something went wrong.Try restarting Geforce Experience.
When you find that Nvidia Geforce Experience cannot be opened, the following interface will be prompted no matter how it is opened (run by administrator)

Searched a circle on the net, it is reinstall software at the beginning, update BIOS, all useless.
And then found that Nvidia related service is disabled, is following the http://tieba.baidu.com/p/5733082084

Manually set to start automatically, manually open complains at http://tieba.baidu.com/p/5758178861
In the “Computer acceleration” function of Tencent Computer Housekeeper, restore the disabled in the lower left corner and open the disabled service item, the result was still disabled after a while. I also tried to add the Nv related directory to the anti-virus scan trust area, but still failed.
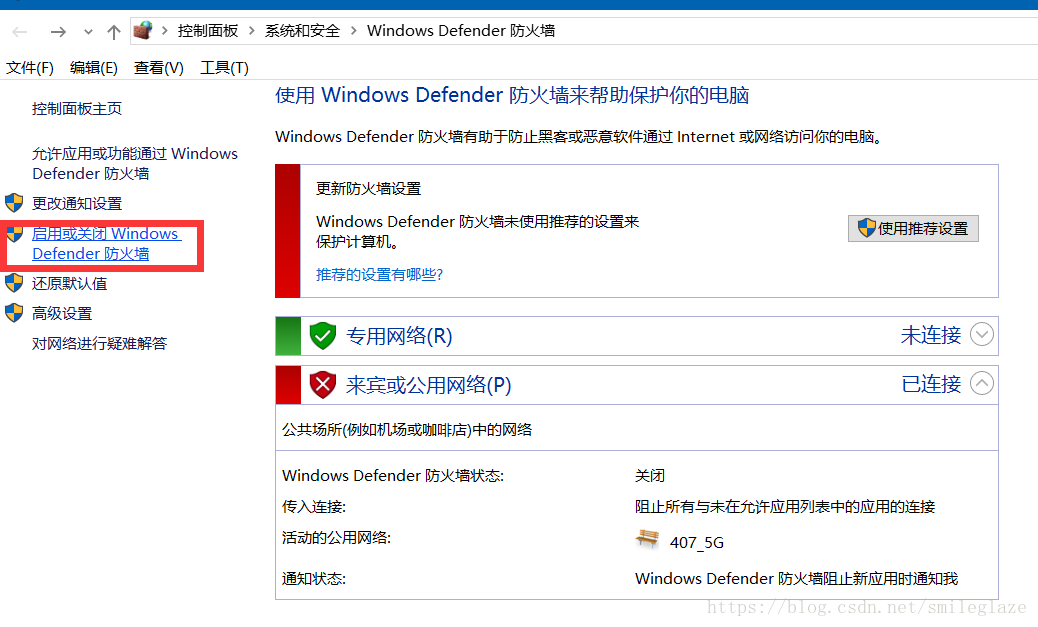
Using the https://zhidao.baidu.com/question/263205342659652165.html approach allows the application or function through Windows firewall, still can’t open it.
final solution
Is to close the firewall, then start the relevant services, the problem is resolved

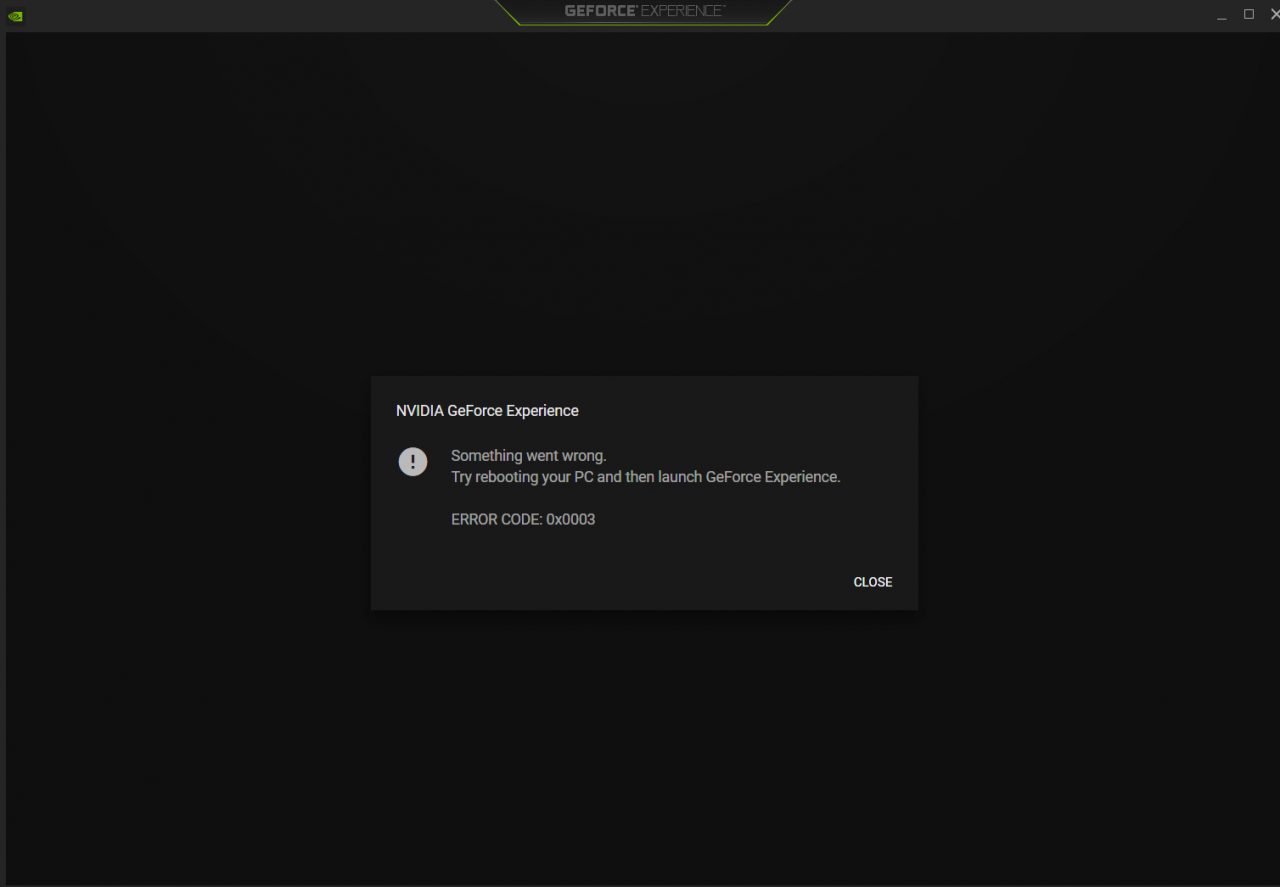
Something went wrong.Try rebooting your PC and then launch GeForce Experience. ERROR CODE:0x0003
The error message encountered in this case is as follows

The corresponding solution is the same as the above scenario, except that the corresponding service should be NVIDIA Telemetry Container, which is set to start automatically
The solution is as follows:
1. Search or find the operation in the system menu with the shortcut win + R.
2, then enter services.msc in run and click ok.
3, find the NVIDIA Telemetry Container in the open services.msc.
4, right-click NVIDIA Telemetry container to open its properties.
5, there is a running state in the property general, if it is stopped, click start.

Python custom class typeerror: ‘module’ object is not callable

When I was new to Python, I wanted to customize the Item and reference it when I was learning crawlers. The custom Item is shown below

import scrapy

​​​​​​​
class MyItem(scrapy.Item):
    title = scrapy.Field()
    pass

In the crawler file, the code is as follows:

# -*- coding: utf-8 -*-

import scrapy
from tutorial.items.MyItem import MyItem


class MySpider(scrapy.Spider):
    name = 'myitem.demo'
    allowed_domains = ['toscrape.com']

    def start_requests(self):
        yield scrapy.Request('http://toscrape.com/tag/humor/', self.parse)

    def parse(self, response):
        for h1 in response.xpath('//h1').getall():
            yield MyItem(title=h1).print_item()

        for href in response.xpath('//a/@href').getall():
            yield scrapy.Request(response.urljoin(href), self.parse)

Here, Tutorial.item.myItem needs to write the class file name

Windows FTP Error 425: Unable to build data connection

http://www.trapstone.com/articles/windows_ftp_425_connection_refused

Having problems transferring files with FTP?If you are using the command line FTP client within Windows and getting errors like these…

500 Illegal PORT command 425 Unable to build data connection: Connection refused

Well, don’t worry – you’re in good company.
This is probably one of the most commonly encountered problems by Windows users with the command line FTP client, primarily when connecting to servers that use non-default ports.
This article explains why … and what you can do about it.
Illegal Port Command – Why FTP may be running on a non-standard port
Every day, countless attempts are made to get access to servers via FTP by guessing account names and passwords.
As a result, many companies who provide FTP access to their customers have configured their servers to run FTP on a non-standard port (i.e. anything other than the default port 21).
Normally this should not be a problem, as you can tell your FTP client which port to connect to on the server and to use passive mode. If you don’t know what passive mode is all about, take a look at the article on Active FTP vs. Passive FTP.
Why Windows FTP Can’t Build A Data Connection
If you use the standard FTP client (the command line one) that comes bundled with Microsoft Windows, then you will find that even if you specify a different port number, you cannot enable passive mode.
Note also that you can’t specify the port number on the command line itself as a server.name:port pair (unlike pretty much every other command line FTP client on the planet).
Instead, you can only attempt this from within the client interactively. For example, here’s a session from an attempt to connect to one of our FTP servers which is running on port 7021…

Here we can see our attempt to connect to our server on it’s non-standard port is successful.
However, as soon as we attempt to transfer data, the attempt to open a secondary port for the data flow fails. Microsoft’s own article on the Windows FTP Client Receives Error Message 425 points out that:

“The FTP clients that ship with Windows do not support passive mode. Therefore, they always need to negotiate a data port when issuing a command that returns data.”

As a result, even if you do correctly specify a non-default port number, you still cannot use passive mode.
Sigh… cheers guys.
Note that you may find a lot of articles on the ‘net claiming that Windows FTP client does support passive FTP – often because they’ve seen the PASV entry in the registry or because the client appears to accept the literal pasv command.
It does not work with the Windows command line FTP client!
The server might respond to a PASV command with a message saying it is in passive mode but the Windows command line client has silently ignored it.
How You Can Use Passive FTP Under Windows
Internet Explorer can support passive mode as an FTP client if you enable it in the “Internet Options”, although that’s only useful for retrieving files – you can’t upload via Internet Explorer.
For full bidirectional FTP functionality, the simple answer is to not use the Windows command line FTP client at all.
We recommend that you use something like FileZilla, which provides a clear, friendly and useful interface – and it’s free!. Alternatively, Firefox users can get the FireFTP add-on to integrate bi-directional FTP with their browser.
If security is a concern and if the FTP server supports SSH connections, you may also want to download SFTP, which is part of the PuTTY SSH client distribution. This is also free and FileZilla supports SFTP as an alternative backend.

FileZilla 425 Can’t open data connection

Yesterday found that the company server being poisoned half a month, abnormal reminding email is not in their hand, alive when the chicken, half month is normal business running, if it weren’t for yesterday exploded with CPU can’t found dead, snapshot backup after reshipment system didn’t even find FTP death, active passive automatic all tried and can access to the directory but unable to traverse the file, is the problem of port:
First go to the server to open the firewall 80 (HTTP), 3306 (SQL), 443 (HTTPS), 21 (FTP) these open ports are open, at this time the website can normally access, but FTP still can not get the file as usual;
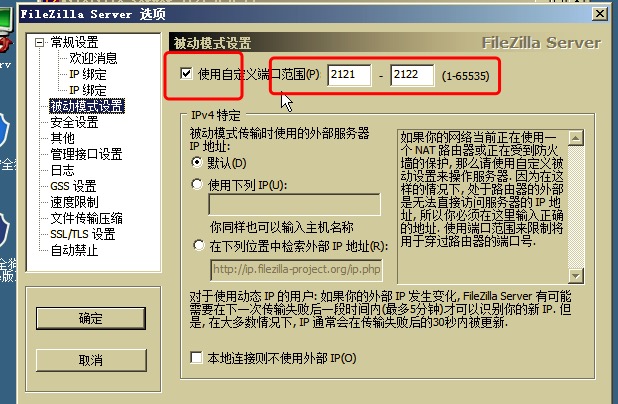
The server is ftPserV, but it has been changed to passive and port:
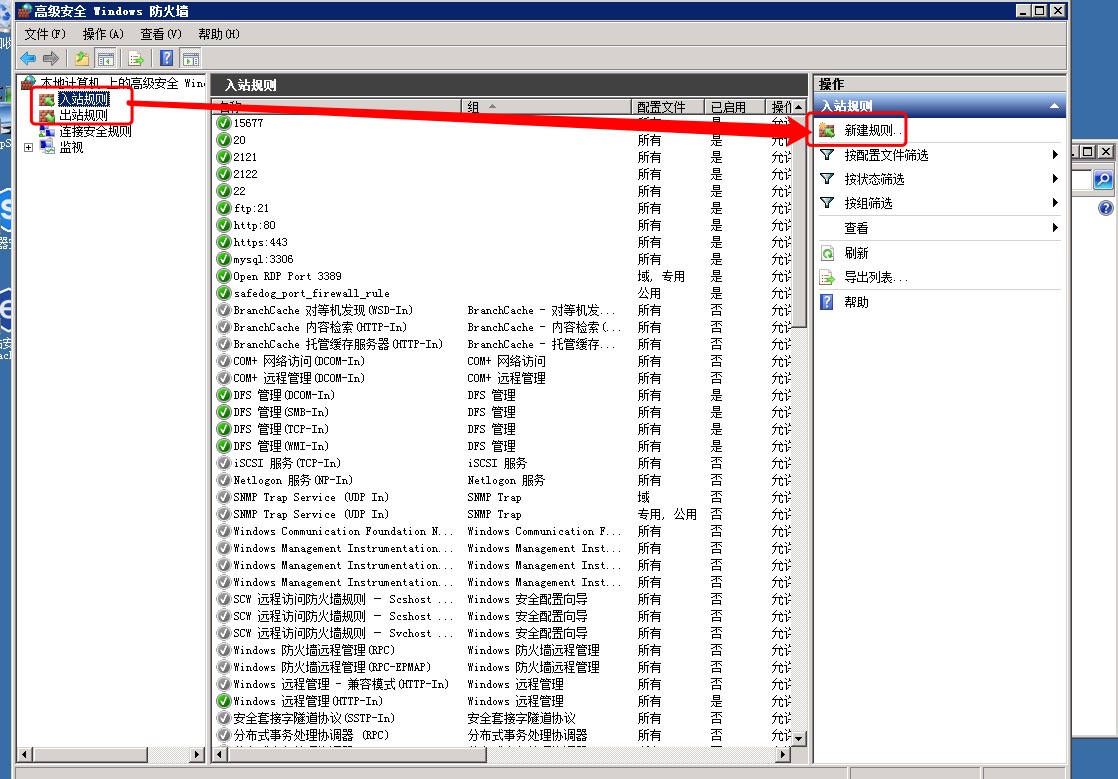
Then add these two ports to your firewall (note that both inbound and outbound rules are added) :

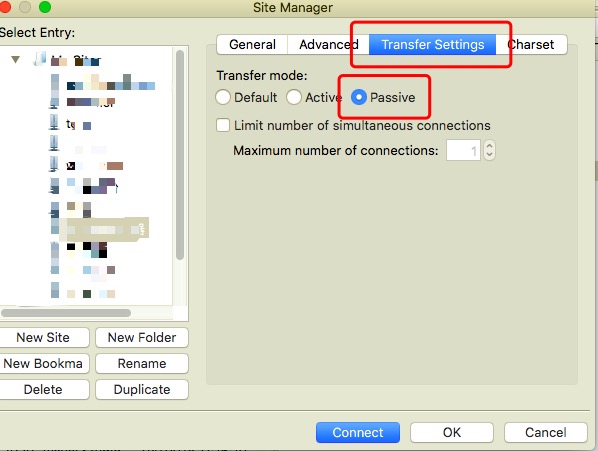
Filezilla for the client, change the mode to passive mode:

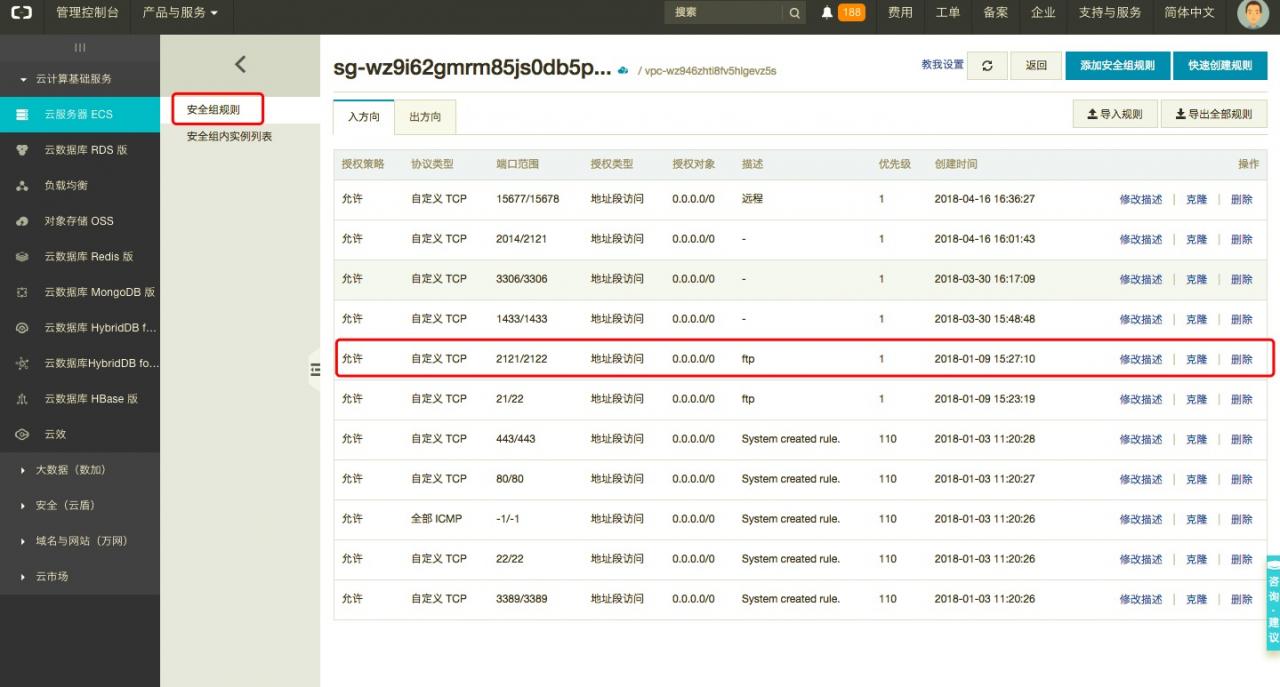
It turns out that it still doesn’t work. It turns out that the security group of Aliyun also needs to match these ports (both entering and leaving should be matched) :

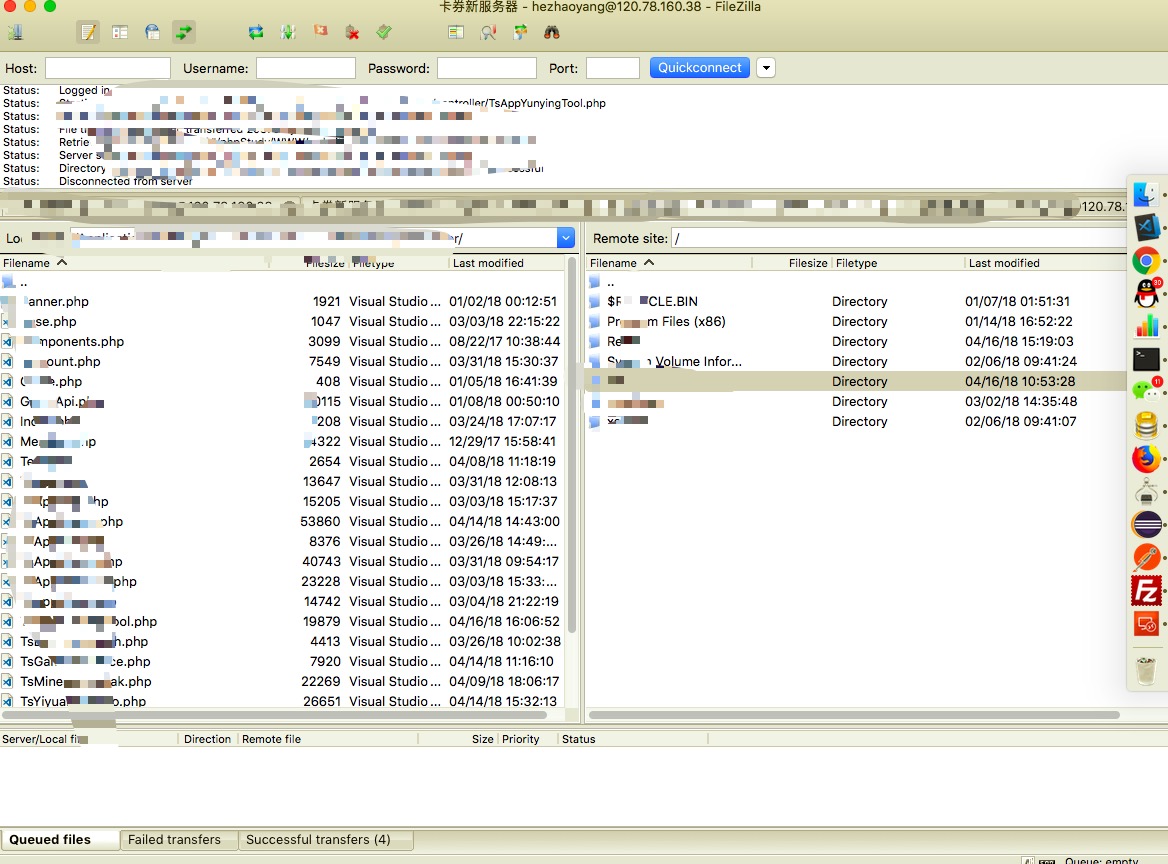
At this point, FTP is perfectly linked.

Maven compilation error: package does not exist jar package does not exist

A compilation failure was encountered while using the Maven command MVN package to package. Maven prompted the compilation error: the package does not exist JAR package. After checking, it was the use of non-Maven repository jars in the project, i.e., the use of local jars, which caused Maven to compile without finding jars. The solution is to configure POm.XML to add the path to the local JAR so that Maven can identify and find the local JAR at compile time.

The configuration of the Maven-compiler-plugin in POM.xml is referred to below. The focus is on the configuration of the compilerArguments element. To add a native JAR package, just add a line to the compilerArguments element.

< compilerArguments>
< extdirs> ${project.basedir}/src/main/webapp/WEB-INF/lib< /extdirs>
< /compilerArguments>

The pom.xml build configuration is referenced below.

<build>
		<finalName>test</finalName>
		<plugins>
			<plugin>
				<groupId>org.apache.maven.plugins</groupId>
				<artifactId>maven-compiler-plugin</artifactId>
				<configuration>
					<source>1.8</source>
					<target>1.8</target>
					<compilerArguments>
					<extdirs>${project.basedir}/src/main/webapp/WEB-INF/lib</extdirs>
					</compilerArguments>
				</configuration>
			</plugin>
			<plugin>
				<groupId>org.apache.maven.plugins</groupId>
				<artifactId>maven-surefire-plugin</artifactId>
				<configuration>
					<skipTests>true</skipTests>
					<testFailureIgnore>true</testFailureIgnore>
				</configuration>
			</plugin>
		</plugins>
</build>

Error of oracel VM installing Windows Server 2012

Windows Server 2012 R2 on VirtualBox – Error 0x000000C4

Vardhan asked this question in a comment:
I have tried Windows Server 2012 R2 Preview on VirtualBox but fell over with 0x000000C4 error. Is there any remedy for this?

EMCO MSI Package Builder

Create MSI AutomaticallyConvert EXE to MSICustomize Existing InstallationsBuild MSI for Remote Installation

I got the same error message. It doesn’t matter if you install from the ISO or the VHD. You always get:
Your PC needs to restart.
Please hold down the power button.
Error code: 0x000000C4
Parameters:
0x0000000000000091
0x000000000000000F
0xFFFFF801E5962A80
0x0000000000000000
The solution to the problem is this command:

1

“c:\Program Files\Oracle\VirtualBox\VBoxManage.exe”

setextradata

[
vmname
]

VBoxInternal
/
CPUM
/
CMPXCHG16B

1

You have to replace vname with the name of your Virtual Machine which you can find in the VirtualBox interface or with this command:

1

“c:\Program Files\Oracle\VirtualBox\VBoxManage.exe”

list
vms

Don’t forget to set the VM name in quotes if it contains blanks.
The command enables the CPU instruction CMPXCHG16B. More info here.
I tried it with the VHD of Windows Server 2012 R2 Preview and it with the ISO.

MySQL – ERROR 1146 (42S02): Table ‘mysql.user’ doesn’t exist

When we were testing the service and restarting it, we failed and reported an error of “Table ‘mysqlm. user’ doesn’t exist”. This user Table was created before, and it saved the data of users and permissions of the whole database. How could it not exist?
The database login is still normal, indicating that the user is still available, but the query is executed after entering
SELECT * FROM mysql. The user;
ERROR 1146 (42S02): Table ‘mysql.user’ doesn’t exist
Do something!!
When I checked the status of the cluster, I found that it was not normal. The USER table of 3 Mqsql in the cluster was gone, and only Master node was left working alone. Although the other two were RUNNING, they were working independently from the cluster, which was so strange…
Looking for a circle on the Internet, there are some good ways to try;
1 stop service
2 data directory mysql folder rename
3 execute mysql_install_db regenerate authorization table
4 start service
So since the Master can’t move, so I’m going to try slave first, execute mysql_install_DB
The user table is generated, but just like when it was installed, there is no data. The login password has to be reconfigured. In this way, if you join the cluster, there will be some problems.
I had to consult my database-savvy colleagues, and at their suggestion, COPY a user table from somewhere else, and then re-add the user information to the database user table according to the various existing services (fortunately, most of the services in this cluster were applications under test). When you rejoin the cluster, it’s back to normal…
Also, although the user data for the service is not in the table copied, when I restart the service and recreate the user to create the table, It tells me that the user already exists. DROP USER ‘username ‘@’ %’ first; And then “flush privileges”; Refresh permission operation; Recreate the user again, and that’s fine. Does MySQL have a cache of places to store this information??
But why does the mysql.user table disappear?I didn’t see any drop table operation through the MySQL log. It’s so strange… Can only restore the service first, the problem first record and then slowly check…

Mac Windows partition merge and delete

Before using The MAC bootcamp installed win10 system, used for a period of time, Win10 inexplicable into the card, also do not want to explore why, I plan to re-install the Win10 system.
Itself lz is a MAC, a small white, think in MAC disk tools directly wipe win10 partition, erase and then enter the bootcamp prompted “startup disk cannot be partition or back to a single partition”, that’s just scared (should not erase the Windows partition directly, it should be removed in the bootcamp Windows), online access to the data, to combine erase win10 partition to MAC partition to partition, installation win10, behind will points several ways to analyze:
Situation 1: There is no Recovery HD partition in the computer
1. Open the terminal, type Diskutil List, and find the disk number corresponding to your Windows partition, such as disk0s3.
2. Format the partition as HFS+ format: Diskutil Erasme HFS+ Blank disk0s3, Blank renames the partition for you after formatting
3. Consolidate the newly formatted DISk0s3 partition to MAC (disk0s2) : diskutil mergePartitions to HFS+ MAC disk0s2 disk0S3. Note: The merged partition is in the back
Situation 2: The Recovery HD partition is in the computer
1. Open the terminal and type Diskutil List to find the respective disk Numbers of your Recovery HD partition and Windows partition, such as disk0S3 (Recovery HD disk number) and DISk0S4 (Windows disk number).
2. Format the two partitions as HFS+ format: Diskutil Erasme HFS+ Blank disk0s3, Diskutil Erasme HFS+ Blank1 Disk0s4, Blank reformatting the partition name for you
3. Merge the newly formatted PARTITIONS (DISk0s3 and DISk0s4) into the MAC (disk0s2) partition in turn: diskutil mergePartitions (PARTITIONS) HFS+ MAC disk0s2 disk0s3 and Diskutil Merges3). Note: The merged partition is in the back
The mergepartition merging command must be continuous. For example, your Recovery HD partition is disk0s3, MAC partition is disk0s2 and WIN partition is disk0S4. You can’t combine WIN partition to MAC partition, so you must format the Recovery HD to an IMAGE (this should be the system toolkit). When you click the option at startup, you will see a disk named “Recovery HD-10.11.XX” or a disk named “Recovery -10.11.XX”, which contains system tools such as Time Machine, INSTALLATION OS X, disk tools, terminal, etc.), and then merge them one by one.
Situation 3: The Windows partition that was just erased could not be merged into the MAC partition
1. After wiping out the Win10 partition and The Win10 Recovery, merge the two Win10 related partitions and then merge the MAC partition into the wrong one:
You cannot merge disks into an APFS Physical Store
Instead, you can delete the partitions following the APFS Physical Store by
using “diskutil eraseVolume free n ” for all such partitions, and
then by growing the corresponding APFS Container by its APFS Physical Store
to fill the gap by using “diskutil apfs resizeContainer disk0s2 0”
You can’t merge win10 partition to MAC partition, but you can delete this Win10 partition by diskutil Erasme free n disk0S3 and then passively add the Win10 partition you just deleted to MAC partition by fill the gap with MAC partition. Diskutil Apfs resizeContainer disk0s2 0
Situation 4: LZ is too impulsive to format the MAC partition
It’s not really necessary. If you don’t format the MAC, the above solution is enough. The following is a backup for those who need to do more. You can use the Time Machine to back up your hard drive, preferably one and a half times as much space as your MAC system already USES, and the backup disk needs to be formatted into a MAC specific format to be backed up, and the data on the backup disk needs to be exported. Backup complete will restart some option in the Recovery of HD into the disk tools to MAC partitions are formatted, and then make into the erroneous zone, Recovery HD is a MAC and Windows partition in the middle of the partition, I have no way to combine the three partitions (feeling into an infinite loop, Recovery HD into the terminal cannot be deleted Recovery HD partitions, prompt the Error erasing disk Error number (69888, 0), oneself cannot be deleted, Can only delete) from the outside, also found a homemade Recovery HD U disk, startup disk method, finally found the command + R also can enter and Recovery HD interface (before actually thought they were a thing, actually Recovery HD and command + R is not a thing, no contact), in the command + R can erase Recovery HD partitions, and then to merge several partitions, Then you restored the MAC, reinstalled Win10 using Bootcamp, and everything was back to normal.
Originally very simple things, give me a chance for two minutes to solve the problem of the merger of the partition for three days, I use online solutions are given to solve the small problem, and online comments is in accordance with the article is to solve the problem, I how all won’t work here, the last is their patchwork coupled with a little luck to realize partition processing mode in the MAC, also related to lz easily reshipment system, formatted partition, if you encounter problems or rational analysis, simple to solve it, don’t get a lane, to the extent that is difficult to pick up, laborious. But on the other hand, I’ve made a lot of progress in this way, and I’m not afraid of any problems in the future