To conclude:
GetApplicationContext () can fetch the Application object, and getContext() is generally considered to return an Activity object (which, of course, is not actually limited to the Activity). 2. For Application, you can see from the Manifest file that an Application typically has only one Application node. Application is just an Application, that is, as long as the current Application is still running, it can get to the Application object. 3.Application is a long reference, and Activity is a short reference. Application is suitable for storing objects that need to be read repeatedly, such as the user’s username and password, the current Settings of the Application, and so on. When an Activity is applied to the current active form, such as displaying a Dialog, or creating a new View, the context object passed in should be the current Activity, not the Application.
Android applications limit heap memory to 16M (note: heap memory is also related to device performance; available heap memory for high performance devices may be 24M or more), with phone functions taking up a portion of the heap and developers having very limited access to it. If you’re not going to run out of memory, your application should use as little as possible so that other programs don’t get killed when they run. The more applications the Android system can hold in memory, the faster users can switch between applications. As part of my work, I researched memory leaks in Android applications and found that most of the time it was the same problem: holding a long reference to the Context.
In Android, Context is used for many operations, but mostly to load or access resources. This is why all Widget components receive a Context parameter in the constructor. For a typical Android Application, there are usually two contexts, namely Activity and Application. Developers often need the context to select an Activity when passing between classes or methods.

this indicates that Views have a reference to the entire Activity, so anything in your Activity will be held by Views, which are generally held by the view hierarchy and its corresponding resources. So, if you give away the Context, you’re giving away some memory. If you’re not careful, it’s very easy to reveal an Activity.
when the screen direction changes, the system will save its state by default, destroy the current Activity, and create a new one. To do this, Android reloads the application’s UI from resources. Now let’s say you’re developing an app that contains a lot of bitmaps, and you don’t want to load bitmaps every time you switch screens. So the easiest way to do this is to use the static static field.
GetApplicationContext () can fetch the Application object, and getContext() is generally considered to return an Activity object (which, of course, is not actually limited to the Activity). 2. For Application, you can see from the Manifest file that an Application typically has only one Application node. Application is just an Application, that is, as long as the current Application is still running, it can get to the Application object. 3.Application is a long reference, and Activity is a short reference. Application is suitable for storing objects that need to be read repeatedly, such as the user’s username and password, the current Settings of the Application, and so on. When an Activity is applied to the current active form, such as displaying a Dialog, or creating a new View, the context object passed in should be the current Activity, not the Application.
Android applications limit heap memory to 16M (note: heap memory is also related to device performance; available heap memory for high performance devices may be 24M or more), with phone functions taking up a portion of the heap and developers having very limited access to it. If you’re not going to run out of memory, your application should use as little as possible so that other programs don’t get killed when they run. The more applications the Android system can hold in memory, the faster users can switch between applications. As part of my work, I researched memory leaks in Android applications and found that most of the time it was the same problem: holding a long reference to the Context.
In Android, Context is used for many operations, but mostly to load or access resources. This is why all Widget components receive a Context parameter in the constructor. For a typical Android Application, there are usually two contexts, namely Activity and Application. Developers often need the context to select an Activity when passing between classes or methods.
this indicates that Views have a reference to the entire Activity, so anything in your Activity will be held by Views, which are generally held by the view hierarchy and its corresponding resources. So, if you give away the Context, you’re giving away some memory. If you’re not careful, it’s very easy to reveal an Activity.
when the screen direction changes, the system will save its state by default, destroy the current Activity, and create a new one. To do this, Android reloads the application’s UI from resources. Now let’s say you’re developing an app that contains a lot of bitmaps, and you don’t want to load bitmaps every time you switch screens. So the easiest way to do this is to use the static static field.
Solution to PCL XL error of HP p2055d laser printer
Recently, HP P2055d laser printer (produced in November 2009) has been installed at the customer’s office. The hardware environment is as follows: PC: Dell OptiPlex 360, and another Fujitsu DPK 8600E ticket printer. P2055d is connected to PC via USB data cable. Software environment: The operating system, Windows XP SP2, USES the driver disk attached. After the installation of the operating system and the driver, the HP P2055d printer will be installed. After the installation of the driver, the test page will be printed, OK; Then, the Fujitsu DPK8600E was installed. After the installation was completed, everything worked fine. As a result, the P2055d hung up.
— — — — — — — — — — — — — — — — — — — — — — — — — — — error message started the author add (visit) — — — — — — — — — — — — — — — — — — — — — — — — — — — —
PCL XL error
Subsystem: KERNEL
Error: IllegalOperatorSequence
Operator: EndSession
Position: 7
— — — — — — — — — — — — — — — — — — — — — — — — — — — — — — — — — — — — — — — — — — — — — — — — — — — — — — –// error message end I (visit)
Using the built-in test function of the machine, the printer can work normally, but it cannot communicate with the PC normally. Uninstall and reinstall the driver and all associated software, and the problem remains. Helpless, call HP customer service, customer service staff told the problem cannot be determined, can only use the following methods to try. Because the telephone is far from the machine, it is not convenient to operate. After two calls to customer service, the P2055d can finally be printed. The operation method is listed here for later use.
1. Change the advanced options for the first time
1) Right-click the printer and select “Print Preference…” in the window that pops up. , as shown in Figure 1.
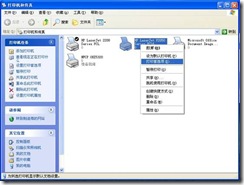
Figure 1
2) Open the print preferences window as shown in Figure 2

Figure 2
3) Expand “Graph” and select “Download as Soft Font” from the drop-down list of “True Type Font” below (Figure 3)
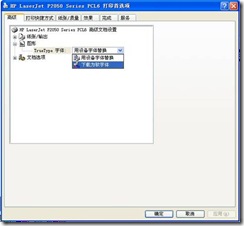
Figure 3
4) Expand Document Options a Printer Functions and change the drop-down list of Send True Type as bitmap to Enabled (Figure 4).
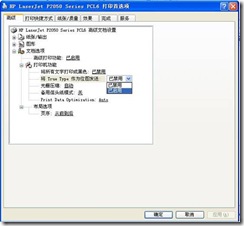
Figure 4.
5) Then, change the “Print Data Optimization” drop-down list to “Optimize for Text and Vector,” apply “–” Optimize “(Figure 5).
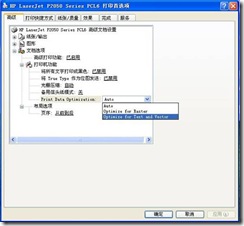
Figure 5
To be on the safe side, I restarted the machine and printer (actually shutting down the computer and then shutting down the printer).
2. Try again and change the driver
As the problem was not solved, the author turned to HP customer service again (every time I played HP customer service, I had to wait, I didn’t know whether HP service was too good or HP product quality was wrong). The author was told to replace it with a 2200 driver, so I tried again.
1) Open the “Printer and Fax” window (start A to set A printer and fax), and click “File” A to “Add Printer” in turn, as shown in Figure 6.
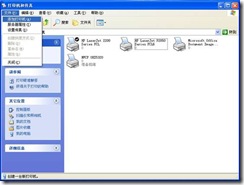
Figure 6.
2) Open the “Add Printer Wizard” window as shown in Figure 7, and click “Next”.
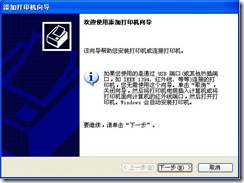
Figure 7.
3) Remove the selection of “Automatic Detection and Installation of plug and play Printer” in the window shown in Figure 8, and click “Next”.
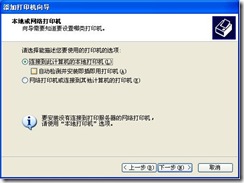
Figure 8.
4) In the “Select Printer Ports” window, select “USB001” (Figure 9) from the following port drop-down list and click “Next”.
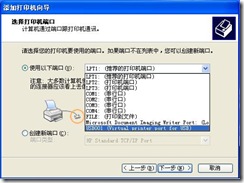
Figure 9.
5) In the “Install Printer Software” window, select “HP” from the list of manufacturers, and the printer select “HP LaserJet 2200 Series PCL”, and click “Next” to add the printer.
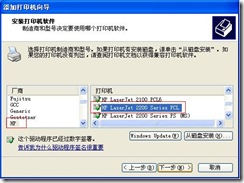
Figure 10.
After adding this printer, print the document and test page OK. The original 2055D printer system will be installed automatically. It is recommended to set this 2200 printer as the default printer. At this point, the “PCL XL error” problem is resolved.
When the operating system was reinstalled, the printer was installed directly in accordance with Plan 2, and everything was fine.
— — — — — — — — — — — — — — — — — — — — — — — — — — — error message started the author add (visit) — — — — — — — — — — — — — — — — — — — — — — — — — — — —
PCL XL error
Subsystem: KERNEL
Error: IllegalOperatorSequence
Operator: EndSession
Position: 7
— — — — — — — — — — — — — — — — — — — — — — — — — — — — — — — — — — — — — — — — — — — — — — — — — — — — — — –// error message end I (visit)
Using the built-in test function of the machine, the printer can work normally, but it cannot communicate with the PC normally. Uninstall and reinstall the driver and all associated software, and the problem remains. Helpless, call HP customer service, customer service staff told the problem cannot be determined, can only use the following methods to try. Because the telephone is far from the machine, it is not convenient to operate. After two calls to customer service, the P2055d can finally be printed. The operation method is listed here for later use.
1. Change the advanced options for the first time
1) Right-click the printer and select “Print Preference…” in the window that pops up. , as shown in Figure 1.
Figure 1
2) Open the print preferences window as shown in Figure 2
Figure 2
3) Expand “Graph” and select “Download as Soft Font” from the drop-down list of “True Type Font” below (Figure 3)
Figure 3
4) Expand Document Options a Printer Functions and change the drop-down list of Send True Type as bitmap to Enabled (Figure 4).
Figure 4.
5) Then, change the “Print Data Optimization” drop-down list to “Optimize for Text and Vector,” apply “–” Optimize “(Figure 5).
Figure 5
To be on the safe side, I restarted the machine and printer (actually shutting down the computer and then shutting down the printer).
2. Try again and change the driver
As the problem was not solved, the author turned to HP customer service again (every time I played HP customer service, I had to wait, I didn’t know whether HP service was too good or HP product quality was wrong). The author was told to replace it with a 2200 driver, so I tried again.
1) Open the “Printer and Fax” window (start A to set A printer and fax), and click “File” A to “Add Printer” in turn, as shown in Figure 6.
Figure 6.
2) Open the “Add Printer Wizard” window as shown in Figure 7, and click “Next”.
Figure 7.
3) Remove the selection of “Automatic Detection and Installation of plug and play Printer” in the window shown in Figure 8, and click “Next”.
Figure 8.
4) In the “Select Printer Ports” window, select “USB001” (Figure 9) from the following port drop-down list and click “Next”.
Figure 9.
5) In the “Install Printer Software” window, select “HP” from the list of manufacturers, and the printer select “HP LaserJet 2200 Series PCL”, and click “Next” to add the printer.
Figure 10.
After adding this printer, print the document and test page OK. The original 2055D printer system will be installed automatically. It is recommended to set this 2200 printer as the default printer. At this point, the “PCL XL error” problem is resolved.
When the operating system was reinstalled, the printer was installed directly in accordance with Plan 2, and everything was fine.