Author Archives: Robins

Finally solved the importError: DLLload failed: the specified module could not be found when import matplotlib.pyplot

After all the dependent libraries in Matplotlib (dependent library details: click the open link) were installed successfully, import matplotlib succeeded, but the following error occurred when importing matplotlib.pyplot as PLT:
ImportError: DLLload failed: the specified module
cannot be found
Then I found that the size of matplotlib I installed was 8128 KB, and the same version of Matplotlib I found from another address was 8503 KB. Finally, I uninstalled and reinstalled matplotlib of 8503KB and introduced Matplotlib. pyplot successfully.
J presented here introduced successful version of the download address: https://pypi.org/project/matplotlib/#files
Use administrator privileges to perform the following uninstall:
pip uninstall matplotlib
Reinstall after uninstalling:
pip install matplotlib
Close test effectively
Dependency library installation example:
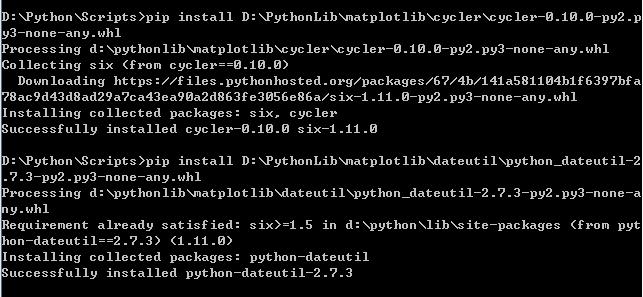
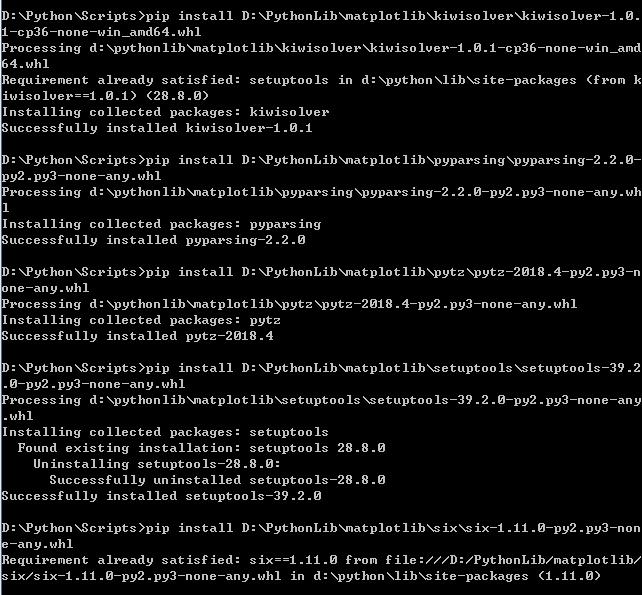
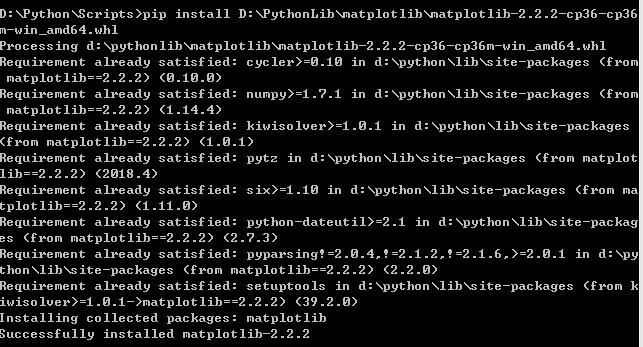
Matplotlib was installed successfully:
unrecognized relocation (0x2a) in section `.text`

The problem
One of the libraries used today has been updated. After the new version is updated, there will be an error when compiling the Linux-x86-64 version on the server:
/usr/bin/ld: libsdk.a(Imagexxx.cpp.o): unrecognized relocation (0x2a) in section .text
/usr/bin/ld: final link failed: Bad value
collect2: error: ld returned 1 exit status
Then I tested it on my own computer, and the results compiled.
Based on the relevant information of see on stack overflow:
https://stackoverflow.com/questions/46058050/unable-to-compile-unrecognized-relocation
Most likely the LD version is incorrect

ld version:
GNU ld(GNU Binutils for Ubuntu) 2.26
server ld version:
GNU ld(GNU Binutils for Ubuntu) 2.24
To solve
Have root access

$ sudo apt-get update
$ sudo apt-get install binutils-2.26

export PATH="/usr/lib/binutils-2.26/bin:$PATH"

No root
download source:
https://ftp.gnu.org/gnu/binutils/

tar -zxvf binutils-2.26.tar.gz
cd binutils-2.26
./configure --prefix=/home/xxx/binutils
make
make install
export PATH="/home/xxx/binutils/bin:$PATH"

How to Fix ubuntu phpmyadmin error: “Connection for controluser as defined in your configuration failed”

Recently when Ubuntu 12.04 was developed with PhpmyAdmin, Connection for Controluser as defined in your Configuration failed after logging in
This tip, when I looked it up, was an extension to the new PHpmyAdmin version, and I didn’t enable it.
Now take a look at your own steps:
1. In the usr/share/doc/phpmyadmin/examples find create_table. SQL. Gz, decompression
Sudo Gzip create_table.sql.gz can then import the SQL file directly from phpmyAdmin
2. After successful import, go to the directory etc/phpmyadmin and modify config.inc. PHP
$dbuser = ‘phpmyadmin’;
$dbpass=’ password ‘;
$basepath=”;
$dbname=’phpmyadmin’;
$dbserver=”;
$dbport=”;
$dbtype=’mysql’;
// So I changed the next two lines
$dbuser = ‘phpmyadmin’;
$dbpass=’ password ‘; // change the password to the corresponding user
3. Restart apache server after modification
The error message will disappear,

Reference:
http://ckwsteven.pixnet.net/blog/post/27469170-phpmyadmin%E9%8C%AF%E8%AA%A4%E8%A8%8A%E6%81%AF%EF%BC%9A-connection-for-controluser-as-defi
http://www.rvdavid.net/how-to-fix-phpmyadmin-error-connection-for-controluser-as-defined-in-your-configuration-failed/
http://wiki.phpmyadmin.net/pma/pmadb

Virtualbox failed to attach usb, VERR_PDM_NO_USB_PORTS problem solved

The problem described
Error:VERR_PDM_NO_USB_PORTS
my machine environment:
host kali Linux virtualbox version 5.0.x
Question why
Usb Settings should use USB 3.0, as if because VirtualBox doesn’t support anything else
Problem solving
Settings Go to USB Settings and select USB 3.0 but Invalid Settings Detected appears. Tip need to install the Extension pack. And go to the website to download the Extension pack, then warrant 5.1.1 version seems finally to version, so the final solution is to update the virtualbox.
but here are a few need to be aware of, update need completely remove clean before virtualbox virtualbox

apt-get remove virtualbox
apt-get remove virtualbox-dkms

After that, I used the official downloaded.deb file for the installation

dpkg -i virtualbox-5.1_5.1.6-110634~Debian~jessie_amd64.deb

Prompt lack of libvpx1 and libssl1.0.0
apt-get found that these two can not directly down,libvpx is related to libvpx3 and libvpx4, it seems that must be libvpx1 can, so there is no way, can only search libvpx1 and libssl1.0.0, here is my search to download the address
libssl1.0.0 download address
libvpx1 download address
and then respectively through DPKG After the -i installation, install Virtualbox-5.1 and open Discover USB is now available. The default is 3.0

Solutions to problems encountered when installing isc-dhcp-server on debian9.6

To set up a DHCP server, I encountered a problem during the installation:

guoyanzhang@bogon:~$ sudo apt-get install isc-dhcp-server-ldap
Reading the package list... Finished.
Dependency tree of the package being analyzed       
Reading status information... Done.       
The following software will be installed at the same time.
  isc-dhcp-server
The following [new] packages will be installed.
  isc-dhcp-server isc-dhcp-server-ldap
0 packages upgraded, 2 new packages installed, 0 packages to uninstall, 7 packages not upgraded.
0 B/955 kB of archives to download.
Decompression consumes 2,366 kB of extra space.
Do you wish to proceed? [Y/n] y
Predefined packages ...
Unselected package isc-dhcp-server is being selected.
(Reading the database ... The system currently has 169038 files and directories installed.)
Preparing to unpack ... /isc-dhcp-server_4.3.5-3+deb9u1_amd64.deb ...
Unpacking isc-dhcp-server (4.3.5-3+deb9u1) ...
Unselected package isc-dhcp-server-ldap is being selected.
Preparing to unpack ... /isc-dhcp-server-ldap_4.3.5-3+deb9u1_amd64.deb ...
isc-dhcp-server-ldap being added causes /usr/sbin/dhcpd to move to /usr/sbin/dhcpd-noldap
Unpacking isc-dhcp-server-ldap (4.3.5-3+deb9u1) ...
Working with triggers for systemd (232-25+deb9u6) ...
Processing triggers for man-db (2.7.6.1-2) ...
isc-dhcp-server (4.3.5-3+deb9u1) is being set up ...
Generating /etc/default/isc-dhcp-server...
Job for isc-dhcp-server.service failed because the control process exited with error code.
See "systemctl status isc-dhcp-server.service" and "journalctl -xe" for details.
invoke-rc.d: initscript isc-dhcp-server, action "start" failed.
● isc-dhcp-server.service - LSB: DHCP server
   Loaded: loaded (/etc/init.d/isc-dhcp-server; generated; vendor preset: enabled)
   Active: failed (Result: exit-code) since Wed 2019-01-09 11:52:37 CST; 12ms ago
     Docs: man:systemd-sysv-generator(8)
  Process: 2169 ExecStart=/etc/init.d/isc-dhcp-server start (code=exited, status=1/FAILURE)

1月 09 11:52:35 bogon dhcpd[2180]: Not searching LDAP since ldap-server, ldap-port and ldap-base-dn were not specified in the config file
1月 09 11:52:35 bogon dhcpd[2180]: irs_resconf_load failed: 59.
1月 09 11:52:35 bogon dhcpd[2180]: Unable to set resolver from resolv.conf; startup continuing but DDNS support may be affected
1月 09 11:52:35 bogon dhcpd[2180]: Wrote 0 leases to leases file.
1月 09 11:52:37 bogon isc-dhcp-server[2169]: Starting ISC DHCPv4 server: dhcpdcheck syslog for diagnostics. ... failed!
1月 09 11:52:37 bogon isc-dhcp-server[2169]:  failed!
1月 09 11:52:37 bogon systemd[1]: isc-dhcp-server.service: Control process exited, code=exited status=1
1月 09 11:52:37 bogon systemd[1]: Failed to start LSB: DHCP server.
1月 09 11:52:37 bogon systemd[1]: isc-dhcp-server.service: Unit entered failed state.
1月 09 11:52:37 bogon systemd[1]: isc-dhcp-server.service: Failed with result 'exit-code'.
isc-dhcp-server-ldap (4.3.5-3+deb9u1) is being set up ...
Processing triggers for systemd (232-25+deb9u6) ...

Key words:
irs_resconf_load failed: 59.
Unable to set resolver from resolv.conf; startup
Check out my resolv.conf and find:

guoyanzhang@bogon:/etc/network$ cat /etc/resolv.conf 
# Generated by NetworkManager
nameserver fe80::1%wlp8s0
nameserver 192.168.1.1

The first nameserver looks like a nameserver and has been modified as follows:

guoyanzhang@bogon:/etc/network$ cat /etc/resolv.conf 
# Generated by NetworkManager
nameserver 8.8.8.8
nameserver 8.8.4.4

The reason is that this file was not configured in debian system at the beginning. This file was generated after I successfully installed it on the Internet. Now delete ISC-DHCP-Server and install it like this:

guoyanzhang@bogon:~$ sudo apt-get install isc-dhcp-server
Reading the package list... Finished.
Dependency tree of the package being analyzed       
Reading status information... Done.       
Recommended installation.
  isc-dhcp-server-ldap
The following [new] packages will be installed.
  isc-dhcp-server
0 packages upgraded, 1 new package installed, 0 packages to uninstall, 7 packages not upgraded.
An archive of 0 B/526 kB needs to be downloaded.
Unpacking consumes 1,425 kB of extra space.
Package is being preset ...
The unselected package isc-dhcp-server is being selected.
(Reading the database ... The system currently has 169038 files and directories installed.)
Preparing to unpack ... /isc-dhcp-server_4.3.5-3+deb9u1_amd64.deb ...
Unpacking isc-dhcp-server (4.3.5-3+deb9u1) ...
Working on a trigger for systemd (232-25+deb9u6) ...
Processing triggers for man-db (2.7.6.1-2) ...
Setting up isc-dhcp-server (4.3.5-3+deb9u1) ...
Generating /etc/default/isc-dhcp-server ...
Job for isc-dhcp-server.service failed because the control process exited with error code.
See "systemctl status isc-dhcp-server.service" and "journalctl -xe" for details.
invoke-rc.d: initscript isc-dhcp-server, action "start" failed.
● isc-dhcp-server.service - LSB: DHCP server
   Loaded: loaded (/etc/init.d/isc-dhcp-server; generated; vendor preset: enabled)
   Active: failed (Result: exit-code) since Wed 2019-01-09 12:45:19 CST; 5ms ago
     Docs: man:systemd-sysv-generator(8)
  Process: 6137 ExecStart=/etc/init.d/isc-dhcp-server start (code=exited, status=1/FAILURE)

Jan 09 12:45:17 bogon systemd[1]: Starting LSB: DHCP server...
Jan 09 12:45:17 bogon isc-dhcp-server[6137]: Launching both IPv4 and IPv6 servers (please configure…her).
Jan 09 12:45:17 bogon dhcpd[6148]: Wrote 0 leases to leases file.
Jan 09 12:45:19 bogon isc-dhcp-server[6137]: Starting ISC DHCPv4 server: dhcpdcheck syslog for diag…iled!
Jan 09 12:45:19 bogon isc-dhcp-server[6137]:  failed!
Jan 09 12:45:19 bogon systemd[1]: isc-dhcp-server.service: Control process exited, code=exited status=1
Jan 09 12:45:19 bogon systemd[1]: Failed to start LSB: DHCP server.
Jan 09 12:45:19 bogon systemd[1]: isc-dhcp-server.service: Unit entered failed state.
Jan 09 12:45:19 bogon systemd[1]: isc-dhcp-server.service: Failed with result 'exit-code'.
Hint: Some lines were ellipsized, use -l to show in full.
Processing triggers for systemd (232-25+deb9u6) ...

Failed to load the JNI shared library solution

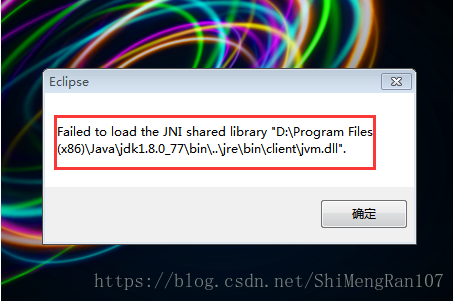
Recently open Eclipse to report an error, as shown in the figure below:

The reason:
The JDK is not compatible with the Eclipse version, and an open error occurs: Failed to load the JNI Shared Library… That’s the question. This is usually due to a discrepancy between the native-installed (32bit/64bit) version of Eclipse and the JDK (32bit/64bit).    
JDK (x86 32BIT, x86_64 64bit)
Eclipse (x86 32bit, x86_64 64bit)
Solution: Reinstall the JDK or reinstall Eclipse.
 
Inspection method:
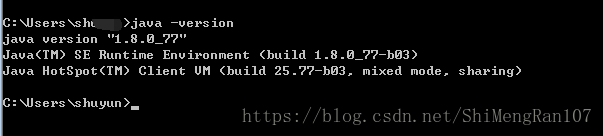
1. First check how many bits is the JDK on your machine?
Type in Java-Version, and a 64bit JDK will normally be displayed, while a 32bit JDK will generally be not.

2. Check how many bits of Eclipse are installed?
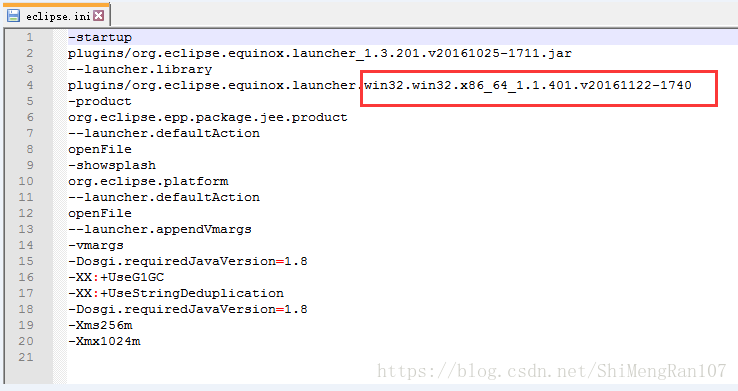
Go to your Eclipse installation directory, open Eclipse.ini as a text file, and find the line below –launcher. Library, which shows 32bit if win32.x86 and 64bit if win32.x86_64.

I chose to reinstall the JDK, so be sure to modify the environment variables on your machine.
Click the hyperlink on the right to download the JDK you want

Pull the git warehouse code IDEA reports an error: Clone failed: Authentication failed for’http://10.xx.XXXXXXXXXXXXXXXXX’

Write custom directory titles here
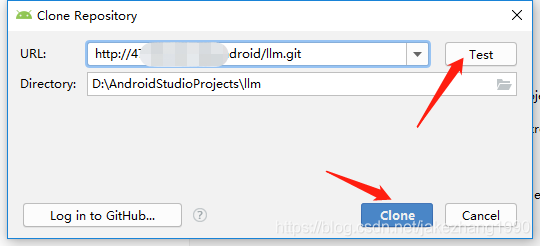
The IDEA of an error: Clone failed: Authentication failed for ‘http://10.70.XXXXXXXXXXXXXXXXX’ git error: Please make sure you have the correct access rights and the repository exist. Step 1 check out project form version control. 2, enter. Git end of the clone address, test, and then clone. 3. It is worth mentioning that the second step before Test or clone needs to be logged in. (There’s a pit here.)
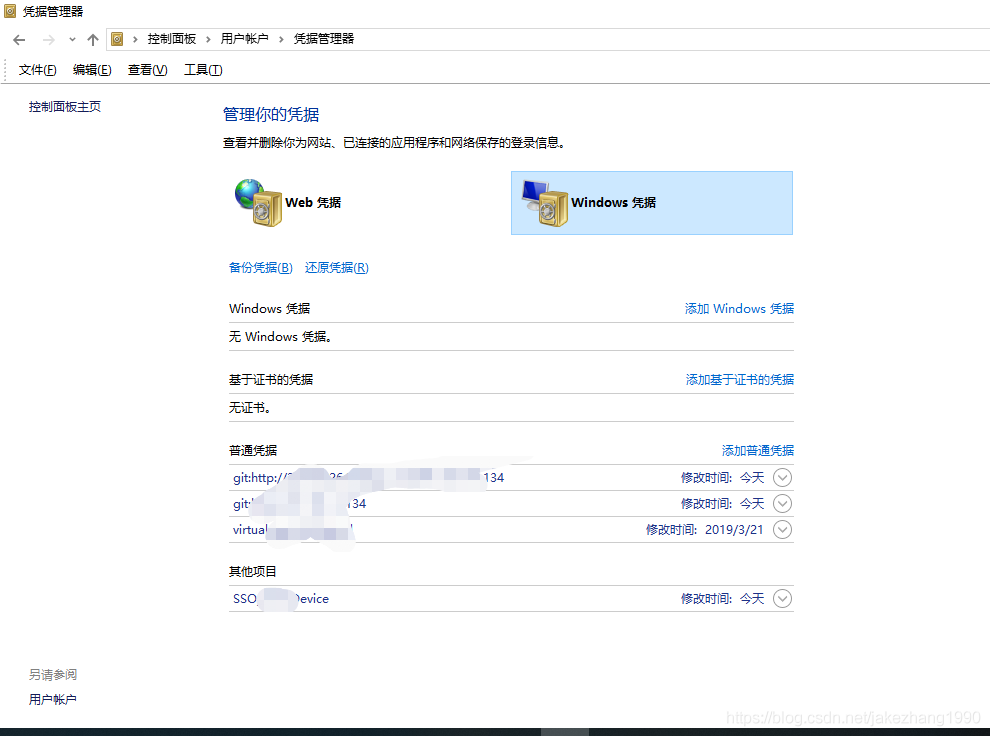
The solution is as simple as finding the Windows credentials manager and changing or deleting the username and password you saved before. Win + S input “credentials” will prompt “Credentials management”. Please make sure you have the correct access rights and the repository exist.

The IDEA of an error: Clone failed: Authentication failed for ‘http://10.70.XXXXXXXXXXXXXXXXX’
Make sure you have the correct access rights and the repository exist
Reference:
https://blog.csdn.net/m0_38022029/article/details/83374407
The first step on the job
The first thing I do when I enter a new company is to configure the development tools and pull down the code of the company’s current project from the company cloud. However, this first step will be a little painful. I will spend half the morning digging the hole.
steps
It’s usually pulled from Git. I used SVN before, but it’s very limited for Git, almost zero. Record the pull steps from your company’s Git repository.
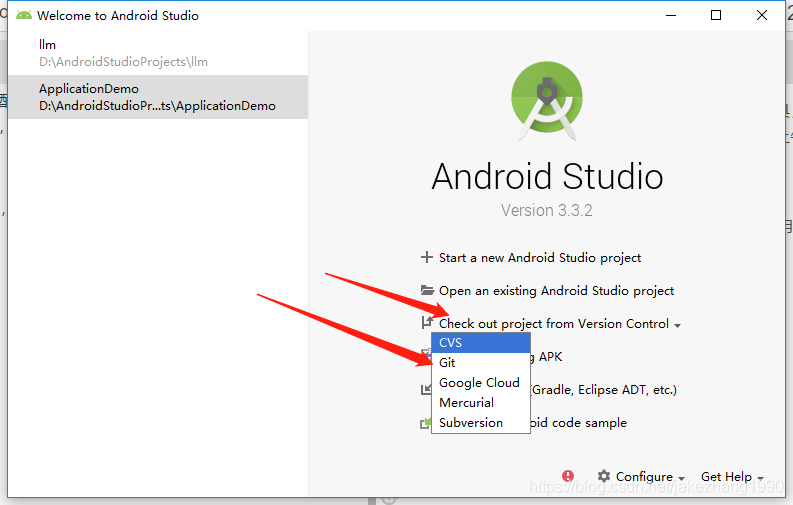
1. Check out project Form version control.

will first say that for eclipse and Androidstudio, the workspace of eclipse is equivalent to the projects of Androidstudio, and the projects of eclipse are equivalent to the modules of Androidstudio.
and the reason why I say this is because when you pull a project, you have to pay attention to project management, directory management.
2, enter. Git end of the clone address, test, and then clone.
Without further ado, look at the picture.

3. It is worth mentioning that the second step before Test or clone needs to be logged in. (There’s a pit here.)
Pit here, prompt, enter the user name and password ‘popup window pop up only once, after the Windows are recorded in the local, to be exact records manager, the document of the Windows is the first time that I lose the wrong user name password, but still record and save the Windows, so after don’t pop up the user name password input box.
The solution is simple. Just go to the Windows credentials manager and change or delete the username and password you saved before. Win + S input “credentials” will prompt “Credentials management”.
Above the

Please make sure you have the correct access rights and the repository exist.
As for both Please make sure you have the correct access rights and the repository exist this error, is actually the remote warehouse are not logged in, without permission of course, the administrator has repeatedly confirmed give you permission, but git you are here to see this mistake, is actually you don’t have a successful login to the git remote warehouse, is in the git – bash on remote warehouse operation, of course.
I also searched a lot and typed a lot of commands in Git-bash, but none of them were caused by those problems. Here I also referred to other people’s posts, respected the originality, and marked the quotation at the beginning, which I also recorded and summarized myself, hoping that it could be helpful to others.
if comparison helps, please thumb up.

python3 request module https certificate verify failed error

Wrote a small program, a simple test HTTPBasicAuthorization based REST API, the results of the program on the Windows machine error:

[SSL: CERTIFICATE_VERIFY_FAILED] certificate verify failed (_ssl.c:645)

Error reporting on Linux machines:

"bad handshake: Error([('SSL routines', 'SSL3_GET_SERVER_CERTIFICATE', 'certificate verify failed')],)"

The small procedure is as follows:

#!/bin/python

import requests
from requests.auth import HTTPBasicAuth
from pprint import pprint

my_url = 'https://192.168.12.34/nodes'

def main():
    try: 
        r = requests.get(my_url, 
                         auth=HTTPBasicAuth('username', 'passw0rd'))

        pprint(r.status_code)
        pprint(r.json())
    except Exception as ex:
        print("Exception: {ex}".format(ex=ex))


if __name__ == '__main__':
    main()

The solution, it turns out, is to add verify=False to the parameters of the GET function
The root cause is that the certificate given by the site under test is considered questionable, so verify=False is required to pass the error.
, however, is not enough, because with verify=False, a large section of warning is printed out for each connection, indicating that the connection is secure. How can you disable this message if it is secured?Add a sentence to: requests. Packages. Urllib3. Disable_warnings ()
final code is as follows:

#!/bin/python

import requests
from requests.auth import HTTPBasicAuth
from pprint import pprint

my_url = 'https://192.168.12.34/nodes'

def main():
    try: 
        requests.packages.urllib3.disable_warnings()
        r = requests.get(my_url, 
                         auth=HTTPBasicAuth('username', 'passw0rd'),
                         verify=False)

        pprint(r.status_code)
        pprint(r.json())
    except Exception as ex:
        print("Exception: {ex}".format(ex=ex))


if __name__ == '__main__':
    main()


An error was reported during PSU upgrade: OPatch failed with error code 73

Question.
When performing a patch upgrade, the following error is reported
/u01/app/oracle/grid/OPatch/ OPatch auto /soft/psu/gipsu/18706472/ -oh /u01/app/oracle/grid/ -ocmrf /u01/app/oracle/grid/ ocm/bin/ ocm.rsp

Logs:

2014-07-22 16:28:58: For /u01/app/oracle/grid, patch /soft/psu/gipsu/18706472 opatch minimum version check failed

2014-07-22 16:28:58: opatch version check failed with the following error

2014-07-22 16:28:58: Oracle Temporary Patch Installer Version 11.2.0.3.4

Copyright (c) 2012, Oracle Corporation. all rights reserved.


Oracle Home: /u01/app/ Oracle /grid

Central inventory:/u01/app/oraInventory

from: /u01/app/oracle/grid/oraInst.loc

OPatch version:11.2.0.3.4

OUI version:11.2.0.4.0

Log file location:/u01/app/oracle/grid/cfgtoollogs/opatch/opatch2014-07-22_16-28-57PM_1.log

Call the utility “checkminimumopatchversion”.

ZOP-49: prereq cannot be executed. opatch cannot tell if the patch meets the minimum version requirements.

PatchObject constructor: Input file “/soft/psu/gipsu/18706472/etc/config/actions” or “/soft/psu/gipsu/18706472/etc/config/inventory”.

” does not exist.

UtilSession failed: PatchObject constructor:Input file “/soft/psu/gipsu/18706472/etc/config/actions” or “/soft/psu/gipsu/18706472/”.

etc/config/inventory” does not exist.

OPatch failed, error code 73


2014-07-22 16:28:58: /u01/app/oracle/grid’s opatch version check status is 0

2014-07-22 16:28:58: Opatch version check for oracle home /u01/app/oracle/grid fails

2014-07-22 16:28:58: Opatch version check fails

2014-07-22 16:28:58: Update failed opatch version of home, then retry


Reason.
To patch a new version of Opatch, put the latest version of Opatch under ORACLE_HOME and GI_HOME respectively, and then use the Opatch car command.

nginx: [error] open() "/var/run/nginx/nginx.pid" failed (2: No such file or directory)

Maybe you don’t have a folder, just create it,
Or maybe it’s not running Nginx,
The first time I made an error: it did not run, so I directly executed the refresh configuration.
My second mistake:

Question:
After restarting the virtual machine, restarting Nginx will report an error: open() “/var/run/nginx/nginx.pid” failed (2: No such file or directory)
Solutions:
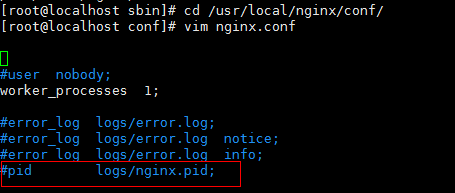
(1) Enter CD /usr/local/nginx/conf/ directory and edit the configuration file nginx.conf;
(2) Where there is a comment in the configuration file: # PID logs/nginx.pid;

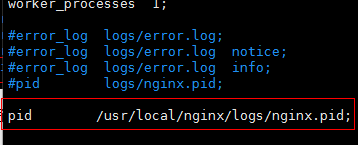
(3) the annotation, go out and amended as: pid/usr/local/nginx/logs/nginx pid;

(4) Create the logs directory under /usr/local/nginx: mkdir /usr/local/nginx/logs
(5) start nginx service:/usr/local/nginx/sbin/nginx
 

Kali linux installation guide

Carly’s guide to installing linux and avoiding potholes
1. Problem 1: The installation procedure has failed. You can try to run the failed item from the menu again, or skip it and select another item. The failed step is to install system2. grub-pc package failed to install in /target/.

1. Problem 1: The installation procedure has failed. You can try to run the failed item from the menu again, or skip it and select another item. The failed step is to install the system

Reason: Wrong partition selection.
Solution: Choose the default partition, i.e. recommend new user option.
2. grub-pc package could not be installed in /target/.

Reason: Network packet update error.
Solution: Don’t enable network update, just select no option.