Today, my colleague wrote a program to get the Window service with Sigar, and found that several services could not get out anyway.
I looked at the code and got it using OpenService, so I wrote a Demo using VC, but I still couldn’t get it.
But the error code is this 5, check MSDN is access problem.
Take a look at the permission bits obtained by Sigar, compare MSDN, Sigar USES ALL_ACCESS, but in Windows Scardspace, how to report an error.
http://www.cpp-home.com/forum/viewtopic.php?f=1& t=16325
http://social.msdn.microsoft.com/forums/en-US/vclanguage/thread/8c28faac-9056-4e72-9839-1f475079adc4
http://msdn.microsoft.com/en-us/library/windows/desktop/bb540474(v=vs.85).aspx
http://bbs.pediy.com/showthread.php?t=115649
After searching a few articles, the question was not completely solved, but fortunately we just want to get the status, not start and stop service, so we changed the source code, add a read permission bit (see MSDN), so
Even the bypass solves the problem.
Author Archives: Robins
A strange upgrade data package error problem
As we all know, in Android system, APP upgrade or OTA package upgrade, we download the completed file from the background. After the download, we will check whether the file is downloaded properly and whether there is an error in the middle by checking whether the md5 and byte size match the package hung in the background server.
if the download is normal, we will go to the upgrade process; If download error, will go to delete the wrong file, download again.
general file download data error may be due to the network outage, re-breakpoint when the continuation of the cause.
Recently encountered a very tricky question,
phenomenon described as follows: the OTA updates after the download is complete, has passed the md5 check and file byte size, confirm the identity of the package and server backstage netting, software validation is completed, will soon enter the 5 s countdown prompt the user system update, at this time in the countdown screen immediately for manual power Android devices, the Android system reboot into recovery to upgrade, you will be prompted to upgrade package data corruption error; However, if the upgrade package is downloaded and the software is verified and passed, the power will be turned off again after a while, and the upgrade will be resumed normally.
Opening update package...
I:read key e=3 hash=20
I:1 key(s) loaded from /res/keys
Verifying update package...
E:footer is wrong
I:verify_file returned 1
E:signature verification failed
Installation aborted.
After communicating with colleagues who are maintaining Recovery, they said that this situation is usually caused by corrupted data of the downloaded upgrade package, or the file to be upgraded is not the upgrade package, which leads to Footer is wrong.
When checking this problem, the log found that both MD5 and file size verification of OTA upgrade package downloaded were correct. How could the packet be abnormal when upgrading after fast power failure?
but when the recovery report data is damaged, the data size of the upgrade package is indeed several M smaller than that of the complete upgrade package in the background. Moreover, the faster the power failure is after verification, the larger the difference between the upgrade package and the complete upgrade package will be in the next upgrade. If the power failure is slower, the difference will be smaller.
1. The upgrade package was not downloaded before power failure;
2. The download was completed before power off, and the packet was read and written again before power on and upgrade, resulting in data error.
immediately after the download of the upgrade package, the permission of the upgrade package is changed to ro read-only to see if the upgrade can be successful.
can be successfully upgraded, indicating that the upgrade package has been downloaded before the power failure is confirmed. Otherwise, it is concluded that the upgrade package data has not been downloaded.
download upgrade package after completion, upgrade package directory through ls-l command to see the file size is right, originally wanted to manually upgrade package permission chmod 400 *.zip, but found that the file operation is not, more weird;
power off, power on and upgrade through the upgrade package directory to see that there is still a few M missing.
can’t change the upgrade package property to read only.
How possible, clearly a file has been downloaded, and checked, boot after you said that the file is damaged, faint ~
After communication with colleagues, hold on, there is another possibility, even though the download is complete, although it’s been md5 checksum, although also match the file size, but through the command to read or software calibration data is not completely synchronized to the flash, because the data loss is related to the speed of power, haha ~
thought of this, the feeling is probably like this.
experiment immediately, before power off, manually execute sync command, found that the packet is normal after startup,
and sync action after completion, chmod 400 *.zip changed to read-only action can also be executed, it seems that the system did not fully synchronize the data to flash, at this time we are not allowed to change the file permissions.
experiments, found that all normal. I’m so excited
Finally, the software added protection for this situation,
after the file verification was completed, added the action of sync, which fixed this weird problem.
Solve github :error: failed to push some refs to problem

**
The error code is reported as follows
* *
To [email protected]:Fu4ng/Cpp.git
 ! [rejected]        master -> master (non-fast-forward)
error: failed to push some refs to '[email protected]:Fu4ng/Cpp.git'
hint: Updates were rejected because the tip of your current branch is behind
hint: its remote counterpart. Integrate the remote changes (e.g.
hint: 'git pull ...') before pushing again.
hint: See the 'Note about fast-forwards' in 'git push --help' for details.
The solution
The problem arises because you do not have a READme.md file in your local library
The solution is also simple
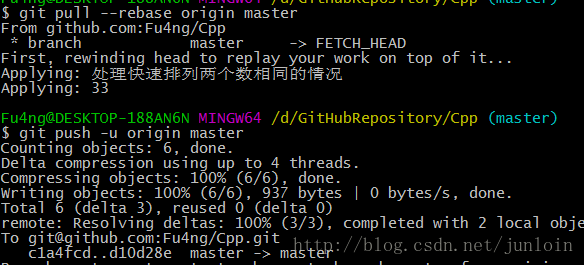
enter git pull --rebase origin master
to pull down the MD file on github.
You can successfully upload your code by typing in the Git push-u Origin Master.
The route addition failed: Either the interface index is wrong or the gateway do es not lie on the s
The clinical environment is as follows:
VPN server network segment :192.168.1.0/24
Client internal network segment :192.168.2.0/24
VPN server IP 10.0.10.0
VPN client IP 10.0.10.1
Xp system connection VPN add route times error
The route addition failed: Either the interface index is wrong or the gateway do es not lie on the same network as the interface. Check the IP Address Table for the machine.
Add the command: Route Add 192.168.1.0 Mask 255.255.255.0 10.0.10.0
The client does not have this problem with Windows 7
Search the Internet for a long time to get the most meaningful words are :XP system is not supported and so on
Think xp is really out of date
Accidentally checking the routing table of the client system found that XP is different from Win7 (VPN link)
Xp: 192.168.1.0 255.255.255.0 10.0.1.1 10.0.1.1 1
Windows 7 is: 192.168.1.0 255.255.255.0 10.0.1.0 10.0.1.1 11
I don’t know why, but it will solve my temporary problem
Change the command to Route Add 192.168.1.1 Mask 255.255.255.0 10.0.10.0
Windows 7 was ok in my test though not perfect
Of course, a more rigorous word is to judge the system before choosing different commands
I hope I can help those in need
VPN server network segment :192.168.1.0/24
Client internal network segment :192.168.2.0/24
VPN server IP 10.0.10.0
VPN client IP 10.0.10.1
Xp system connection VPN add route times error
The route addition failed: Either the interface index is wrong or the gateway do es not lie on the same network as the interface. Check the IP Address Table for the machine.
Add the command: Route Add 192.168.1.0 Mask 255.255.255.0 10.0.10.0
The client does not have this problem with Windows 7
Search the Internet for a long time to get the most meaningful words are :XP system is not supported and so on
Think xp is really out of date
Accidentally checking the routing table of the client system found that XP is different from Win7 (VPN link)
Xp: 192.168.1.0 255.255.255.0 10.0.1.1 10.0.1.1 1
Windows 7 is: 192.168.1.0 255.255.255.0 10.0.1.0 10.0.1.1 11
I don’t know why, but it will solve my temporary problem
Change the command to Route Add 192.168.1.1 Mask 255.255.255.0 10.0.10.0
Windows 7 was ok in my test though not perfect
Of course, a more rigorous word is to judge the system before choosing different commands
I hope I can help those in need
VMware uninstall installation problem (The MSI Failed)
VMware uninstall installation problem (The MSI Failed)
Reference: https://coderwall.com/p/zbbtga/fixed-vmware-installation-problem-the-msi-failed
The problem
VMware is not clean when uninstalling. The MSI Failed and The new VMware cannot be installed.
To solve
Step 1
Disable vmware-related processes. Then go to %TEMP% directory (” win+R “enter %TEMP%, usually C:\Users\(username)\AppData\Local\ TEMP ) and delete all VMware files.
Restart the computer.
Step 2
Go to CMD, type runas /user: username CMD go to the administrator, and then CD to the directory of the old VMware installation file.
Run vmware-workstation -***. Exe /x /v EULAS_AGREED=1 to reinstall/uninstall the old version. /v EULAS_AGREED=1 enabled license)
All right.
AH01075: Error dispatching request to
AH01075: Error scheduling request to
[proxy_fcgi:error] [pid 10550:tid 139819984324352] [client 108.162.215.94:42834] AH01067: Failed to read FastCGI header
[proxy_fcgi:error] [pid 10550:tid 139819984324352] (104)Connection reset by peer: [client 108.162.215.94:42834] AH01075: Error dispatching request to :
[proxy_fcgi:error] [pid 10761:tid 139819883611904] [client 108.162.215.110:43318] AH01067: Failed to read FastCGI header
[proxy_fcgi:error] [pid 10761:tid 139819883611904] (104)Connection reset by peer: [client 108.162.215.110:43318] AH01075: Error dispatching request to :
[proxy_fcgi:error] [pid 20213:tid 139819975931648] [client 172.69.35.77:20770] AH01067: Failed to read FastCGI header
[proxy_fcgi:error] [pid 20213:tid 139819975931648] (104)Connection reset by peer: [client 172.69.35.77:20770] AH01075: Error dispatching request to :
[proxy_fcgi:error] [pid 10550:tid 139819875219200] [client 172.69.35.77:20664] AH01067: Failed to read FastCGI header
[proxy_fcgi:error] [pid 10550:tid 139819875219200] (104)Connection reset by peer: [client 172.69.35.77:20664] AH01075: Error dispatching request to :
I ran into the same problem, originally Apache had a module for handling timeouts called mod_reqTIMEOUT
The default value (which you won’t see in the default HTTp.conf) is:
RequestReadTimeout handshake=0 header=20-40,MinRate=500 body=20,MinRate=500In my case, I uploaded the file through a pure HTML form submission, so the file is technically part of the title, and the default configuration to display the title will time out between 20 and 40 seconds. 20-40 is cool because it will time out after 20 seconds, but if it sends 500 bytes in a second, it will increase the wait time by another second until it reaches 40 seconds, and then timeout anyway.
I uploaded a larger file on the site, so I added the following line to the httpd.conf file:
RequestReadTimeout handshake=0 header=20-600,MinRate=500 body=20,MinRate=500Therefore, as long as my user is sending data at a rate of at least 500 bytes/second, the request will not time out until the maximum is reached. Reach 600 seconds (better read the documentation, don’t quote me on throughput)
It’s actually a very cool Apache module, but it’s not super well known, because people suggest changing other Apache timeouts in other, similar, “Specified timeout expired:” Settings. The problem is related to PHP-FPM, but any post that costs more than 40 will have this problem in the number of seconds it is committed by default in Apache.
---------------------------------------------------------------------------------------------------
Your PHP code seems to have a longer timeout than configured. When Apache USES fCGI to load a PHP page, it sends the request to the PHP-FPM service for processing. If PHP-FPM takes a long time to respond, you will see this type of timeout. The possible reason is that your PHP code may be stuck in a loop or waiting for a response from a database that takes an extremely long time.
To troubleshoot, I’ll use the PHP version of the CLI to see if the script is finished in a reasonable amount of time ($time PHP /path/to/file.php). The PHp-fPM log may contain additional information (default: /var/log/php-fpm.log).
————————————————————————————————————————————————–
I have encountered the same problem, and as far as I am concerned, this solution works:
Add request_terminate_timeout I /etc/php-fpm.d/www.conf file.
Note: This option overrides the PHP max_execution_time INI option and setting a low value for it can cause you a lot of trouble, as it overrides other options and forces the request to terminate when the timeout expires. (If you ask which value to set; It should be based on the maximum script processing time you need, but typically 600s (10 minutes) or 10m (10 minutes) is much more.
—————————————————————————————————————————————————–
-----

Apache 2.4.10
Ubuntu 14.04
PHP5-FPM: 5.5.9

-----

<IfModule mod_proxy.c>

  ProxyTimeout 900

  <Proxy fcgi://127.0.0.1:9000>
    ProxySet connectiontimeout=5 timeout=900 retry=3
  </Proxy>

</IfModule>

--

<VirtualHost *:443>

  ...

  ProxyPassMatch ^/(.*\.php(/.*)?)$ fcgi://127.0.0.1:9000/var/www/test/$1
  DirectoryIndex /index.php

</Virtualhost>
Condition judgment and error handling in ansible playbook (fail module failed_when changed_when keyword)
I. Fail module
When writing a shell script, there are may have such demand, when the script to a certain stage, it is necessary to determine a condition, if the condition is established, then immediately stop scripts run, implement this requirement in a shell script is very simple, need only in conditions can call “exit” command to terminate the script when running, so when writing the playbook, if have similar requirements, what should we do?
In order to interrupt the execution of the playBook as we wish, it is also very simple. We only need one module to do this, and this module is the “Fail” module.
We know that when executing playBook, if any of the tasks in PlayBook fail, PlayBook will stop running unless the task is set “ignore_errors: true”. In the task, “ignore_errors: In the case of “true”, the playbook will terminate automatically after the failure of the task execution, while the Fail module is inherently a module for” failed execution “. When the Fail module executes, the Playbook will consider that a task has failed, so as to terminate the operation and achieve the interrupt effect we want. Let’s take a look at a small example:
[root@server4 ~]# vim block8.yml
[root@server4 ~]# cat block8.yml
---
- hosts: testB
  remote_user: root
  tasks:
  - debug:
      msg: "1"
  - debug:
      msg: "2"
  - fail:
  - debug:
      msg: "3"
  - debug:
      msg: "4"
, as shown in the example above cases on the playbook altogether four debug task, after the second debug task, we call the fail module, then let us have a run on the playbook, execute the following after the output information
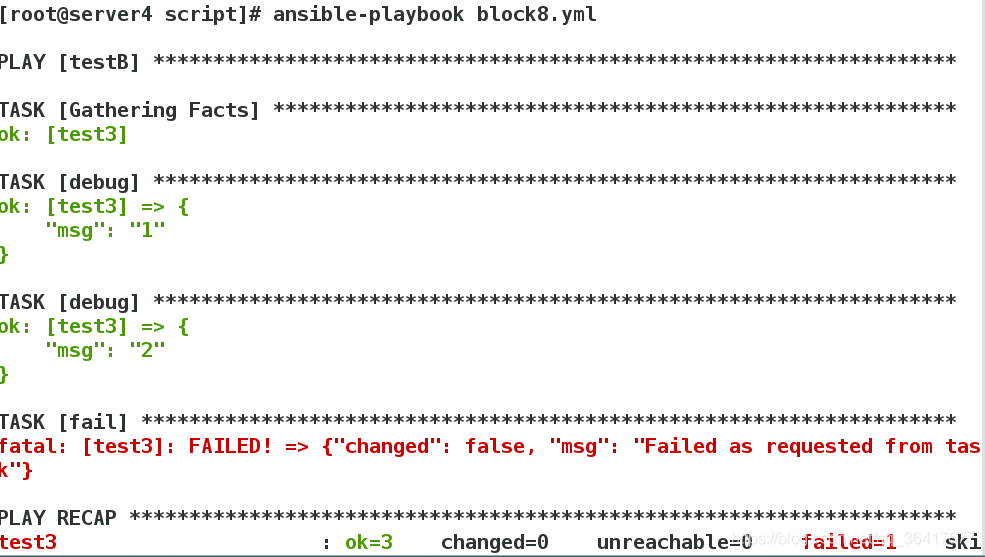
can be seen from the above, the current two debug module and output the corresponding information, the playbook is announced, after the debug module has not been called, has realized the interrupt script running effect, when performing the fail module, The default output of the FAIL module is’ Failed as requested from Task ‘, and we can customize the error message through the MSG parameter of the FAIL module, as shown below
[root@server4 ~]# vim block9.yml
[root@server4 ~]# cat block5.yml
---
- hosts: testB
  remote_user: root
  tasks:
  - debug:
      msg: "1"
  - fail:
      msg: "Interrupt running playbook"
  - debug:
      msg: "2"
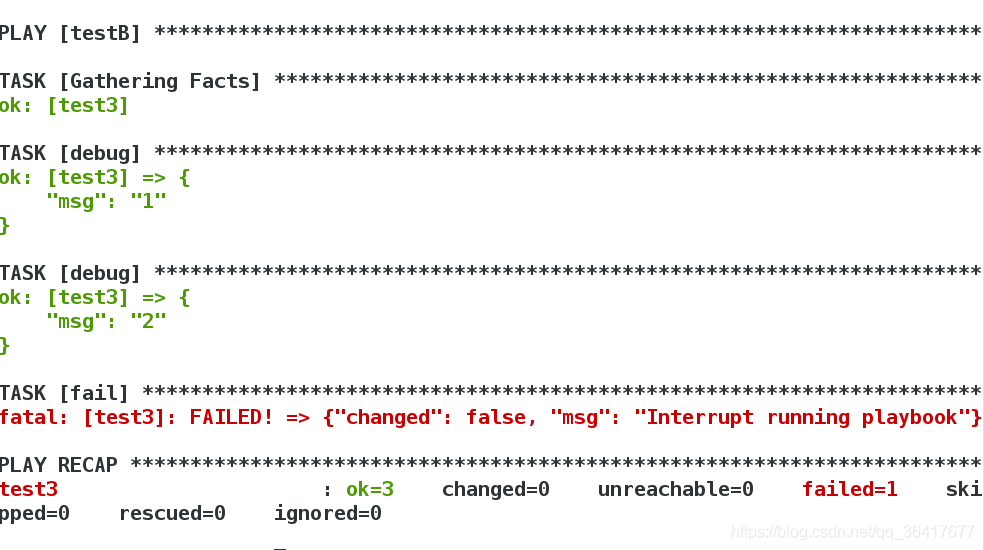
of course, the sample is only for the use of the preliminary introduction to fail the module, we usually don’t want to interrupt the playbook for no reason, often need to determine certain conditions, if the condition is met, then interrupt the script, so usually fail module combined with the when using, for example, if before the module after the execution of the standard output information contain the string “error”, argues that interrupts the script was established, the condition of fail immediately call module, in order to end the playbook, the sample is as follows:
[root@server4 ~]# vim fail1.yml
[root@server4 ~]# cat fail1.yml
---
- hosts: testB
  remote_user: root
  tasks:
  - shell: echo '---error'
    register: return_value
  - fail:
      msg: 'running fail'
    when: "'error' in return_value.stdout"
  - debug:
      msg: 'I never execute, Because the playbook has stopped'
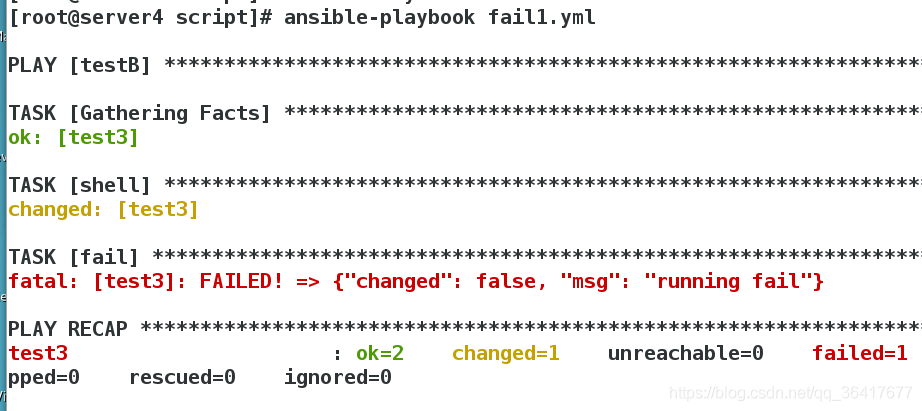
in the above example, we use the shell output module deliberately a contains’ error ‘string of text, and the shell after module performs the return value of the register to the variable’ return_value ‘, in the later call fail module, and the fail module adds the judgment condition, the corresponding conditions for “. “error” in return_value stdout “, said the conditions shell module after the execution of tagging output information if the string contains “error”, Condition was established, among them, the ‘in’ use of key words and the use of the python ‘in’ is the same, you can use the ‘in’ keyword to judge whether there is a string in another string, can also be used to determine whether a particular value exists in the list, because the shell standard output information does contain the error string, so the fail module corresponding conditions was established, the final call fail module, the playbook terminates.
Note, however, that when using “in” or “not in” for conditional judgments, the entire condition needs to be enclosed in quotation marks, and the string to be judged needs to be enclosed in quotation marks, so the following syntax is correct when using “in” or “not in” for conditional judgments:
when: ' "successful" not in return_value.stdout '
when: " 'successful' not in return_value.stdout "
The failed_when keyword
‘failed_when ‘is used to set the execution status of the corresponding task to failure when the corresponding condition is true. This may not be easy to understand. Let’s start with a small example.
[root@server4 ~]# vim fail2.yml
[root@server4 ~]# cat fail2.yml
---
- hosts: testB
  remote_user: root
  tasks:
  - debug:
      msg: "I execute normally"
  - shell: "echo 'This is a string for testing error'"
    register: return_value
    failed_when: ' "error" in return_value.stdout'
  - debug:
      msg: "I never execute,Because the playbook has stopped"
In the above example, there are three tasks. The first task outputs “I execute NORMALLY” through the debug module, and the second task calls the shell module, echoing the sentence ‘This is a string for testing error’, and registers the return value into the variable ‘return_value’. The keyword ‘failed_when’ is aligned with the shell keyword, indicating that the corresponding condition is for the shell module. ‘failed_when’ corresponding conditions is’ “error” in return_value stdout, ‘says “error” string if exists in shell module after the execution of the standard output, the established conditions, when the condition after the establishment, execution of the shell module status will be set to fail, due to shell module execution status is set to fail, so the device will stop running, so the final debug module will not be implemented, so, also carried on the playbook, The effects are as follows:
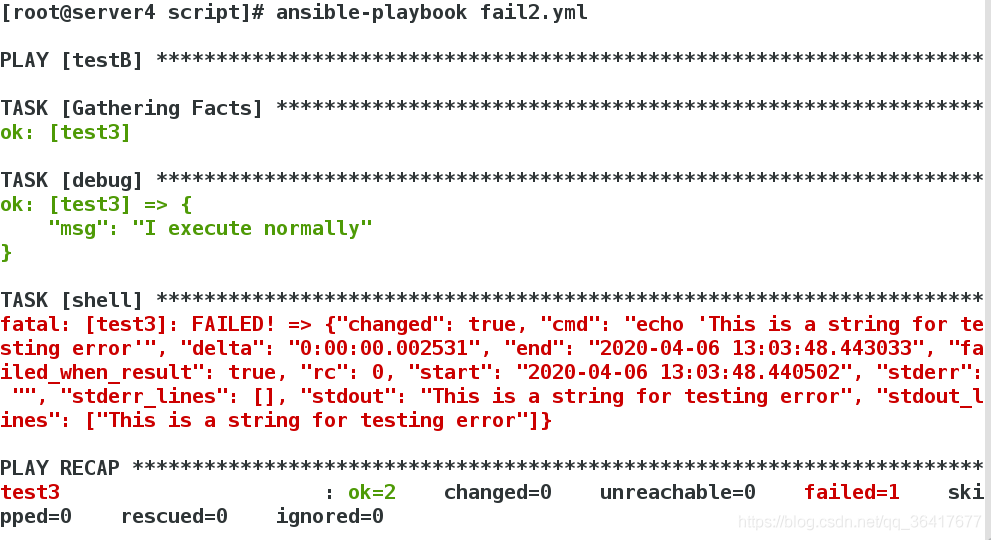
failed_when ‘role is, when the’ failed_when ‘keyword matching conditions,’ failed_when ‘will set the corresponding task execution status, for failure to stop the operation of the playbook, but need to be aware of,’ failed_when ‘although task execution status will be set to fail, but does not represent the task really failed, as the above example, in the case of shell module is carried out completely normal, just after the execution, ‘failed_when’ set the execution state of the shell module to failure. Therefore, ‘failed_when’ does not affect the execution process of the shell module, but only affects the final execution state of the shell module when the condition is established in order to stop the running of playbook.
3. The changed_when keyword
The ‘failed_when’ keyword is used to set the execution status of the corresponding task to failure if the condition is true
The ‘changed_when’ keyword is used to set the execution state of the corresponding task to changed when the condition is true
Let’s look directly at a small example:
[root@server4 ~]# vim changed.yml
[root@server4 ~]# cat changed.yml
---
- hosts: testB
  remote_user: root
  tasks:
  - debug:
      msg: "test message"
    changed_when: 2 > 1
We know that the debug module can only be in the “OK” state for normal execution. In the above example, we use the ‘changed_when’ keyword to define the post-execution state of the debug module as “changed”. You can try to execute the playBook as shown in the above example.
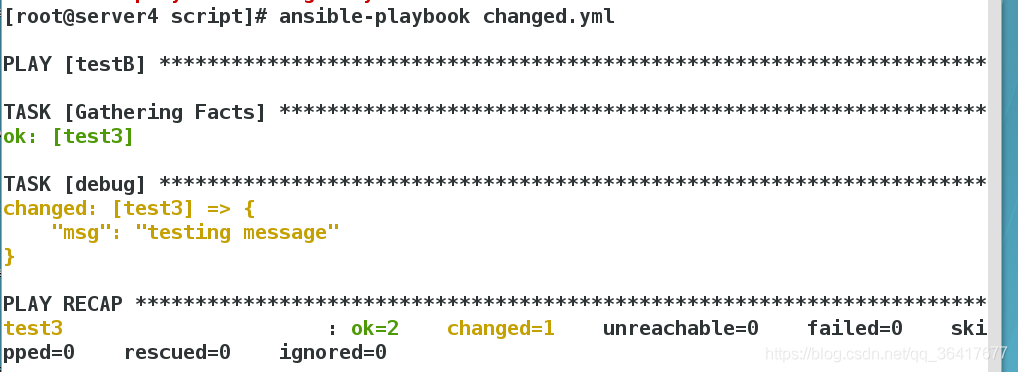
this paper summed up the use of the handlers before, we know that only a task made actual operation (after the execution status is changed), will truly the execution of the corresponding handlers, and in some cases, if you want to after the tasks performed by the return value of the task to determine the final execution status of changed, you can use ‘changed_when’ keywords, so that, when conditions can perform the corresponding handlers, in fact, In addition to being able to set the execution state of a task to “changed” if the condition is true, ‘changed_when ‘also enables the corresponding task to never be changed. Here’s an example:
[root@server4 ~]# vim changed2.yml
[root@server4 ~]# cat changed2.yml
---
- hosts: testB
  remote_user: root
  tasks:
  - shell: "ls /opt"
    changed_when: false
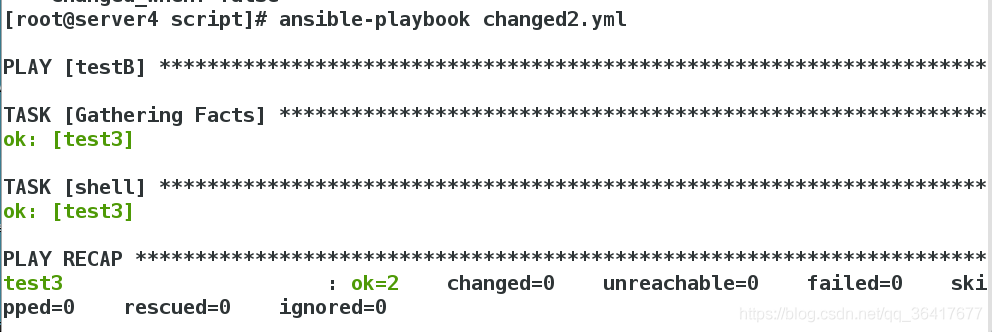
plus changed_when: false keyword:
can see that changed_when: false keyword can make the corresponding task never be changed state.
To the brothers who encountered simple bind failed 192.168.1.×××: 636
Last time I wrote an article about changing passwords for LDAP users (mainly referring to the other two articles), I noticed a strange phenomenon. The AD server I developed and used is three in one with my own WEB server and certificate server. The password can be successfully changed as described above. The program was packaged into a WAR package and tested on the servers on the 6th floor, 15th floor and 16th floor. They both used a single AD, WEB server and certificate server in one. Both the 6th and 15th floors could normally change the user password of the CONNECTED AD, but the 16th floor did not work. The IP:636 error of simple Bind failed AD was reported all the time, which depressed me very much. Had to search on the net, in the middle because of other task intermittent for a period of time, looked for a few weeks on and off, there is no enable SSL, there is said to be “do not support SSL”, there is said to be your simple binding error (this is nonsense), is not a definite answer. Join several communication groups of LDAP, waffled for a long time, also no solution. During this period, the AD configured by the WEB application on the 15th floor was replaced by another one, but this error also occurred. I found another machine to configure again, but the same error occurred. Xj installed WIN2003 machine, let me test, the same mistake, original WEB applications can be installed on your machine normal change passwords, then even sometimes can’t change, can change sometimes, fifteenth floor originally that one cannot change the password, suddenly can change the password again yesterday afternoon, I asked others, making sure that no one is changed AD or WEB set, same application, the same configuration, perform the same function, can downs about it, that day is my most depressing day. This morning on a sudden impulse, the certificate again guided, the result changed the password successfully. Steps (omit the installation of the certificate service, see the previous section) : 1. Select “Start -& GT; “Run”, enter MMC, enter the console, select “Add Certificate Management Unit” menu item, as before, select “Personal -& GT; After “Certificates”, select the certificate you previously created in the Certificate Services section, and then “All Tasks -& GT; Export “, re-export to a new CER file, and then “start-run-& gt; CMD “into the console, use the CD command to switch to the WEB application under JDK bin directory, enter the command:” the keytool – import – keystore certificate. The keystore file – cer file path “, and to import a new certificate, when we enter the JDK bin directory to be able to see your new name the name extension keystore file, and then set the change password when the certificate path of change to just generate the certificate file path. After restarting the server, test the password change function again, and you’re done. Then I followed suit and did the same on the 14 machine, and the 14 machine was able to change the password successfully. Is too great. I don’t know if this is the exact solution to the simple Bind failure (or did it just happen to cause me to change a setting on my system?). But if any of your brothers have the same problem, try reimporting the certificate and you might be able to fix the problem.
Python uses requests to request and reports SSL: CERTIFICATE_VERIFY_FAILED error
Requests module has been normal, before one day began to HTTPS requests the thrown error:
requests. Exceptions. SSLError: [1] Errno _ssl. C: 504: error: 14090086: SSL routines: SSL3_GET_SERVER_CERTIFICATE: certificate verify failed
At first, I thought the agent was unstable and restarting the agent was invalid, then I restarted the machine and it was invalid. Code problems?It is ok to copy the error code to another machine, or to report the certificate error if the code running normally on another machine is copied to the error machine. Just try the requests. Get requests FOR HTTP.
All sorts of solutions have been tried in vain. Search the Internet for answers. I found two solutions: the first One I used. The second one is also backed up.
The first solution:
What is SSL validation?
SSL certificates are SSL protocol compliant, issued by a trusted digital certificate authority (CA) after server authentication, with server authentication and data transmission encryption.
SSL routines:SSL3_GET_SERVER_CERTIFICATE:certificate verify failed
add a new feature in python 2.7 that will validate the SSL certificate when urlopen requests it, or make an error if it is a self-signed SSL certificate.
Python request SSL error
has a verify parameter in both the request-post and request-get methods. Set the verify parameter to FALSE.
r = requests. Get (“xxx.com”, headers=request_headers, verify=False)
print r.tent
The second solution:
Try:
requests. Exceptions. SSLError: [1] Errno _ssl. C: 504: error: 14090086: SSL routines: SSL3_GET_SERVER_CERTIFICATE: certificate verify failed
At first, I thought the agent was unstable and restarting the agent was invalid, then I restarted the machine and it was invalid. Code problems?It is ok to copy the error code to another machine, or to report the certificate error if the code running normally on another machine is copied to the error machine. Just try the requests. Get requests FOR HTTP.
All sorts of solutions have been tried in vain. Search the Internet for answers. I found two solutions: the first One I used. The second one is also backed up.
The first solution:
What is SSL validation?
SSL certificates are SSL protocol compliant, issued by a trusted digital certificate authority (CA) after server authentication, with server authentication and data transmission encryption.
SSL routines:SSL3_GET_SERVER_CERTIFICATE:certificate verify failed
add a new feature in python 2.7 that will validate the SSL certificate when urlopen requests it, or make an error if it is a self-signed SSL certificate.
Python request SSL error
has a verify parameter in both the request-post and request-get methods. Set the verify parameter to FALSE.
r = requests. Get (“xxx.com”, headers=request_headers, verify=False)
print r.tent
The second solution:
Try:
sudo apt-get install ca-certificates
sudo update-ca-certificates
No effect,
finally tried the following one that worked:
sudo pip uninstall -y certifi
sudo pip install certifi==2015.04.28
Of course, there are caveats:
/usr/local/lib/python2.7/dist-packages/requests/packages/urllib3/util/ssl_.py:79: InsecurePlatformWarning: A true SSLContext object is not available. This prevents urllib3 from configuring SSL appropriately and may cause certain SSL connections to fail. For more information, see https://urllib3.readthedocs.org/en/latest/security.html#insecureplatformwarning.
  InsecurePlatformWarning
No, at least we can use it for now. The reason for this is estimated to be that the Later version (2016.2.8) CertiFI is more certifying.
Prompt “The MSI failed” solution when uninstalling VMware
After installing The compact version of VM and then installing other versions of VM, or when you want to upgrade and install a higher version, it cannot be uninstalled normally (such as prompt The MSI failed), you can refer to The following method to solve The problem. (Registry values, files, devices, etc. mentioned in this article are ignored if they do not exist in the system.)
Manual unloading:
Manual unloading:
clear the registry manually
start → run →regedit
click hkey-local-machine→software→ find the VMware file and right click to delete it.
(go to [HKEY_LOCAL_MACHINE\Software\VMware,inc] and delete the whole VMware,inc.)
operating on the registry may cause the system to fail to start properly. Please backup the registry before modifying it
1. Log in to the local computer as an administrator
2. Stop the following services
VMware Authentication Service
VMware Registration Service
VMware DHCP Service
VMware NAT Service
3. Uninstall VMware network bridge
to start & gt; Set up & gt; Network connection & GT; Right click on any network adapter & GT; attribute
select VMware Bridge Protocol and uninstall it
4. Uninstall VMware installed devices
computer management > Device Manager & GT; Check & gt; Shows hidden devices
double-click the non-plug and play driver and delete as follows
hcmon
VMware Network Application Interface
VMparport
vmx86
VMware Bridge Protocol
double-click the network adapter
uninstall a network device that contains the word VMware
5. Run VMware_Install_Cleaner. Exe (you can download it here
http://download.csdn.net/detail/xxdddail/6265655)
The default installation location is C:\Program Files\VMware. The specific location depends on the location you set when installing the software. Note: if your virtual system is also in this directory, please save the virtual system Files before deleting
7. Delete Application information folder in C:\Documents and Settings\All Users\Application Data\VMware\.
8. Delete VMware program group folder, default location is C:\Documents and Settings\All Users\Start Menu\Programs\VMware\.
9. Delete the shortcut icon for the desktop
10. Delete the following files in the system folder (note :XP system to replace “WINNT” in the path with “Windows”)
% SystemDrive % \ WINNT \ system32 \ vmnat exe
% SystemDrive % \ WINNT \ system32 \ vmnetbridge exe
% SystemDrive % \ WINNT \ system32 \ vmnetdhcp. Conf
% SystemDrive % \ WINNT \ system32 \ VMNetDHCP exe
% SystemDrive % \ WINNT \ system32 \ vmnetdhcp leases
% SystemDrive % \ WINNT \ system32 \ vmnetnat. Conf
% SystemDrive % \ WINNT \ system32 \ vmxw2ksetup DLL
% SystemDrive % \ WINNT \ system32 \ vnetprobe exe
% SystemDrive % \ WINNT \ system32 \ vnetprobelib DLL
% SystemDrive % \ WINNT \ system32 \ vnetinst DLL
% SystemDrive % \ WINNT \ system32 \ vnetlib DLL
% SystemDrive % \ WINNT \ system32 \ vnetlib exe
% SystemDrive % \ WINNT \ system32 \ drivers \ vmnet sys
% SystemDrive % \ WINNT \ system32 \ drivers \ vmnetx sys
% SystemDrive % \ WINNT \ system32 \ drivers \ VMparport sys
% SystemDrive % \ WINNT \ system32 \ drivers \ vmx86 sys
% SystemDrive % \ WINNT \ system32 \ drivers \ vmnetadapter sys
% SystemDrive % \ WINNT \ system32 \ drivers \ vmnetbridge sys
% SystemDrive % \ WINNT \ system32 \ drivers \ vmnetuserif sys
% SystemDrive % \ WINNT \ system32 \ drivers \ hcmon sys
% SystemDrive % \ WINNT \ system32 \ drivers \ vmusb sys
Delete the user groups of vmware_user__ and vmware__ __ user groups in the local user group management
12. Restart the computer
After the above operation, if the new version of VM(such as VM10) cannot be uninstalled normally, please install the original version of VM(such as VM9.0.2), and then install and uninstall. This is how I successfully installed VM10.0.
It is also possible to have uninstallable problems when installing more advanced versions of a VM with a compact version, and you can refer to this method to resolve the problem.
An I/O operation initiated by the Registry failed unrecoverably
The WIN2003 server reported an error with the following error message: An I/O operation initiated by the Registry failed unrecoverably. The Registry could not read in, or write out, or flush, one of the files that contain the system’s image of the Registry. Registry failure caused by an I/O operation. The registry, which contains the system image of the registry, will not be able to read, write, or refresh. In cases like this, it is generally necessary to restart the system with and restore the system configuration information with an emergency repair disk. However, there is no remote desktop to connect and restart (plus the console parameter is also not available). There is also no restart with serverView hardware monitoring software, so you can’t go to the IDC room of century Internet. The shutdown – I command suddenly occurred to me. Ping first, it looks normal, then add the REMOTE host’S IP using shutdown – I, and reboot successfully.

How to Fix SSL_connect returned=1 errno=0 state=SSLv3 read server certificate B: certificate verify failed.
Download the cacert. Pem </ code> file
http://download.csdn.net/download/u011534057/9847571
Create folder,C:\RailsInstaller
Save to
C:\RailsInstaller\cacert.pem.
Type in the command line CMD or Ruby prompt, and jekyll s will be fine
set SSL_CERT_FILE=C:\RailsInstaller\cacert.pem