Tag Archives: visual studio

Exception from HRESULT: 0x80041FE2

Installation vs community version, new project appears:

Exception from HRESULT: 0x80041FE2

Reasons for the problem:
when installing, the Linux related environment was selected. When creating the project, the visual c + + project was created, because these components were not installed, an error was reported
Creating Linux related projects will not.

.NETproject compilation error. Type or namespace name could not be found. Visual studio automatically introduces dependency package (shortcut key)

Intro

Using visual studio to compile a. Net MVC project, many errors are reported in the following form:

CS0246	The type or namespace name 'xxx' could not be found (are you missing a using directive or an assembly reference?)
CS0246	Typ- oder Namespace-Name "xxx" nicht gefunden (fehlender Verwendungshinweis oder Assembly-Referenz?)

Screenshot:

Similar to in Java, if you directly use some class definitions without importing related packages, a similar error will be reported.

CS 0246 official document of error code: compiler error cs0246 | Microsoft docs

solve

In the above screenshot, the solution has been given:

is actually to add the correct class path using XXX .

However, in different versions of visual studio, does not introduce the same shortcut keys in the namespace where the class is located.

There are three ways to try:

Alt+Enter
Ctrl+.
Shift+Alt+F10

Of course, if you don’t know the shortcut key, but you know the full path (namespace, classname) of the class you are using, you should add using XXX at the beginning of the source code is OK.

Vs (Visual Studio) encountered a solution that could not open iostream

Recently, when configuring some projects, I couldn’t even open the iostream header file

Finally, we try to reset vs C + +, and successfully solve the problem.

My version is vs2013 in the following way

Tools -> Import and Export -> Reset all -> ..

Tools → import and export settings → reset all settings → next →

Select “save the current settings (I chose to reset directly)”,

Next → select “development language to reset (for example, Visual C + + development settings)” → finish

My CSDN first blog actually wrote this..

A first chance exception of type ‘ System.NullReferenceException ‘when occurred, you did encounter a bug

Maybe when you debug the program in Viusal studio, you find that output windows prints out a line of information about a first chance exception of type ‘ System.NullReferenceException ‘occurred, you may have wondered what is the first chance exception, Does this sentence mean that there is something wrong with my code?But if there is a problem, why does my program not throw any exception but display such a message in output windows?If I don’t look at the output window, I may not find this message at all.


Let’s talk about the first chance exception. When you are debugging a program in VS, when there is a problem with the program, it is the debugger (which can also be understood as vs itself) who first catches the exception. At this time, vs has to decide how to solve the problem.


    is to stop now, throw out the problem, pop up a dialog box, tell the user that there is a problem in your program, and let the user decide whether to continue or stop.


    leave it alone. If the user has a try catch, let the user’s own code process it. If there is no try catch, let the runtime capture it and then let the runtime process it. But when debugging, it is still vs to capture again.


So what does vs rely on to decide how to deal with it?Under debug settings, if CLR exception is checked, vs will catch an exception. It will not only print a message in output windows, but also pop up a dialog box to notify the user.


If there is no check here, then vs does nothing, just like there is no such thing.

For example, like the following code,

If vs catches and throws, the program stops at line 36 and notifies the user. If vs lets it go, the program jumps to line 39 and continues to execute the processing logic of the code.

Two concepts need to be understood. When C # programs are really running, it is runtime. As the top manager, exception will be thrown here. When debugging in VS, VS Runtime is the top manager, exception will throw it here, so that VS can notify users through the form of dialog box. First chance exception will inform the user through the pop-up box. If the user selects continue, the program can continue to run. However, if the code does not have a corresponding capture mechanism to deal with it, it is thrown to vs runtime again and captured, then it is called second chance exception. At this time, a dialog box will pop up again, but this time, the code will not continue to run.

Moreover, it should be noted that if we do not check the above option, vs will throw an exception dialog box on line 39 when calling the program.

But if we check it, we will throw an exception dialog box where the 52 line exception actually occurs.

Some people will ask if I should check it?If your project references a heavyweight tool like NHibernate, the DLL itself is likely to throw exceptions in many places, but the DLL itself has try If you check “catch”, vs will capture the catch code block before it is processed, and then inform the user. There will be a lot of such cases. As a result, the user will point to a lot of continue dialog boxes. Don’t check it at this time.

Reference link:

https://blogs.msdn.microsoft.com/davidklinems/2005/07/12/what-is-a-first-chance-exception/

http://dzimchuk.net/post/when-a-first-chance-exception-of-type-xxx-occurred-you-really-have-a-bug

error C1189: #error : Please use the /MD switch for _ Afxdll builds — solutions

The general method found on the Internet is to change “property page – & gt; configuration property – & gt; C/C + + – & gt; code generation – & gt; runtime” from “multi thread (/ MT)” to “multi thread DLL (/ MD)”.
MT is a static compilation option, while MD is a dynamic compilation option. What if you want to compile statically?

In fact, while setting “runtime” to MT, you can change “property page – & gt; configuration property – & gt; general – & gt; use of MFC” to “use MFC in static library”
.
IntelliSense: error instruction: please use the/MD switch for_ Afxdll builds – Solutions – ordinarydilligent – Zhang Sir’s blog

IntelliSense: error instruction: please use the/MD switch for_ Afxdll builds – Solutions – ordinarydilligent – Zhang Sir’s blog

Similarly, if you want to compile dynamically, for:
error 1, error C1189: # error: building MFC application with/MD [D] (CRT DLL version) requires MFC shared DLL version. Please define_ AFXDLL or do not use /MD[d]

You need to set “property page – & gt; configuration property – & gt; general – & gt; use of MFC” to “use MFC in shared DLL”, and set “property page – & gt; configuration property – & gt; C/C + + – & gt; code generation – & gt; runtime” to “multithreaded DLL (/ MD)”

Supplement: (/ MD) and (/ MT) are used to compile release version, (/ MDD) and (/ MTD) are used to compile debug version

Vs2015 failed to compile problem 1

MSB4036 “SetEnvironmentVariable” not found
Error reason: stylistic Microsoft. CodeAnalysis. The Targets to make mistakes
Solution: Replace this file in the path: C:\Program Files (x86)\MSBuild\Microsoft\VisualStudio\v14.0\CodeAnalysis
The original blogger and file link: https://blog.csdn.net/u014411348/article/details/103487246

Vs2013 + glfw + glew configure OpenGL development environment

Transfer: http://blog.csdn.net/u011926277/article/details/50912638

Recently found a very good learning OpenGL basics website, click open the link. Since the configuration environment section is not very detailed, after many days of struggle, the development environment was successfully configured, for the record.
1. Download GLFW. The URL is: Click the open link. Because still have over the wall, so use the github download.
2. Download cMake. The URL is: Click the open link. The download is the version used by the author of this site, the Win32 Installer.
3. Download Glew. The URL is: Click the open link. Download the zip package, because the method used here is native compilation.

1> After the tool is prepared, a folder is set up in a directory to place the source code and library. OpenGL folder is set up on the machine, and include and libs folders are set up under it to place the source code and library respectively. The screenshot is shown below.

2> Since glew does not use cMake, glew is compiled first to get the required libraries.
A. Unpack Glew’s zip package, enter the build directory, and open the corresponding project with the corresponding version of VS (select the project under VS12 directory). VS2013 is used for this machine.
B. Open glew.sln with VS2013 or later and compile the project (right-click ->; Generate the solution).
C. Open glew-2.0.0\lib\Debug\Win32 and copy glew32sd.lib to OpenGL/libs.
D. Copy the GL folder from glew-2.0.0\include folder to the OpenGL/include folder.

3> To prepare the GLFW library, use the CMake tool to first generate the project and then compile it. The process is as follows.
A. After installing cMake, open cMake (cmake-gui) and click Browse Source to set the directory to the GLFW directory.
B. Click Browse Build and set the directory to the GLFW/Build folder. (The Build folder here needs to be created by yourself) as follows.

C. Click Configure in the lower left corner and select the target platform. Since this is VS2013, select Visio Studio 12 2013 and click OK.
D. Then click Configure again, and click Generate to build the project. The selection status is as follows.

E. Close cMake. Open the project in vs2013, compile it, and generate glfw3.lib after success.
F. Build \ SRC \Debug directory has just compiled the project generated glfw3.lib library, copy this library to the OpenGL/libs directory.
G. Copy the GLFW folder under GLFW-master /include to the OpenGL/include folder.
H. The files in the finally generated OpenGL folder are as follows:


4> At this point the basic environment is configured, and the next step is to link the libraries to the source code in a newly created, empty project, and import some libraries manually. The specific process is as follows.
A. Create an empty project. (C ++ project)
B. Right-click item ->; Property – & gt; Configure properties ->; Vc + + directories – & gt; Include the directory, add the path to OpenGL/include.
C. Right-click item ->; Property – & gt; Configure properties ->; Vc + + directories – & gt; Add the path to OpenGL/libs. The screenshot is shown below.

D. Right-click item ->; Property – & gt; Configure properties ->; The linker – & gt; Input – & gt; Attach dependencies to which to add
opengl32.Lib
glfw3.lib
glew32sd.lib
, the screenshot is as follows.

E. After saving the configuration in turn, you can enter the code in the Main class and test it. If no error is reported, that is, the environment is configured successfully, the test code can be tested from the beginning of the website or, or copy the code below.

#include <iostream>  

// GLEW  
#define GLEW_STATIC  
#include <GL/glew.h>  

// GLFW  
#include <GLFW/glfw3.h>  


// Function prototypes  
void key_callback(GLFWwindow* window, int key, int scancode, int action, int mode);

// Window dimensions  
const GLuint WIDTH = 800, HEIGHT = 600;

// The MAIN function, from here we start the application and run the game loop  
int main()
{
	std::cout << "Starting GLFW context, OpenGL 3.3" << std::endl;
	// Init GLFW  
	glfwInit();
	// Set all the required options for GLFW  
	glfwWindowHint(GLFW_CONTEXT_VERSION_MAJOR, 3);
	glfwWindowHint(GLFW_CONTEXT_VERSION_MINOR, 3);
	glfwWindowHint(GLFW_OPENGL_PROFILE, GLFW_OPENGL_CORE_PROFILE);
	glfwWindowHint(GLFW_RESIZABLE, GL_FALSE);

	// Create a GLFWwindow object that we can use for GLFW's functions  
	GLFWwindow* window = glfwCreateWindow(WIDTH, HEIGHT, "LearnOpenGL", nullptr, nullptr);
	if (window == nullptr)
	{
		std::cout << "Failed to create GLFW window" << std::endl;
		glfwTerminate();
		return -1;
	}
	glfwMakeContextCurrent(window);
	// Set the required callback functions  
	glfwSetKeyCallback(window, key_callback);

	// Set this to true so GLEW knows to use a modern approach to retrieving function pointers and extensions  
	glewExperimental = GL_TRUE;
	// Initialize GLEW to setup the OpenGL Function pointers  
	if (glewInit() != GLEW_OK)
	{
		std::cout << "Failed to initialize GLEW" << std::endl;
		return -1;
	}

	// Define the viewport dimensions  
	glViewport(0, 0, WIDTH, HEIGHT);

	// Game loop  
	while (!glfwWindowShouldClose(window))
	{
		// Check if any events have been activiated (key pressed, mouse moved etc.) and call corresponding response functions  
		glfwPollEvents();

		// Render  
		// Clear the colorbuffer  
		glClearColor(0.2f, 0.3f, 0.3f, 1.0f);
		glClear(GL_COLOR_BUFFER_BIT);

		// Swap the screen buffers  
		glfwSwapBuffers(window);
	}

	// Terminate GLFW, clearing any resources allocated by GLFW.  
	glfwTerminate();
	return 0;
}

// Is called whenever a key is pressed/released via GLFW  
void key_callback(GLFWwindow* window, int key, int scancode, int action, int mode)
{
	std::cout << key << std::endl;
	if (key == GLFW_KEY_ESCAPE && action == GLFW_PRESS)
		glfwSetWindowShouldClose(window, GL_TRUE);
}

cop

F. After compilation and running, the following window appears on behalf of successful environment configuration.

At this point, the environment configuration is complete.

Thanks again for sharing, the environment is finally matched!!

Simple configuration of glfw + glad in vs2015 OpenGL development environment

A tutorial learning OpenGL reference is https://learnopengl-cn.github.io
this tutorial is based on GLFW (window) + glad (cross-platform), the following VS2015 a simple method of environment configuration:
1. New projects
Simply create an empty project and add a blank CPP file.
2. Add the Nupengl Core library
Add method: VS->; Tools – & gt; NUGET Package Manager -> Package management console
and then in the bottom of the Package management console input Install – Package nupengl. Enter the core instruction can
at this point, your this project has been configured glut GLFW glew
3. The configuration is glad
If you don’t need glad, you can skip this step, but glad is used in the tutorial above, so it should also be configured incidentally:

Open the Glad online service, set the Language to C/C++ and, from the API options, select OpenGL version 3.3 and above (we will use version 3.3 for this tutorial, but newer versions will work just fine). Generate
a
ader is selected. Generate
loader is selected. Generate
a
loader is selected. Ignore the Extensions for now (for now). When you have selected everything, click the Generate button to Generate the library files.

: Packages \nupengl. Core.0.1.0.1\build\native\include

After these previous steps, the environment is actually configured
4. Test

#include <glad/glad.h>
#include <GLFW/glfw3.h>

#include <iostream>

void framebuffer_size_callback(GLFWwindow* window, int width, int height);
void processInput(GLFWwindow *window);

// settings
const unsigned int SCR_WIDTH = 800;
const unsigned int SCR_HEIGHT = 600;

int main()
{
    // glfw: initialize and configure
    // ------------------------------
    glfwInit();
    glfwWindowHint(GLFW_CONTEXT_VERSION_MAJOR, 3);
    glfwWindowHint(GLFW_CONTEXT_VERSION_MINOR, 3);
    glfwWindowHint(GLFW_OPENGL_PROFILE, GLFW_OPENGL_CORE_PROFILE);

#ifdef __APPLE__
    glfwWindowHint(GLFW_OPENGL_FORWARD_COMPAT, GL_TRUE); // uncomment this statement to fix compilation on OS X
#endif

    // glfw window creation
    // --------------------
    GLFWwindow* window = glfwCreateWindow(SCR_WIDTH, SCR_HEIGHT, "LearnOpenGL", NULL, NULL);
    if (window == NULL)
    {
        std::cout << "Failed to create GLFW window" << std::endl;
        glfwTerminate();
        return -1;
    }
    glfwMakeContextCurrent(window);
    glfwSetFramebufferSizeCallback(window, framebuffer_size_callback);

    // glad: load all OpenGL function pointers
    // ---------------------------------------
    if (!gladLoadGLLoader((GLADloadproc)glfwGetProcAddress))
    {
        std::cout << "Failed to initialize GLAD" << std::endl;
        return -1;
    }    

    // render loop
    // -----------
    while (!glfwWindowShouldClose(window))
    {
        // input
        // -----
        processInput(window);

        // render
        // ------
        glClearColor(0.2f, 0.3f, 0.3f, 1.0f);
        glClear(GL_COLOR_BUFFER_BIT);

        // glfw: swap buffers and poll IO events (keys pressed/released, mouse moved etc.)
        // -------------------------------------------------------------------------------
        glfwSwapBuffers(window);
        glfwPollEvents();
    }

    // glfw: terminate, clearing all previously allocated GLFW resources.
    // ------------------------------------------------------------------
    glfwTerminate();
    return 0;
}

// process all input: query GLFW whether relevant keys are pressed/released this frame and react accordingly
// ---------------------------------------------------------------------------------------------------------
void processInput(GLFWwindow *window)
{
    if(glfwGetKey(window, GLFW_KEY_ESCAPE) == GLFW_PRESS)
        glfwSetWindowShouldClose(window, true);
}

// glfw: whenever the window size changed (by OS or user resize) this callback function executes
// ---------------------------------------------------------------------------------------------
void framebuffer_size_callback(GLFWwindow* window, int width, int height)
{
    // make sure the viewport matches the new window dimensions; note that width and 
    // height will be significantly larger than specified on retina displays.
    glViewport(0, 0, width, height);
}

If the configuration is successful, a window like

OpenGL class library and environment configuration under win10 and vs2015

Quote:
The OpenGL Super Bibliography (Fifth Edition) and the OpenGL Programming Guide (Eighth Edition) are two practical OpenGL learning books. The difference is that the former has more examples and is easier to follow step by step, while the latter focuses on the API, so it’s best to read the former first.  
OpenGL class library configuration has been troubled by many beginners, I browse the configuration methods of various reference articles, found that in VS2015 configuration encountered many problems, after a few days of groping finally solved.
This article mainly refer to https://www.cnblogs.com/zpcdbky/p/6724772.html
http://blog.csdn.net/brillianteagle/article/details/51623208
http://www.it165.net/pro/html/201504/38164.html
Thanks to the contributions of the authors.
In this paper, all the resources have been packaged well, download address: http://download.csdn.net/download/shs1992shs/10142198
I. GLEW configuration
Glew’s official website: http://glew.sourceforge.net/
glew making official homepage: https://github.com/nigels-com/glew
glew is a cross-platform OpenGL extensions library, supporting multiple operating system, the url has to provide the latest version of glew.

1. Download Source and Binaries respectively, where the Binaries version is the compiled glew file and the Source is the Source.
2. Find the VS2015 installation directory, if it is installed in C disk, most is similar to C: Program Files(x86)\Microsoft Visual Studio 15.0 such path (the next is Microsoft Visual Studio 14.0), can also be in other disk directory; For the convenience of expression, the following will be explained according to the directory “D:\ Software Installation \VS2015”.
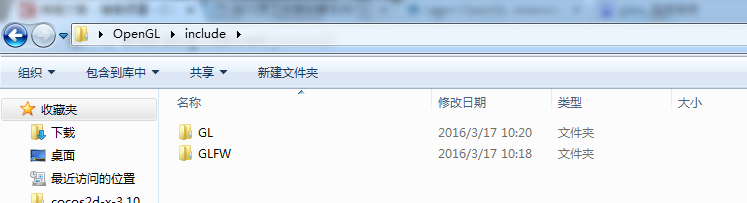
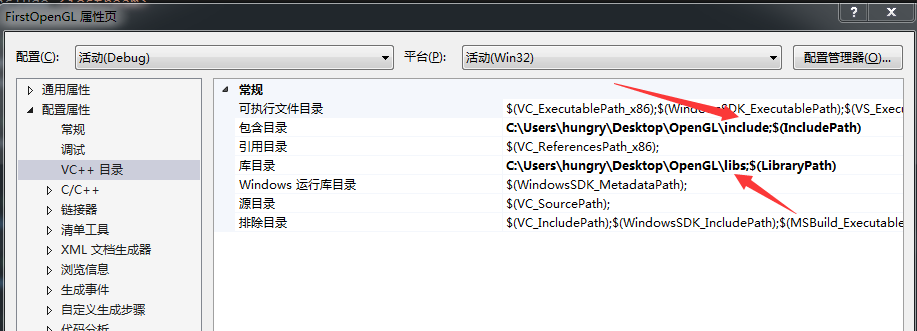
3. Locate the C++ header directory, such as “D:\ software installation \VS2015\VC\include”, and create a new GL folder under the include directory (if there is none).
4. Page 1 Binaries glew – 2.1.0/include/GL folder 4 header files are copied to 3 GL in the folder.
5. Copy glew32.dll from Binaries version to D:\ software installation \VS2015\VC\bin.
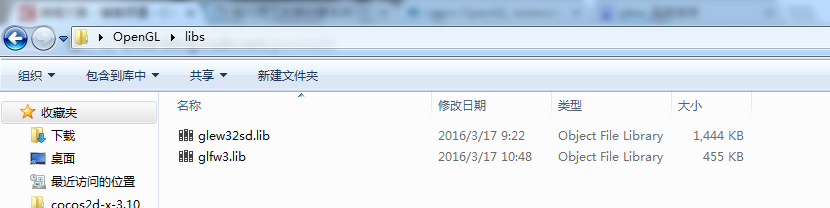
6. Copy the Binaries version of glew-2.1.0\lib\Release\Win32 to the directory D:\ software installation \VS2015\VC\lib.
Note that it is not necessary to copy the DLL file to C:\Windows\System32 or C:\Windows\SysWOW64.
At this point, glew is configured.

FreeGLUT configuration

1. GLEW obtains the latest version of OpenGL API. The FreeGLUT is used to replace the GLUT library. So, the glew and freeGLUT libraries are configured to completely replace the glu and GLUT libraries, and the latest version of the API is available for Shader programming.

f
The latest stable version of ReeGLUT is 3.0, which can be downloaded at:
http://freeglut.sourceforge.net/

Open the page and see the following section:

Download the Prepackaged version of MSVC and click the red button to get to the next page

Click on the red box to download the file named FreeGlut-MSVC-3.0.0-2.MP.zip

2.
“FreeGlut-MSVC-3.0.0-2.MP.zip” to extract the FreeGlut-MSVC-3.0.0-2.MP.zip folder.
There are four header files in the FreeGLUT /include/GL directory. Copy the three header files except GLUT. H to the D:\ software installation \VS2015\VC\include\GL directory.

Copy the FreeGlut. DLL file from FreeGlut. bin to D:\ software installation \VS2015\VC\bin.

4. Copy the FreeGlut. lib file to D:\ software installation \VS2015\VC\lib.

At this point, the FreeGLUT is configured.

Third, GLUT configuration

The GLUT library is old and hasn’t been updated since 2000, and many of them can be downloaded online or packaged with the resource bundles I uploaded.

Glut.h, Glut.dll, Glut32.dll, Glut.lib, Glut32.lib. Glut.h, Glut.dll, Glut32.dll, Glut.lib, Glut32.lib

2. Copy Glut. h to D:\ software installation \VS2015\VC\include\GL.

3. Copy ULT. DLL, GLUT32.DLL to D:\ software installation \VS2015\VC\bin.

4. Copy Glut. lib and Glut32. lib to D:\ VS2015\VC\lib.

At this point, GLUT is configured.

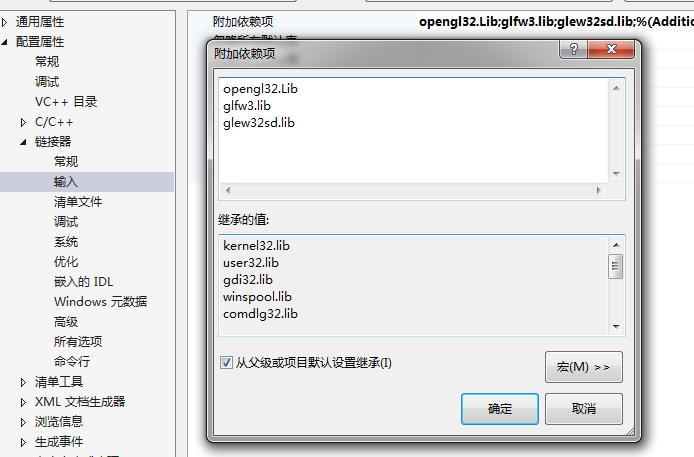
Note: When using the OpenGL Super Bibliotheca example, you need to add #pragma comment(lib,”gltools.lib”) to the beginning of the program. Used to connect to gltools.lib.

Four, GLTools configuration

The GLTools library is provided by the author of the OpenGL Super Bibliome. It is cumbersome to configure. I can use the files packaged in my resource pack, or I can compile them myself.

1. Copy all 11 header files from the gltools\include directory to the D:\ software installation \VS2015\VC\include directory (note the include directory, not the GL subdirectory).

2. Copy gltools.lib to D:\ software installation \VS2015\VC\lib.
> At this point, GLTools is configured.
> At this point, OpenGL is configured.

Self-compilation method:

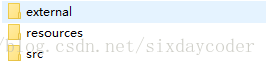
Unzip the resource bundle and get the gltools folder. This folder has two folders, include and SRC, in its directory. Since GLTools compilations depend on glew, you can see that GLTools \include\GL is a version of the glew header, and GLTools \ SRC has the glew.c source.  

Since you have already used the latest version of glew-2.1.0, you need to replace all the header files in the gltools\include\GL directory and select
with
Glew-2.1.0 version glew.c source file replaces glew.c in gltools\ SRC. (The Source version of glew-2.1.0\ SRC \glew.c as mentioned earlier).

Note 1: GLTools in the resource pack is all packaged and does not need to be changed. Readers who need to update the resource pack should follow the above method.

Note 2: when using the OpenGL super treasure dian example, found that transformation pipeline header file GLGeometryTransform. H compile error, a large number of can’t find the identifier, so the revised, if readers encounter such problems, in the resource bundle of gltools within a folder GLGeometryTransform – fix GLGeometryTransform. H header file to replace to D: \ software \ VS2015 VC \ \ the include directory, can be normal use.

Generate gltools. Lib

1. Copy all 11 header files from the gltools\include directory to the D:\ software installation \VS2015\VC\include directory (note the include directory, not the GL subdirectory).

2.
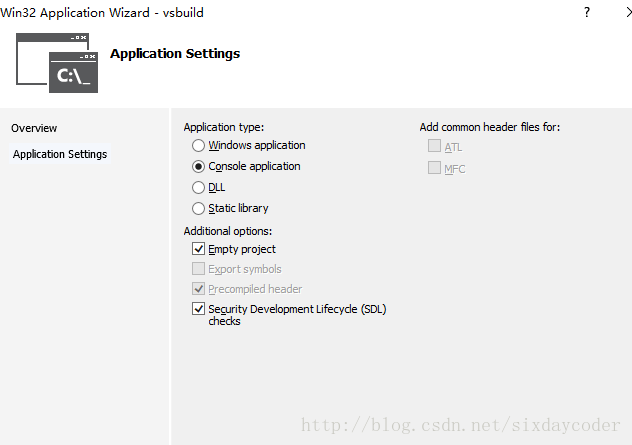
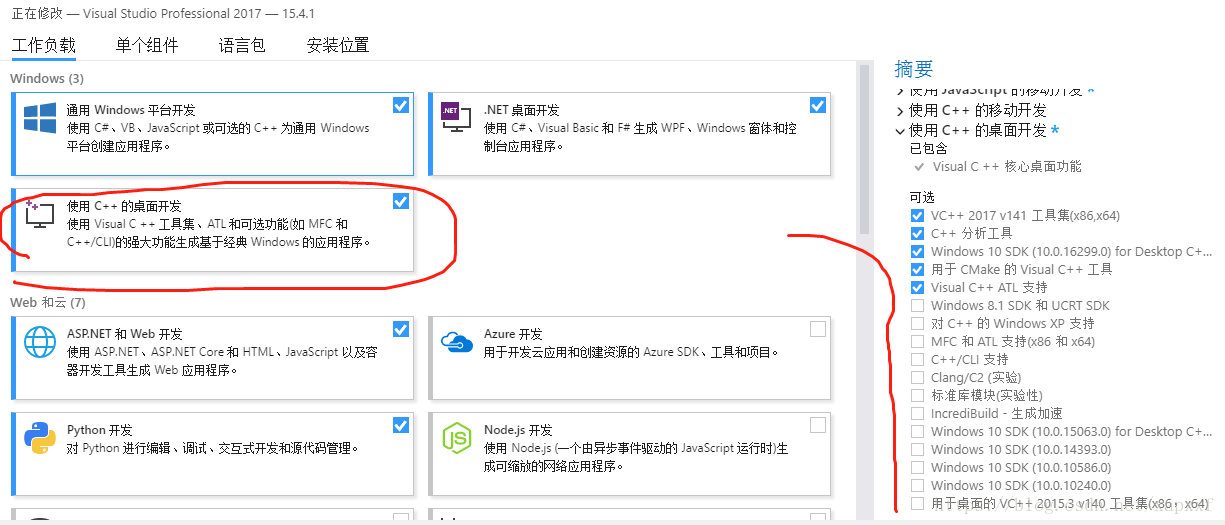
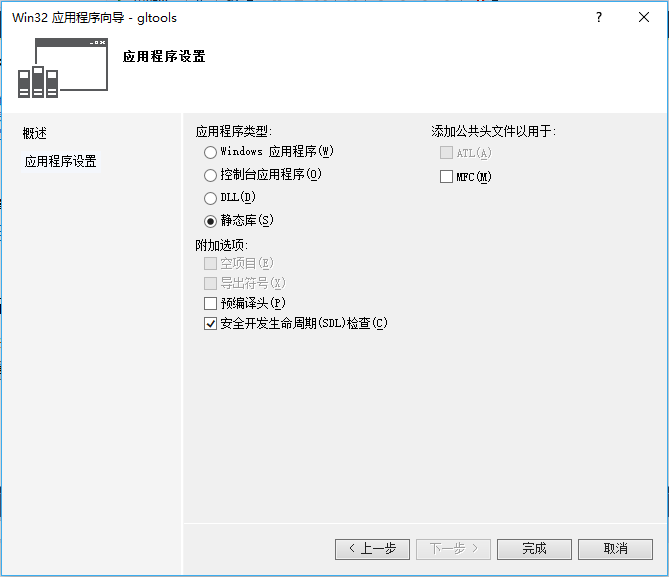
Start VS2015 and create a Win32 application called GLTools.

3. Select “Static Library” and uncheck the “Precompiled Header” box.

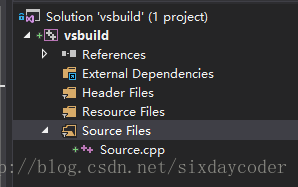
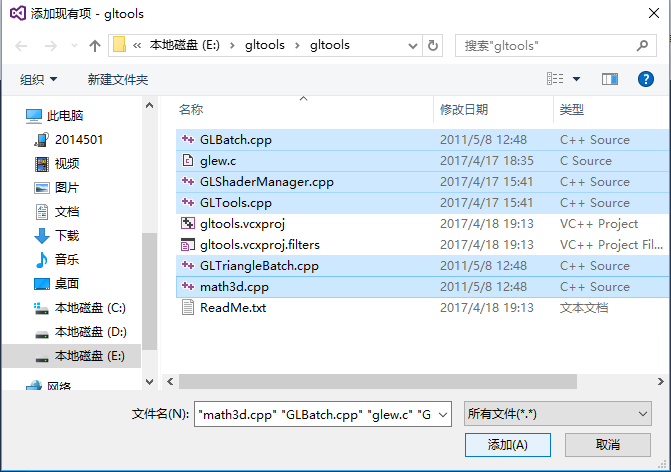
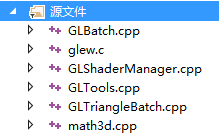
4. Copy the six files in the gltools\ SRC directory to the project directory you just created (for example, E: gltools\gltools).
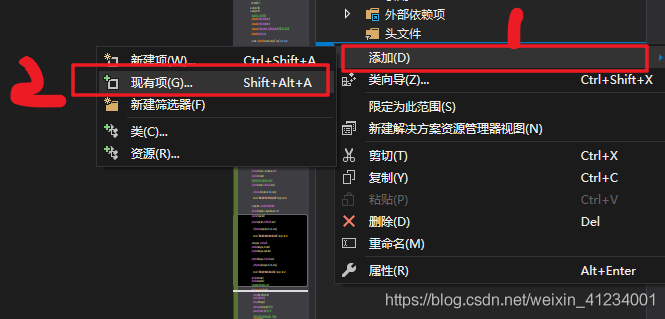
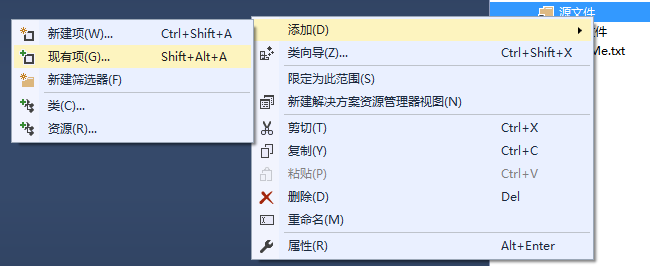
5. Right-click ‘Source File’ –>; “Add”, & gt; “Existing Items”, add 6 of the 4 files to the project.


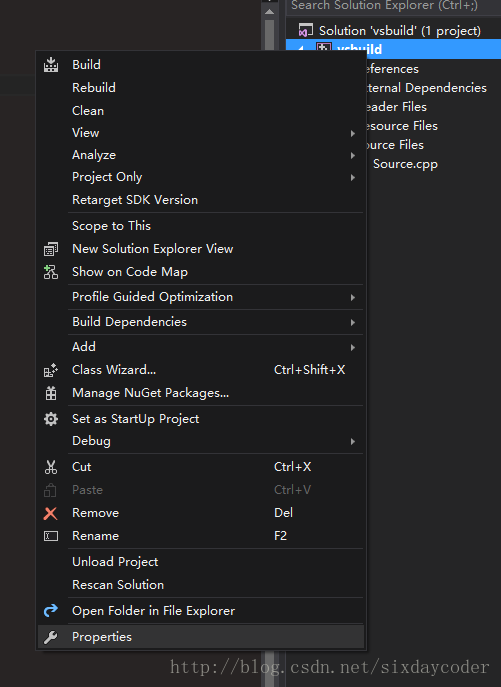
C/C++ > C/C++ > C/C++ > Add _CRT_SECURE_NO_WARNINGS to the preprocessor definition to the right of the preprocessor,
Otherwise, the function will be warned that it is not safe to use and will not compile successfully.

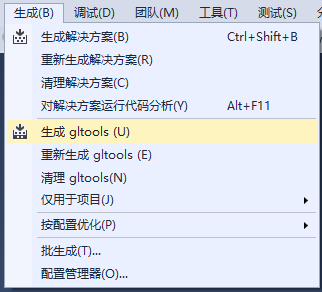
7. To generate – & gt; Generate gltools
I have seen a compilation in Release mode and a compilation in Debug mode in different articles, so far I can’t see the specific difference, just to be safe, I can compile in both modes.

There were a bunch of “DLL link inconsistencies” warnings on the compile, but the compilation was successful.

8. The generated gltools.lib files can be found in the E: gltools\Debug directory and the E: gltools\Release directory respectively. To copy the gltools.lib file from the Release file, refer to the lib file placement format of FreeGLUT. You can copy the gltools.lib file from the Release file to the D:\ software installation \VS2015\VC\lib directory.

At this point, you are done.

Configure OpenGL development environment (glfw3 + glad) once and for all with visual studio

primers
There are many versions of OpenGL, we need to introduce additional third-party libraries to meet our usual rendering needs, which is more troublesome for students who just started learning.
I also met many many times behind the configuration of the tutorial, wasted time, also their technology and modern technology of OpenGL.
(2018), at the current time from learning OpenGL if glBegin () and a glEnd () that a is behind The Times, this tutorial is to demonstrate how to configure OpenGL3.3 over the environment.
> Learn the OpenGL tutorial: Learnopengl, you may need over the wall, there is a Chinese translation.
If you want to learn OpenGL quickly, here is the configured environment: (open it directly in VS2015 or above, Win7/10 test)
perlink: Resources
(> header files, lib files, DLLs used in the directory structure are also in this link)
The directory structure
The environment we configured is not only responsible for storing code and third party lib, but also some shader files and resource files, so we need to build a good directory structure.
The full configuration directory structure is as follows:

tr> <>> vsbuild> td>

/ table> <>d>
name

note

SRC

store code

external \ include

third-party library header files, Contains stb_image. J h, glad. J h, GLFW. J h, assimp. H such as

external \ lib

third-party libraries of lib

external \ DLL

third-party library DLL

resources

resource folder,
>
Focus on the folders under external\include
GLM OpenGL mathematical library, defined a lot of vector, matrix operations, concise and fast. GLFW is a cross-platform abstract library of window resources. Glad has different OpenGL implementations for different graphics card drivers, Glad helps us hide these differences and happily use OpenGL. STB_IMAGE lightweight library for reading images ASSIMP lightweight library for reading models
We have, so to speak, all the common components except the physics engine and sound control.
Now let’s construct the directory structure from scratch.
> First find an empty folder and create the following directory structure in it:

Instead of creating a vsbuild, VS will do it for us.
> Open Visual Studio and create an empty project. The project name is vsbuild.

After creation:

Next we need to configure lib, include to be introduced into our project.
Right-click on the vsbuild project and open the properties page:

Find the C/C++ Genral

note that the C/C++ option only appears when you create a new.cpp file)
E>the additional directory on the right:

Note that SolutionDir is a macro that represents the directory where VSBuild is located, so we can find External/Include relative to it.
(Type the information $(SolutionDir)… , external, include).
Similarly, select the additional library directory for Linker’s General

Open Edit:

In addition, open the Linker Input directory and enter the following values:


glfw3.lib
ad.lib
s>mage.lib
assimp.>
SolutionDir \external\lib
(here I compiled glad and stb_image into static libraries)
nally, because ASSIMP requires dynamic linking, we need to import the corresponding DLL into our project.
The easiest way to do this is as follows:

Select Debug and edit the environment entry:

The meaning of this line is to temporarily add the EXTERNAL \ DLL directory to the environment variable in debug mode so that we can successfully dynamically link.
After the configuration is complete, paste the following code into source.cpp and run.

#include <glad\glad.h>
#include <glfw\glfw3.h>
#include <iostream>


void framebuffer_size_callback(GLFWwindow* window, int width, int height);

void processInput(GLFWwindow *window);


// settings

const unsigned int SCR_WIDTH = 800;

const unsigned int SCR_HEIGHT = 600;


int main()

{

    // glfw: initialize and configure

    // ------------------------------

    glfwInit();

    glfwWindowHint(GLFW_CONTEXT_VERSION_MAJOR, 3);

    glfwWindowHint(GLFW_CONTEXT_VERSION_MINOR, 3);

    glfwWindowHint(GLFW_OPENGL_PROFILE, GLFW_OPENGL_CORE_PROFILE);


#ifdef __APPLE__

    glfwWindowHint(GLFW_OPENGL_FORWARD_COMPAT, GL_TRUE); // uncomment this statement to fix compilation on OS X

#endif


                                                         // glfw window creation

                                                         // --------------------

    GLFWwindow* window = glfwCreateWindow(SCR_WIDTH, SCR_HEIGHT, "LearnOpenGL", NULL, NULL);

    if (window == NULL)

    {

        std::cout << "Failed to create GLFW window" << std::endl;

        glfwTerminate();

        return -1;

    }

    glfwMakeContextCurrent(window);

    glfwSetFramebufferSizeCallback(window, framebuffer_size_callback);


    // glad: load all OpenGL function pointers

    // ---------------------------------------

    if (!gladLoadGLLoader((GLADloadproc)glfwGetProcAddress))

    {

        std::cout << "Failed to initialize GLAD" << std::endl;

        return -1;

    }


    // render loop

    // -----------

    while (!glfwWindowShouldClose(window))

    {

        // input

        // -----

        processInput(window);


        // render

        // ------

        glClearColor(0.2f, 0.3f, 0.3f, 1.0f);

        glClear(GL_COLOR_BUFFER_BIT);


        // glfw: swap buffers and poll IO events (keys pressed/released, mouse moved etc.)

        // -------------------------------------------------------------------------------

        glfwSwapBuffers(window);

        glfwPollEvents();

    }


    // glfw: terminate, clearing all previously allocated GLFW resources.

    // ------------------------------------------------------------------

    glfwTerminate();

    return 0;

}


// process all input: query GLFW whether relevant keys are pressed/released this frame and react accordingly

// ---------------------------------------------------------------------------------------------------------

void processInput(GLFWwindow *window)

{

    if (glfwGetKey(window, GLFW_KEY_ESCAPE) == GLFW_PRESS)

        glfwSetWindowShouldClose(window, true);

}


// glfw: whenever the window size changed (by OS or user resize) this callback function executes

// ---------------------------------------------------------------------------------------------

void framebuffer_size_callback(GLFWwindow* window, int width, int height)

{

    // make sure the viewport matches the new window dimensions; note that width and 

    // height will be significantly larger than specified on retina displays.

    glViewport(0, 0, width, height);

}

The following window shows that the configuration is successful.

[OpenGL · error] visual studio 2019 reports an error. It is an external symbol gladloadglloader that cannot be parsed. This symbol is referenced in the function main

Errors encountered
Today before open write OpenGL rendering triangular program, found that have been submitted to the following error

when thought is a good start you don’t have links to files and library files, search on the Internet, and finally found the problem, is you don’t have the glad. C files added to the project.
The solution
Before remembering yourself to add glad.c file is passed in the source file ->; Create a new item, create a new glad.c file, and then copy the contents of the glad.c file from the other directory.

> By right-clicking the source file ->; Add an existing item ->;

Vs2017 C + + cannot open source file: “sdkddkver. H”, “stdio. H”, “TCHAR. H”

The first time it was installed, the error in the picture appeared. Searched for this for a long time, thought is the installation problem, uninstall reinstall several times…… Thirty grams of stuff, it’s no joke.

But finally found that the reason for this problem is!! In the case of Visual Studio default installation, there are files that are not checked by default, that is, they are not installed by default. (Also should be because Win10SDK installation failed, but how to install also can not install, even if…

, causing problems)
But!!!!! H and stdio.h exist in these files.
It is not installed by default, as shown in the figure below:

Because oneself is this pit for a long time, think the net search is all sorts of separate download, the latter search, and then reconfigure and so on incomparable trouble operation. Here are some of the easiest ways to do it once and for all

Solution:
Just go to Programs and Functions, go to VS, right-click, modify, and check those, and you’re done.


Right-click and go to Change
Then you can see:

Then, click More and Select – Modify (check the box). After the completion of the picture, found that I forgot that several are unsolved problems ticked)

C++, check, and then confirm the modification OK, wait for the installation, problem solved. You don’t have to go to download WindowsSDK yourself.

Solve!
(after this can be used, my development needs can basically meet, but this is the installation of Win10SDK failure, the helpless move)

Separate installation, you can reference this article: http://blog.csdn.net/hhh1108/article/details/50352027
There is also a point of benefit, so you can install to other disks. Configure it yourself. VS will be installed on the C drive.

Of course, if you can install the Win10SDK on your computer, you should not have this problem.