When debugging using the console, console.log(" Hello word!" ) does not print.
I’m beginning to doubt myself…
Several circumstances
Default Default Default levels
Configuring common environment variables in Windows
The article directories
1, JDK 2, Maven 3, Gradle 4
A, the JDK
Two environment variables JAVA_HOME and CLASSPATH need to be configured:
va_home =D:\programs\jdk1.8 p>
%java_home % \>; %JAVA_HOME%\jre\bin; add classpath:
code> c>path =.; %JAVA_HOME%\lib\dt.jar; %JAVA_HOME% lib\tools.jar
Use java-version and javac-version determine if the creation was successful
Second, the maven
Increase MAVEN_HOME:
 MAVEN_HOME = D: \ apache maven - 3.3.9
 in the Path to increase again:
  % MAVEN_HOME % \ bin

 mvn-v

Third, gradle

Increase the  GRADLE_HOME = D: \ gradle - 6.7.1
 in the path to increase again:
  % GRADLE_HOME % \ bin

 gradle-v / code>

Four,
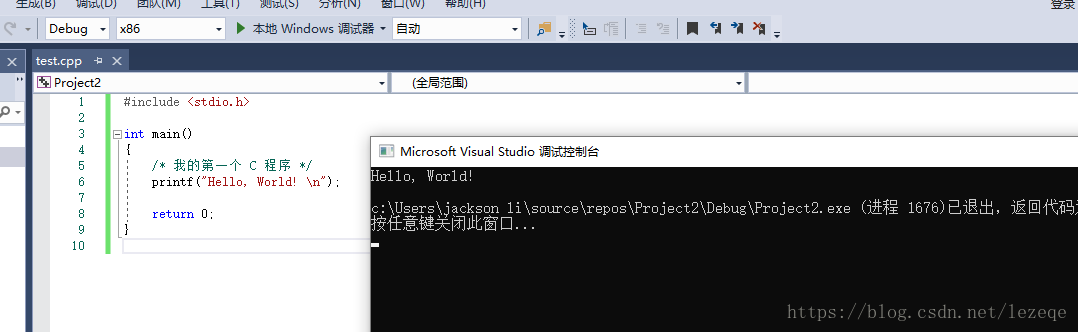
Solve the problem of “Visual Studio debugging flash back”
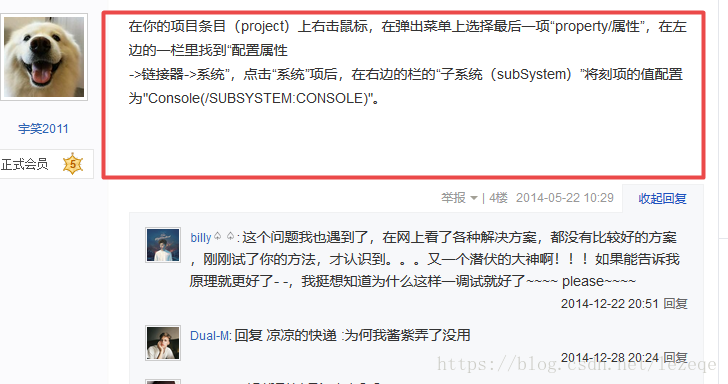
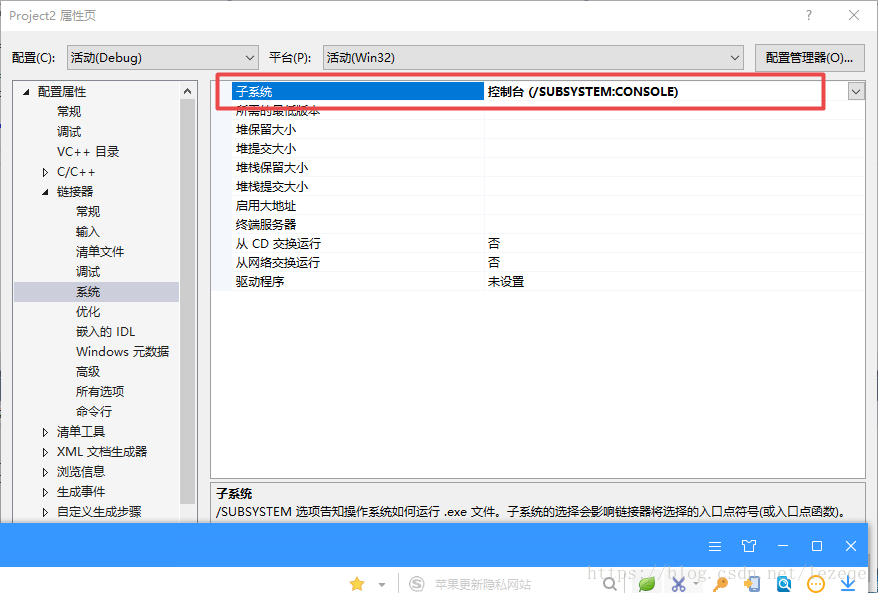
MDK (keil) debugging often appears flashback phenomenon solution.
1, open registry
, Win+R call out “run”, type “Regedit” in the box, enter to open registry.
3, if the popup “Do you allow this application to make changes to your computer” permissions, select “Yes”
the registry, find and enter HKEY_CURRENT_USER\Software\Microsoft\Windows NT\CurrentVersion\AppCompatFlags\Layers If found the following entry (C: Keil\UV4\ uv4.exe), — this path is the actual installed path of Keil in your computer.
4, after delete, restart Keil, test debugging is feasible
VTK series: installation and introduction of VTK
I use VS2008, there are a lot of tutorials on the Internet, according to the tutorial to do, to the end of the toolbox are VTK controls, full of joy thought that can be successful, drag a control up a debug results prompt that the specified module can not be found. I can follow the tutorial but still make mistakes is a little puzzled. The net searched for a long time, still did not solve, want to despair. I saw a friend’s QQ in the Visualization Lab forum, added him, he is very nice, asked questions immediately back to me, the key is to help me to solve the problem. In the heart that thank ah, I can not say. The main problem is to put all the downloaded DLLs under the program’s “dubug” and it will work fine. There is a problem with the VTK control that is pulled from the Toolbox. The first time it is displayed, the form will not load when the project is closed and the second time it is opened. This problem is not solved.
After several days of hard work, I finally saw a HelloWord program. Everything is difficult at the beginning, so I can only take it slowly.
Here are a few good links, a good tutorial to get started with VTK.
http://ooplab.org/post/624.html VTK installation tutorial, which also have a step to c:/VTK file to add to the system environment variables.
http://www.cadcaecam.com/Forum/viewthread.php?tid=14832& extra=& page=1
C3P forum, but only wrote a small part of it.
http://hi.baidu.com/ophir/blog/category/%D7%CA%D4%B4%CF%C2%D4%D8%C7%F8 is good too.
Thanks to the articles written by these authors, it is really a great help for beginners.
Learning notes — opengl01
The first lesson
1.1 Simple OpenGL program contains:
First, you need to include the header file #include <; GL/glut.h> So this is the header file for GLUT. OpenGL programs typically include <; GL/gl.h> And & lt; GL/glu.h> , but both files are automatically included in the GLUT header file and do not need to be included again. The functions that begin with GLUT are all functions provided by the GLUT toolkit. Here are some of the functions used: Glutinit initializes GLUT. This function must be called once before another GLUT is used. Glutinit (& Arg C, Arg V. 2, GLUTINITDISPLAYMODE, set the display mode, where GLUT_RGB means to use the RGB color, and GLUT_INDEX (means to use the index color). GLUT_single means to use a single buffer, as does GLUT_DOUBLE (to use a double buffer). GlutinitWindowPosition, which is simple, sets the position of the window on the screen. 4, GlutinitWindowSize, this is also easy, set the window size. 5, GlutCreateWindow, create a window based on the information set above. Parameters will be used as the title of the window. Note: The window is not immediately displayed on the screen after it is created. You need to call glutMainLoop to see the window. 6. GlutdisplayFunc, which sets a function that will be called when a drawing is needed. (This statement is not accurate, but the accurate statement may not be easy for beginners to understand, so say for the time being). 7. GlutMainLoop, which runs a message loop. (This may not be obvious to beginners, but for now it is enough to know that this function displays a window and waits for the window to close before returning.) All the functions that start with GL are standard OpenGL functions, and the ones that are used are described below. 1, Glclear. GL_Color_BUFFER_BIT clears the color, and glClear clears other things, but I won't cover them here. 2, Glrectf, draw a rectangle. The four parameters represent the horizontal and vertical coordinates of the two points located on the diagonal. Glflush ensures that previous OpenGL commands are executed immediately (rather than having them wait in the buffer). It works similarly to fflush(stdout). The second lesson 2.1 Draw simple geometric shapes Dots: Dots in OpenGL will be drawn as individual pixels Straight lines: OpenGL's concept of a "line" is close to the mathematical concept of a "line segment," which can be defined by two endpoints. Polygon: A polygon must be a "convex polygon" (defined as: any two points in a polygon are within the polygon, from which it can also be deduced that a convex polygon cannot be hollow), usually triangular By using points, lines and polygons, you can combine various geometric figures 2.2 Specify vertices OpenGL provides a number of functions. They all start with glVertex, followed by a number and one or two letters. Such as: GLVERTEX2D GLVERTEX2F GLVERTEX3F GLVERTEX3FV and so on. The number means the number of arguments, 2 means there are two arguments, 3 means three, and 4 means four. Letters parameter type, s 16-bit integers (due to the type defined as GLshort OpenGL), I said a 32-bit integer (OpenGL in this type is defined as the GLint and GLsizei), f is a 32-bit floating point Numbers (due to the type defined as GLfloat OpenGL and GLclampf), d said 64 floating point Numbers (due to the type defined as GLdouble OpenGL and GLclampd). V indicates that several parameters will be passed using Pointers 2.3 Start drawing OpenGL requires that the command specifying the vertex be included after glBegin and before glEnd (otherwise the specified vertex will be ignored). GlBegin is left to indicate how to use these points. Such as: glBegin(GL_POINTS); GlVertex2f (0.0 0.0 f, f); GlVertex2f (0.0 0.5 f, f); glEnd(); Then these two points will be drawn separately. If you replace GL_POINTS with GL_LINES, then the two points will be considered to be the two endpoints of the line, and OpenGL will draw a line. You can also specify more vertices and then draw more complex shapes. GL_POINTS, GL_LINES, GL_LINE_STRIP, GL_LINE_LOOP, GL_TRIANGLES, GL_TRIANGLE_STRIP, GL_TRIANGLE_FAN, etc. (See Figure 1) The third class 3.1 about the point Point size: Default value is 1.0F, function prototype void glpointSize (GLFloat Size); Example: void myDisplay(void) { glClear(GL_COLOR_BUFFER_BIT); GlPointSize (5.0 f); GlBegin (GL_POINTS); ... GlEnd (); glFlush(); } 3.2 About Straight Lines 3.2.1 Line width Function prototype void gllineWidth (glFloat Width); The usage is similar to glpointSize. 3.2.2 dotted line First, use glEnable(GL_LINE_STIPPLE); To start the dotted line mode (use glDisable(GL_LINE_STIPPLE) to turn it off). Then, use glLineStipple to set the style of the dotted line. void glLineStipple(GLint factor, GLushort pattern); Pattern is a sequence of length 16 composed of 1 and 0. Viewed from the lowest position, if it is 1, then factor points that should be drawn next on the line will be drawn as solid. If 0, then factor points that should be drawn next on the line will be drawn as virtual. 3.3 About polygons 3.3.1 Both sides of polygons and their drawing methods Although we haven't really used 3D coordinates to draw a picture yet, it is necessary to establish some 3D concepts. In three dimensions, a polygon has two faces. Each face can be drawn in a different way: fill, draw only edges, and draw only vertices, with fill being the default. You can set the two faces in different ways. glPolygonMode(GL_FRONT, GL_FILL); // Set front to fill mode glPolygonMode(GL_BACK, GL_LINE); GlPolygonMode (GL_FRONT_AND_BACK, GL_POINT); glPolygonMode(gl_front, GL_POINT); // Set both sides to vertices 3.3.2 rainfall distribution on 10-12 inversion The convention is that the face whose vertices appear counterclockwise on the screen is "heads" and the other face is "tails". Common surfaces in life can usually be represented with such "heads" and "tails" as "reasonable". But there are some surfaces that are special. For example, a "Maibius strip" can be represented with either all "heads" or all "tails". You can exchange the concepts of "heads" and "tails" through the glFrontFace function. glFrontFace(GL_CCW); // Set the CCW direction to "Front", CCW is Counterclockwise Glfrontface (GL_CW); // Set the CW direction to "Front", CW is ClockWise * There is routine openGL4 3.3.3 Remove polygonal surfaces In three dimensional space, a polygon has two faces, but we can't see the polygons on the back, and some of the polygons are on the front, but are obscured by other polygons. Treating invisible polygons the same as visible polygons will definitely reduce the efficiency of our graphics processing. At times like this, you can cut out unnecessary surfaces. First, use glEnable(GL_CULL_FACE); To enable culling (disable using glDisable(GL_CULL_FACE)), then use glCullFace to cull. The parameter of glCullFace can be GL_FRONT, GL_BACK, or GL_FRONT_AND_BACK, which are polygons that remove the front, back, and back sides, respectively. Note: the cull function only affects polygons, not points and lines. For example, with glCullFace(GL_FRONT_AND_BACK), all polygons are removed so that only points and lines are visible. 3.3.4 Hollow out polygon Straight lines can be drawn as dotted lines, while polygons can be hollowed out. First, use glEnable(GL_POLYGON_STIPPLE); To start the hollowout mode (which can be turned off with glDisable(GL_POLYGON_STIPPLE)). Then, use glPolygonStipple to set the hollow out style. void glPolygonStipple(const GLubyte *mask); The mask parameter points to a space of 128 bytes, which indicates how a 32 by 32 rectangle should be hollow out. Where: The first byte indicates whether the 8 pixels at the bottom left are hollow (1 means no hollow, showing the pixel; 0 indicates hollowout, showing the color behind it), and the last byte indicates whether the top right eight pixels are hollowout or not. If such data is saved as a picture and edited with a special tool, it is obviously much more convenient. Here's how to do it. First, create a new image using the Windows Brush program and name it mask.bmp. Make sure to save it with "Monochrome Bitmap" selected. In "Image" -> In the Properties dialog box, set the height and width of the image to 32. Look at the picture with a magnifying glass and edit it. Black corresponds to binary zero (hollow out), white corresponds to binary one (no hollow out), after editing saved. You can then use the following code to get the Mask array.
static GLubyte Mask[128];
FILE *fp; fp = fopen(“mask.bmp”, “rb”);
if( ! fp ) exit(0);
// Move the file pointer to this position so that reading sizeof(Mask) will encounter the end of the file
// Note that -(int)sizeof(Mask) is not a good way to write it, but it does work here, right
If (fseek(fp, -(int)sizeof(Mask), SEEK_END) exit(0); if(fseek(fp, -(int)sizeof(Mask), SEEK_END) exit(0);
// Read the sizeof(Mask) bytes into the Mask
if( ! fread(Mask, sizeof(Mask), 1, fp) )
exit(0);
fclose(fp);
Edit an image as a mask, and use the above method to get the array of masks. After running, observe the effect. Note: The factor factor can be set when drawing a dashed line, but the factor factor cannot be set when drawing a hollow polygon. Please use the mouse to change the size of the window, observe the change of the hollowout effect.
* There is routine openGL5
Configuring OpenGL in VS
VS2010
GLUT Download Address:
http://www.opengl.org/resources/libraries/glut/glutdlls37beta.zip
Glut. H – & gt; C:/Program Files (x86)/Microsoft SDKs/Windows/v7.0 A/Include/gl
glut.dll,glut32.dll —> C:/Windows/ SYSWOW64 (Windows 7 64-bit operating system)
– & gt; C:/Windows/System32 (Windows 7 32-bit operating system)
glut.lib,glut32.lib —> C:/Program Files (x86)/Microsoft Visual Studio 10.0/VC/lib
!!!!! No!!!!! With # define macros GLUT_DISABLE_ATEXIT_HACK
So a lot of people Glut. h didn’t know where to put it, and they created a new folder, and a lot of people Glut. h said,
To search the GL folder, place Glut. h in the GL folder that contains the two files Glut. h and Glut. h.
Direct copy of the following routine compilation can be passed
Routine as follows
#include < gl/glut.h>
Void myDisplay (void)
{
glClear (GL_COLOR_BUFFER_BIT);
glRectf(-0.5f, -0.5f, 0.5f, 0.5f);
glRectf(-0.5f, -0.5f, 0.5f, 0.5f);
glFlush ();
} int main (int arg c, char * argv [])
{
glutInit (& amp; argc, argv);
glutInitDisplayMode (GLUT_RGB | GLUT_SINGLE);
glutInitWindowPosition (100, 100);
glutInitWindowSize (400, 400);
GlutCreateWindow (” First OpenGL program “);
glutDisplayFunc (& amp; myDisplay);
glutMainLoop ();
return 0;
}
VS2008
The first step is to choose a compilation environment
now the mainstream of Windows compiled environment have Visual Studio, Broland c + + Builder, Dev – c + +, etc., they are all support OpenGL.
I chose Visual Studio 2008 and VC6++ as the environments to learn OpenGL.
Second, install the GLUT toolkit
Glutters
Glutters
Glutters
Glutters
Glutters
Glutters
Glutters
Glutters
Windows GLUT download address :(size about 150K)
http://www.opengl.org/resources/libraries/glut/glutdlls37beta.zip
cannot be downloaded from the above address, please use the links below:
http://upload.programfan.com/upfile/200607311626279.zip
install GLUT for Windows:
2, Search for “gl.h” in “My Computer” and find the folder in which it is located
If it is VC++6, then Glut.h should be copied in “D:/Program Files/
MicrosoftVisualStudio/VC98/Include/GL folder “). If it’s VisualStudio2008, copy Glut.h to
X :/Program Files/Microsoft/Visual Studio 9.0/VC/include/GL X is the disk symbol that you use to install VS. If you install VC++, there is a GL file in it. Visual Studio 2008 needs to go to it yourself
Create a new one)
3, let the glut of decompression. Lib and glut32 lib on static libraries in the folder (that is, with the include side by side under the lib folder).
4, let the glut of decompression. DLL and glut32 DLL in the operating system directory under the system32 folder. (Typical location: C:/Windows/System32)
Step 3: Set up an OpenGL project
VisualStudio2008 or VC++6:
choose File – & gt; New-> The Project, and then
Select Win32 Console Application, (not Win32 Application). Select a name and press OK. Click Application Settings on the left side of the resulting dialog box, locate the Empty Project, check it, and select Finish. Then add a code file to the project, called “opengl.c”, and note that you end the file with.c.
is done, just like any other project.
include <
#include < GL/glut.h>
#pragma comment(lib, “opengl32.lib”)
#pragma comment(lib, “glu32.lib”)
#pragma comment(lib, “glut32.lib”)
rst OpenGL program
A simple OpenGL program is as follows:
(Note that if you need to compile and run, GLUT needs to be installed correctly, as described above.)
# include & lt; GL/glut.h>
void myDisplay (void)
{
glClear (GL_COLOR_BUFFER_BIT);
glRectf(-0.5f, -0.5f, 0.5f, 0.5f);
glRectf(-0.5f, -0.5f, 0.5f, 0.5f);
glFlush ();
}
int main(int argc, char *argv[])
{
glutInit (& amp; Arg c, argv);
glutInitDisplayMode (GLUT_RGB | GLUT_SINGLE);
glutInitWindowPosition (100, 100);
glutInitWindowSize (400, 400);
GlutCreateWindow (” First OpenGL program “);
glutDisplayFunc (& amp; myDisplay);
glutMainLoop ();
return 0;
}
This program draws a white rectangle in the center of a black window. Each of the statements is explained below.
First, you need to include the header file #include
; GL/glut.h> So this is the header file for GLUT.
GL/gl.h> And & lt; GL/glu.h> , but both files are automatically included in the GLUT header file and do not need to be included again.
then look at the main function.
int main(int argc, char *argv[])
int main(int argc, char *argv[]) Comrades who have not seen it, please read the book more, and then look down when you understand.
Notice that all statements in main begin with GLUT, except for the return at the end.
The functions that begin with GLUT are all functions provided by the GLUT toolkit, and the functions used are described below.
1, glutInit (GLUT) — This function must be called once before another GLUT is used. Glutinit (& Arg C, Arg V.
2, glutInitDisplayMode, set the display mode, including GLUT_RGB said using RGB color, and the matching and GLUT_INDEX (using the index color). GLUT_single means to use a single buffer, as does GLUT_DOUBLE (to use a double buffer). For more information, please Google yourself. Of course, there will be some explanations in future tutorials.
>
>
>
>
>
>
>
>
>
>
>
>
5, GlutCreateWindow, create the window based on the information set above. Parameters will be used as the title of the window. Note: The window is not immediately displayed on the screen after it is created. You need to call glutMainLoop to see the window.
6, glutDisplayFunc, set up a function, when the need for drawing, this function will be invoked. (This statement is not accurate, but the accurate statement may not be easy for beginners to understand, so say for the time being).
(This may not be obvious to beginners, but for now it is enough to know that this function displays a window and waits for the window to close before returning.)
in glutDisplayFunc function, we set up “when need drawing, please call myDisplay function”. So myDisplay function is going to be used to draw the graph. When you look at the three function calls in MyDisplay, you see that they all start with GL.
Functions that start with GL are standard OpenGL functions, and the ones we use are described below.
GL_Color_BUFFER_BIT clears the color, and glClear clears other things, but I won’t cover them here.
2, Glrectf, draw a rectangle. The four parameters represent the horizontal and vertical coordinates of the two points located on the diagonal.
3, Glflush, which ensures that previous OpenGL commands are executed immediately (rather than having them wait in the buffer). It works similarly to fflush(stdout).
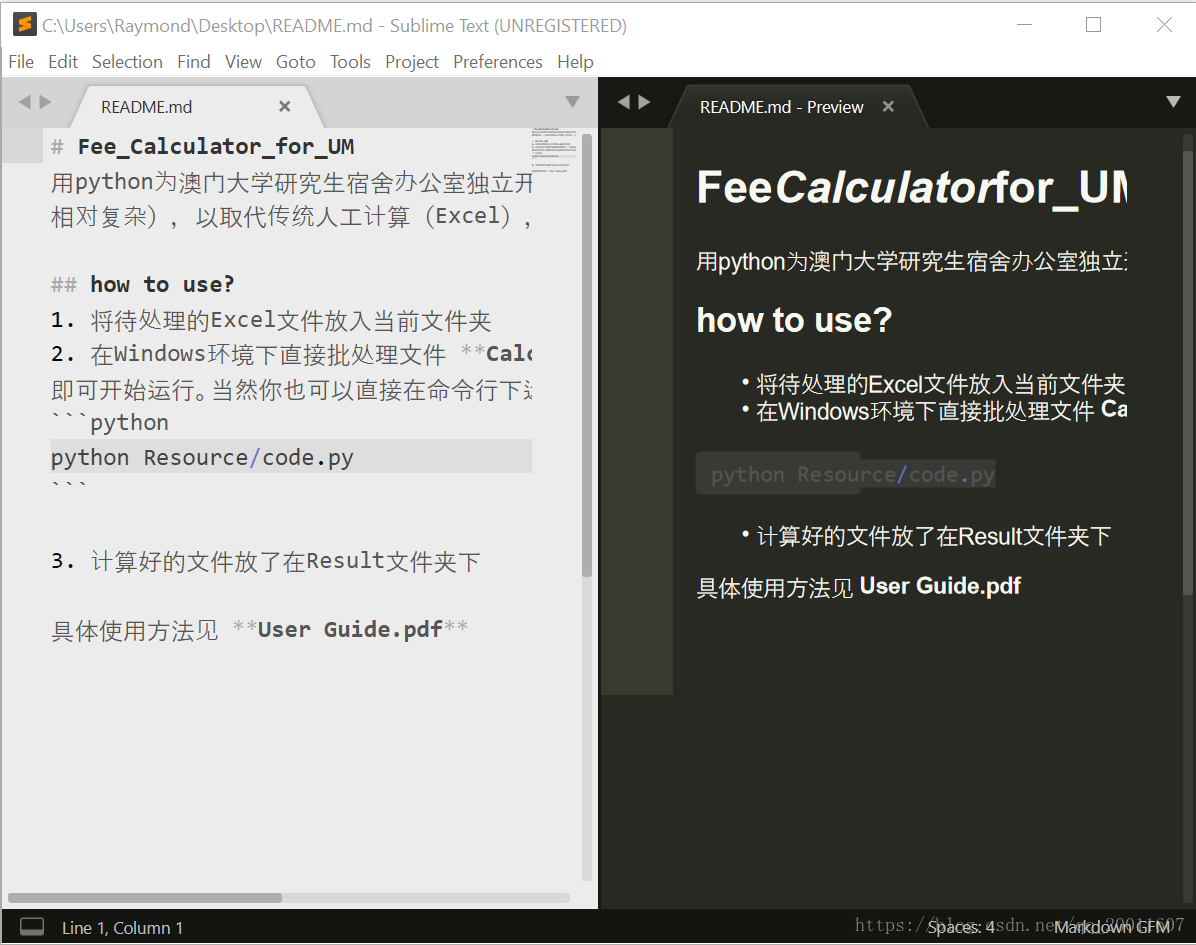
Markdown real time preview of sublime Text3
As mentioned above in Sublime Text3’s Package Control Installation and Usage, Sublime has powerful plug-in extensions, and this article details how to preview or even refresh the preview in real time when writing Markdown documentation with Sublime.
0. Review: Plug-in installation method, which will be used repeatedly in the future
- combination
Ctrl+Shift+P bring up the command panel and enter Package Control: Install Package, press enter and enter the Package name to be installed (one by one, not multiple at the same time) in the search box. After a few seconds, the installation will be successful
The plugin is introduced
Introduces a few common plug-ins for the Markdown class:
| function | |
|---|---|
| 1 MarkdownEditing | 3 a plug-in that improves the Markdown editing features in Sublime Markdown |
| 7 MarkdownPreview | 9 Markdown to HTML, Preview in the browser |
| MarkdownLivePreview | provides real-time preview in the edit box |
| LiveReload | 1 a plug-in that provides real-time refresh preview of documents such as md/ HTML |
5
The next few plug-ins are presented at a time.
1. MarkdownEditing
The Markdown editor, as the name suggests, is a must-have plug-in for Markdown writers, which not only highlights the syntax of Markdown but also supports syntax highlighting for many programming languages.
special note: MarkdownEditing is enabled only for files in md\mdown\ MMD \ TXT format.
features
MarkdownEditing implements a series of optimizations for the editing of Markdown documents, both visually and conveniently. Such as:
Color schemes like Byword and iA Writer automatically match asterisks (*), underscores (_), and back quotes (‘) in selected text by pressing the above symbols to automatically add matching symbols before and after the selected text to facilitate bold, italic, and code box input
Effect:
2. MarkdownLivePreview
function
Real-time preview Markdown file, md file on the left and preview results on the right. Can be used with MarkdownEditing.
use
MarkdownLivePreview turns off live preview by default, so now that you have the plugin installed, you should definitely use it. Open in Preferences -& GT; Package Settings -> MarkdownLivePreview -> Add a "markdown_live_preview_on_open" to the right of Settings: true,, and restart sublime.
This is because the default configuration on the left side is unchangeable (read only), and the edit area on the right side is the user-defined area.
rendering
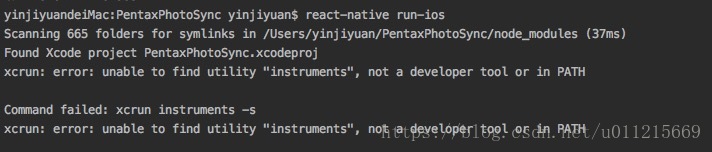
Unable to find utility “instruments”, not a developer tool or in PATH
An error occurred while debugging a project on ios
unable to find utility “instruments”, not a developer tool or in PATH
error cause:
The default version
is not set when xcode has been upgraded or when multiple versions of xcode coexist
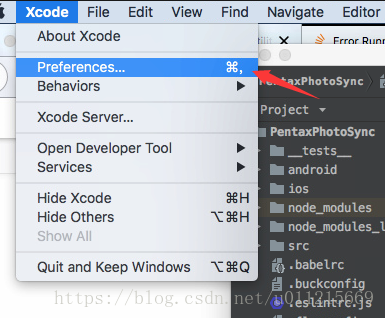
solution:
Open up Xcode and select
Go to Locations, and select the version you want to use in Command Line Tools
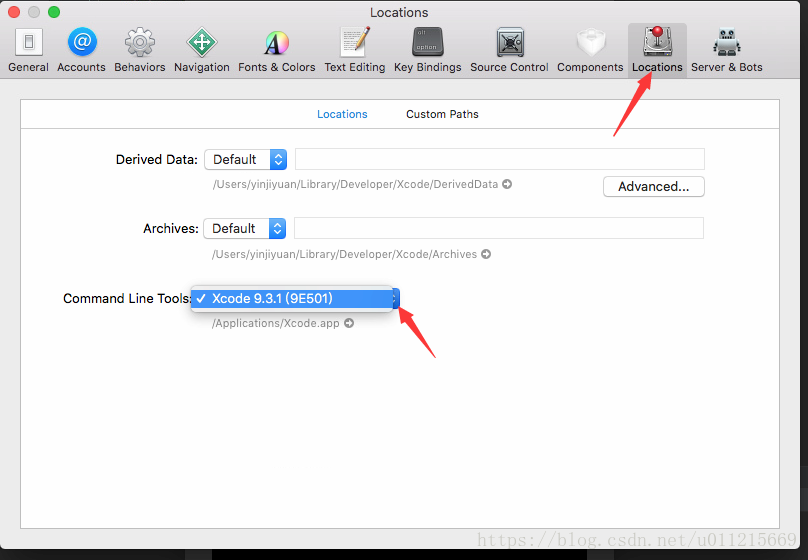
At this point, exit Xcode completely and try run-ios again. Everything is ok!
Pychar runtime error r6034 solution
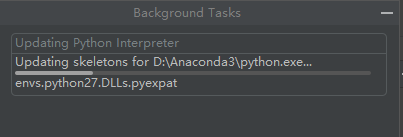
Simultaneously report an error:
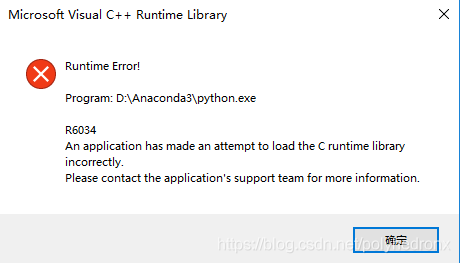
Found a solution to this problem on Stack Overflow, so share it here. Click here for the original.
Step1: download Process Explorer and open procexp.exe inside.
Step2: select view-& gt from the menu of software interface; lower pane view -> Then find the Python. exe under the Pycharm directory and click, and the bottom pane should display a list of DLLs loaded for the application.
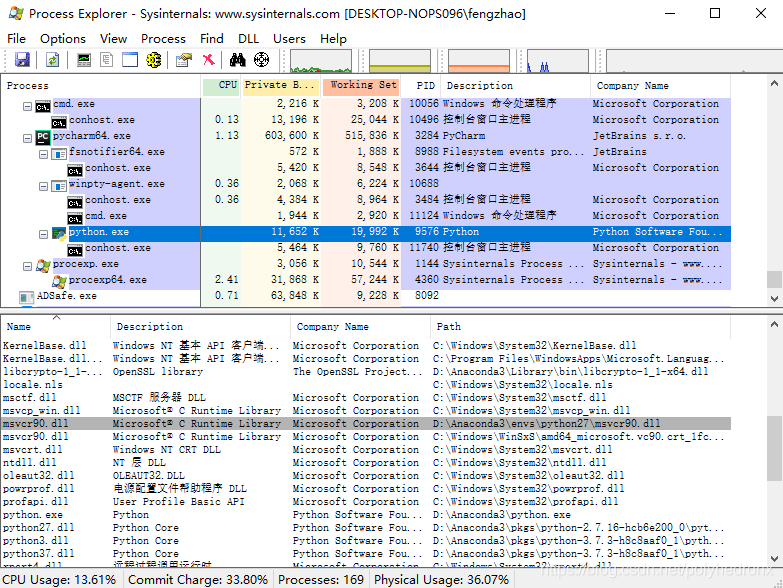
Step3: find “MSVCR??” in the DLL list. .DLL “, pay attention to the following path, as long as it is not under the path of “C:\Windows\WinSxS”, it should be deleted or renamed the suffix. For example, in the figure above, there is a MSvCR90. DLL under D:\Anaconda3\envs\ Python27 \msvcr90. DLL. Find it and rename it “MSvCR90. DLL -bak”.
Step4: restart pycharm and it will be ok.
firefox sec_error_untrusted_issuer
please install firefox [url=https://addons.mozilla.org/zh-cn/firefox/addon/foxyproxy-standard/] FoxyProxy [/ url]
firefox needs to import the certificate, open firefox -> Options – & gt; Advanced – & gt; Encryption – & gt; View certificate -& GT; Certificate Authority -& GT; Import certificate, select Ca. CRT (attached), check all items, import.
rules for adding agents.
is working properly.
but the following problems will occur:
[color=red]firefox sec_error_untrusted_issuer[/color]
solution
[img]http://dl.iteye.com/upload/picture/pic/122368/d378a637-4b15-3bef-b62d-18be23033245.jpg[/img]
The requested resource is not found