Tag Archives: Operation and maintenance

Info:Memory module [DIMM] needs attention: Single-bit warning error rate exceeded, Single-bit fai…

Why can’t 80% of code farmers be architects?> > >
Dell server hardware monitoring software OpenManager, can monitor the battery, motherboard, temperature, hard disk, and so on. See installation usage
While monitoring OpenManage(OMSA) for Dell Server installation, you may encounter the following error message: Info:Memory Module 6 [DIMM7, 2048 MB] Needs attention: single-bit warning error rate Exceeded, Single-bit Failure Error rate Exceeded. Need to shut down and replug the memory bar. Due to the need to shut down service shutdown, will affect the business. But the problem will always be reported. Everyone would be upset if they got an alarm. Memory monitoring can be shielded as follows:

check_openmanage --check storage -b dimm=all

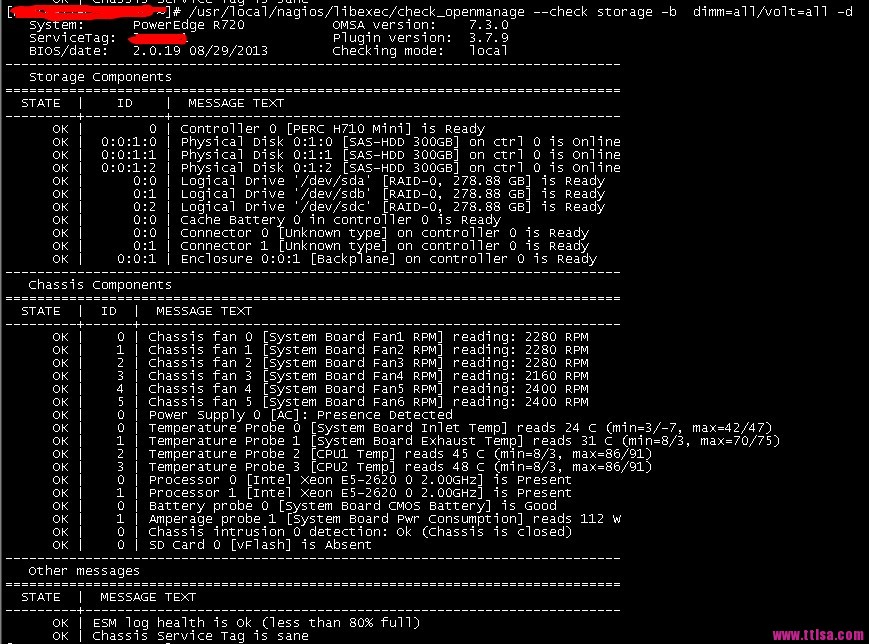
can see that the memory and Voltage are not tested. Memory will be detected without dimm=all.
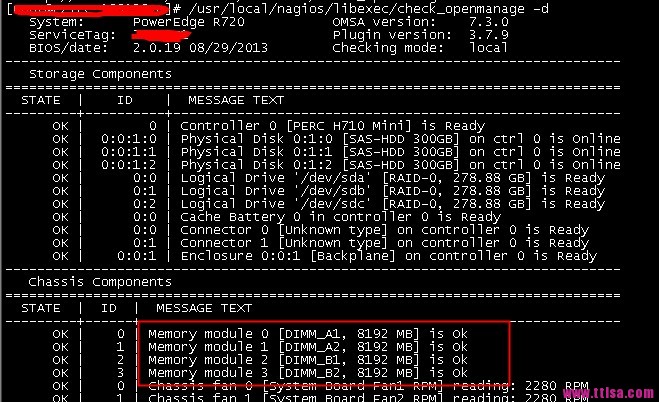
is able to block the detection of relevant hardware. Such as temperature detection and so on. Such as:

/usr/local/nagios/libexec/check_openmanage --check storage -b ctrl_fw=all/ctrl_driver=all/ctrl_stdr=all/bat_charge=all/encl=all/ps=all/fan=all/temp=all/volt=all

Please quote from
Dimensional time: http://www.ttlsa.com/html/3880.html

Reproduced in: https://my.oschina.net/766/blog/211381

No Internet access error 137 (net::ERR_NAME_RESOLUTION_FAILED): Solution to unknown error

Internet Explorer, Chrome can’t surf the Internet, but Firefox can, QQ and other clients can also surf the Internet.

chrome error code: error 137 (net::ERR_NAME_RESOLUTION_FAILED): unknown error.

thought it was a DNS resolution problem, so it changed to 8.8.8.8 8.8.4.4 and so on. I can’t.

the reason is that I installed a local PHP running server: APMServ5.2.6. After using its software conflict resolution feature, I found a problem:

Finally, administrator open CMD →netsh winsock reset → restart the computer and solve the problem.

source: http://hi.baidu.com/tzg18/item/dbf826f2fd683f733d198b1b

DHCP principle and experimental verification

I. Function overview
The main function of DHCP (Dynamic Host Configuration Protocol) is to centrally manage and assign IP addresses, so that hosts in the network environment can dynamically obtain IP address, Gateway address, DNS server address and other information, and improve the utilization rate of addresses.
DHCP protocol adopts the client/server model: When the DHCP server receives the address application information from the network host, it will send the relevant address configuration information to the network host to realize the dynamic configuration of the network host address information.
Ii. Working principle
DHCP USES UDP as the transport protocol. The host sends the request message to port 67 of DHCP server, and the DHCP server responds the reply message to port 68 of the host. The detailed interaction is as follows.
(1) DHCP Client sends DHCP Discover message by broadcasting.

    (2) all DHCP servers can receive DHCP Discover message sent by the DHCP Client, and all DHCP servers will give a response and send a DHCP Offer message to the DHCP Client. (3) The “Your(Client) IP Address” field in the DHCP Offer packet is the IP Address that DHCP Server can provide to THE DHCP Client, and DHCP Server will put its IP Address in the “Option” field so that DHCP Client can distinguish different DHCP servers. The DHCP Server will have a record of the assigned IP address after sending this message. (4) DHCP Client can only handle one DHCP Offer packet among them, and the general principle is that DHCP Client can handle the DHCP Offer packet that it receives first. (5) The DHCP Client will send a broadcast DHCP Request message, and add the IP address and the required IP address of the selected DHCP Server into the option field. (6) After the DHCP Server receives the DHCP Request message, it shall determine whether the IP address in the option field is the same as its own address. If it is not the same, DHCP Server does not do anything but clear the corresponding IP address assignment record; If the same is true, the DHCP Server will respond to the DHCP Client with a DHCP ACK packet and add the usage lease information for the IP address in the options field. (7) After the DHCP Client receives the DHCP ACK packet, it shall check whether the IP address assigned by the DHCP Server can be used. If it can be used, then the DHCP Client successfully obtains the IP address and automatically starts the renewal process by using the lease term according to the IP address; If the DHCP Client finds that the assigned IP address has been used, the DHCP Client will send the DHCP Decline message to the DHCPServer, notify the DHCPServer to disable this IP address, and then the DHCP Client will start the new address application process. (8) After the DHCP Client successfully obtains the IP address, it can Release its IP address at any time by sending THE DHCP Release message. After the DHCP Server receives the DHCP Release message, it will recover the corresponding IP address and reassigned it. 3. Experimental verification: After DHCP services are configured on servers and network devices (routers and switches), DHCP can generally be used as DHCP servers. In this experiment, routers were used to simulate the network topology, as shown in the figure below: In the 
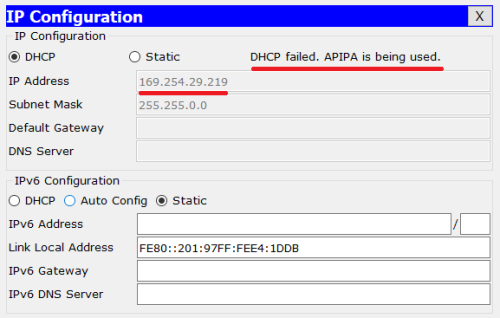
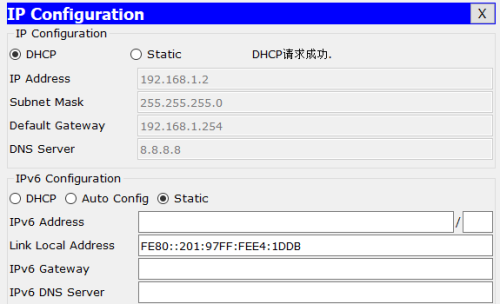
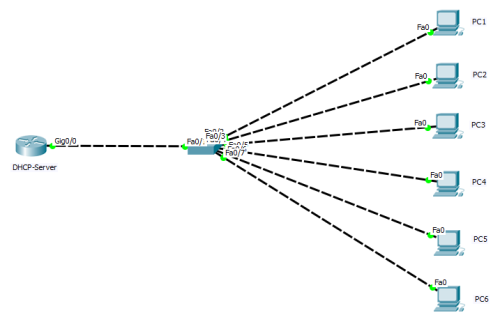
diagram, routers were dhCP-server and switches were two-layer devices (switch ports connected to PC1-6 hosts were all in the default VLAN 1).

1. Before the configuration of dhcp-server is completed, PC1 is configured to DHCP to get the IP address, which is shown as follows:

The result shows “DHCP failed. APIPA is being used”, indicating that the IP address was not successfully obtained (generally a “169.254.0.0/16” segment address is displayed, indicating that the IP address was not obtained from the DHCP server).
2. Configure DHCP related information on the router:
(1) configure port IP as shown in the figure below:

(2) configure DHCP service as shown in the figure below:

3. At this point, verify the IP address acquisition above PC1:

As can be seen from the figure above, PC1 successfully obtained the CONFIGURATION information of IP address, gateway, DNS-Server, etc.

Reproduced in: https://blog.51cto.com/13401027/1977218

SSH connection to MAC server shows No route to host solution

First, the MAC operating system is 10

When other computers SSH into a MAC server, sometimes they can log in, and the display shows no route to host
Jenkins installed on the MAC was also accessed through the browser, but the response was slow. After the following modifications, it could be used normally.
 
1. System preference setting & GT; > Sharing & gt; > Check file sharing, log in, remote management

 
It is also possible that the computer is in sleep state, so cut off the network, the following configuration, so that the computer does not go to sleep even if the monitor is turned off.
2. System preference setting & GT; > Energy-saving & gt; > When the monitor is turned off, prevent the computer from falling asleep automatically

3. Desktop and Protector & GT; > Screen saver & GT; > Idle options before starting [never]

With reference to
https://jingyan.baidu.com/article/ae97a64606acfabbfd461d9d.html


Reproduced in: https://www.cnblogs.com/kaerxifa/p/11382652.html

ESXi creates datastore error Fail to create VMFS datastore solution

When you create a new data warehouse datastore in VMware vShere/ESXi, the following error message pops up! “Fail to create VMFS Datastore VMFS XXXX” – Cannot change the host Configuration. For the first time, it’s hard to know what to do about this bug, so here’s how to fix it!

Log in to your VMware vShere/ESXi host using SSH or Telnet, and run the following command, which lists all the storage partitions, and then copy out the ID number of the partition where the creation failed. My example is shown in red below.

Then enter the copied id after the following command:

Then fix it with the following command:

With the above fixes, you can go back to VMware vShere/ESXi host again to create datastore and no longer report errors!
Attach a KB for reference: https://kb.vmware.com/s/article/1008886

Pod reports error “Back-off restarting failed container” solution

Pod error “back-off Restarting Failed Container” solution
Phenomenon:

Events:
  Type     Reason          Age                  From                         Message
  ----     ------          ----                 ----                         -------
  Normal   Scheduled       3m                   default-scheduler            Successfully assigned default/jenkins-master-deploy-6694c4f497-r46fn to master.localdomain
  Normal   SandboxChanged  85s                  kubelet, master.localdomain  Pod sandbox changed, it will be killed and re-created.
  Normal   Pulled          83s (x5 over 2m59s)  kubelet, master.localdomain  Container image "drud/jenkins-master:v0.29.0" already present on machine
  Normal   Created         83s (x5 over 2m59s)  kubelet, master.localdomain  Created container jenkins-master
  Normal   Started         81s (x5 over 2m59s)  kubelet, master.localdomain  Started container jenkins-master
  Warning  BackOff         78s (x9 over 2m57s)  kubelet, master.localdomain  Back-off restarting failed container

Solution:
reference page:

https://serverfault.com/questions/924243/back-off-restarting-failed-container-error-syncing-pod-in-minikube in deployment that mirror followed by the command
command: [“/bin/bash “, “- ce”, “tail -f/dev/null”]

kind: Deployment
apiVersion: apps/v1beta2
metadata:
  labels:
    app: jenkins-master
  name: jenkins-master-deploy
spec:
  replicas: 1
  selector:
    matchLabels:
      app: jenkins-master
  template:
    metadata:
      labels:
        app: jenkins-master
    spec:
      containers:
      - name: jenkins-master
        image: drud/jenkins-master:v0.29.0
        imagePullPolicy: IfNotPresent
        command: [ "/bin/bash", "-ce", "tail -f /dev/null" ]
        volumeMounts:
        - mountPath: /var/jenkins_home/
          name: masterjkshome
        ports:
        - containerPort: 8080
      volumes:
      - name: masterjkshome
        persistentVolumeClaim:
          claimName: pvcjkshome


Login failed in rabbitmq

First, use the following command to see why the log is logged:

 tail /var/log/rabbitmq/rabbit\@wzb1.log

Note: The default user guest only allows localhost login.
 
To create a remote login user, the guest user can only run under localhost:

rabbitmqctl add_user admin admin
rabbitmqctl set_user_tags admin administrator
rabbitmqctl set_permissions -p/admin ".*" ".*" ".*"


Mac install pycurl error: python setup.py egg_info" failed with error code 1”

(env3) [MrYang:Desktop]$ python3 -m pip install pycurl
Looking in indexes: http://mirrors.aliyun.com/pypi/simple/
Collecting pycurl
  Downloading http://mirrors.aliyun.com/pypi/packages/e8/e4/0dbb8735407189f00b33d84122b9be52c790c7c3b25286826f4e1bdb7bde/pycurl-7.43.0.2.tar.gz (214kB)
    100% |████████████████████████████████| 215kB 3.1MB/s
    Complete output from command python setup.py egg_info:
    Using curl-config (libcurl 7.43.0)
    Traceback (most recent call last):
      File "<string>", line 1, in <module>
      File "/private/var/folders/dx/m2t9qg010gg9pk5v8xzt4gxc0000gn/T/pip-install-bn546qog/pycurl/setup.py", line 913, in <module>
        ext = get_extension(sys.argv, split_extension_source=split_extension_source)
      File "/private/var/folders/dx/m2t9qg010gg9pk5v8xzt4gxc0000gn/T/pip-install-bn546qog/pycurl/setup.py", line 582, in get_extension
        ext_config = ExtensionConfiguration(argv)
      File "/private/var/folders/dx/m2t9qg010gg9pk5v8xzt4gxc0000gn/T/pip-install-bn546qog/pycurl/setup.py", line 99, in __init__
        self.configure()
      File "/private/var/folders/dx/m2t9qg010gg9pk5v8xzt4gxc0000gn/T/pip-install-bn546qog/pycurl/setup.py", line 316, in configure_unix
        specify the SSL backend manually.''')
    __main__.ConfigurationError: Curl is configured to use SSL, but we have not been able to determine which SSL backend it is using. Please see PycURL documentation for how to specify the SSL backend manually.

    ----------------------------------------
Command "python setup.py egg_info" failed with error code 1 in /private/var/folders/dx/m2t9qg010gg9pk5v8xzt4gxc0000gn/T/pip-install-bn546qog/pycurl/

The solution is as follows
# First upgrade PIP
Sudo Python-m PIP install — Upgrade — Force PIP
You can then specify the version number to install (the version number can be found in the error log)
Sudo PIP install pycurl = = 7.43.0
 

FileZilla Server prompts 550 Could not open file for reading when downloading files (illustration)

This error prompts me to study for an hour, finally found that it was because the downloaded file was occupied by another program, so it could not be downloaded.
Solutions:
Open the FileZilla Server admin screen – Settings -Miscellaneous-Allow M.E. of files which are open for writing by another process.
The diagram below:

Swap off failed: cannot allocate memory

swap partition closes

is ready to adjust the utilization of the swap partition under Linux.

executing swapoff-a-v under Linux reports the following error:

swapoff: /dev/mapper/cryptswap1: swapoff failed: Cannot allocate memory

error cause analysis:

can be seen from the above information, the current Linux/dev/mapper/cryptswap1 this device as a swap partition, if the current swap partition instead of the current remaining capacity is greater than the system memory, will quote this mistake, because at the time of closing swap partition, all need to partition data written to the memory, if the memory capacity is insufficient, will cause the error.

resolved:

method 1: free memory cache

# sync ; echo 3 > /proc/sys/vm/drop_caches  #先把内存数据回写到磁盘,然后释放内存缓存

drop_caches accepted parameters are 1, 2, 3, empting pagecache, slab object, pagecahce, and slab object

, respectively

parameters explanation to this file can be found from https://github.com/torvalds/linux/blob/master/Documentation/sysctl/vm.txt:

drop_caches

Writing to this will cause the kernel to drop clean caches, as well as
reclaimable slab objects like dentries and inodes.  Once dropped, their
memory becomes free.

To free pagecache:
    echo 1 > /proc/sys/vm/drop_caches
To free reclaimable slab objects (includes dentries and inodes):
    echo 2 > /proc/sys/vm/drop_caches
To free slab objects and pagecache:
    echo 3 > /proc/sys/vm/drop_caches

dirty state memory cache will not be freed. To free as much memory cache as possible, first execute the command sync to reduce memory cache in the dirty state. If disable, the input parameter 4, note that 0 is not acceptable:

the above method may not work if you use too much swap partition.

method 2: allows memory overcommit

overcommit_memory controls “when user space requests memory, overcommit and approve:

When this flag is 0, the kernel attempts to estimate the amount
of free memory left when userspace requests more memory.

When this flag is 1, the kernel pretends there is always enough
memory until it actually runs out.

When this flag is 2, the kernel uses a "never overcommit"
policy that attempts to prevent any overcommit of memory.
Note that user_reserve_kbytes affects this policy.

2 means overcommit is not allowed. At this point, if swap is stopped, the available memory is reduced and the user space memory request may trigger overcommit to be rejected.


Reference

https://www.lijiaocn.com/%E9%97%AE%E9%A2%98/2019/02/27/linux-swap-off-fail.html

reproduced in: https://www.cnblogs.com/yjt1993/p/11163679.html

Error analysis of veeam backup: failed to create NFC download stream

Veeam backup virtual machine error: Failed to create NFC download stream.

log is:

2017/8/13 22:06:15 :: Processing 10.1_ad02 Error: DiskLib Error: [11].

Failed to create NFC download stream. The NFC path: [NFC:// conn: 192.168.10.12 nfchost: ha – host, STG: 5942 [email protected]_ad02/10.112 _AD02. VMX].

root cause analysis: https://www.veeam.com/kb1198

1, port problems, Telnet host 902 port can be excluded;

2. Access problem, re-verify the root account when adding the host;

3. Physical host setup problem, check DNS;

final problem:

added by physical host, named Chinese caused, changed because English character backup copy is normal

reproduced in: https://blog.51cto.com/aragoon/2398864

Centos8 solves SSH secure shell error algorithmic negotiation failures

the new server version has arrived at CentOS8 today, but SSH Secure Shell is still 3.2.9 years ago, so I encountered an error in the title when connecting to the server. This question is a tragic waste of my time.

there are many, many posts on the web that address this problem, and they all go like this:

Sshd_config
sudo vim /etc/ssh/sshd_config

2. at the end of the file add the following information
Ciphers either aes128 – CBC, aes192 – CBC, aes256 – CBC, either aes128 – CTR, aes192 – CTR, aes256 – CTR, 3 des – CBC, arcfour128, arcfour256, arcfour, blowfish – CBC, cast128 – CBC
MACs Hmac – md5, hmac – sha1, [email protected], hmac – ripemd160 digest, hmac – sha1-96, hmac – md5-96
KexAlgorithms diffie-hellman-group1-sha1,diffie-hellman-group14-sha1,diffie-hellman-group-exchange-sha1,diffie-hellman-group-exchange-sha256,ecdh-sha2-nistp256,ecdh-sha2-nistp384,ecdh-sha2-nistp521,diffie-hellman-g roup1-sha1,[email protected]

3. after saving SSH service
sudo /etc/init.d/ SSH restart

everyone said it was good, but after I tried it, it was tragic. After I added the configuration, I could not restart SSH and it would report an error.

these two articles explain the real reason and offer a solution:

https://blog.csdn.net/pgmzyy/article/details/88586101

https://blog.csdn.net/Vertoria/article/details/82226340

, however, I still failed to solve the problem, and finally decided to abandon the outdated SSH Secure Shell Client and replace it with FileZilla to solve the problem: FileZilla also supports SSH protocol to transfer files, and its operation is slightly more humane than SSH Secure Shell Client