Tag Archives: OpenGL

Implementation of OpenGL rotating cube


Topic request
OpenGL is used to implement a rotating cube.


Process steps
It is mainly divided into two parts: setting up the environment and completing the code writing.
Set up the environment
TDM GCC 4.9.2code>TDM GCC 4.9.2 TDM GCC 4.9.2 TDM GCC 4.9.2 TDM GCC 4.9.2

File - & gt; New - & gt; Project - & gt; Multimedia -> OpenGL

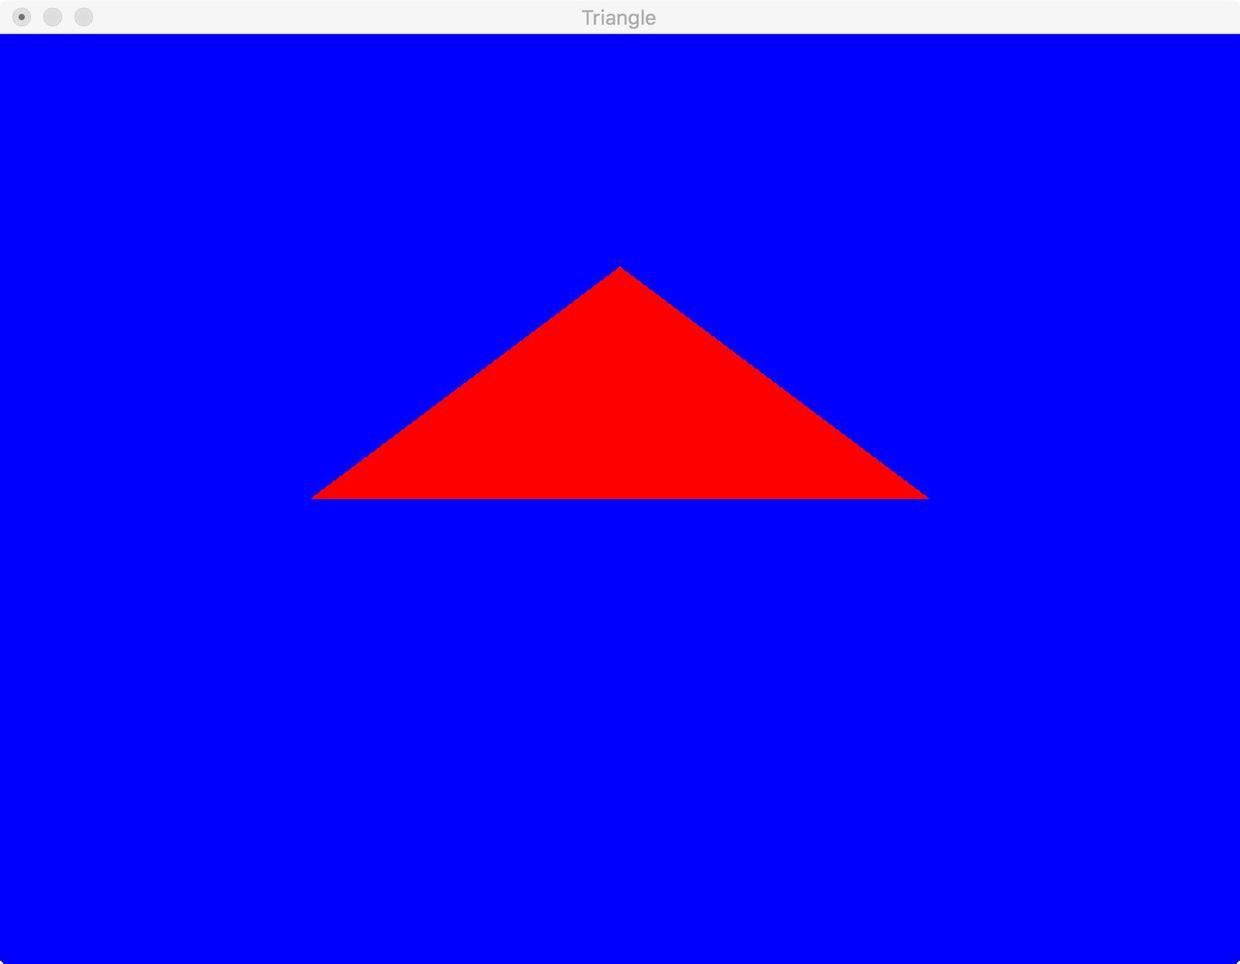
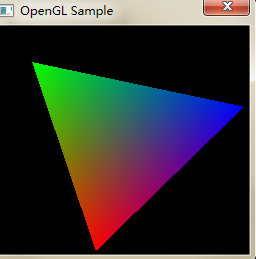
directly compile and run the Demo, which will show a rotating triangle as shown in the image below:


> > >

Will be relevant. DLL file copy to the C: \ Windows \ system32 directory
the related. Lib file copy to D: \ \ Program Files \ Dev - Cpp \ MinGW64 \ x86_64 - w64 - mingw32 \ lib32 directory
the related. H file copy to D: \ \ Program Files \ Dev - Cpp \ MinGW64 \ include \ GL directory
the last link is added in the compiler options, Set the appropriate compilation options under Linux and in the Makefile.

Draw cube
void cube()/ code>void cube()
glBegin()
and > glEnd()e> > glColor3f()>>glVertex3f()e> /code> glVertex3f() glVertex3f() glVertex3f()

void cube()
{
    glBegin(GL_QUADS);
    glColor3f(1.0,1.0,0.0);            
    glVertex3f( 1.0, 1.0,-1.0);        
    glColor3f(0.0,1.0,0.0);            
    glVertex3f(-1.0, 1.0,-1.0);        
    glColor3f(0.0,1.0,1.0);            
    glVertex3f(-1.0, 1.0, 1.0);        
    glColor3f(1.0,1.0,1.0);            
    glVertex3f( 1.0, 1.0, 1.0);        

    glColor3f(1.0,0.0,1.0);            
    glVertex3f( 1.0,-1.0, 1.0);        
    glColor3f(0.0,0.0,1.0);            
    glVertex3f(-1.0,-1.0, 1.0);        
    glColor3f(0.0,0.0,0.0);            
    glVertex3f(-1.0,-1.0,-1.0);        
    glColor3f(1.0,0.0,0.0);            
    glVertex3f( 1.0,-1.0,-1.0);        

    glColor3f(1.0,1.0,1.0);            
    glVertex3f( 1.0, 1.0, 1.0);        
    glColor3f(0.0,1.0,1.0);            
    glVertex3f(-1.0, 1.0, 1.0);        
    glColor3f(0.0,0.0,1.0);            
    glVertex3f(-1.0,-1.0, 1.0);        
    glColor3f(1.0,0.0,1.0);            
    glVertex3f( 1.0,-1.0, 1.0);        

    glColor3f(1.0,0.0,0.0);            
    glVertex3f( 1.0,-1.0,-1.0);        
    glColor3f(0.0,0.0,0.0);            
    glVertex3f(-1.0,-1.0,-1.0);        
    glColor3f(0.0,1.0,0.0);            
    glVertex3f(-1.0, 1.0,-1.0);        
    glColor3f(1.0,1.0,0.0);            
    glVertex3f( 1.0, 1.0,-1.0);        

    glColor3f(0.0,1.0,1.0);            
    glVertex3f(-1.0, 1.0, 1.0);        
    glColor3f(0.0,1.0,0.0);            
    glVertex3f(-1.0, 1.0,-1.0);        
    glColor3f(0.0,0.0,0.0);            
    glVertex3f(-1.0,-1.0,-1.0);        
    glColor3f(0.0,0.0,1.0);            
    glVertex3f(-1.0,-1.0, 1.0);        

    glColor3f(1.0,1.0,0.0);            
    glVertex3f( 1.0, 1.0,-1.0);        
    glColor3f(1.0,1.0,1.0);            
    glVertex3f( 1.0, 1.0, 1.0);        
    glColor3f(1.0,0.0,1.0);            
    glVertex3f( 1.0,-1.0, 1.0);        
    glColor3f(1.0,0.0,0.0);            
    glVertex3f( 1.0,-1.0,-1.0);        
    glEnd();                            
}

The cube rotates about its axis
In OpenGL, glRotatef()nction is used to achieve rotation at a specific Angle. However, to achieve rotation, it is necessary to keep changing the parameters of rotation Angle. Here, we control the rotation of the cube around three axes by setting three static variables and allowing them to increase automatically, and control the rotation speed by changing the increment.

static float xrot = 0.0; 
static float yrot = 0.0; 
static float zrot = 0.0; 
glRotatef(xrot, 1, 0, 0);
glRotatef(yrot, 0, 1, 0);
glRotatef(zrot, 0, 0, 1);
cube();
xrot = xrot + 0.01;
yrot = yrot + 0.01;
zrot = zrot + 0.01;

The cube moves along an axis
glTranslatRef ()nction Specifies the position of the cube in the 3D coordinate system in OpenGL. Here let’s take the Z axis as an example and let the cube move back and forth, where H is used to control the speed of motion:

static float z=-5;
static float h=-0.001;
glTranslatef(0, 0, z);
z=z+h;
if(z<-10)
    h=-h;
if(z>-5)
    h=-h;

This completes the simple rotation and axis movement of the cube.


The problem

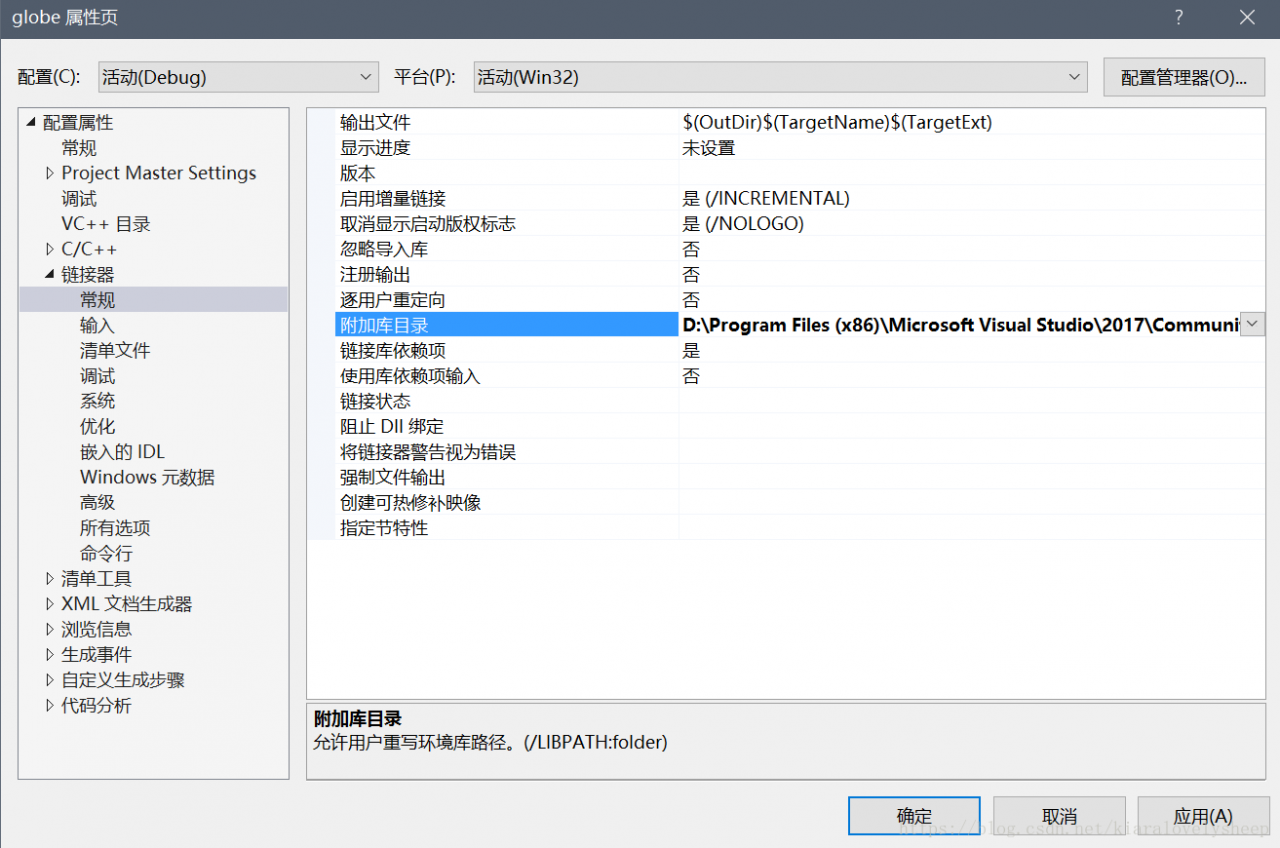
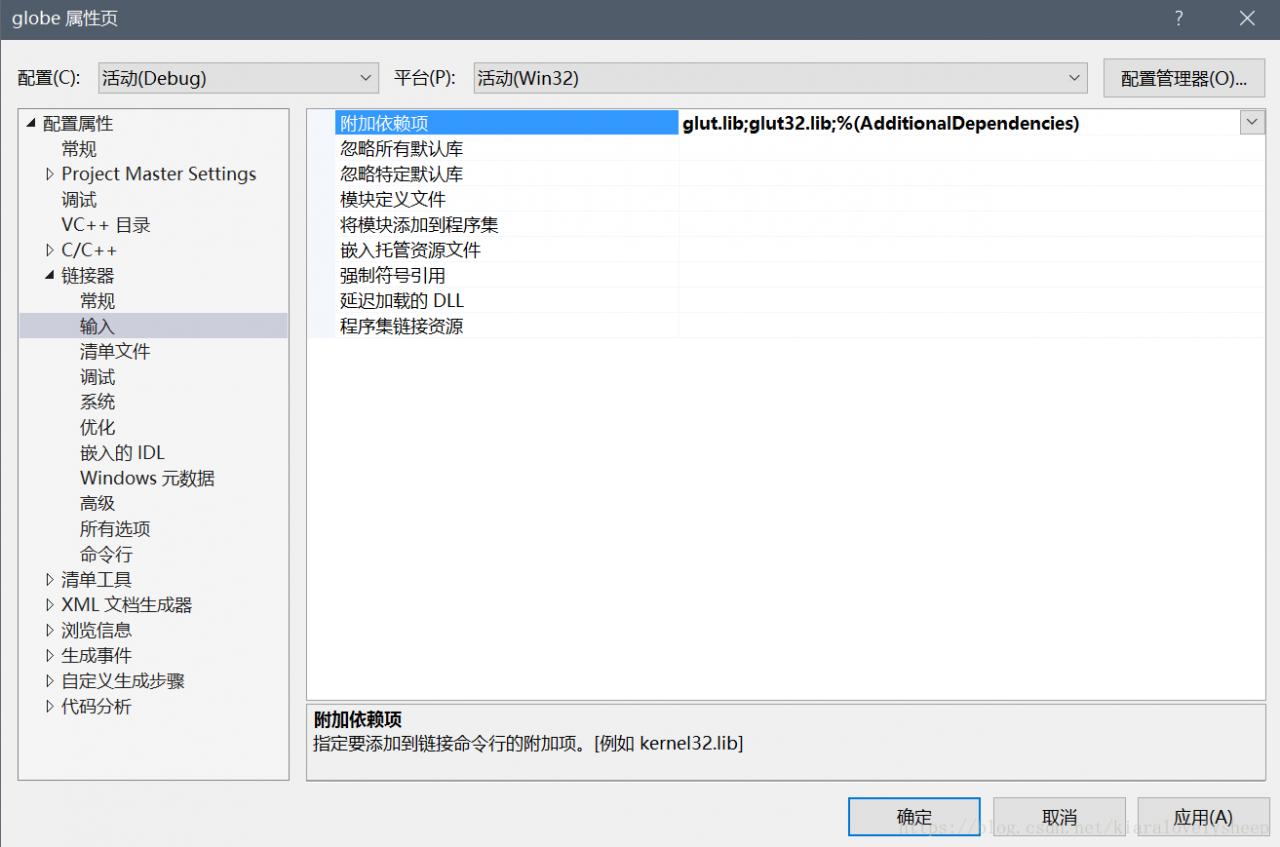
mainly compiler options. At the same time, references the glut in lib and glut32 lib, and in the compiler options - lglut - lglut32 front, the linker when first looking for OPENGL. DLL without looking for opengl32. DLL, at the moment we entered the DEV in c + + project configuration in the face of the changes:

Project - & gt; Project Properties ->; Parameters - & gt; Link
- lopengl32
- lglut32// in front
- lglut
- LGLU
- lglu32

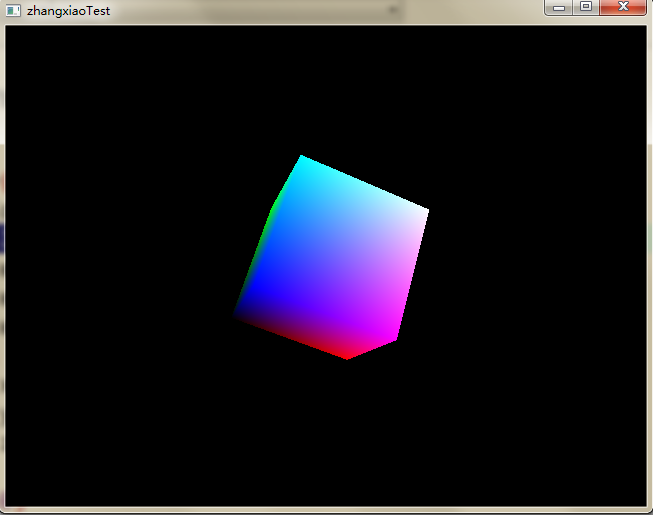
It compiles correctly and runs as expected:


tips
It took a week to finally complete the computer graphics such a simple big job - to achieve the rotation of the cube.
in the code level, is very simple, because of the content is not much involved, and provided a good OpenGL function encapsulation, the Internet has a lot of similar sample.
The most troublesome part is the environment construction, because OpenGL is an open source project, there is no very authoritative manual guide, so the online case is also good and bad, learning efficiency is very low.
in the beginning, for example, to find a project, use the Glaux , finally you can compile all that trouble found that can't run, then online and others said the Glaux basic deprecated , and Windows 7 didn't seem to support, had to start from scratch.

Drawing a cube with OpenGL

So let’s draw a cube in OpenGL

When you use OpenGL to draw a cube, you actually draw multiple triangles, and the triangles end up being stitched together into a cube.

#include "glew.h"
#include <glfw3.h>
#include "common/loadShader.h"
#include "glm.hpp"
#include "ext.hpp"

int main(void)
{
	GLFWwindow* window;

	/* Initialize the library */
	if (!glfwInit())
		return -1;

	/* Create a windowed mode window and its OpenGL context */
	window = glfwCreateWindow(480, 320, "Hello World", NULL, NULL);
	if (!window)
	{
		glfwTerminate();
		return -1;
	}

	/* Make the window's context current */
	glfwMakeContextCurrent(window);

	// Needed in core profile
	if( glewInit() != GLEW_OK)
	{
		glfwTerminate();
		return -1;
	}

	// Our vertices. Tree consecutive floats give a 3D vertex; Three consecutive vertices give a triangle.
	// A cube has 6 faces with 2 triangles each, so this makes 6*2=12 triangles, and 12*3 vertices
	static const GLfloat g_vertex_buffer_data[] = {
		-1.0f,-1.0f,-1.0f, //triangle 1 : begin
		-1.0f,-1.0f,1.0f,
		-1.0f,1.0f,1.0f,  //triangle 1 : end
		1.0f, 1.0f,-1.0f, // triangle 2 : begin
		-1.0f,-1.0f,-1.0f,
		-1.0f, 1.0f,-1.0f, // triangle 2 : end
		1.0f,-1.0f, 1.0f,
		-1.0f,-1.0f,-1.0f,
		1.0f,-1.0f,-1.0f,
		1.0f, 1.0f,-1.0f,
		1.0f,-1.0f,-1.0f,
		-1.0f,-1.0f,-1.0f,
		-1.0f,-1.0f,-1.0f,
		-1.0f, 1.0f, 1.0f,
		-1.0f, 1.0f,-1.0f,
		1.0f,-1.0f, 1.0f,
		-1.0f,-1.0f, 1.0f,
		-1.0f,-1.0f,-1.0f,
		-1.0f, 1.0f, 1.0f,
		-1.0f,-1.0f, 1.0f,
		1.0f,-1.0f, 1.0f,
		1.0f, 1.0f, 1.0f,
		1.0f,-1.0f,-1.0f,
		1.0f, 1.0f,-1.0f,
		1.0f,-1.0f,-1.0f,
		1.0f, 1.0f, 1.0f,
		1.0f,-1.0f, 1.0f,
		1.0f, 1.0f, 1.0f,
		1.0f, 1.0f,-1.0f,
		-1.0f, 1.0f,-1.0f,
		1.0f, 1.0f, 1.0f,
		-1.0f, 1.0f,-1.0f,
		-1.0f, 1.0f, 1.0f,
		1.0f, 1.0f, 1.0f,
		-1.0f, 1.0f, 1.0f,
		1.0f,-1.0f, 1.0f
	};

	
	//This will identify our vertex buffer
	GLuint vertexbuffer;

	
	//Generate 1 buffer,put the resulting identifier in vertexbuffer
	glGenBuffers(1,&vertexbuffer);		

	//The following commands will talk about our 'vertexbuffer' buffer
	glBindBuffer(GL_ARRAY_BUFFER,vertexbuffer);

	//Give our vertices to OpenGL.
	glBufferData(GL_ARRAY_BUFFER,sizeof(g_vertex_buffer_data),g_vertex_buffer_data,GL_STATIC_DRAW);


	// One color for each vertex. They were generated randomly.
	static const GLfloat g_color_buffer_data[] = {
		0.583f, 0.771f, 0.014f,
		0.609f, 0.115f, 0.436f,
		0.327f, 0.483f, 0.844f,
		0.822f, 0.569f, 0.201f,
		0.435f, 0.602f, 0.223f,
		0.310f, 0.747f, 0.185f,
		0.597f, 0.770f, 0.761f,
		0.559f, 0.436f, 0.730f,
		0.359f, 0.583f, 0.152f,
		0.483f, 0.596f, 0.789f,
		0.559f, 0.861f, 0.639f,
		0.195f, 0.548f, 0.859f,
		0.014f, 0.184f, 0.576f,
		0.771f, 0.328f, 0.970f,
		0.406f, 0.615f, 0.116f,
		0.676f, 0.977f, 0.133f,
		0.971f, 0.572f, 0.833f,
		0.140f, 0.616f, 0.489f,
		0.997f, 0.513f, 0.064f,
		0.945f, 0.719f, 0.592f,
		0.543f, 0.021f, 0.978f,
		0.279f, 0.317f, 0.505f,
		0.167f, 0.620f, 0.077f,
		0.347f, 0.857f, 0.137f,
		0.055f, 0.953f, 0.042f,
		0.714f, 0.505f, 0.345f,
		0.783f, 0.290f, 0.734f,
		0.722f, 0.645f, 0.174f,
		0.302f, 0.455f, 0.848f,
		0.225f, 0.587f, 0.040f,
		0.517f, 0.713f, 0.338f,
		0.053f, 0.959f, 0.120f,
		0.393f, 0.621f, 0.362f,
		0.673f, 0.211f, 0.457f,
		0.820f, 0.883f, 0.371f,
		0.982f, 0.099f, 0.879f
	};
	GLuint colorbuffer;
	glGenBuffers(1,&colorbuffer);
	glBindBuffer(GL_ARRAY_BUFFER,colorbuffer);
	glBufferData(GL_ARRAY_BUFFER,sizeof(g_color_buffer_data),g_color_buffer_data,GL_STATIC_DRAW);


	GLuint programID = LoadShaders("./shader/vertex.shader","./shader/fragment.shader");
	glUseProgram(programID);
	glClearColor(0.0f, 0.0f, 0.4f, 0.0f);
	/* Loop until the user closes the window */

	// Projection matrix : 45° Field of View, 4:3 ratio, display range : 0.1 unit  100 units
	//glm::mat4 Projection = glm::ortho(-4.0f/3.0f, 4.0f/3.0f, -1.0f, 1.0f, 0.1f, 100.0f);
	glm::mat4 Projection = glm::perspective(45.0f,4.0f/3.0f,0.1f,100.f);
	glm::mat4 View = glm::lookAt(
		glm::vec3(4,3,-3), // Camera is at (4,3,3), in World Space
		glm::vec3(0,0,0), // and looks at the origin
		glm::vec3(0,1,0) // Head is up (set to 0,-1,0 to look upside-down)		
		);

	//Model matrix : an identity matrix (model will be at the origin)
		glm::mat4 Model = glm::mat4(1.0f);
		
		// Our ModelViewProjection : multiplication of our 3 matrices
		glm::mat4 MVP = Projection * View * Model;// Remember, matrix multiplication is the other way around


		// Get a handle for our "MVP" uniform.
		// Only at initialisation time.
		GLuint MatrixID = glGetUniformLocation(programID,"MVP");
	
		// Send our transformation to the currently bound shader,
		// in the "MVP" uniform
		// For each model you render, since the MVP will be different (at least the M part)
		glUniformMatrix4fv(MatrixID,1,GL_FALSE,&MVP[0][0]);


	while (!glfwWindowShouldClose(window))
	{
		glClear(GL_COLOR_BUFFER_BIT | GL_DEPTH_BUFFER_BIT);


		glEnableVertexAttribArray(0);
		glBindBuffer(GL_ARRAY_BUFFER,vertexbuffer);
		glVertexAttribPointer(
			0,			// attribute 0. No particular reason for 0, but must match the layout in the shader.
			3,			// size
			GL_FLOAT,	// type
			GL_FALSE,	// normalized?
			0,			// stride
			(void*)0	// array buffer offset
			);

		glEnableVertexAttribArray(1);
		glBindBuffer(GL_ARRAY_BUFFER,colorbuffer);	
		glVertexAttribPointer(
			1,			// attribute 0. No particular reason for 0, but must match the layout in the shader.
			3,			// size
			GL_FLOAT,	// type
			GL_FALSE,	// normalized?
			0,			// stride
			(void*)0	// array buffer offset
			);
		
		glDrawArrays(GL_TRIANGLES,0,12*3);// Starting from vertex 0; 3 vertices total -> 1 triangle
		glEnable(GL_DEPTH_TEST);
		glDepthFunc(GL_LESS);


		glDisableVertexAttribArray(0);
		glDisableVertexAttribArray(1);
		/* Swap front and back buffers */
		glfwSwapBuffers(window);

		/* Poll for and process events */
		glfwPollEvents();
	}

	glfwTerminate();
	return 0;
}

vertex.shader

version 330 core

layout(location = 0) in vec3 vertexPosition_modelspace;
layout(location = 1) in vec3 vertexColor;

uniform mat4 MVP;
out vec3 fragmentColor;

void main(){
	vec4 v = vec4(vertexPosition_modelspace,1);
	gl_Position = MVP * v;
	// The color of each vertex will be interpolated
    // to produce the color of each fragment
	fragmentColor = vertexColor;
	
}

fragment.shader

out vec3 color;
in vec3 fragmentColor;

void main(){
	color = fragmentColor;
}

First, you set the vertex position, then the vertex color, glvertexattribute passes the data to the shader, and vertex.shader exports the vertex color to the fragment.shader. Note that glEnable (GL_DEPTH_TEST); glDepthFunc(GL_LESS); With the depth test turned on, the final triangle will be occluded based on the Z-axis position. If not, the occluded triangle will be determined based on the sequence of the drawings.

Building OpenGL environment

1. Introduction of OpenGL
OpenGL is a programming interface for creating real-time 3D images.
OpenGL is a professional graphical programming interface that defines a cross-language, cross-platform programming interface specification. It is used for three – dimensional images (two – dimensional also), is a powerful, easy to call the underlying graphics library.
The development of the OpenGL
OpenGL was originally Iris GL developed by SGI for its graphics workstation. OpenGL came into being in order to solve the shortcoming of poor portability. While Microsoft’s DirectX is leading the home market overall, OpenGL is the dominant player in professional high-end graphics. Direct3D currently doesn’t support high-end graphics devices and professional applications, where OpenGL dominates. OpenGL is favored by developers for its independent, platform-independent 3D graphics development library in game development. For more information, you can go to the official website and check out OpenGL’s official website.
Version of the course
In July 1992, SGI released the 1.0 version of OpenGL, and then jointly developed the Windows NT version of OpenGL with Microsoft, so that some of the large 3D graphics processing software that must run on the high-grade graphics workstation can also be used on the microcomputer.
1995 version 1.1 of OpenGL came out, improved printer support, included OpenGL calls in enhanced metafiles, new features for vertex arrays, improved transfer speeds for vertex positions, normals, colors, color indices, texture coordinates, polygonal edge markers, introduced new texture features, and more.
July 28, 2003, SGI and ARB release OpenGL 1.5, including the OpenGL ARB’s official extension specification drawing Language, “OpenGL Shading Language”. New features include: vertex Buffer Object, Shadow function, covert query, non-power texture, etc.
In August 2004, OpenGL2.0 version was released ~OpenGL 2.0 standard is not the original SGI, but gradually occupy the active position in the ARB 3DLabs. OpenGL2.0 supports OpenGL Shading Language, new shader extension features, and many other enhancements.
In early August 2008, the Khronos Working Group announced the OpenGL 3.0 Graphics Interface Specification at SIGGRAPH 2008. The GLSL1.30 Shader language and other new features will once again point the way to the future development of open 3D interfaces.
In March 2009, the updated version of the new specification OpenGL 3.1 was released. OpenGL 3.1 simplifies the entire API model system on the basis of the 3.0 version, which can greatly improve the efficiency of software development.
In August 2009, the Khronos team released OpenGL 3.2, which improved performance, visual quality, geometric processing speed, and made Direct3D programs easier to port to OpenGL.
OpenGL 4.1 and OpenGL Shading Language 4.10 were released on July 26, 2010. OpenGL4.1 improves interoperability for vision-intensive OpenCL™ applications and continues to accelerate computing profile for core support and compatibility with the first release of OpenGL 3.2, enabling developers to use a simplified API or retain backward compatibility with existing OpenGL code, depending on their market needs.
Khronos released details of the new OpenGL 4.2 standard at SIGGRAPH 2011 in Vancouver on August 9, 2011, adding some new support features to APIs that support existing hardware.
After the continuous improvement and update of predecessors, OpenGL has been updated to OpenGL 4.6 (2017-07-30) OpenGL Shading Language 4.60 (2017-07-23).
OpenGL builds environments on top of Xcode
1. Installation process
1. Open Xcode (install Xcode 9.1)->; macOS -> Cocoa App


2. Add OpenGL. Framework Glut. Framework System Library.


3. Add the include file and libgltool. a file. And in BuildSettings – & gt; Header -> Search -> Add the path to the.a file in the Paths.


M View Controller. H. M Main. M Delete the file AppDelegate.H. M ViewController. Replace the main entry. So all of this will have to be removed and replaced with the main function interface we’re going to use.


5. Create a replacement mian function, create a C ++ file, and tick off.h.


6. Copy the following code in the main function.

#include “GLTools.h”
#include < glut/glut.h>
#include “GLShaderManager.h”
GLBatch triangleBatch;
GLShaderManager shaderManager;
/** The new width and height received when the window size is changed. 0,0 is the coordinate at the bottom left corner of the window, w, h represents pixels */
void ChangeSize(int w,int h)
{
GlViewport (0, 0, w, h);
}
/** A one-time setup for the program */
void SetupRC()
{
// Set the back color
GlClearColor (0.0 f, f, 0.0 1.0 f, 1.0 f);
// Initialize the shader manager
shaderManager.InitializeStockShaders();
// Set triangles where the array VVERT contains x,y, and Cartesian coordinate pairs for all 3 vertices.
GLfloat vVerts[] = {
0.5 f, f 0.0, 0.0, f
0.5 f, f 0.0, 0.0 f,
0.0 f, f 0.5, 0.0 f,
}
// batch processing
triangleBatch.Begin(GL_TRIANGLES,3);
triangleBatch.CopyVertexData3f(vVerts);
triangleBatch.End();
}
// Start rendering
void RenderScene(void)
{
Clear one or a set of specific buffers
glClear(GL_COLOR_BUFFER_BIT|GL_DEPTH_BUFFER_BIT|GL_STENCIL_BUFFER_BIT);
// Set a set of floating-point numbers to represent red
GLfloat vRed [] = {0.0 1.0 f, f, f 0.0, 1.0} f;
// Pass to the storage shader, the GLT_SHADER_IDENTITY shader, which simply renders the geometry on the screen using the specified color in default Cartesian coordinates
shaderManager.UseStockShader(GLT_SHADER_IDENTITY,vRed);
// Submit the shader
triangleBatch.Draw();
// will render in the background buffer and then swap to the foreground at the end
glutSwapBuffers();
}
int main(int argc,char* argv[])
{
// Set the current working directory for Mac OS X
gltSetWorkingDirectory(argv[0]);
// Initialize the GLUT library
glutInit(& argc, argv);
/* Initialize a double-buffered window where the GLUT_DOUBLE, GLUT_RGBA, GLUT_DEPTH, and GLUT_STENCIL markers refer to double-buffered window, RGBA color mode, depth test, and template buffer */
glutInitDisplayMode(GLUT_DOUBLE|GLUT_RGBA|GLUT_DEPTH|GLUT_STENCIL);
// Glut window size, title window
GlutInitWindowSize (800600);
glutCreateWindow(“Triangle”);
// Register the callback function
glutReshapeFunc(ChangeSize);
// There were no problems with the initialization of the driver.
GLenum err = glewInit();
if(GLEW_OK ! = err) {
fprintf(stderr,”glew error:%s\n”,glewGetErrorString(err));
return 1;
}
//call SetupRC
SetupRC();
glutMainLoop();
return 0;
}

7. Run the program to appear the following interface that you have succeeded.


2. Error handling
There may be some mistakes in the above process. Here are some of the problems encountered by me and the solutions.
1. Error in header file
Because we’re pulling the file in, and by default the file is imported in framework form so we’re going to put <; > Change to "", you can directly click Fix according to the system prompts.


2. File path error. File A cannot be found.
BuildSettings ->; Path error introduced in Hearder Search Path. The.a file should be placed under the project file. The project name must be followed by the.a name in the import path. Here is a very good simple book similar to the error handling method of the article recommended for you to click my jump. The following error may have been caused by dragging the file in and then changing the file location.


Finally attach himself successful Demo a https://github.com/ClementGu/GJ_OpenGL_ConfigDemo, if you need resources can be downloaded to the OpenGL’s official website.

The solution of configuring OpenGL in vs2017

I’ve just tried to mesh the sphere using OpenGL in the last two days. The solution to configure OpenGL in VS2017 is as follows:
Running is the link of https://blog.csdn.net/xdg_blog/article/details/52864872 code, the following need library file is also for this code, need to add other library method.
 
1. Download glut in the website, website link: https://www.opengl.org/resources/libraries/glut/.

2. The downloaded file is as follows:

A. Put the two lib files Glut.lib and Glut32.lib into the directory:
D:\Program Files (x86)\Microsoft Visual Studio\2017\Community\VC\Tools\MSVC\14.15.26726\ Lib \x86
B. Put Glut. DLL and Glut32.dll into a directory: C:\Windows\syswow64
Under 64-bit Windows: 64-bit EXE and DLL are in the directory C :\ Windows \ System32, and 32-bit EXE and DLL are in the directory C :\ Windows \ SYSWOW64. So note that registering a 32-bit OCX or DLL on a Win64-bit system requires copying the 32-bit OCX or DLL to the C :\ Windows \syswow64\ directory. C :\ Windows \ SYSWOW64 \ REGSVR32 XXXXXXXX. OCX or DLL.)
C. In the directory: D:\Program Files (x86)\Microsoft Visual Studio\2017\Community\VC\Tools\MSVC\14.15.26726\ Include, create a new folder GL and put the header file in GL folder.
3. In VS2017, the configuration is as follows. First create a new C ++ project, then open the toolbar: Project ->; Properties:
A. general – & gt; Character set – & gt; Is not set

B. Linker ->; Conventional – & gt; Add the library directory, add OpenGL library file directory and its own library file directory. Write the path where the two lib files are placed.
D:\Program Files (x86)\Microsoft Visual Studio\2017\Community\VC\Tools\MSVC\14.15.26726\ Lib
D:\Program Files (x86)\Microsoft Visual Studio\2017\Community\VC\Tools\MSVC\14.15.26726\ Lib \x86

C. Linker ->; Input – & gt; Attach dependencies. Add the individual lib files from OpenGL (Glut.lib and Glut32.lib are the only ones added here), separated by English keyboard semicolons.

Note: There are other ways on the web to set: linker ->; System – & gt; Subsystem – & gt; SUBSYSYTEM: WINDOWS. But I’ve tried setting this to not work, so just leave it unset by default. (Although I don’t know why ~
Finally all the way down to determine the configuration of good ~

OpenGL development environment configuration [vs2017] + common problems

The article detailed configuration:
the reference 1: OpenGL development environment configuration (Windows) – Visual Studio 2017 + GLFW + GLAD detailed graphic tutorials
reference 2: OpenGL + VS2017 environment configuration reference 3:
[OpenGL] configuration GLFW
configuration process are detailed in this article, I mainly to mention a few configuration in the pit

    create an empty project. If you create a new Windows console application, the program will automatically include the pch.h header. You must consult include "pch.h" o>me other precompiled header at the beginning of the source file. E0035 # error instructions: OpenGL header already included, remove this include, glad already provides it there are two solutions:
    2.1 leave out the third line glad. H header file, the header file
    define conflict
    2.2 this method is more brutal, I saw from the Internet: In the glad. H file commented error: OpenGL header already included, remove this include, glad already provides it GL_COLOR_BUFFER_BIT defined variables is not found, such as:
    the solution: The iostream. H file in header file at the end of the

The solution of OpenGL not displaying normally in win7 system

These days I want to have a look at OpenGL, according to the online introduction to use the GLUT plug-in on Windows 7 VS2008. After the GLUT plug-in is installed, the program will compile, but at run time, the GLUT window will either be white or stuck, not properly.
I thought Windows 7 was incompatible with the GLUT plugin. Inadvertently see in online (http://bbs.tgbus.com/thread-1707009-1-1.html) said today may be the graphics driver (I is amd hd 8570 m). So, with 360 hardware master detection, the original their graphics card driver is too old. After updating the video card driver, it still can’t display normally. In right click on the desktop, select “configuration can exchange CARDS”, appear amd graphics Settings, left corner of the window we recommend: swappable display card global Settings, a battery case and insert the power supply two Settings, choose to “maximize performance” (or choose according to need) can normal use openGL glut plugin.
If you have any questions, you can ask me in the thread

The reason of OpenGL configuration error in VS

When working with OpenGL, I encountered a number of errors:
The glut32.lib library cannot be opened.
2. Openg. DLL file missing
And so on.
After my debugging, I found two possible reasons. Please pay attention when debugging, it may be caused by these two reasons.
1.VS has two development platforms, X64 and Win32, I found that there are problems on X64 platform, first, there is no such error on Win32 platform, I guess it is because OpenGL is 32-bit.
I don’t know if OpenGL 64 is going to work, but I didn’t verify it, but you can verify it.
2. If there is an error in question 2, it may be that the lib library file in connector input is incorrect. I have tested it, and if it is changed to glu32.lib and glut32.lib, the error can be eliminated!
This is the problem I encountered in writing OpenGL, to give you a debugging idea.

Problems in configuring OpenGL

glut32.lib does not reference
vironment :vs2013
c> & VC++ directory ->; C/C++> C/C++> C/C++> Additional include directories to add it again inside VS complains.
Conclusion :VS is really bad for property configuration... emmmmm

Some configuration problems of OpenGL in VS2008

1. Just for the first time today in VS2008 using OpenGL, configuration when met some problems, then checked the online to find a better way to site at: http://blog.csdn.net/joven0/article/details/7639715. Most of them are correct, but there is something wrong with the download address of GLEW given by the author. The downloaded file does not have DLL file and lib file. Later, I searched the Internet and found a relatively complete program zip package. Click to download the zip package.
You can’t start this program because GLUT32. DLL is missing from your computer. You can put GLUT32. DLL together with the exe file of this program, but I don’t know why this works.
Today I write here, later if you have any questions to supplement.
Added: Later, I got some advice from one of my classmates, because my system is 64-bit, so glut32.dll should be placed in the folder SysWOW64. Later, I put glut32.dll file in this file and the problem was solved.

Xcode configuring OpenGL

Xcode configuration OpenGL
Link GLFW
Download the source files, http://www.glfw.org/download.html
compilation Open a terminal, type the command line

cmake .
sudo make install

Compiles displays library paths, such as:
Installing:/usr/local/lib/libglfw3. A

<>sr /local/include/>

the source file: http://glew.sourceforge.net/ zip is ok

make
sudo make install
make clean

This is going to be a slow step
Sudo make install on Mac OS X EI Capitan
install -d-m 0755 “/usr/include/GL”
stall: mkdir /usr/include: Operation not permitted
m>: * [install.include] Error 71
This is because, starting with El Capitan, Mac OS X has enabled System Integrity Protection, which no longer allows direct access to directories under /usr, except /usr/local, so you need to install GLEW under /usr/local. GLEW’s Makefile will be changed to GLEW_DEST?= /usr = GLEW_DEST?Sudo make install = /usr/local
Then link some Framework
Cocoa, IOKIT, CoreVideo, and the generated libglfw3.a

Configuring OpenGL environment on Mac OS

OpenGL environment is configured under Mac OS system
1. Prepare resources
CLToolsglewlibGLTools.
a
file can be downloaded in baidu network backup, link: https://pan.baidu.com/s/13gkpLWjbKSBNFnA-IGo23A password: g3b5
2. Create a project

3. Import the system Framework
Import OpenGL. Framework and Glut. Framework.

4. Add prepared resources
Drag the include file down into the project;
Drag the libgltools.a file into the Framework group under your project;
Add glew.h and gltools.h Paths to Header Search Paths.

5. Delete the unwanted files and create Main.cpp
Delete AppDelegate.swift, ViewController.swift, and if there are any main.m files, delete them as well.
create main.cpp file, do not check “Also create a header file”.

6. Compile
If you encounter a compilation error, import mode from the system library to <; > Change to plain file to introduce "".
test as follows:


#include "GLShaderManager.h"
#include "GLTools.h"
#include <GLUT/GLUT.h>

GLShaderManager shaderManager;

GLBatch triangleBatch;

void changeSize(int w,int h)
{
    glViewport(0, 0, w, h);
}

void RenderScene(void)
{
    glClear(GL_COLOR_BUFFER_BIT | GL_DEPTH_BUFFER_BIT|GL_STENCIL_BUFFER_BIT);
    
    GLfloat vRed[] = {1.0,1.00,0.0,0.5f};
    
    shaderManager.UseStockShader(GLT_SHADER_IDENTITY,vRed);
    
    triangleBatch.Draw();
    
    glutSwapBuffers();
}

void setupRC()
{
    glClearColor(0.3f, 1.0f, 1.0f, 1);
    
    shaderManager.InitializeStockShaders();
    
    GLfloat vVerts[] = {
        0.0f,0.8f,0.0f,
        0.5f,0.0f,0.0f,
        -0.5f,0.0f,0.0f
    };
    
    triangleBatch.Begin(GL_TRIANGLES, 3);
    triangleBatch.CopyVertexData3f(vVerts);
    triangleBatch.End();
    
}

int main(int argc,char *argv[])
{
    glutInit(&argc, argv);
    glutInitDisplayMode(GLUT_DOUBLE|GLUT_RGBA|GLUT_DEPTH|GLUT_STENCIL);
    glutInitWindowSize(600, 400);
    glutCreateWindow("Triangle");
    glutReshapeFunc(changeSize);
    glutDisplayFunc(RenderScene);
    GLenum status = glewInit();
    if (GLEW_OK != status) {
        
        printf("GLEW Error:%s\n",glewGetErrorString(status));
        return 1;
        
    }
    setupRC();
    glutMainLoop();
 
    return  0;
    
}

DEVC + + configuring OpenGL

First of all, very, very important, don’t know what is my version of the problem was strange reasons, in a 64 – bit compiler under me, no matter use what method can’t configuration is successful, but under the 32-bit compiler success soon, so if you are completely in accordance with some online method to configure but can’t succeed, may first take a look at yourself in the compiler is 32 bits.
Glut. h in the GL folder of your compile environment include. Then put GLUT32.lib in any lib directory, and add the command -lopengl32-lglu32-lglut32 when connecting. Try replacing -lglut32 with “glut32.lib “as the path to the file /glut32.lib. It should work.
The following is my configuration :(ignoring that I installed DevC ++ in the folder downloaded from Baidu Cloud…
Above, you should be able to start using DevC ++ for OpenGL programming.


2018.11.19 update
Today, when I was helping my roommate configure the environment, I encountered a strange problem: the glut32.dll file was missing
I have already put glut32.dll in the System32 folder according to previous experience, but I can’t solve this problem… But after a bit of searching on Baidu, I found that for some reason I don’t know, I might need to put the file in the SysWow64 folder.