OpenGL is a programming interface for creating real-time 3D images.
OpenGL is a professional graphical programming interface that defines a cross-language, cross-platform programming interface specification. It is used for three – dimensional images (two – dimensional also), is a powerful, easy to call the underlying graphics library.
The development of the OpenGL
OpenGL was originally Iris GL developed by SGI for its graphics workstation. OpenGL came into being in order to solve the shortcoming of poor portability. While Microsoft’s DirectX is leading the home market overall, OpenGL is the dominant player in professional high-end graphics. Direct3D currently doesn’t support high-end graphics devices and professional applications, where OpenGL dominates. OpenGL is favored by developers for its independent, platform-independent 3D graphics development library in game development. For more information, you can go to the official website and check out OpenGL’s official website.
Version of the course
In July 1992, SGI released the 1.0 version of OpenGL, and then jointly developed the Windows NT version of OpenGL with Microsoft, so that some of the large 3D graphics processing software that must run on the high-grade graphics workstation can also be used on the microcomputer.
1995 version 1.1 of OpenGL came out, improved printer support, included OpenGL calls in enhanced metafiles, new features for vertex arrays, improved transfer speeds for vertex positions, normals, colors, color indices, texture coordinates, polygonal edge markers, introduced new texture features, and more.
July 28, 2003, SGI and ARB release OpenGL 1.5, including the OpenGL ARB’s official extension specification drawing Language, “OpenGL Shading Language”. New features include: vertex Buffer Object, Shadow function, covert query, non-power texture, etc.
In August 2004, OpenGL2.0 version was released ~OpenGL 2.0 standard is not the original SGI, but gradually occupy the active position in the ARB 3DLabs. OpenGL2.0 supports OpenGL Shading Language, new shader extension features, and many other enhancements.
In early August 2008, the Khronos Working Group announced the OpenGL 3.0 Graphics Interface Specification at SIGGRAPH 2008. The GLSL1.30 Shader language and other new features will once again point the way to the future development of open 3D interfaces.
In March 2009, the updated version of the new specification OpenGL 3.1 was released. OpenGL 3.1 simplifies the entire API model system on the basis of the 3.0 version, which can greatly improve the efficiency of software development.
In August 2009, the Khronos team released OpenGL 3.2, which improved performance, visual quality, geometric processing speed, and made Direct3D programs easier to port to OpenGL.
OpenGL 4.1 and OpenGL Shading Language 4.10 were released on July 26, 2010. OpenGL4.1 improves interoperability for vision-intensive OpenCL™ applications and continues to accelerate computing profile for core support and compatibility with the first release of OpenGL 3.2, enabling developers to use a simplified API or retain backward compatibility with existing OpenGL code, depending on their market needs.
Khronos released details of the new OpenGL 4.2 standard at SIGGRAPH 2011 in Vancouver on August 9, 2011, adding some new support features to APIs that support existing hardware.
After the continuous improvement and update of predecessors, OpenGL has been updated to OpenGL 4.6 (2017-07-30) OpenGL Shading Language 4.60 (2017-07-23).
OpenGL builds environments on top of Xcode
1. Installation process
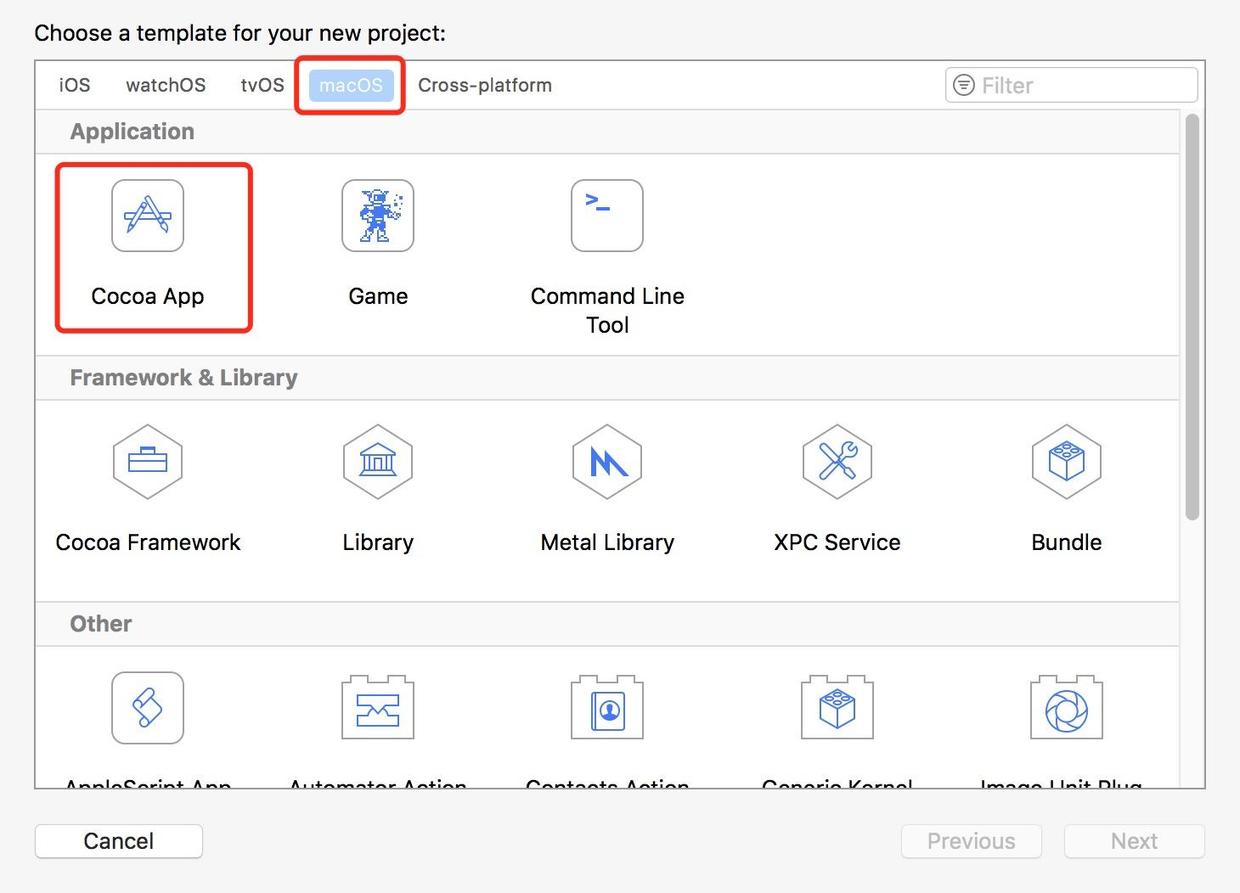
1. Open Xcode (install Xcode 9.1)->; macOS -> Cocoa App
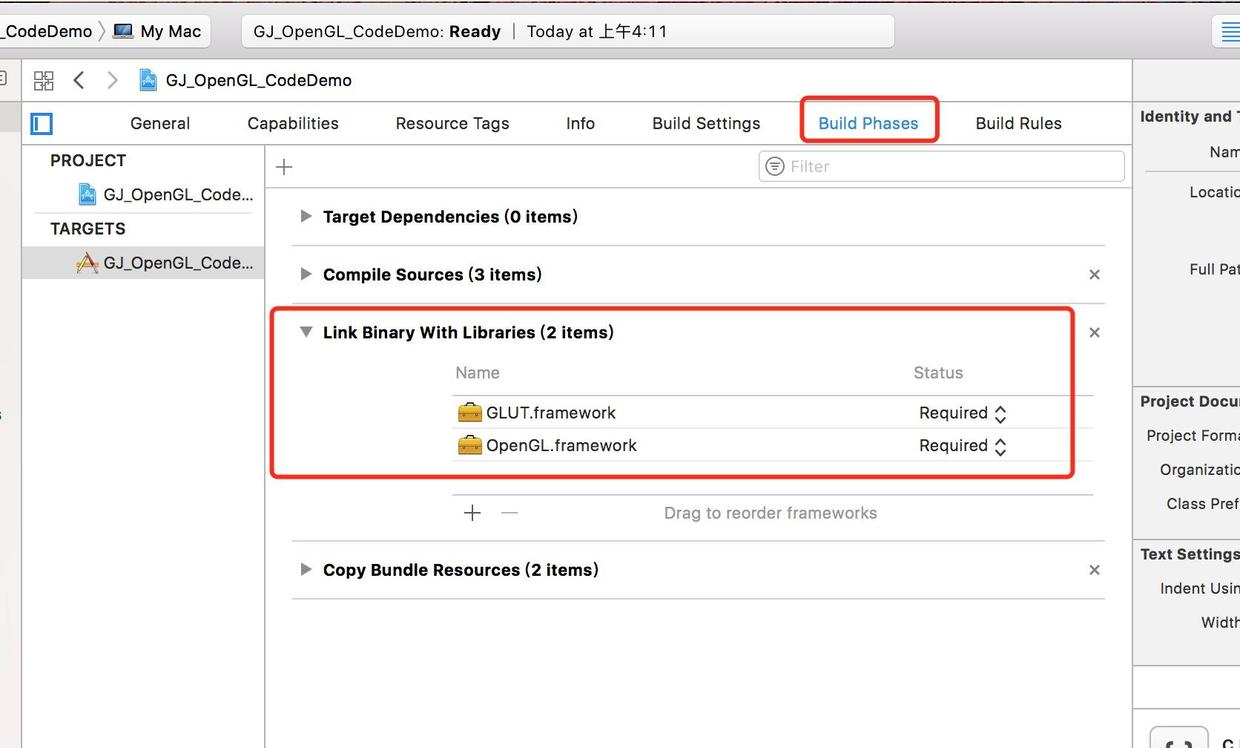
2. Add OpenGL. Framework Glut. Framework System Library.
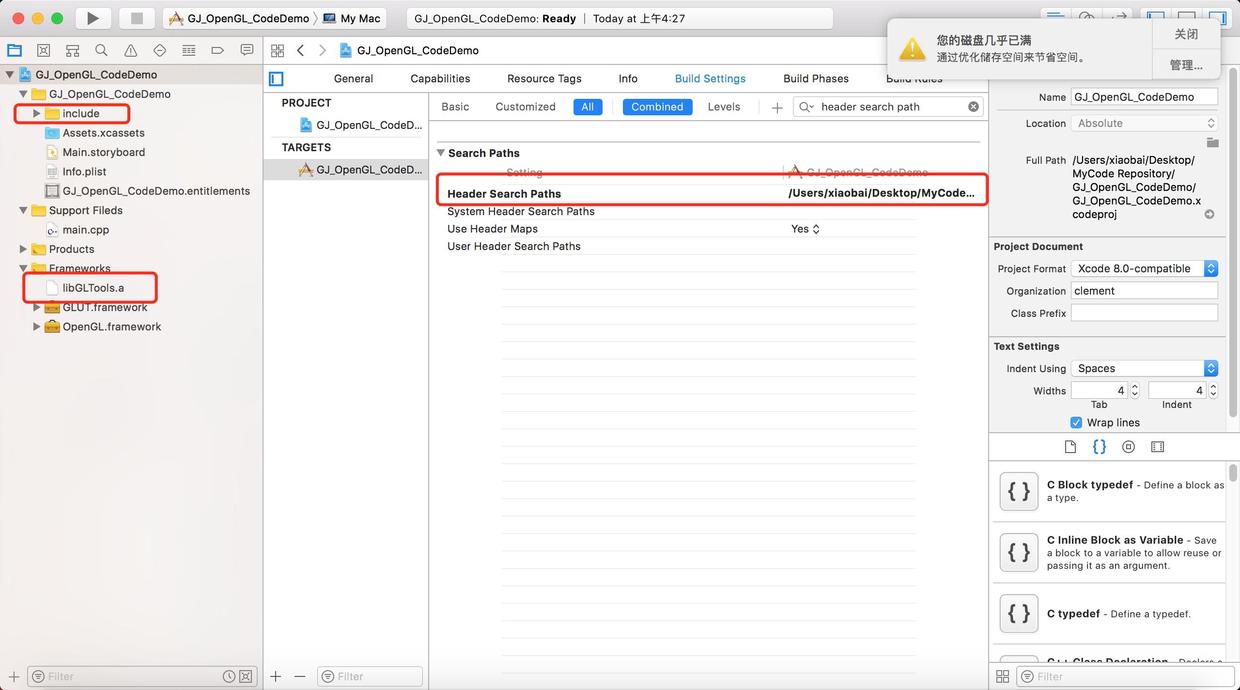
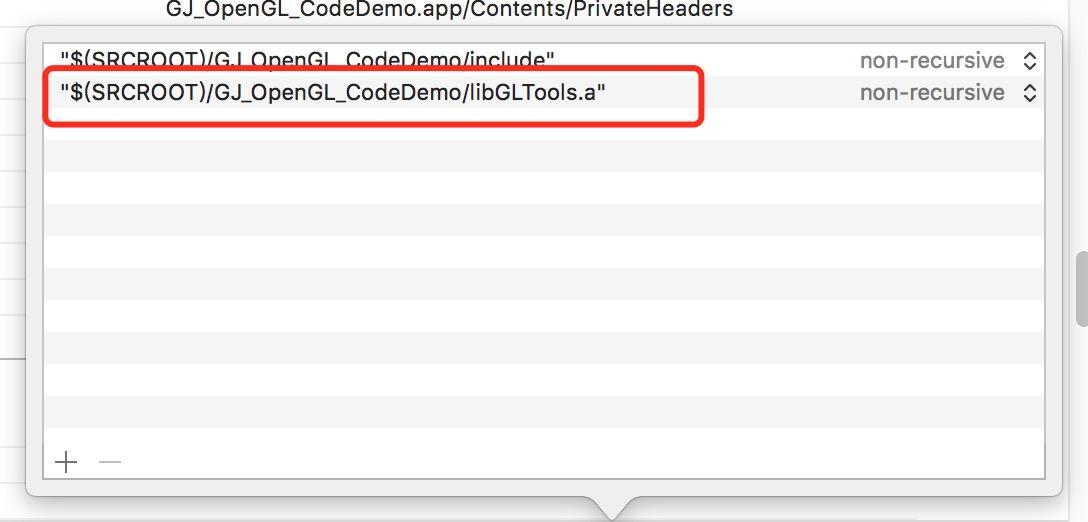
3. Add the include file and libgltool. a file. And in BuildSettings – & gt; Header -> Search -> Add the path to the.a file in the Paths.
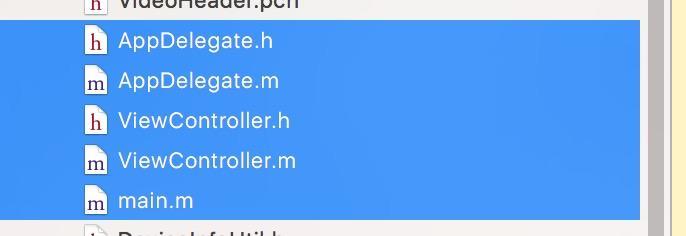
M View Controller. H. M Main. M Delete the file AppDelegate.H. M ViewController. Replace the main entry. So all of this will have to be removed and replaced with the main function interface we’re going to use.
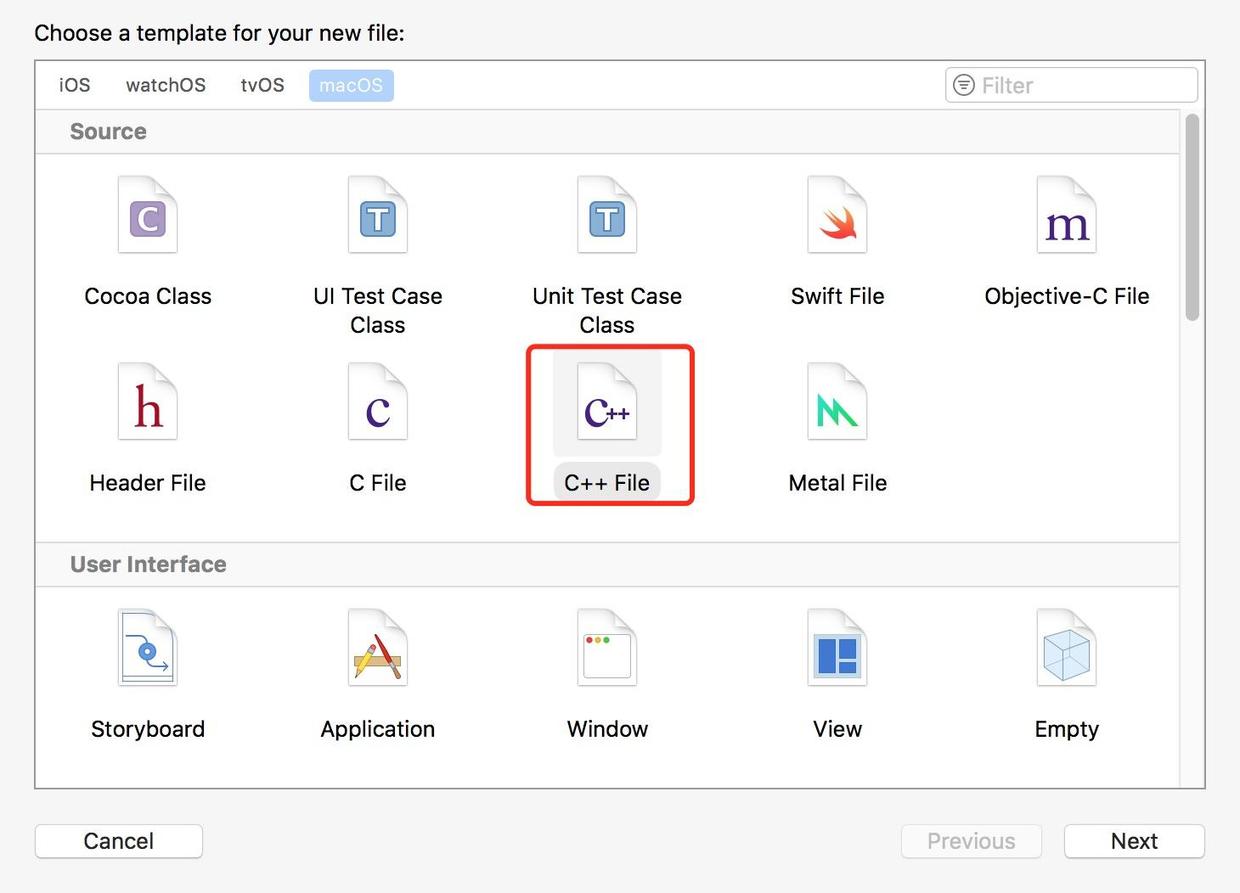
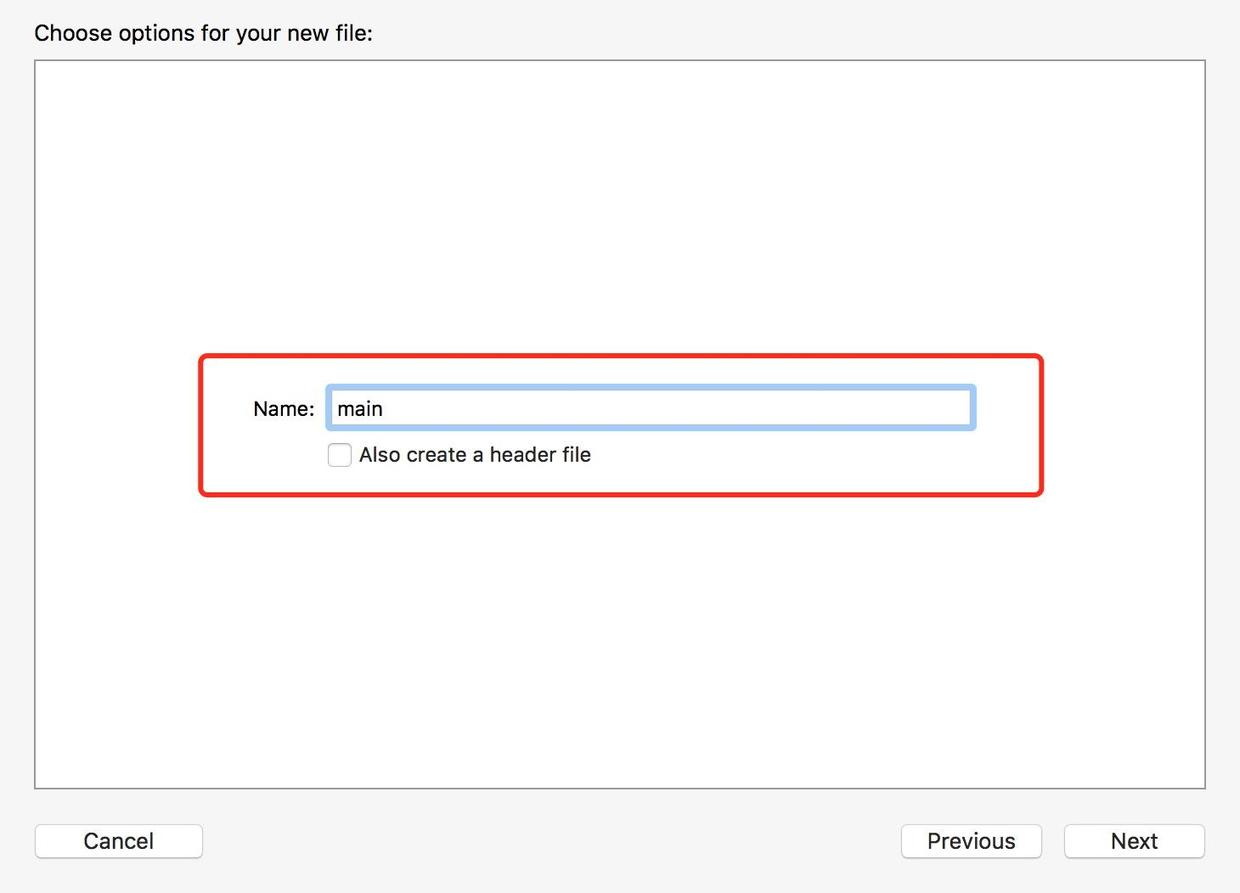
5. Create a replacement mian function, create a C ++ file, and tick off.h.
6. Copy the following code in the main function.
#include “GLTools.h”
#include < glut/glut.h>
#include “GLShaderManager.h”
GLBatch triangleBatch;
GLShaderManager shaderManager;
/** The new width and height received when the window size is changed. 0,0 is the coordinate at the bottom left corner of the window, w, h represents pixels */
void ChangeSize(int w,int h)
{
GlViewport (0, 0, w, h);
}
/** A one-time setup for the program */
void SetupRC()
{
// Set the back color
GlClearColor (0.0 f, f, 0.0 1.0 f, 1.0 f);
// Initialize the shader manager
shaderManager.InitializeStockShaders();
// Set triangles where the array VVERT contains x,y, and Cartesian coordinate pairs for all 3 vertices.
GLfloat vVerts[] = {
0.5 f, f 0.0, 0.0, f
0.5 f, f 0.0, 0.0 f,
0.0 f, f 0.5, 0.0 f,
}
// batch processing
triangleBatch.Begin(GL_TRIANGLES,3);
triangleBatch.CopyVertexData3f(vVerts);
triangleBatch.End();
}
// Start rendering
void RenderScene(void)
{
Clear one or a set of specific buffers
glClear(GL_COLOR_BUFFER_BIT|GL_DEPTH_BUFFER_BIT|GL_STENCIL_BUFFER_BIT);
// Set a set of floating-point numbers to represent red
GLfloat vRed [] = {0.0 1.0 f, f, f 0.0, 1.0} f;
// Pass to the storage shader, the GLT_SHADER_IDENTITY shader, which simply renders the geometry on the screen using the specified color in default Cartesian coordinates
shaderManager.UseStockShader(GLT_SHADER_IDENTITY,vRed);
// Submit the shader
triangleBatch.Draw();
// will render in the background buffer and then swap to the foreground at the end
glutSwapBuffers();
}
int main(int argc,char* argv[])
{
// Set the current working directory for Mac OS X
gltSetWorkingDirectory(argv[0]);
// Initialize the GLUT library
glutInit(& argc, argv);
/* Initialize a double-buffered window where the GLUT_DOUBLE, GLUT_RGBA, GLUT_DEPTH, and GLUT_STENCIL markers refer to double-buffered window, RGBA color mode, depth test, and template buffer */
glutInitDisplayMode(GLUT_DOUBLE|GLUT_RGBA|GLUT_DEPTH|GLUT_STENCIL);
// Glut window size, title window
GlutInitWindowSize (800600);
glutCreateWindow(“Triangle”);
// Register the callback function
glutReshapeFunc(ChangeSize);
// There were no problems with the initialization of the driver.
GLenum err = glewInit();
if(GLEW_OK ! = err) {
fprintf(stderr,”glew error:%s\n”,glewGetErrorString(err));
return 1;
}
//call SetupRC
SetupRC();
glutMainLoop();
return 0;
}
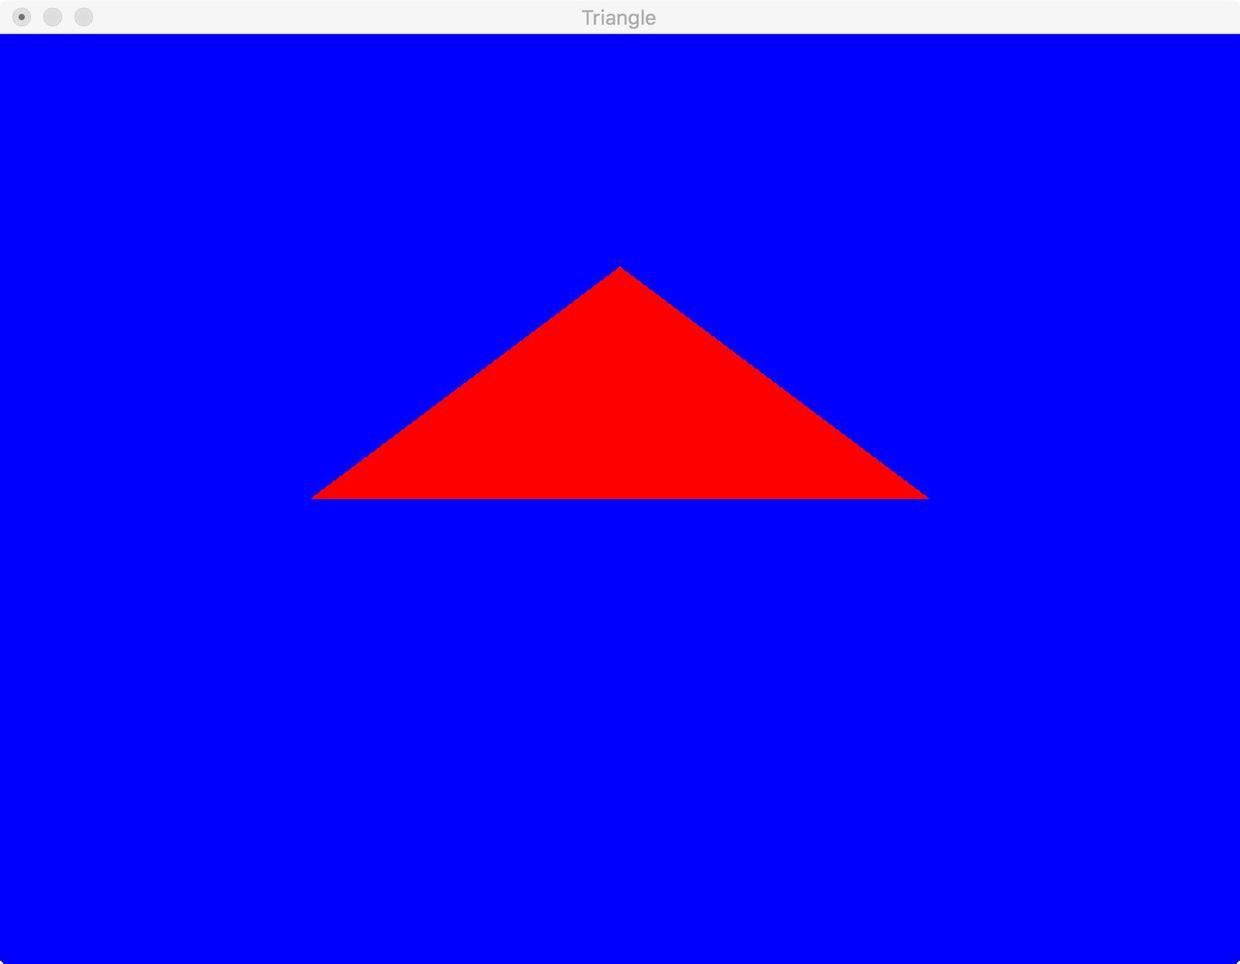
7. Run the program to appear the following interface that you have succeeded.
2. Error handling
There may be some mistakes in the above process. Here are some of the problems encountered by me and the solutions.
1. Error in header file
Because we’re pulling the file in, and by default the file is imported in framework form so we’re going to put <; > Change to "", you can directly click Fix according to the system prompts.


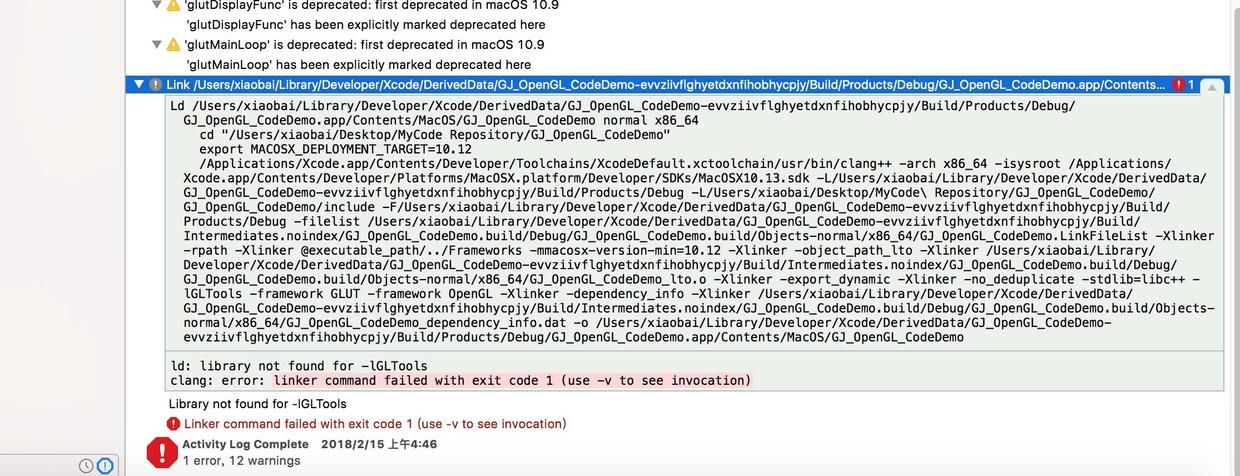
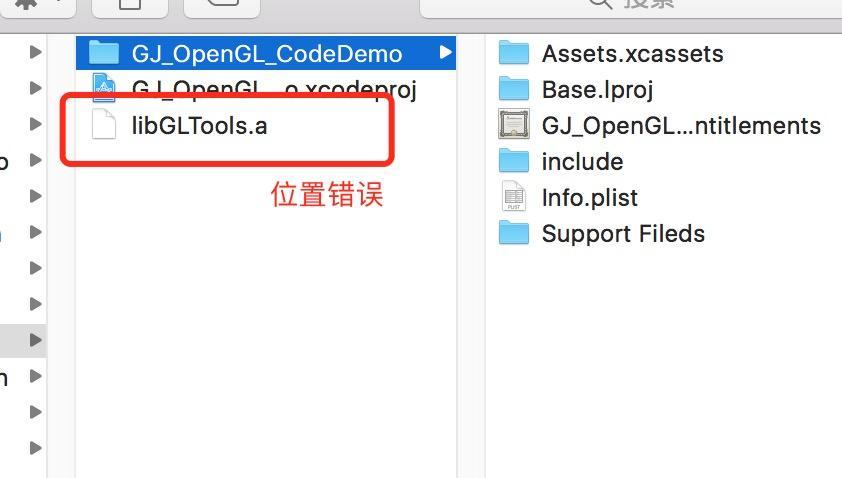
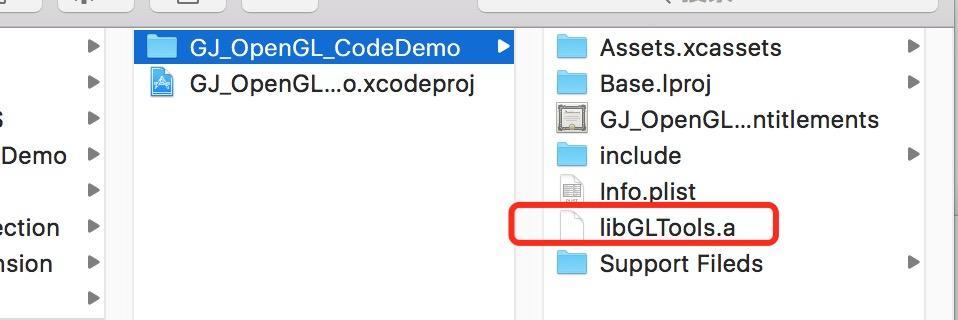
2. File path error. File A cannot be found.
BuildSettings ->; Path error introduced in Hearder Search Path. The.a file should be placed under the project file. The project name must be followed by the.a name in the import path. Here is a very good simple book similar to the error handling method of the article recommended for you to click my jump. The following error may have been caused by dragging the file in and then changing the file location.

Finally attach himself successful Demo a https://github.com/ClementGu/GJ_OpenGL_ConfigDemo, if you need resources can be downloaded to the OpenGL’s official website.
Read More:
- Configuration of OpenGL development environment under Windows environment, win10 + vs2019 + glfw + glad
- Building virtual machine environment based on kvm-qemu under ubuntu12.10 (12)
- Vc2010 configuring OpenGL environment
- Vs2015 OpenGL environment configuration
- Invalid cluster ID. ignore in building Doris database environment
- Vs2015 + OpenGL environment configuration
- OpenGL environment configuration
- CodeBlocks configuring OpenGL environment
- Simple configuration of glfw + glad in vs2015 OpenGL development environment
- On the configuration of OpenGL Red Book eighth edition environment in vs2013
- Vs2013 + glfw + glew configure OpenGL development environment
- Configure OpenGL development environment (vs2015)
- OpenGL development environment configuration [vs2017] + common problems
- Construction of vs2015 OpenGL configuration environment
- Configuring OpenGL environment on Mac OS
- OpenGL class library and environment configuration under win10 and vs2015
- Configure OpenGL development environment (glfw3 + glad) once and for all with visual studio
- Visual studio 2019 + OpenGL environment configuration
- Clion MinGW super fast configuration OpenGL development environment
- The simplest way to configure OpenGL development environment with vs2015