Tag Archives: Network

[Solved] Python Networkx Error: Network error: random_state_index is incorrect

A few months ago, you can also use the Networkx package in Python. Recently, you rerun the previous code and report the following error

Network error: random_state_index is incorrect

Now the landlord has solved this problem. The specific steps are as follows:

First: open Anaconda prompt (Anaconda 3), demote Networkx package and decorator package, and enter the following code:

pip install --user decorator==4.3.0
pip install --user networkx==2.3

Second: turn off Anaconda prompt (Anaconda 3) and reopen Python to run without problem.

Ionic Save to Gallery Plugin IOS Error: Method ‘requestAuthorization:’ not defined in Plugin ‘PhotoLibrary’ ERROR: Method ‘xxx’ not defined

Error in IOS when ionic is saved to the gallery plug-in error: method ‘requestauthorization:’ not defined in plugin ‘photolibrary’ error: method ‘xxx’ not defined in plugin

In IOS, when saving pictures to mobile photo album, the error is as follows

ERROR: Method 'requestAuthorization:' not defined in Plugin 'PhotoLibrary'

FAILED pluginJSON = ["PhotoLibrary815393554","PhotoLibrary","requestAuthorization",[{"write":true,"read":true}]]

resolvent

cordova plugin rm cordova-plugin-photo-library
cordova plugin add https://github.com/nilebma/cordova-plugin-photo-library.git

Due to GitHub network problems, you can use the following command

npm install --save @ionic-native/photo-library
cordova plugin add https://gitee.com/liuzhuo8081/cordova-plugin-photo-library.git

[Nginx] solution: it can’t be accessed on the background API interface after HTTPS (access the specified port through the domain name)

Demand

Original address: http://ip :54774/api_ Name
now requires you to access the specified port through the domain name: https://api.example.com/api_ name
realization

The most important thing is to configure the reverse proxy address of location

When we enter the domain name/API_ Name
will be mapped by nginx to IP or domain name: 54774/API_ Name path go to the nginx directory, open nginx. Conf , add reverse proxy :

server
{
    listen 80;
	listen 443 ssl http2;
    server_name https://api.example.com;
    
    # Reverse Proxy
    location ~ ^/api_name {
        proxy_pass http://ip:54777;
    }
    
    #SSL-START SSL-related configuration, please do not delete or modify the next line with the comment 404 rules
    #error_page 404/404.html;
    ssl_certificate    /www/server/panel/vhost/cert/api.example.com/fullchain.pem;
    ssl_certificate_key    /www/server/panel/vhost/cert/api.example.com/privkey.pem;
    ssl_protocols TLSv1.1 TLSv1.2 TLSv1.3;
    ssl_ciphers EECDH+CHACHA20:EECDH+CHACHA20-draft:EECDH+AES128:RSA+AES128:EECDH+AES256:RSA+AES256:EECDH+3DES:RSA+3DES:!MD5;
    ssl_prefer_server_ciphers on;
    ssl_session_cache shared:SSL:10m;
    ssl_session_timeout 10m;
    add_header Strict-Transport-Security "max-age=31536000";
    error_page 497  https://$host$request_uri;


    #SSL-END
    
    #ERROR-PAGE-START  Error page configuration, which can be commented, deleted or modified
    #error_page 404 /404.html;
    #error_page 502 /502.html;
    #ERROR-PAGE-END
    
    #PHP-INFO-START  PHP reference configuration, can be commented or modified
    #include enable-php-72.conf;
    #PHP-INFO-END
    
    #REWRITE-START URL rewrite rule reference, the modification will cause the panel to set the pseudo-static rules are invalid
    #include /www/server/panel/vhost/rewrite/api.example.com.conf;
    #REWRITE-END
    
    #Files or directories to which access is prohibited
    location ~ ^/(\.user.ini|\.htaccess|\.git|\.svn|\.project|LICENSE|README.md)
    {
        return 404;
    }
    
    #One Click Application for SSL Certificate Verification Directory Related Settings
    location ~ \.well-known{
        allow all;
    }
}
    1. overload configuration file:
./nginx -s reload

Solution of device eth0 does not see to be present, delaying initialization. Error in network card under Linux

Today, when I was practicing under Linux, I saw two network cards under the ifconfig command, one is the l0 network card, and the other is eth1. At the beginning, it was l0 and eth0. I don’t know how it became eth1, so I became obsessive-compulsive and deleted all network card configurations. As a result, when I restarted the network service, it was a tragedy…

First of all, let’s talk about the reason why my network card changed from eth0 to eth1: it was due to the previous operation error, and I didn’t know this before, so I followed the online tutorial. As a result, I configured eth0 to eht0, and the system couldn’t find it. Later, due to the configuration failure, I configured it once, and the result became eth1. Until today, I found this error…

Because I couldn’t change eth0, I saw that there was a tutorial on the Internet, but it didn’t work.. (I don’t know why.) so I deleted all the network card configuration with one hand. The steps are as follows:

First, stop the network service

1./etc/sysconfig/network scripts directory, delete the network card configuration that you want to delete. I want to delete eth1, so RM – RF ifcfg-eth1, and so on

2./etc/sysconfig/Networking/devices directory, delete all files, simple and easy

3./etc/sysconfig/Networking/profiles/default directory, delete all files related to eth1

After starting the network service, there should be only one l0 network card left, and the service is stopped

Write network card configuration file

1./etc/sysconfig/network scripts directory, write the configuration file with VI, here I name it ifcfg-eth0 (my eth0 is finally coming back)

The configuration is as follows:

DEVICE=eth0
ONBOOT=yes
IPADDR=172.168.0.108
BOOTBROTO=none
NETMASK=255.255.255.0
PREFIX=24

Here is a simple write a few configuration, complete configuration I can not remember, there is no need to remember. I found a more complete configuration on the Internet, you can have a look

DEVICE=eth0 #Indicates the device name
NM_CONTROLLED=yes #network mamager's parameter, effective in real time, no need to reboot
ONBOOT=yes #Set to yes to enable network connection automatically on power on
IPADDR=192.168.21.129 #IP address
BOOTPROTO=none # set to none to disable DHCP, set to static to enable static IP address, set to dhcp to enable DHCP service
NETMASK=255.255.255.0 #subnet mask
DNS1=8.8.8.8 #the first dns server
TYPE=Ethernet #Network type is: Ethernet
GATEWAY=192.168.21.2 #set gateway
DNS2=8.8.4.4 #second dns server
IPV6INIT=no #Disable IPV6
USERCTL=no #Whether to allow non-root user to control the device, set to no, can only be changed by root user
HWADDR=00:0C:29:2C:E1:0F #Mac address of the NIC
PREFIX=24
DEFROUTE=yes
IPV4_FAILURE_FATAL=yes
NAME="System eth0" #Define the device name


After I started the network service, I reported the error of device eth0 does not see to be present, delaying initialization. After searching on the Internet, I found that it was caused by the MAC address mismatch. There are two solutions

1. 70 persistent in/etc/udev/rules. D directory- net.rules File, open, modify the MAC address inside, and ifcfg-eth0 can be the same

2. Delete/etc/udev/rules.d/70-persistent directly- net.rules File, then restart, simple and crude

After restart, we will find that the network service can start normally, and the current network card is l0 and eth0


The solution of PL / SQL can’t connect to the remote server after installing Oracle locally

Before, there was no Oracle client installed on the computer, just using PL/SQL to access the remote server. During this time, I want to install myself for fun. As a result, after installing Oracle 10g locally, PL/SQL can’t access the original server. Baidu didn’t find a feasible solution for a long time. Later, I thought of Google. It’s really professional. The first result I found solved my problem… I don’t want to talk too much nonsense. I want to talk about my problems and solutions.


Prompt when connecting to the server:

Ora-12514: the listener is currently unable to recognize the service requested in the link description


I think there is something wrong with the configuration. And then check it on the Internet. The solutions found (I used them and they are feasible) are as follows:


Configure listener of Oracle server

Modify the & lt; installation directory & gt;/network/admin/directory listener.ora and tnsnames.ora Two files. among

The listener file is as follows:

# listener.ora Network Configuration File: /oracle/app/product/10.1.0/db_ 1/network/admin/ listener.ora

# Generated by Oracle configuration tools.

SID_ LIST_ LISTENER =

(SID_ LIST =

(SID_ DESC =

(SID_ NAME = PLSExtProc)

(ORACLE_ HOME = /oracle/app/product/10.1.0/db_ 1)

(PROGRAM = extproc)

)

(SID_ DESC =
(GLOBAL_ Dbname = Demo1) # Demo1 is the Oracle instance name
(Oracle)_ HOME = /oracle/app/product/10.1.0/db_ 1)
(SID_ NAME = demo1)
)

)

LISTENER =

(DESCRIPTION_ LIST =

(DESCRIPTION =

(ADDRESS = (PROTOCOL = IPC)(KEY = EXTPROC1))

(address = (protocol = TCP) (host = 192.168.0.100) (Port = 1521)) # IP address is Oracle server

)

)

tnsnames.ora The document is amended as follows:

# tnsnames.ora Network Configuration File: /oracle/app/product/10.1.0/db_ 1/network/admin/ tnsnames.ora

# Generated by Oracle configuration tools.

Demo1 =
(description =
(address = (protocol = TCP) (host = 192.168.0.100) (Port = 1521))?The IP address is Oracle server
(connect)_ DATA =
(SERVER = DEDICATED)
(SERVICE_ Name = Demo1) # Demo1 is the Oracle instance name or service name, which can be modified by netmgr or netca
)

)

EXTPROC_ CONNECTION_ DATA =

(DESCRIPTION =

(ADDRESS_ LIST =

(ADDRESS = (PROTOCOL = IPC)(KEY = EXTPROC1))

)

(CONNECT_ DATA =

(SID = PLSExtProc)

(PRESENTATION = RO)

)

)

The above modifications can also be configured through netmgr and netca.

After modification, restart the listener

After modifying these configurations, you can connect to the server.


Feeling: I haven’t really used PL/SQL and Oracle before, but this time I have a problem I felt that the problem of crouching trough was very advanced. At that time, I was a little flustered. My first reaction was to ask others, but I was not willing to. So I went to the Internet to find a solution. Baidu didn’t find a feasible solution for a long time. Later, I asked in the classmate group, and no one knew the solution. Some students asked Google, so I became a living horse doctor and tried it I searched for it, and it turned out…. The result is what you see now ~ some things can’t only look at the surface, and can’t be scared by the problems. When you work hard to solve them, you will find that they are all small cases. Ha ha, it’s not bad. I haven’t solved a problem that makes me feel successful for a long time. come on.

Linux’s method of clearing DNS cache and refreshing DNS in shell terminal (Ubuntu, Debian)

preface

Use the following command to query DNS in Linux system

dig baidu.com @114.114.114.114

Or use the default DNS server to query

nslookup baidu.com

The following methods may not all work, but you can always find one that works

1.network-manager and networking

In some Linux operating systems, such as the specific version of Ubuntu, DNS is managed by network manager.
In these systems, you need to run the command:

sudo service network-manager restart

In other systems, you can use the following command:

sudo service networking restart

2.ubuntu

In Ubuntu 12.04, you can try the following command:

sudo kill -HUP $(pgrep dnsmasq)

In Ubuntu 16.04 and Debian 9, you can refresh DNS with the following command

sudo systemd-resolve --statistics

On Ubuntu 17.04 and later, use the following command:

sudo systemd-resolve --flush-caches

3 /etc/ resolv.conf

/etc/ resolv.conf This file stores the address of the DNS server. Directly modifying this file can only temporarily change the default DNS address and restore the settings after restart.
You can modify this file directly for temporary use

# Dynamic resolv.conf(5) file for glibc resolver(3) generated by resolvconf(8)
#     DO NOT EDIT THIS FILE BY HAND -- YOUR CHANGES WILL BE OVERWRITTEN
nameserver 8.8.8.8

After modification, Ping or NSLOOKUP again will get the IP address from the new DNS server
for the method of permanent modification, see how do I add a DNS server via resolv.conf?

4.nscd

NSCD is a good DNS caching service. Use the following command to install it:

apt install nscd  #debian ubuntu

If you have NSCD installed on your Linux system, you can use the following command to refresh DNS:

sudo /etc/init.d/nscd restart

Resources:
How do I clear the DNS cache?
flush DNS cache in Ubuntu

WSS connection server error

Error:

1. The error prompt for SSL certificate rejection is different between Firefox and chrome

(1) Chrome error: websocket connection failed: error in connection establishment: Net:: err_ CERT_ AUTHORITY_ INVALID

(2) an error is reported in Firefox: it is unable to create a wss://www.wss.com/ Connection to the server.

2. Although the error prompts for SSL certificate rejection are different between Firefox and chrome, the solution steps are exactly the same.


code:

1 var ws = new WebSocket("wss://www.wss.com");


Cause of the problem:

Because the certificate is self signed, the CA of the certificate must not exist in the root storage area of the operating system. Naturally, the operating system will not recognize you, and the natural browser will not recognize you, that is, the self signed certificate is not trusted.


Solution:

1. Open a new tab page in Firefox or chrome.

2. Visit your websocket server domain name: https://www.wss.com (change the WSS request to an HTTPS request with the same domain name and port number).

3. You will find the browser alarm: “your connection is not private connection…”.

Don’t panic, look down and click “advanced”.

5. Continue to click “continue to” www.wss.com (unsafe) “.

6. The page will prompt “400 bad request…”, don’t worry. This is due to using HTTP protocol to access WSS service. Don’t worry. You can solve the prompt error here.


Reprinted from: http://www.blogdaren.com/post-2456.html?from=singlemessage

Reproduced in: https://www.cnblogs.com/XuYuFan/p/10917909.html

Windows 7 system, start to run input CMD, the window flashed by, disappeared

First of all, my system is Windows 7, this is also suitable for other systems, because my computer is Windows 7 of this problem, so I just in Windows 7, my computer is likely to be used with the first of a virus or Trojan and later killed and incomplete, but kill may have this problem, for example I will use the CMD window to view the IP ah, see ping network speed ah of what, don’t have the CMD feel very uncomfortable, but every time I enter CMD, one black car window is a flash is automatically shut down, no time to lose anything, Through checking the information, fumbled to find a solution, if you also have a similar problem, according to the following methods do not prevent to try.

The CMD command window is used in some special cases, such as PING to see if the network is connected. If you run commands such as Disk Format Conversion in the CMD window, enter CMD Enter and the black box of the CMD command will flash out and disappear, please refer to the following solution.

a, first check the C: \ WINDOWS \ SYSTEM32 of CMD EXE exists, the document date is normal;
test result is normal, same as other system file date, should not be this problem.

br>

%SystemRoot%;
view after found (if there is no need to add)

3, it is not in the above two common problems, should be modified is the registry.
registry:
ey_local_machine \Software\Microsoft\Command Processor\AutoRun
HKEY_LOCAL_MACHINE\Software\Microsoft\Command Processor\AutoRun
registry:
HKEY_LOCAL_MACHINE\Software\Microsoft\Command Processor\AutoRun (There is no numerical value, but a flash may be eXist, it can be cleared.)

, if it still doesn’t work, try using CMD /k, for example “CMD /k ipconfig /all” in the “Run” window.

How to connect and share printer under win7

1. Make sure the Spooler service is up and running first

2. Find a random place to add a printer. I found it in the Control Panel

3. Click “Add printer” and select “Add network printer” (Generally, you can not find the printer you want to connect), then click “The printer I want to connect is no longer in the list”, click “Select a printer by sharing” and then. Click “Browse” (usually we still can’t find the printer we want to connect to), as shown below:

4. Enter the printer IP and printer name you want to connect to :\\59.74.111.59\hpLaserJ2, as shown below:

Then click select, the next step, the next step on the line, when the password input password…

Chrome browser network error: err_ CERT_ AUTHORITY_ INVALID

Reprint please indicate the author (DuGuShangLiang dugushangliang) reference: https://blog.csdn.net/dugushangliang/article/details/85275319
 
NET::ERR_CERT_COMMON_NAME_INVALID, NET::ERR_CERT_AUTHORITY_INVALID, etc. NET::ERR_CERT_AUTHORITY_INVALID, etc.
Tries all the browsers on this machine: Chrome, Firefox, Internet Explorer, Microsoft Edge, by clicking: Advanced, continue to go to, can open, but in the open interface for some operations, display a variety of errors, can not achieve the expected results, Chrome F12 to view the network, as follows:

This problem has been torturing for a long time, I have repeatedly antivirus, repair system, uninstall and reinstall, and so on, still have this problem.
And finally, it dawned on me what the problem was.
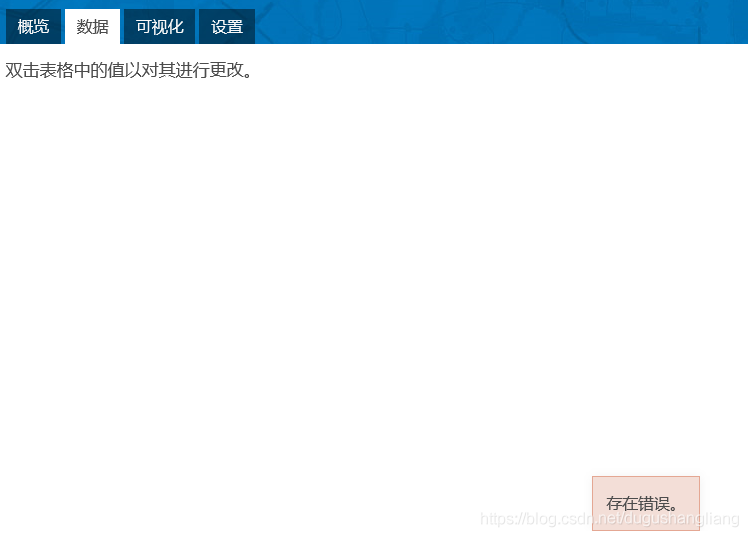
As shown in the figure below, the interface I just opened is an overview. I want to view the data, so I click “Data” with the mouse, and an error occurs.

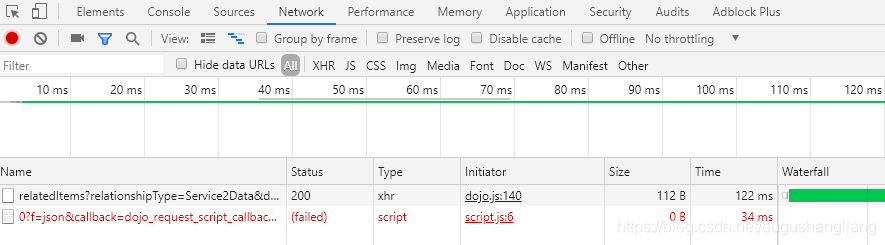
Error reporting occurs when a page jumps or when we click on a page widget, so we open the Developer Tools before the error occurs. Chrome can be opened directly by pressing F12. In this case, it opens when the page is just opened and the interface is an overview. Then we carry out page operation, such as clicking a button, in this case, clicking “Data” to switch to the data interface. At this time, an error will be reported. When we check the network, we find red information.

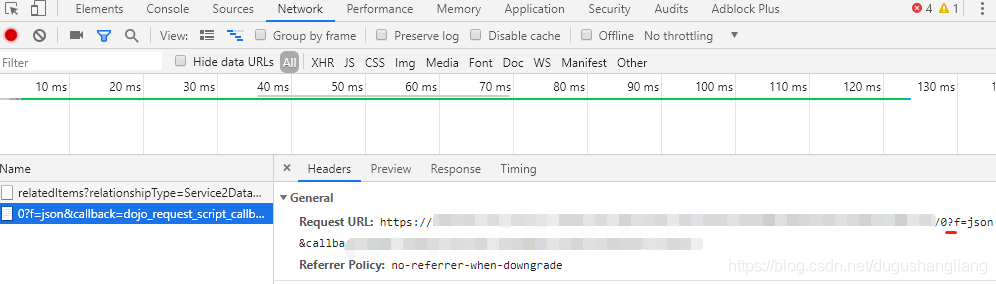
We select the red message to see the details. Under headers, we’ll find the request URL, and in that URL we’ll find a question mark “?” “, copied all the URLs in front of the question mark, such as: https://www.xxx.com/… /0, open another TAB and try to visit the URL by pasting it into the URL bar and going to

As shown in the following picture, the prompt from Chrome browser will prompt that the connection is not secure, so we choose to continue. Firefox will say “Added as an exception.”
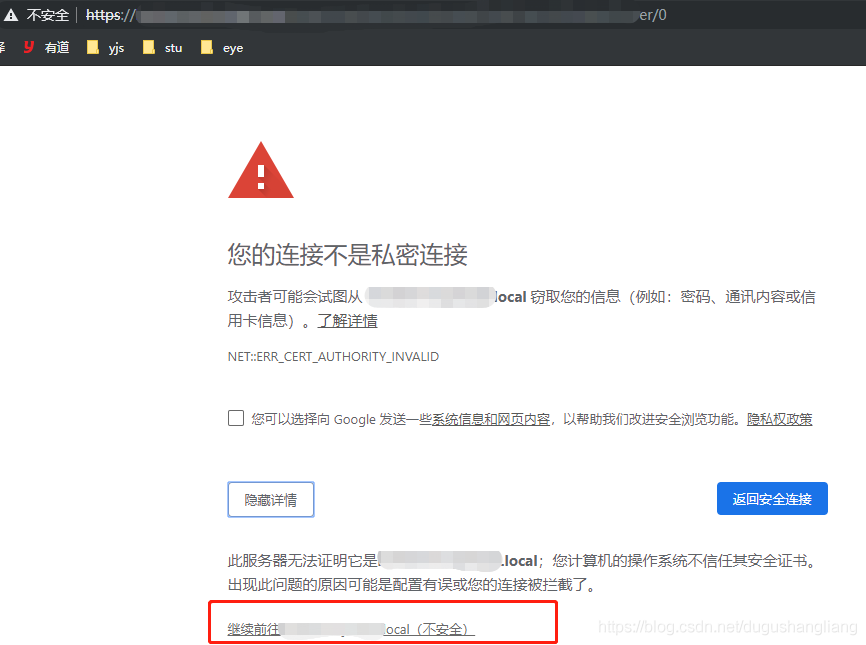
above
 
That was the problem, and when the site was successfully opened, our problem was solved. The default setting is to deny access to this site because it has not been made an exception first, so you will get an error if you go directly to this site via the link.
I searched up and down, forget all about eating and sleeping, sweat and sweat, and was also an accidental opportunity (that is, accidentally opened the website, so was added exceptions, so later on normal) to solve, but did not know the problem at that time. Later, by chance, I figured it out and verified the situation, and added the reasons for reference. This is like Duan Yu mistakenly into Wulianshan Jian Lake Palace, obtained the same martial arts secret books. Tap-stamping iron shoes have no place to find, the original trouble me for a long time, is such a simple small problem.
If there are people who don’t understand this article, don’t criticize them. If there are any problems, let’s try to solve them. After all, there are multiple possible causes of the same or similar symptoms. If you’re here to find fault, don’t bother to add a comment.)
(September 26, 2019, and the other an open, discusses related development solution: https://blog.csdn.net/dugushangliang/article/details/101421339).
 
Solitary and good Dugushangliang

Solutions to network connection problems in Ubuntu 16.04.3

Ubuntu 16.04 network problem solving
Background:
Recently, we need to use Ubuntu16.04 version to build Huawei’s Mind Studio platform, and there is a problem of blocked network.
Solution process:
First I checked my virtual machine network Settings to see if there was anything wrong with the network Settings

Then I started looking for the problem in the Ubuntu network Settings and entered ifconfig in the terminal to see if the IP card information was working properly.

ah