Tag Archives: Machine learning

Resolve the error raise importerror, str (MSG) + ‘, please install the python TK package’ (valid for personal testing)

Solve the following similar error reports:

Traceback (most recent call last):
  File "<stdin>", line 1, in <module>
  File "/usr/lib/python2.7/lib-tk/Tkinter.py", line 42, in <module>
    raise ImportError, str(msg) + ', please install the python-tk package'
ImportError: /usr/lib/libtk8.5.so.0: invalid ELF header, please install the python-tk package

terms of settlement:

It appears that the library is corrupted
try sudo apt get remove Python TK ,
then sudo apt get clean download the package again,
sudo apt get install Python TK and then try importing again
this problem is resolved.

Another possibility is that you somehow messed up your apt/sources. List, and you installed a library for the wrong platform.

Reference link:
https://stackoverflow.com/questions/11043844/python-tk-package-not-recognized-in-python-2-7-3

NVIDIA-SMI has failed because it couldn’t communicate with the NVIDIA driver

Problem: Ubuntu 18.04 installs the graphics card driver normally. When the Ubuntu system is opened, the graphics card driver cannot be used. Use NVIDIA SMI to check the above errors.

resolvent:

Just execute two commands:

Sudo apt get install DKMS
sudo DKMS install – M NVIDIA – V 440.44 (440.44 indicates the driver version number)

Use the command ll/usr/SRC/to view the nvidia-440.44/ folder below. The version number varies from computer to computer

Then restart the computer, success.

Python Error: Failed to establish a new connection: [Errno -2] Name or service not known

Error Messages:

Traceback (most recent call last):
File "/usr/local/python3/lib/python3.7/site-packages/ddt.py", line 192, in wrapper
return func(self, *args, **kwargs)
File "/usr/hxy/auto-test/interface/test_start.py", line 49, in test
result = RequestsHandle().httpRequest(method, reparam.uri, data=reparam.data, headers=reparam.headers)
File "/usr/hxy/auto-test/common/request_handle.py", line 32, in httpRequest
headers=headers, verify=False, proxies=proxies)
File "/usr/local/python3/lib/python3.7/site-packages/requests/sessions.py", line 542, in request
resp = self.send(prep, **send_kwargs)
File "/usr/local/python3/lib/python3.7/site-packages/requests/sessions.py", line 655, in send
r = adapter.send(request, **kwargs)
File "/usr/local/python3/lib/python3.7/site-packages/requests/adapters.py", line 516, in send
raise ConnectionError(e, request=request)
requests.exceptions.ConnectionError: HTTPSConnectionPool(host='sync-test.helianhealth.com', port=443): Max retries exceeded with url: /sync-channel/channel/admin/hsp/template/isOnline (Caused by NewConnectionError('<urllib3.connection.HTTPSConnection object at 0x7fd369b643c8>: Failed to establish a new connection: [Errno -2] Name or service not known'))

I don’t get the error locally, but when I deploy the project on a Linux server, I get the error.
This is because there are other technicians using the server besides me, and the version of the request is outdated.
Solution: Update requests with the command: pip install -U requests

If the following error occurs.

ERROR: Cannot uninstall ‘requests’. It is a distutils installed project and thus we cannot accurately determine which files belong to it which would lead to only a partial uninstall.
After installing a package with distutils, you need to uninstall it with distutils. Unfortunately distutils does not contain an uninstall command, so “uninstall using distutils” means that you have to remove the package manually.

cd /usr/lib/python2.7/site-packages/
mkdir /opt/pylib_backup/
mv requests* /opt/pylib_backup/

PIP list sees that the requests package has been unloaded

[root@bareos_server site-packages]# pip list |grep request
DEPRECATION: Python 2.7 reached the end of its life on January 1st, 2020. Please upgrade your Python as Python 2.7 is no longer maintained. pip 21.0 will drop support for Python 2.7 in January 2021. More details about Python 2 support in pip can be found at https://pip.pypa.io/en/latest/development/release-process/#python-2-support pip 21.0 will remove support for this functionality.
[root@bareos_server site-packages]# 

Error in plot.new() : figure margins too large

Error in plot.new() : figure margins too large

Full error:


#Question

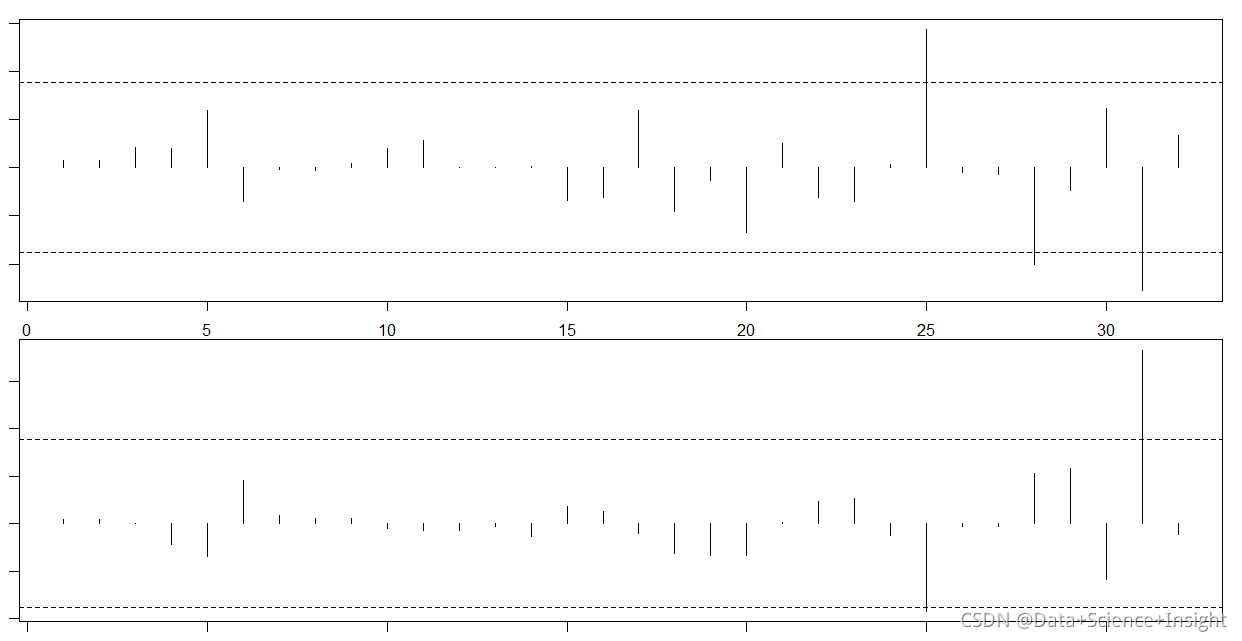
Fit the regression model and calculate the dfbetas value of each sample and the optimal dfbetas threshold. Finally, visualize the impact of each sample on each predictive variable;

#fit a regression model
model <- lm(mpg~disp+hp, data=mtcars)

#view model summary
summary(model)

#calculate DFBETAS for each observation in the model
dfbetas <- as.data.frame(dfbetas(model))

#display DFBETAS for each observation
dfbetas

#find number of observations
n <- nrow(mtcars)

#calculate DFBETAS threshold value
thresh <- 2/sqrt(n)

thresh

#specify 2 rows and 1 column in plotting region

#dev.off()
#par(mar = c(1, 1, 1, 1))

par(mfrow=c(2,1))

#plot DFBETAS for disp with threshold lines
plot(dfbetas$disp, type='h')
abline(h = thresh, lty = 2)
abline(h = -thresh, lty = 2)

#plot DFBETAS for hp with threshold lines 
plot(dfbetas$hp, type='h')
abline(h = thresh, lty = 2)
abline(h = -thresh, lty = 2)

#Solution
par(mar = c(1, 1, 1, 1))

#fit a regression model
model <- lm(mpg~disp+hp, data=mtcars)

#view model summary
summary(model)

#calculate DFBETAS for each observation in the model
dfbetas <- as.data.frame(dfbetas(model))

#display DFBETAS for each observation
dfbetas

#find number of observations
n <- nrow(mtcars)

#calculate DFBETAS threshold value
thresh <- 2/sqrt(n)

thresh

#specify 2 rows and 1 column in plotting region

#dev.off()
par(mar = c(1, 1, 1, 1))

par(mfrow=c(2,1))

#plot DFBETAS for disp with threshold lines
plot(dfbetas$disp, type='h')
abline(h = thresh, lty = 2)
abline(h = -thresh, lty = 2)

#plot DFBETAS for hp with threshold lines 
plot(dfbetas$hp, type='h')
abline(h = thresh, lty = 2)
abline(h = -thresh, lty = 2)


Full Error Message:
> par(mfrow=c(2,1))
>
> #plot DFBETAS for disp with threshold lines
> plot(dfbetas$disp, type=’h’)
Error in plot.new() : figure margins too large
> abline(h = thresh, lty = 2)
Error in int_abline(a = a, b = b, h = h, v = v, untf = untf, …) :
plot.new has not been called yet
> abline(h = -thresh, lty = 2)
Error in int_abline(a = a, b = b, h = h, v = v, untf = untf, …) :
plot.new has not been called yet
>
> #plot DFBETAS for hp with threshold lines
> plot(dfbetas$hp, type=’h’)
Error in plot.new() : figure margins too large
> abline(h = thresh, lty = 2)
Error in int_abline(a = a, b = b, h = h, v = v, untf = untf, …) :
plot.new has not been called yet
> abline(h = -thresh, lty = 2)
Error in int_abline(a = a, b = b, h = h, v = v, untf = untf, …) :
plot.new has not been called yet

Error in *** : subscript out of bounds [How to Solve]

Error in *** : subscript out of bounds

Full error:


Question:

The data is out of bounds. Except for others, who knows where it is? Do you ask memory? Who do you ask?

#make this example reproducible
set.seed(0)

#create matrix with 10 rows and 3 columns
x = matrix(data = sample.int(100, 30), nrow = 10, ncol = 3)

#print matrix
print(x)

#attempt to display 11th row of matrix
x[11, ]

#attempt to display 4th column of matrix
x[, 4]

#attempt to display value in 11th row and 4th column
x[11, 4]

Solution:

#

#display number of rows and columns in matrix
dim(x)

#

#display 10th row of matrix
x[10, ]

#display number of columns in matrix
ncol(x)

#display 3rd column of matrix
x[, 3]

#display value in 10th row and 3rd column of matrix
x[10, 3]

Full error Messages:
>
> #attempt to display 11th row of matrix
> x[11, ]
Error in x[11, ] : subscript out of bounds
>
> #attempt to display 4th column of matrix
> x[, 4]
Error in x[, 4] : subscript out of bounds
>
> #attempt to display value in 11th row and 4th column
> x[11, 4]
Error in x[11, 4] : subscript out of bounds
>

[Solved] AttributeError: module ‘tensorflow._api.v2.train‘ has no attribute ‘AdampOptimizer‘

Error Message: AttributeError: module ‘tensorflow._api.v2.train’ has no attribute ‘AdampOptimizer’
Tensorflow 2.6.0:

>>> import tensorflow as tf
>>> tf.__version__
'2.6.0'

Error code snippet:

model.compile(optimizer=tf.train.AdampOptimizer(0.001),
              loss='mse',
              metrics=['accuracy'])

Replace with:

from tensorflow.keras.optimizers import Adam
model.compile(optimizer=Adam(learning_rate=0.001), loss='mse', metrics=['accuracy'])

It can also be changed as follows:

model.compile(optimizer='adam',
              loss='mse',
              metrics=['accuracy'])

Both are operational.

[Perfectly Solved] attributeerror: module ‘SciPy. Misc’ has no attribute ‘toimage’ error

Problem Description:

When learning the MNIST machine learning introductory course, the attributeerror: module ‘SciPy. Misc’ has no attribute ‘toimage’ error occurs when converting the numpy array into a picture and saving it
the execution code is as follows:

# Save the first 20 images
for i in range(20):
    image_array = train_images[i]
    #Save file as the format:mnist_train_0.jpg,mnist_train_1.jpg,...
    filename = save_dir + '/mnist_train_%d.jpg' %i
    #save image_array to image
    # use scipy.misc.toimage to convert to image and save
    scipy.misc.toimage(image_array, cmin=0.0, cmax=1.0).save(filename)

Crux attribution:
I checked the scene where Python 3 uses the toimage() function on the Internet and found that this function has been deprecated. Many tutorials recommend reducing the version of the third-party SciPy to match the use of the toimage() function. I feel that this is a bit “married down” and can not fundamentally solve the problem. Moreover, the iteration of technology update is inevitable, We need to follow the trend.

Scipy.misc.toimage official latest instructions.

Solution:

Turn the problem into how to save the array as an image?

Method 1: use the .Imwrite() function of CV2 module to convert the numpy array into an image and save it. The specific codes are as follows:

cv2.imwrite(filename, image_array)  #Mutual transformation of images and numpy arrays using cv2

Method 2: use the .Fromarray() function under Image in PIL module to convert the numpy array into an image and save it. The specific codes are as follows:

from PIL import Image
Image.fromarray((image_array)).save(filename)  #Mutual transformation of images and numpy arrays using PIL
# or
Image.fromarray((image_array*255).astype('uint8'), mode='L').convert('RGB').save(filename)  # For processing color images

Method 3: use the Matplotlib module to convert the numpy array into a picture and save it. (including two methods): (1) preferred recommendation:   Use the . Imsave() function under Image in the Matplotlib module to convert the numpy array into an image for saving. The specific codes are as follows:

from matplotlib import image
image.imsave(filename,image_array,cmap='gray')  # cmap is often used to change the drawing style, such as black and white gray, emerald green virdidis

(2) Not recommended:   Use the .Savefig() function under pyplot in Matplotlib module to convert the numpy array into a picture for saving. The generated picture contains coordinate axis and border information. The specific codes are as follows:

import matplotlib.pyplot as plt
# Drawing pictures
plt.imshow(image_array,cmap='gray')
# save image
plt.savefig(filename) # In this case, the picture variable is already specified when drawing the picture, so there is no need to specify it again when saving

python gensim AttributeError: ‘Doc2Vec‘ object has no attribute ‘dv‘

python3

gensim 4.0.1

My code: doc2vec reported an error when loading the doc2vec model file

from gensim.models import Doc2Vec

doc2vec_model = Doc2Vec.load('data/doc2vec.model')

“AttributeError: ‘Doc2Vec’ object has no attribute ‘dv’”

Reason 1: there may be some problems with the latest version. Change the version!!!

Reason 2: another code   Change model.dv to = & gt;    model.docvecs  

resolvent:

I uninstalled gensim PIP uninstall gensim

Reinstall PIP install gensim = = 3.8.3

Solved!!! I hope it will be useful to you.

Solution of Prophet error reporting when installing R package in Kubuntu virtual machine environment

Initial error reporting environment

Oracle VM VirtualBox 6.1.22
kunbuntu-21.04
memory 2048MB
storage space 20g

Error reporting and Solutions

If I directly install. Packages (‘prophet ‘) in R according to the above environment, three environment dependent errors will be reported, namely libcurl, libdev and rstan
first solve the problem that libcurl and libdev are not installed. First q() exit the R environment and install the two development tools:

sudo apt-get install libcurl4-openssl-dev
sudo apt-get install libv8-dev

Then enter the R environment and reinstall rstan. The key errors are as follows:

g++: internal compiler error: Killed (program cc1plus)
ERROR: compilation failed for package 'rstan'
In install.packages("rstan") :
  installation of package 'rstan' had non-zero exit status

There are many similar error reports and strange solutions on the Internet. In fact, most cases are caused by insufficient memory allocation. You can adjust the allocated memory to 4096mb in the virtual machine. After installing the above dependencies, reinstall. Packages (‘prophet ‘) and the installation will succeed.

Python fbprophet predicts that the code runs with an error

Prophet was successfully installed before, but the following error occurred when the computer was changed. Record it
if Microsoft Visual C + + 14.0 is missing, download a visual studio installer, https://docs.microsoft.com/en-us/visualstudio/install/install-visual-studio?view=vs -In 2019, you can install visual studio 2017
if the error is plot, install plot
If an error is reported, exception ignored in: ‘stanfit4anon_ Model, Download pystan, delete the pystan package in the site packages under CONDA, delete the cache of pystan in appdata \ local \ temp under the user, and then reinstall it.

Ab3dmot vehicle pedestrian recognition (How to Use)

Code base: https://github.com/xinshuoweng/AB3DMOT

Setting up environment:
Ubuntu 16.04, Python 3.7.6 in anaconda, python 1.2 + CUDA 9.2
refer to pointrcnn environment setting up and running for the pre research environment

Kitti object tracking dataset Download

Dataset official website: http://www.cvlibs.net/datasets/kitti/eval_Tracking. PHP
when pre researching according to the project description, you only need to download the image_ 02 dataset:
http://www.cvlibs.net/download.php?file=data_tracking_image_2.zip

Xinshuo_Pytoolbox preparation

The project requires the author’s toolkit https://github.com/xinshuoweng/Xinshuo_ Pytoolbox
you need to install the package described in its requirements.txt, and then put all the folders directly into the ab3dmot folder

step


  1. install dependeny:
$ cd path/to/AB3DMOT
$ pip install -r requirements.txt

  2. Inference - run our tracker on the KITTI MOT validation set with the provided detection:
$ python main.py pointrcnn_Car_val
$ python main.py pointrcnn_Pedestrian_val
$ python main.py pointrcnn_Cyclist_val
Just select one, e.g. pedestrian

  3. Extract the files in the image_2 package to data/KITTI/resources

  4. Change the variable seq_list in visualization.py to the sample number you want to visualize, e.g.
seq_list = ['0000', '0001', '0002', '0003', '0004', '0005', '0006', '0007', '0008'] 

  5. execute python visualization.py pointrcnn_Pedestrian_val (corresponds to pointrcnn_Pedestrian_val in step 2)

  6. Check the results in results/pointrcnn_Pedestrian_val/trk_image_vis

Effect evaluation

It is easy to recognize cuboids/columns as vehicles/pedestrians, especially when recognizing vehicles, but this misjudgment generally occurs outside the road area, – and the number of continuous frames is very small; It is possible to distinguish cyclists as ordinary pedestrians; There is no obvious missing judgment, but the tracking is likely to be interrupted when occlusion occurs, resulting in unstable tracking object ID;

[Solved] error: OpenCV(4.5.2) :-1: error: (-5:Bad argument) in function ‘copyMakeBorder‘

Question:

##Boundary fill
import cv2
top_size,bottom_size,left_size,right_size=(50,50,50,50)
replicate=cv2.copyMakeBorder(img,top_size,bottom_size,left_size,right_size,boderType=cv2.BORDER_REPLICATE)
reflect=cv2.copyMakeBorder(img,top_size,bottom_size,left_size,right_size,boderType=cv2.BORDER_REFLECT)
reflect101=cv2.copyMakeBorder(img,top_size,bottom_size,left_size,right_size,boderType=cv2.BORDER_REFLECT101)
wrap=cv2.copyMakeBorder(img,top_size,bottom_size,left_size,right_size,boderType=cv2.BORDER_WRAP)
constant=cv2.copyMakeBorder(img,top_size,bottom_size,left_size,right_size,boderType=cv2.BORDER_CONSTANT,value=0) 
Outcome:
error Traceback (most recent call last)
<ipython-input-39-820a457b4770> in <module>
      2 import cv2
      3 top_size,bottom_size,left_size,right_size=(50,50,50,50)
----> 4 replicate=cv2.copyMakeBorder(img,top_size,bottom_size,left_size,right_size,boderType=cv2.BORDER_REPLICATE)
      5 reflect=cv2.copyMakeBorder(img,top_size,bottom_size,left_size,right_size,boderType=cv2.BORDER_REFLECT)
      6 reflect101=cv2.copyMakeBorder(img,top_size,bottom_size,left_size,right_size,boderType=cv2.BORDER_REFLECT101)

error: OpenCV(4.5.2) :-1: error: (-5:Bad argument) in function 'copyMakeBorder'
> Overload resolution failed:
>  - copyMakeBorder() missing required argument 'borderType' (pos 6)

analysis:

error: OpenCV(4.5.2) :-1: error: (-5:Bad argument) in function 'copyMakeBorder'
> Overload resolution failed:
>  - copyMakeBorder() missing required argument 'borderType' (pos 6)

“Bordertype” spelling error!!!!

Correct code:

##Boundary fill
import cv2
top_size,bottom_size,left_size,right_size=(50,50,50,50)
replicate=cv2.copyMakeBorder(img,top_size,bottom_size,left_size,right_size,borderType=cv2.BORDER_REPLICATE)
reflect=cv2.copyMakeBorder(img,top_size,bottom_size,left_size,right_size,borderType=cv2.BORDER_REFLECT)
reflect101=cv2.copyMakeBorder(img,top_size,bottom_size,left_size,right_size,borderType=cv2.BORDER_REFLECT101)
wrap=cv2.copyMakeBorder(img,top_size,bottom_size,left_size,right_size,borderType=cv2.BORDER_WRAP)
constant=cv2.copyMakeBorder(img,top_size,bottom_size,left_size,right_size,borderType=cv2.BORDER_CONSTANT,value=0) 


import matplotlib.pyplot as plt
plt.subplot(231),plt.imshow(img,'gray'),plt.title('ORIGINAL')
plt.subplot(232),plt.imshow(replicate,'gray'),plt.title('REPLICATE')
plt.subplot(233),plt.imshow(reflect,'gray'),plt.title('REFLECT')
plt.subplot(234),plt.imshow(reflect101,'gray'),plt.title('REFLECT101')
plt.subplot(235),plt.imshow(wrap,'gray'),plt.title('WRAP')
plt.subplot(236),plt.imshow(constant,'gray'),plt.title('CONSTANTL')

plt.show()

Output results:
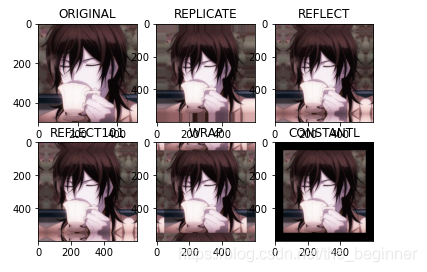
    cv2.BORDER_ Replicate copy method, copy the edge pixel CV2. Border_ Reflect reflection method, the interested image pixels on both sides of the entry CV2. Border_ Reflect101 reflection method, with the most edge pixel as the axis, symmetrical CV2. Border_Wrap method cv2.border_Constant good method