Tag Archives: mac

[Solved] ModuleNotFoundError: No module named ‘requests‘

environment

MacOS 11.4
has been implemented:

pip3 install requests

It’s still wrong.

This reminds me that there are two PIP3
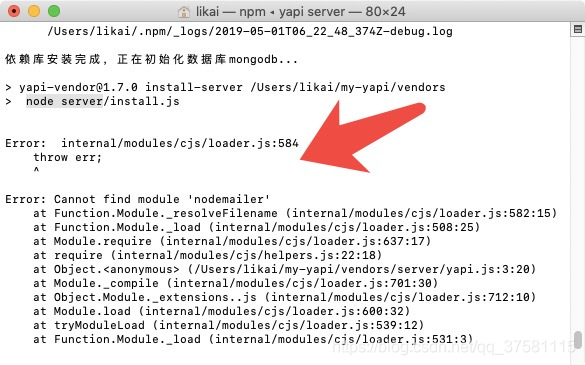
report errors:

import requests
ModuleNotFoundError: No module named ‘requests’

terms of settlement

Execute the following code

/Library/Frameworks/Python.framework/Versions/3.9/bin/pip3 install requests

It was solved successfully.

Cause analysis:
there are two versions of python3 on my computer. I guess one comes with the system. One is that I use brew to install it automatically due to dependency.

The environment variable is /usr/local/opt/ [email protected]/bin/pip3 script is executed in /Library/Frameworks/Python.framework/Versions/3.9/bin/pip3.

The following test shows that my python3 and PIP3 paths do not match.

itkey@ycmit: ~ $ which python3                                                                           [16:43:26]
/usr/local/bin/python3
itkey@ycmit: ~ $ ls -all /usr/local/bin/python3                                                          [16:43:29]
lrwxr-xr-x  1 itkey  admin  69 12 22  2020 /usr/local/bin/python3 -> ../../../Library/Frameworks/Python.framework/Versions/3.9/bin/python3
itkey@ycmit: ~ $ which pip3                                                                              [16:43:32]
/usr/local/bin/pip3
itkey@ycmit: ~ $ ls -all /usr/local/bin/pip3                                                             [16:43:54]
lrwxr-xr-x  1 itkey  admin  35  4 24 08:25 /usr/local/bin/pip3 -> ../Cellar/[email protected]/3.9.4/bin/pip3

cut the weeds and dig up the roots

Now that the above reason analysis has shown that python3 and PIP3 in my path do not match, just modify them to match.

Put brew before the environment variable

#python3 Use brew
export PATH="/usr/local/Cellar/[email protected]/3.9.4/bin:$PATH"

Mac bigsur cannot create other directory solutions in the root directory (M1 chip is also applicable)

The solution is to create a soft link to the real directory

For example:
here, take creating/data in the root directory as an example, and other directory names are the same

First, create a data directory anywhere you want, such as/users/baixxhao/downloads/work/data. Don’t imitate me directly. Remember to change the user name.
2. Open the terminal (Command + space, then enter the terminal, enter)
2. Input sudo VIM/etc/synthetic.conf from the command line, Enter, enter a similar text editing page, do not close the window!!! Press the letter I, pay attention to the use of English characters throughout the operation, do not use pinyin input method (including all the following, are in English)
3, enter the following line (note that the middle is tab, not spaces)!!! Pay attention to the following parameters, use your own real directory

data	/Users/baixxhao/Downloads/work/data

4. Press ESC, press the English colon (Shift + colon), enter WQ, press return, that is, save and exit
5. Then restart, and you will find that/data has
6. If it is successful, like it?

look here
1. MKDIR/users/baixxhao/downloads/work/data
2. Sudo VIM/etc/synthetic. Conf
3

data	/Users/baixxhao/Downloads/work/data

4. Restart
5

To solve the problem of repeated password input when operating sourcetree on MAC

After installing sourcetree, no matter the pull or push code, it will prompt the shell layer to input the password. What should I do?

Copy the following code to the terminal for execution:

git config –global credential.helper osxkeychain

Then enter the computer power on password, and check always allow.

Problem solving!!! You can safely push and pull code ~

Failed to download resource “expect_bottle_manifest“

When we are in brew install XXXX, we will encounter this kind of problem

curl: (22) The requested URL returned error: 404 Not Found
Warning: Bottle missing, falling back to the default domain...
==> Downloading https://ghcr.io/v2/homebrew/core/autoconf/manifests/2.69-4

curl: (22) The requested URL returned error: 404 
Error: Failed to download resource "autoconf_bottle_manifest"
Download failed: https://ghcr.io/v2/homebrew/core/autoconf/manifests/2.69-4

The prompt said that one of the supporting plug-ins could not be installed, which was very annoying

 
This is the time we should visit https://bintray.com/   Website, to search the version of the software you can’t download

Find the software and download it, then put it on the local computer

/In usr/local/cell/folder, and then execute brew install XXX on the terminal,  
You will find that this software is no longer needed to download


SSL_ERROR_SYSCALL in connection to github.com:443

Project scenario:

Mac uses git push or hexo deploy to push GitHub

Problem Description:

Bug contains

LibreSSL SSL_connect: SSL_ERROR_SYSCALL in connection to github.com:443

Cause analysis:

Because the agent is attached locally, you can clone
but when pushing, you need to attach the agent to the terminal


Solution:

vim ~/.gitconfig

View the port of the native agent and replace the following XXXX

[http]
	proxy = socks5://127.0.0.1:xxxx
[https]
	proxy = socks5://127.0.0.1:xxxx

You can also push by turning off the agent and accessing it normally

How to Solve brew ERROR in `initialize‘: Version value must be a string; got a NilClass ()

Reason: after MAC is upgraded to MacOS Big Sur system version 11.1, the old version of homebrew is not suitable for the new system, and the message “in ` initialize ‘: version value must be a string” is sent; Got a nilclass() error

Solution:
just update to the latest version of homebrew

$ brew update-reset

Check the version again, OK

$ brew --version
Homebrew 3.1.5-101-gd3013fc

Solution of device eth0 does not see to be present, delaying initialization. Error in network card under Linux

Today, when I was practicing under Linux, I saw two network cards under the ifconfig command, one is the l0 network card, and the other is eth1. At the beginning, it was l0 and eth0. I don’t know how it became eth1, so I became obsessive-compulsive and deleted all network card configurations. As a result, when I restarted the network service, it was a tragedy…

First of all, let’s talk about the reason why my network card changed from eth0 to eth1: it was due to the previous operation error, and I didn’t know this before, so I followed the online tutorial. As a result, I configured eth0 to eht0, and the system couldn’t find it. Later, due to the configuration failure, I configured it once, and the result became eth1. Until today, I found this error…

Because I couldn’t change eth0, I saw that there was a tutorial on the Internet, but it didn’t work.. (I don’t know why.) so I deleted all the network card configuration with one hand. The steps are as follows:

First, stop the network service

1./etc/sysconfig/network scripts directory, delete the network card configuration that you want to delete. I want to delete eth1, so RM – RF ifcfg-eth1, and so on

2./etc/sysconfig/Networking/devices directory, delete all files, simple and easy

3./etc/sysconfig/Networking/profiles/default directory, delete all files related to eth1

After starting the network service, there should be only one l0 network card left, and the service is stopped

Write network card configuration file

1./etc/sysconfig/network scripts directory, write the configuration file with VI, here I name it ifcfg-eth0 (my eth0 is finally coming back)

The configuration is as follows:

DEVICE=eth0
ONBOOT=yes
IPADDR=172.168.0.108
BOOTBROTO=none
NETMASK=255.255.255.0
PREFIX=24

Here is a simple write a few configuration, complete configuration I can not remember, there is no need to remember. I found a more complete configuration on the Internet, you can have a look

DEVICE=eth0 #Indicates the device name
NM_CONTROLLED=yes #network mamager's parameter, effective in real time, no need to reboot
ONBOOT=yes #Set to yes to enable network connection automatically on power on
IPADDR=192.168.21.129 #IP address
BOOTPROTO=none # set to none to disable DHCP, set to static to enable static IP address, set to dhcp to enable DHCP service
NETMASK=255.255.255.0 #subnet mask
DNS1=8.8.8.8 #the first dns server
TYPE=Ethernet #Network type is: Ethernet
GATEWAY=192.168.21.2 #set gateway
DNS2=8.8.4.4 #second dns server
IPV6INIT=no #Disable IPV6
USERCTL=no #Whether to allow non-root user to control the device, set to no, can only be changed by root user
HWADDR=00:0C:29:2C:E1:0F #Mac address of the NIC
PREFIX=24
DEFROUTE=yes
IPV4_FAILURE_FATAL=yes
NAME="System eth0" #Define the device name


After I started the network service, I reported the error of device eth0 does not see to be present, delaying initialization. After searching on the Internet, I found that it was caused by the MAC address mismatch. There are two solutions

1. 70 persistent in/etc/udev/rules. D directory- net.rules File, open, modify the MAC address inside, and ifcfg-eth0 can be the same

2. Delete/etc/udev/rules.d/70-persistent directly- net.rules File, then restart, simple and crude

After restart, we will find that the network service can start normally, and the current network card is l0 and eth0


The problem can not be viewed in the corner log of the Mac computer

Write the custom directory title here

The problem can not be viewed in the corner log of the Mac computer

The problem can not be viewed in the corner log of the Mac computer

First of all, make sure that your version is cracked or genuine.

If it is a cracked version, the package name is: com.zennaware.cornerstone3 . MAS
the original is: com zennaware.Connerstone

If you use cornerstone to manage SVN, and the first time you view the log, you tragically choose download instead of never. Congratulations, you will not be able to view the log, and you will not be able to roll back. The solution is as follows:

Exit from cornerstone

Open the terminal, execute defaults delete com. Com zennaware.Connerstone HistoryCacheUsage

Go to the folder ~/library/caches/cornerstone to empty the files in the folder

Restart cornerstone and select never when viewing the log again
OK————————————————

~/Resource library/containers/ com.zennaware.cornerstone3 . MAS/data/library/caches/use this, I can find it. com.zennaware.cornerstone3 . MAS is because I use the cracked version.

Intellij IDEA jetty-jmx.xml Error:Duplicate config file paths found

IntelliJ idea configuring jetty- jmx.xml report errors Error:Duplicate config file paths found

Note: IntelliJ idea version: 2016.3.7 for Mac, jetty version: jetty 8.2.0.v20160908.

reason:

When updating jetty version to jetty 8.2.0.v20160908 today, in configure, in addition to the default configuration file, check etc/jetty- jmx.xml and etc/jetty- ssl.xml when configuring and saving, idea reports an error: Error:Duplicate config File paths found and cannot be saved.

Process:

Try to untick etc/jetty- ssl.xml configuration file, the error remains. Instead, uncheck etc/jetty- jmx.xml , the error disappears. Make sure the error message comes from etc/jetty- jmx.xml configuration file.

solve:

Open the root path of jetty package and find start.ini file, open and pull to the bottom, you can see the list of configuration files that have been checked in the graphical interface, and the last two lines are my additional configuration. In the above heap of configurations in these two lines, you can see that the SSL configuration file has been annotated, but the JMX configuration file has not been annotated, so the configuration file is duplicated. Therefore, in the configuration file of idea, uncheck JMX and confirm start.ini There are no duplicate profiles in .

Yapi platform deployment error (MAC must report error) solution

1. Deploy Yapi locally

According to the official documents, after the global installation of Yapi CLI and mongodb, the terminal executes Yapi server, and the browser enters 127.0.0.1:9090 to open the deployment page

After filling in the basic information, click Start deployment, wait for a period of time, the problem appears

node server/install.js

Error:internal/modules/cjs/loader.js:584
   throw err;

Errpr:Cannot find module 'nodemailer'
  at Function.Module_resolveFileName(.........)
  at Function.Module_resolveFileName(.........)
  ........


The reason for the error is probably the lack of nodemailer module, so I tried to install the module globally. After the installation, I still reported the same error. In this way, I kept looking for the error. I deleted the project and started over again. After repeated tossing and tossing, I was about to re install the system. After one afternoon’s tossing and tossing, I finally found a solution

2. Solutions

Due to the problem of MAC permission, Yapi is initialized according to the official document writing method, and finally there is no write permission in NPM, resulting in the loss of packets

Modify the “Yapi server” as

sudo yapi server

Then the project is deployed again and the problem is solved


Error report on startup of rabbitmq in MAC installation error:epmd error for host xiongmindeMacBook-Pro: timeout

Error in starting rabbitmq: error:epmd error for host xiongmindeMacBook-Pro: timeout

Error in starting management console plug-in:

Applying plugin configuration to rabbit@xiongmindeMacBook-Pro… failed.
* Could not contact node rabbit@xiongmindeMacBook-Pro.
Changes will take effect at broker restart.
* Options: –online – fail if broker cannot be contacted.
–offline – do not try to contact broker

terms of settlement:

On the last line of sudo VIM/etc/hosts, add “127.0.0.1” xiaominde MacBook Pro

Error: Command ‘/ usr / bin / clang’ failed with exit status 1 solution for Mac OS installation

1、 Scene description

The error of installing scrapy (PIP3 install scrapy) in terminal on Mac OS system is as follows

error: command '/usr/bin/clang' failed with exit status 1

2、 Scene analysis

Since clang is used in the compiler for C at the bottom of Mac OS system, Xcode needs to be installed

3、 Solutions

Do the following in terminal

xcode-select --install

Then install scrapy

Note: I use Python 3, so I use PIP3 install sketch