can execute more than one command at a time on the command line, in the following categories:
1. Use between each command;
indicates that the execution results of each command will not affect the execution of other commands. In other words, each command will execute,
but there is no guarantee that each command will execute successfully.
cd /home/PyTest/src; python suning.py2. Use & between each command; & Separate
indicates that the following command will only be executed if the previous command succeeds. This ensures that all commands are executed successfully.
cd /home/PyTest/src&&python suning.py3. Use | or | or | between each command
.
pipe can direct the output of one command to the input of another, allowing two (or more) commands to work in a continuous pipeline, constantly processing text streams. On the command line, we use | for pipes
cd /home/PyTest/123 || echo "error234"
cd /home/PyTest/123 | echo "error234"Linux remote copy command and not a regular file solution
Linux remote copy: SCP
SCP filename root-@remote IP :/ path /
Copy the file of test.tar from the local home directory to the /home/adm/ directory of the remote host 192.168.1.23. The command is: SCP /home/test.tar [email protected]:/home/adm/ enter the password
The SCP provides several options to simply add to the SCP
– When p copies a file, it keeps the time when the source file is created.
– Q does not display any prompt message when performing a file copy.
-R copies the entire directory at www.2cto.com
– When v copies a file, a prompt message is displayed.
Linux SCP: /usr/tools: not a regular file failed to successfully transfer solution
1: could not permissions chmod 777
2: when using SCP plus – r parameter
SCP – r [email protected]:/usr/tools/XXXX
Linux_ day07_ 05_ Configure common add, delete, modify and query commands in network
configuration network commonly used add, delete, change search command
modify the IP address
- modify the configuration file
/etc/sysconfig/network-scripts/ifcfg-ens33
- ifconfig command
ifconfig ens33:0 192.168.235.127/24- IP command
ip addr add 192.168.235.127/24 dev ens33 label ens33:1- nmcli command
nmcli connection modify ens33 ipv4.address 192.168.80.100/24 # 修改ip地址 nmcli connection modify ens33 ipv4.gateway 192.168.80.2/24 #修改网关 nmcli connection modify ens33 ipv4.dns1 114.114.114.114 # 修改dns信息 nmcli connection modify ens33 ipv4.method mannual # 指定网络信息获取方式为手动指定 - ifconfig command
open/disable network card
- ifconfig command
ifconfig ens33 up ifconfig ens33 down - ifup/ifdown command
ifup ens33 ifdown ens33 - IP command
ip link set ens33 up ip link set ens33 down - nmcli command
nmcli device connect ens33
nmcli device disconnect ens33
add routing
- modify the configuration file
/etc/sysconfig/network-scripts/route-ens33
The
- way
target via gw
220.181.38.148 via 192.168.80.2 -
each three lines defines a route
ADDRESS0=TARGET
NETMASK0=MASK
GATEWAY0=GWBlockquote>
- way
- route command
route add -net 192.168.235.0 netmask 255.255.255.0 gw 192.168.235.2 dev ens33 - IP command
ip route add 192.168.80.0/24 via 192.168.80.2 dev ens33 # 添加网络路由
ip route add 192.168.80.100 via 192.168.80.0 dev ens33 #添加主机路由
ip route add default via 192.168.80.2 dev ens33 # 添加默认路由
modify routing
- modify the configuration file
/etc/sysconfig/network-scripts/route-ens33
The
- way
target via gw
220.181.38.148 via 192.168.80.2 -
each three lines defines a route
ADDRESS0=TARGET
NETMASK0=MASK
GATEWAY0=GWBlockquote>
- way
- IP command
ip route change # 如果路由本身不存在则报错显示不存在
ip route replace # 如果路由本身不存在则会直接创建该路由信息
delete route
- delete the configuration file
/etc/sysconfig/network-scripts/route-ens33
- the route command
route del -net 192.168.235.0 netmask 255.255.255.0 gw 192.168.235.2 dev ens33- IP command
ip route del 192.168.80.0/24 via 192.168.80.2 dev ens33 - the route command
view routing table
- the route command
route -n - netstat command
netstat -r # 显示内核路由表
netstat -n # 数字格式(不进行反向解析)
Solve the problem of SQL Server limit 2G memory limit installation
records the method of installing sqlserver when the minimum memory limit for Linux installation is not met once.
1. If you previously installed sqlserver but did not succeed, uninstall first (if not installed, skip)
sudo yum remove mssql-server
sudo rm -rf /var/opt/mssql/
sudo rm -rf /opt/mssql/
2. Download the offline installation file (remember: do not install online)
wget https://packages.microsoft.com/rhel/7/mssql-server-2017/mssql-server-14.0.3030.27-1.x86_64.rpm
3. Enter the downloaded file directory to execute the installation command
yum localinstall mssql-server-14.0.3030.27-1.x86_64.rpm4. Break the memory limit
1) enter sqlserver directory CD /opt/ MSSQL /bin/
2) backup sqlservr file mv sqlservr. Old
3) USES python2 to modify the memory bound binary file (python3 does not support this)
oldfile = open("sqlservr.old", "rb").read()
newfile = oldfile.replace("\x00\x94\x35\x77", "\x00\x80\x84\x1e")
open("sqlservr", "wb").write(newfile)
exit()
5. Sqlserver configuration
sudo /opt/mssql/bin/mssql-conf setup
will run into permission issues :(if not skipped)
execute: chmod 777 sqlservr and then start the service systemctl start mssql-server
then check sqlserver status: systemctl status mssql-server
6. Connect to database:
After the
installation is complete, login with sa may fail to log in
![]()
this is a password policy issue, you just need to reset the password for sa
1) stop sqlserver: sudo systemctl stop mssql-server
2) switch directory: CD /opt/ MSSQL /bin
3) reset password command:./mssql-conf set-sa-password
4) after completion, restart sqlserver service: sudo systemctl start mssql-server
is done here (one more way, one more possibility. Good luck!)
Installing open CV under Linux system
1. Install the apt – get
step1:
curl https://raw.githubusercontent.com/dvershinin/apt-get-centos/master/apt-get.sh -o /usr/local/bin/apt-get


step2:
chmod 0755 /usr/local/bin/apt-get
2. Install the PKG – config
download the version you want
https://pkg-config.freedesktop.org/releases/
2. installation
tar xf tar xf pkg-config-0.29.2.tar.gz
cd pkg-config-0.29.2
./configure --with-internal-glib
make
make check
make install
(3) verify
which pkg-config

An error occurred when opensips started the service“ ERROR:core :db_ check_ table_ Version: invalid version 7 for Table dialog found “
recently engaged in SIP phone related projects, encountered a lot of trouble when building opensips server, most of which could be solved by looking up information, but today I encountered a problem that I could not find the solution on the Internet, so I decided to share it with you.
virtual system is Ubuntu14.04
opensips version is 2.1.2
when opensips service is started, the following error occurs:
root@sjt-VirtualBox:/usr/local/opensips_proxy/sbin# ./opensipsctl start

INFO: Starting OpenSIPS :

ERROR: PID file /var/run/opensips.pid does not exist -- OpenSIPS start failed
view the ERROR log and prompt “ERROR:core:db_check_table_version: invalid version 7 for table dialog found”, assuming there was a problem with the database creation
root@sjt-VirtualBox:/usr/local/opensips_proxy/sbin# tail -f /var/log/syslog
Oct 13 08:40:29 sjt-VirtualBox ./opensips[2851]: INFO:alias_db:mod_init: initializing...
Oct 13 08:40:29 sjt-VirtualBox ./opensips[2851]: INFO:dialog:mod_init: Dialog module - initializing
Oct 13 08:40:29 sjt-VirtualBox ./opensips[2851]: INFO:core:evi_publish_event: Registered event <E_DLG_STATE_CHANGED(12)>
Oct 13 08:40:29 sjt-VirtualBox ./opensips[2851]: ERROR:core:db_check_table_version: invalid version 7 for table dialog found, expected 10
Oct 13 08:40:29 sjt-VirtualBox ./opensips[2851]: ERROR:dialog:init_dlg_db: error during table version check.
Oct 13 08:40:29 sjt-VirtualBox ./opensips[2851]: ERROR:dialog:mod_init: failed to initialize the DB support
Oct 13 08:40:29 sjt-VirtualBox ./opensips[2851]: ERROR:core:init_mod: failed to initialize module dialog
Oct 13 08:40:29 sjt-VirtualBox ./opensips[2851]: ERROR:core:main: error while initializing modules
creates opensips database
again
root@sjt-VirtualBox:/usr/local/opensips_proxy/sbin# ./opensipsdbctl create
MySQL password for root:
INFO: test server charset
INFO: creating database opensips ...
ERROR 1007 (HY000) at line 1: Can't create database 'opensips'; database exists
ERROR: Creating database opensips failed!
indicates that the database already exists and the creation failed. The reason was finally found, because I had built a database before, and this installation configuration of OpenSiPs did not match the previous database, so the OpenSips service could not be started.
therefore, delete the previous database, recreate, execute./opensipsdbctl reinit.
root@sjt-VirtualBox:/usr/local/opensips_proxy/sbin# ./opensipsdbctl reinit
MySQL password for root:
INFO: Database opensips deleted
INFO: test server charset
INFO: creating database opensips ...
INFO: Using table engine MyISAM.
INFO: Core OpenSIPS tables successfully created.
Install presence related tables? (y/n): y
INFO: creating presence tables into opensips ...
INFO: Presence tables successfully created.
Install tables for imc cpl siptrace domainpolicy carrierroute userblacklist b2b cachedb_sql registrant call_center fraud_detection? (y/n): y
INFO: creating extra tables into opensips ...
INFO: Extra tables successfully created.
open opensips service again, success!
root@sjt-VirtualBox:/usr/local/opensips_proxy/sbin# ./opensipsctl start

INFO: Starting OpenSIPS :
INFO: started (pid: 3128)
Debian using networking to restart the network can not start the solution of network card
cause: > today’s work required to configure a DNS server for the wireless terminal configuration host test (of course, you can buy a wireless router that can match host, please skip it). Then I set up a DNS server with debian7.5. Every time I configure and restart networking ( service networking restart), the network card could not be started and then there was no way. I went to ifup eth0 to start my network card, but I don’t know why it is like this. Before, ubuntu can be restarted directly. So services networking restart comes again
try to find a way, first in the computer room to see, there is an alarm, but the server room does not take a browser, can not be copied. Start the network card first. Then go back to your office and get the log with the following command, and search for it all at once
service networking restart >>log.txt &&ifup eth0
Running /etc/init.d/networking restart is deprecated because it may not re-enable some interfaces … (warning).
Reconfiguring network interfaces… Reloading /etc/samba/smb.conf: smbd only.
done.
the answer is
in the first Google post
http://am-blog.no-ip.org/BlogEngine/post/2013/12/26/Networking-restart-is-deprecated-because-it-may-not-enable-again-some-interfaces.aspx
The reason is that/etc/init.d/networking uses the program “ifup-a”. This starts only network interfaces that are marked with “auto”.
This means that the previous command to restart the network is equivalent to using ifup-a, but only starts network devices with auto fields in interfaces by default. The solution is to add the eth0 field as
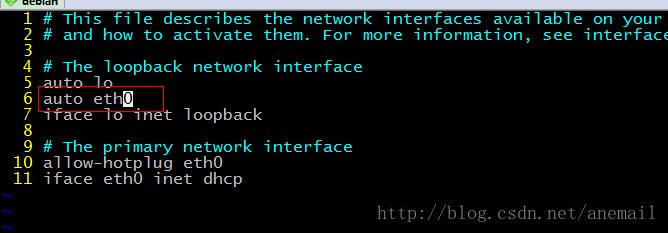
try it again, done.
service networking restart >>log.txt &&ifup eth0Reconfiguring network interfaces… Reloading /etc/samba/smb.conf: smbd only.
done.
Solution not found by JPS command
this problem is actually quite simple. If you type a Command in the terminal and you are prompted to say that the Command is not found, either because you have not installed the appropriate package or because of a path setting problem. If it’s because of a software package, there’s nothing more to say, just install the appropriate software package. In the other case, the user’s path needs to be set.
JPS this command is located under the bin file in the Java installation directory, and you need to check whether the JAVA_HOME and PATH in the etc/profile are added correctly.
Linux view folder size, remaining disk space (DU / DF)
1. Introduction
du for directory size, df for disk usage.
2. du
disk usage
(1) basic function
recursively view the sizes of all files under the folder
(2) common parameters:
-h, — human-readable for size (for example: 1K 234M 2G)
-s, — summarize each parameter in the command column calculated the total amount of
(3) other parameters:
-a, — all output the disk amount of all files, not just the directory
— summary size display surface amount, but not the disk amount; Although the surface usage is usually smaller, it can sometimes become larger due to “holes” between sparse files, internal fragments, blocks that are not directly referenced, and so on.
-b, — block-size=
-b, — bytes = — br>-size =1
-c, — total display total information
-d, The filename ending in NUL in the calculated file F corresponds to the space on the disk. If the value of F is “-“, then the filename read from the standard input
-h is equal to — dereference-args (-d)
-h. The — human-readable sizes are displayed in a readable manner (for example, 1K 234M 2G)
— si similar to -h, but using 1000 as the basis for the calculation instead of 1024
-k is equal to — block-size=1K
-l, — count-links if hard connected, Calculate its size
-m is equal to — block-size=1M
-l, — dereference finds the true destination indicated by any symbolic link
-p, — no-dereference does not follow any symbolic link (default)
-0, — null regards each blank line as 0 bytes instead of a newline
-s, — separate dirs does not include subdirectory occupancy
-s,
-x;
-x;
-x;
-x;
-x;
-x;
-x;
-x;
— exclude=PATTERN files that match the PATTERN described in the specified file
— exclude=PATTERN files that match the PATTERN described in the specified file
— max-depth=N display directory total (used with -all calculation files)
calculates depth N when N is the specified value;
— max-depth=0 equals — summarize
— time summarize
— time=WORD display WORD time, not change time: atime, access, use, ctime or status
— time-style= style display time according to the specified style (same as the “date” command) : FORMAT
full-iso, long-iso, iso, +FORMAT
— help display this help information and exit
— version display version information and exit
3. df
df-hl view disk remaining space
df-h view the partition size of each root path
du-sh [directory name] return the size of the directory
du-sm [folder] return the total number of M of the folder
4. The difference between
du is a file-oriented command that only calculates the space occupied by the file, not the space occupied by the file system metadata.
df is calculated based on the overall file system, and the size of the allocated space in the system is determined by the unallocated space in the file system. The DF command can get how much space is taken up by the hard disk and how much space is left, and it can also show how all file systems are using I nodes and disk blocks.
Linux Ping error name or service not known
forget to set DNS after setting static IP, ping error: Name or service not known
add DNS to
vi /etc/resolv.conf
nameserver 8.8.8.8
nameserver 8.8.4.4Error resolution by Ubuntu: aclocal-1.14 ‘is missing on your system
http://blog.csdn.net/wwt18946637566/article/details/46602305
problem
we have a problem installing protobuf to make
CDPATH="${ZSH_VERSION+.}:" && cd . && /bin/bash /home/user/protobuf-2.6.1/protobuf-2.6.1/missing aclocal-1.14 -I m4
/home/user/protobuf-2.6.1/protobuf-2.6.1/missing: line 81: aclocal-1.14: command not found
WARNING: 'aclocal-1.14' is missing on your system.
         You should only need it if you modified 'acinclude.m4' or
         'configure.ac' or m4 files included by 'configure.ac'.
         The 'aclocal' program is part of the GNU Automake package:
         <http://www.gnu.org/software/automake>
         It also requires GNU Autoconf, GNU m4 and Perl in order to run:
         <http://www.gnu.org/software/autoconf>
         <http://www.gnu.org/software/m4/>
         <http://www.perl.org/>
Makefile:641: recipe for target 'aclocal.m4' failed
make: *** [aclocal.m4] Error 127
solution
reference: http://blog.csdn.net/wwt18946637566/article/details/46602305
actually I used only one instruction
sudo autoreconf-ivf
WSL 2 needs to update its kernel components
welcome to my blog
problem description: open win10 terminal display: WSL 2 needs to update its kernel components;
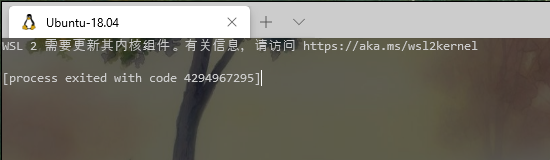
download the upgrade package of WSL2 Linux kernel from Microsoft, download the link, as shown in the figure below, click “this link” to download
